cassava cake

About This Cassava Cake Recipe

Cassava cake is a traditional Filipino snack cake made with grated cassava, coconut milk, and a layer of molten custard on top. The cake is typically gluten free, with a soft and slightly chewy crumb from the cassava. Its texure is very similar to that of Hawaiian butter mochi cake and other sweet rice flour-based desserts.

@hummingbirdhigh filipino cassava cake hits different i swear #filipinofood #bakingrecipe ♬ original sound – hummingbirdhigh

Whenever I go visit my family in the Philippines, I always request that my mom make me my favorite Filipino dishes that are hard to find abroad: adobo (duh—this is like, the unofficial national dish of the Philippines), crispy pata, kare kare, lechon kawali, sinigang, and more. For dessert, I ask for either leche flan (the Filipino version of creme caramel) and this cassava cake.

Sadly, cassava cake isn’t that well known outside of the Philippines and Filipino-immigrant communities. But that needs to change… right now! Why? Cassava cake is absolutely delicious and incredibly easy to make at home. But first—let’s rewind. Because what exactly is cassava, any way?

What is Cassava?

Cassava, also known as yuca (not to be confused with yucca), is a starchy, tuberous root frequently used in the cuisines of tropical countries like the Philippines. In fact, according to Wikipedia, cassava is the third largest source of carbohydrates in the tropics! Depending on the type of cassava and its preparation, it can have either a mildly sweet or mildly bitter taste. As a result, many chefs and home cooks use cassava in both savory and sweet recipes.

Cassava is also frequently processed into a fine powder for use as a thickener similar to cornstarch. This fine powder is then called “tapioca starch”. Yep—the same kind of starch that is used to make the boba pearls in bubble tea! In fact, cassava is what makes boba pearls soft, chewy, and slightly gummy. Plain cassava has a similar texture to these pearls.

What Does Cassava Cake Taste Like?

I mentioned this earlier, but it bears repeating: I like to think of cassava cake as the Philippine version of Hawaiian mochi butter cake. Because cassava is so mild-flavored, this cake mostly tastes like all the other ingredients in it! The cassava cake has a mildly sweet, milky flavor from the combination of coconut milk, evaporated milk, and sweetened condensed milk in the recipe.

That being said, despite not adding too much in the way of flavor, cassava still plays a prominent role in this recipe. Why? The cassava is responsible for the cake’s distinct, chewy texture. The cake manages to be both soft and firm all at once, and is chewy and sticky without being overly gummy or gross. It’s hard to describe! But if you’re the kind of person who likes Hawaiian butter mochi cake, Japanese mochi sweets, and the boba pearls in bubble tea, you’re going to LOVE cassava cake. I promise.

Where is Cassava Cake From?

This particular cassava cake recipe is from the Philippines (where my family is from!). The use of cassava in Filipino cooking dates back to the 16th century. It was then that Spanish colonists first imported cassava from Latin America through the Filipino capital city of Manila.

That being said, other countries have their own iterations of cassava cake. Vietnam has a similar recipe in which the cassava cake is steamed rather than baked. Many African and Caribbean countries have a recipe for a cassava pone (more commonly known as “quickbread”) made with cassava and grated coconut. And finally, many Central and South Americans make different types of pancakes from cassava: bammy, casabe, ereba, and more.

Filipino Cassava Cake Toppings

The Filipino cassava cake, however, stands out from the rest because of its distinct custard topping. Many Filipino cassava cake recipes instruct you to pour a custard made out of coconut milk, sweetened condensed milk, and eggs over the baked cassava cake. You then broil the cake with this custard topping until the custard becomes molten and mottled. Doing so gives the cassava cake a wonderful toasted sugar flavor similar to crème brûlée.

In the Philippines, cassava cake is also served with various toppings. Often times, these are extra ingredients that are mixed into the custard or sprinkled on at the end. The most common cassava cake toppings include macapuno and/or shredded mild cheddar cheese. Macapuno is a type of sweet Filipino coconut with a soft and jelly-like texture; it’s a weird, mutant variation of regular coconut and is absolutely delicious. Alternatively, shredded cheese adds a umami flavor that helps temper down the sweetness of the custard. If you want to use any of these toppings for this cassava cake recipe, I recommend adding in ¼ cup to the custard topping before broiling.

cassava cake

Why You Should Make This Recipe

Now that you’ve learned all about cassava cake, let’s talk about why you should try THIS cassava cake recipe:

This cassava cake recipe is an updated take on a classic, authentic Filipino cassava cake recipe.

This recipe is based on my mom’s recipe for cassava cake, which she in turn adapted from classic Filipino resources like Positively Filipino and the cookbook, Let’s Cook with Nora. The latter is a prominent Filipino cookbook. It was first published in 1969 and quickly became ubiquitous. Growing up, I remember EVERY Filipino household having a copy of Let’s Cook with Nora in their kitchen. Its influence is multi-generational. It was used by both my mom and my lola (the Filipino word for grandmother) extensively. However, Let’s Cook with Nora really hit its stride in the 1980s when its original author hosted a cooking show on TV. Even now, it remains influential: Nora’s daughter recently updated the beloved classic in 2019.

But here’s the thing—as much as I love using and referencing old cookbooks, they can be hard to cook from! Let’s Cook with Nora‘s instructions are often sparse; often times, no precise measurements or cooking times are given. A big part of that has to do with what cooking was like in the 1950s and 1960s. For instance, my own lola made the BEST leche flan (the Filipino version of creme caramel) without measuring any ingredients. She would just measure ingredients by look, feel, and taste. In a pinch, she would use empty cups and milk cans as measuring utensils when necessary.

As much as I admire that skill (and I really, truly do!), modern recipe writing now favors accuracy and precision. Folks expect as much detail as possible to help them achieve the best dish, baked good, and whatever else! As a result, I’ve updated the recipe with more precise measurements and queues.

This cassava cake recipe is gluten-free!

Traditional cassava cake recipes don’t require any flour. Instead, the cake is made simply from the combination of cassava, eggs, and milk! Because cassava is a root, it does not contain any gluten whatsoever.

This cassava cake recipe comes together quickly.

The most time consuming part of this recipe is actually baking and broiling the cassava cake itself. But the cassava cake batter comes together in 5 minutes: simply whisk the ingredients together and pour it into the prepared pan. That’s it!

This cassava cake recipe stores well.

In the Philippines, cassava cake is served either slightly warm from the oven, at room temperature, or straight from the fridge. Although all three serving styles are tasty, my personal favorite is a cassava cake that’s been stored overnight in the fridge to set. Not only does the chilled version make for a more refreshing snack (especially if you’re somewhere hot like Manila), I find that the subtle flavors of the milks and cassava get stronger overnight.

Because the cake is gluten free, it doesn’t really go stale or dry. In fact, it keeps in the refrigerator for up to 1 week. That’s a longer shelf-life than most other cakes (which typically get stale fairly quickly).

cassava cake

Ingredients and Substitutions

Now that I’ve convinced you to make this cassava cake, here’s your shopping list for the recipe:

Shopping List for Cassava Cake Recipe

  • granulated sugar
  • kosher salt
  • large eggs
  • canned coconut milk
  • evaporated milk
  • frozen grated cassava
  • sweetened condensed milk
  • large eggs
  • pure vanilla extract
  • unsalted butter

And let’s talk about some of the key ingredients in the recipe:

Cassava

This cassava cake recipe uses 1 (16-ounce) pack frozen grated cassava.

What is cassava?

I talk about cassava more above, but the TL/DR is this: cassava is a starchy, tuberous root. Depending on the type of cassava and its preparation, it has either a mildly sweet or mildly bitter taste. Its more important quality is its texture. Cassava is starchy and chewy.

Where to buy cassava in the US

In the United States, you can purchase either fresh or frozen cassava.

Fresh cassava can sometimes be found in the produce section of “fancier” grocery stores like Whole Foods. Typically, they’ll be near other tubers like potatoes, sweet potatoes, and more. But watch out! Often times they’ll be labelled by their other name: “yuca”.

However, if you’re serious about making this recipe, I highly suggest shopping at a specialty Asian supermarket instead. Why? Asian supermarkets are more likely to have both fresh AND frozen cassava on hand, both at lower prices.

If you live in Portland, Oregon (hello, neighbor!), I sourced my (frozen) cassava from Fubonn on SE 82nd. However, I’ve also seen frozen cassava at the H Mart on SE Belmont, SF Supermarket on SE Foster, and Uwajimaya in Beaverton.

What kind of cassava to buy

Asian supermarkets typically sell a variety of frozen cassava options. You can buy whole cassava roots (skin and all), peeled whole cassava roots, peeled and diced cassava cubes, grated cassava, and more.

For this recipe, I recommend you buy frozen grated cassava. In a pinch, you can buy the peeled whole cassava roots and/or diced cassava cubes, but you’ll need to grate them before using them in the recipe. Why not save yourself the work and buy it pre-grated instead?

Can I use fresh cassava instead?

Yes, yes you can! Before using in the recipe, peel the cassava with a vegetable peeler or a sharp knife. To make peeling easier, I recommend slicing it crosswise. After the cassava is peeled, finely grate the cassava with a cheese grater or a food processor.

At this point, you may notice the cassava is liquidy. Place the grated cassava in a fine mesh sieve and press down on the cassava to drain it of any excess liquid (alternatively, you can use a cheese cloth to do the job, too!). Why? This liquid tastes bitter. Draining the fresh cassava before using it in this recipe will lead to a sweeter cassava cake.

Prepped fresh cassava can be made ahead and stored in the refrigerator for 3 days before using it in this recipe. You can also freeze it in a ziptop bag for up to 3 months.

Can I use cassava flour instead?

No, please don’t. Cassava flour is made by milling the entire cassava in the same way wheat is milled to make flour. This process results in a meal that has more cassava per cup than grated cassava. If you swap out the grated cassava in this recipe for the same amount of cassava flour, you’ll actually end up using MORE cassava than what’s needed. That means your cake will potentially be too dense and heavy.

Unfortunately, I don’t know how to swap out the grated cassava with cassava flour. Cassava flour is not a common ingredient in Philippine cuisine—instead, many recipes call for the unprocessed cassava. If you’re interested in learning how to bake with cassava flour, I recommend this article by Food52 that has some great tips on how to do so.

Canned Coconut Milk

This cassava cake recipe uses 1 (13.5-ounce) can of coconut milk. Note that you’ll need to divide the amount of coconut milk in half for the recipe. The first half will be used to make the cassava cake batter, and the second half will be used for to make the cassava cake topping.

What is coconut milk?

Coconut milk is made by pureeing shredded coconut flesh with water. The puree is then strained multiple times to create the rich and thick coconut milk.

That being said, there are many types of coconut milk available in grocery stores. You can buy shelf-stable coconut milk in cans, or perishable coconut milk in cartons in the refrigerated aisle. For baking and cooking, it’s best to stick with canned coconut milk—that’s usually what recipes mean when they call for “coconut milk”.

Where to buy canned coconut milk

Canned coconut milk is now available in most major grocery stores in the United States. Canned coconut milk is typically found in the “Asian” aisle. However, “fancier” grocery stores like Trader Joe’s and Whole Foods even offer their own generic versions of coconut milk! Look for them in either the baking or canned goods aisle.

What’s the best canned coconut milk?

While you can probably get away with using any brand of canned coconut milk you have on hand, it’s true. Not all canned coconut milks are created equal. Why? Some manufacturers add sweeteners and stabilizers to thicken the coconut milk and skimp on the real stuff. A quality can of coconut milk should o have only two ingredients (coconut and water), with have a layer of solid white stuff when unshaken. This layer is the “coconut cream” and naturally occurs as the fat and protein in the coconut milk separate from the water.

So what’s the best canned coconut milk? My personal favorite is Arroy-D coconut milk. But I highly encourage you to try different brands and figure out which you like best. Ashlae from Oh Lady Cakes wrote a wonderful guide comparing different coconut milks that’s worth checking out.

Can I use fresh coconut milk instead?

Sure, go for it! Especially if you live in a place like the Philippines where fresh coconut milk is cheap, abundant, and easy to get. In fact, that’s how my mom makes this recipe—she claims it’s her secret ingredient.

Is coconut cream the same as coconut milk? Can I use coconut cream instead of coconut milk instead?

No, coconut cream is NOT the same as coconut milk. Remember when I mentioned earlier that coconut milk separates into two layers of coconut cream and coconut water? A can of coconut cream is literally just a can full of that layer of white stuff!

Because coconut cream is a lot thicker and contains less water than coconut milk, you cannot easily substitute it for the coconut milk in this recipe. Doing so may result in a cake that’s both heavy and dry. It might also sink in the middle! Let’s avoid that, please.

What’s the difference between coconut water and coconut milk? Can I use coconut water instead?

Coconut water is coconut milk that’s been separated from the coconut cream. All that’s left is the water, which tastes slightly fatty and coconutty. While it’s delicious to drink on its own (in fact, it’s my post-workout drink of choice—I’m looking at you, Harmless Harvest!), do not use coconut water in this recipe.

Because coconut water lacks the fat and protein of coconut cream, it’s likely that using it in this recipe will result in a cake that has a hard time setting and holding its shape. Again, you may end up with a cake that sinks in the middle.

Evaporated Milk

This cassava cake recipe uses one 12-ounce can of evaporated milk. Similar to the canned coconut milk, you’ll need to divide the can of evaporated milk into two halves. The first half will be used to make the cassava cake batter, and the second half will be used to make the cassava cake topping.

What is evaporated milk?

Evaporated milk is milk that’s been cooked down to remove its water content. Doing so makes the milk more shelf-stable and last far longer than refrigerated milk. Additionally, this process gives evaporated milk its own distinct taste. Because it’s been cooked down, it is slightly heavier and has a very subtle toasted, caramelized flavor.

Can I use nonfat or low-fat/skim evaporated milk instead?

In theory, yes. But low- and nonfat milks will lead to a less flavorful cassava cake.

Do I have to use evaporated milk?

Technically, no, but I don’t recommend substituting it. In a pinch, You can get away with substituting the evaporated milk with the same amount of whole milk. You may need to increase the cassava cake’s Bake Time if you do.

That being said, remember what I wrote above about evaporated milk having its own, distinct toasted and caramelized flavor? You’d be removing this delicious flavor from your cassava cake, making everything taste blander.

Evaporated milk is hard to find where I’m from. Can I make it at home?

In theory, yes. But I haven’t done it myself, so I can’t personally vouch for it.

That being said, there are many recipes online that teach you how to make evaporated milk at home. This method by Extra Crispy looks particularly interesting—all you need to do is simmer the milk until some of its water evaporates. However, you’ll need to plan ahead if planning to use it in this cassava cake recipe. Simmering the milk can be a time-consuming process.

Sweetened Condensed Milk

This cassava cake recipe uses ¼ cup of sweetened condensed milk for the custard topping.

What is sweetened condensed milk?

Sweetened condensed milk is milk that’s been cooked down to remove water from it. Doing so gives the milk a thick, sticky, and densely creamy texture. Almost all condensed milks are sweetened. The sugar keeps the sweetened condensed milk shelf-stable for years, and gives the sweetened condensed milk a unique flavor. Sweetened condensed milk is often used in baking recipes where the final product is very creamy, but also firm. Think: key lime pie fillings, caramels, and more.

This recipe only uses ¼ cup (2.5 ounces) of sweetened condensed milk, but most sweetened condensed milk cans have 14 ounces of milk in them. What do I do with the rest of it?

Oooh, I have a ton of baking recipes that can make use of the leftover sweetened condensed milk. This banana tres leches cake uses 1 cup (10 ounces) of sweetened condensed milk, this sweetened condensed milk pound cake uses ¾ cup (7.5 ounces), while this tres leches layer cake with coconut chantilly frosting needs a scant ¾ cup (7 ounces). This no churn coffee ice cream recipe calls for ⅔ cup (6.65 ounces) of the stuff. One of the most popular cake recipes on my blog, this vietnamese iced coffee cake, needs 6 tablespoons for its frosting. And what about this overnight babka french toast that uses 3 tablespoons of sweetened condensed milk?

Speaking of breakfast, you can add a dash of sweetened condensed milk to any coffee beverages of your choice. This New Orleans style iced coffee is sweetened with 1 tablespoon of sweetened condensed milk. May I suggest using it in place of simple syrup in this bubble iced coffee recipe or this one for overnight cinnamon iced coffee?

Do I even need to use sweetened condensed milk?

In a pinch, no. You can omit the sweetened condensed milk in the custard topping recipe. However, your custard will be less flavorful. You’ll also likely need to broil the custard topping fo less time than what’s listed in the recipe.

Sweetened condensed milk is hard to find where I’m from. Can I make it at home?

In theory, yes. But I haven’t done it myself, so I can’t personally vouch for it.

However, there are many recipes online that teach you how to make sweetened condensed milk at home. This recipe by Bigger Bolder Baking and this one by Stella Parks at Serious Eats look the most legit to me. That being said, it’s a bit of a time-consuming process: both recipes instruct you to simmer the milk for a minimum of at least 35 minutes. So plan ahead if you’re planning on making your own sweetened condensed milk at home!

cassava cake

How to Make Cassava Cake

Here are the basic steps to make cassava cake:

  1. First, prep your ingredients. (Prep Time: 5 minutes)
    Honestly, prepping the ingredients for this recipe is more time-consuming than the cake itself! Depending on what route you decide to take for your cassava, you’ll need to prep it for this recipe. My prep consisted of thawing the frozen grated cassava overnight in the refrigerator. You’ll also need to divide both the coconut milk and evaporated milk in half. The first halves will be used in the cassava cake batter, while the remaining halves will be used for the custard topping.

  2. Make the cassava cake batter. (Work Time: 5 minutes)
    Whisk together the sugar, salt, eggs, milks, and cassava. Boom! That’s all you need to do to make the cake batter. Easy, right?

  3. Bake the cassava cake. (Bake Time: 40 minutes)
    You’ll need to bake the cassava cake for 40 minutes, or until the edges are set and a skewer inserted into the center of the cake comes out with few crumbs attached.

  4. Make the custard topping. (Work Time: <5 minutes).
    While the cake is in the oven, make the custard topping. Whisk together the remaining milks with an egg. Again, that’s all you need to do! Told you this recipe was easy.

  5. Broil the cassava cake. (Bake Time: 15 minutes)
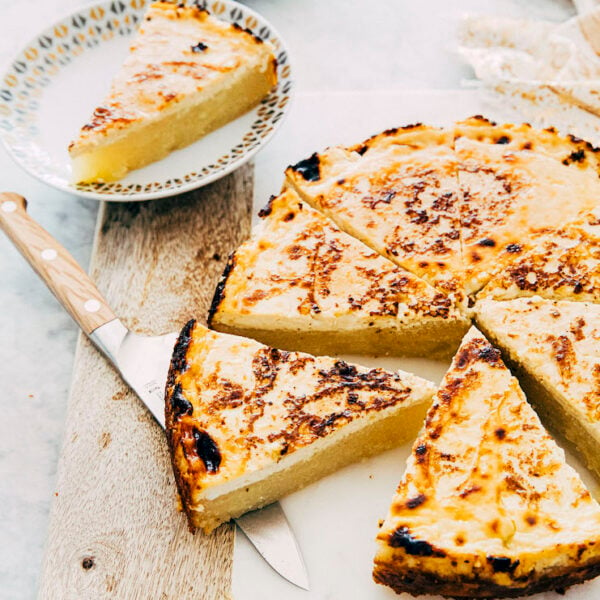
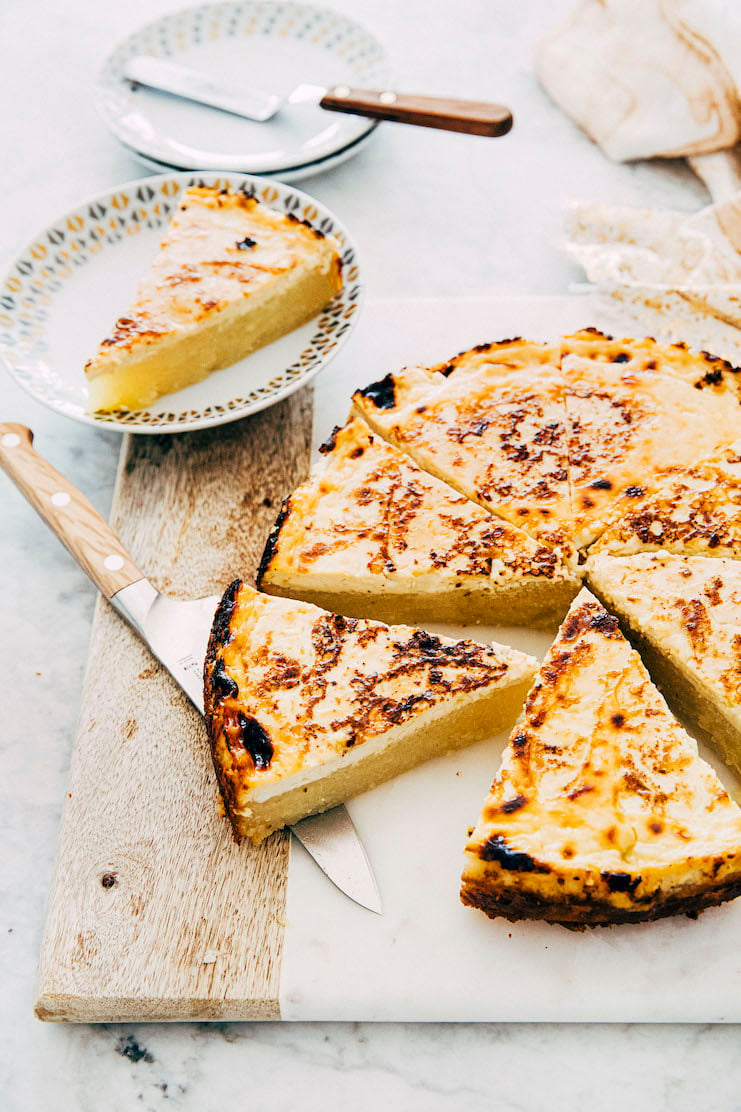
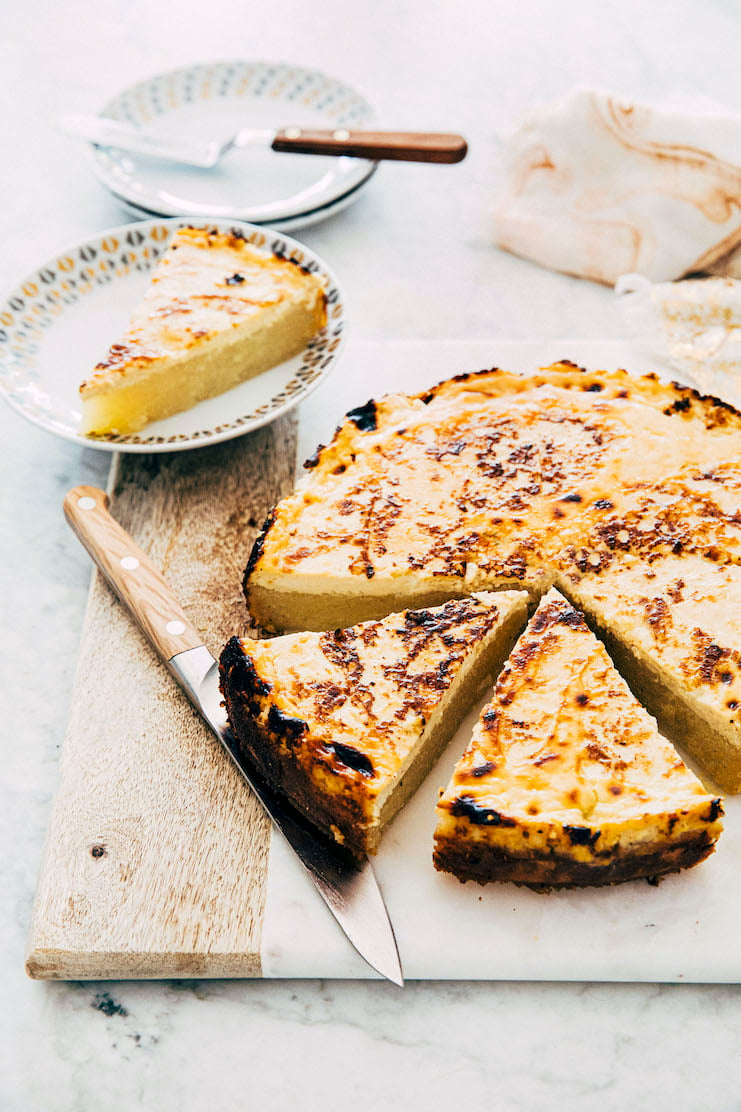
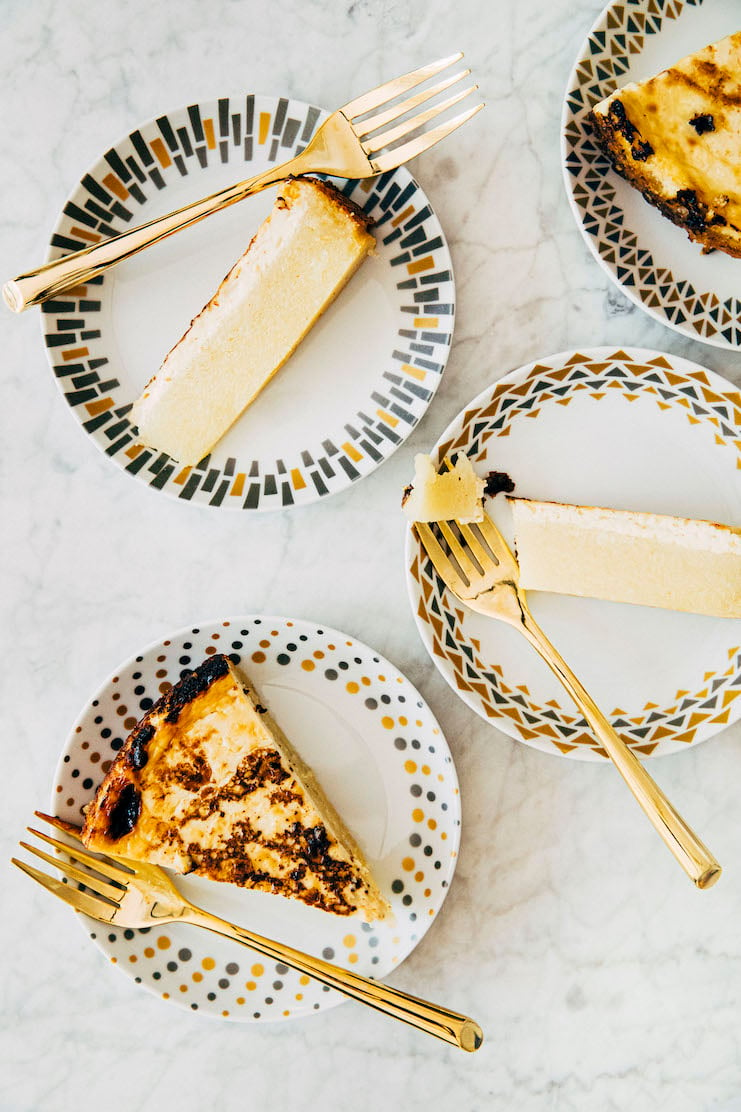
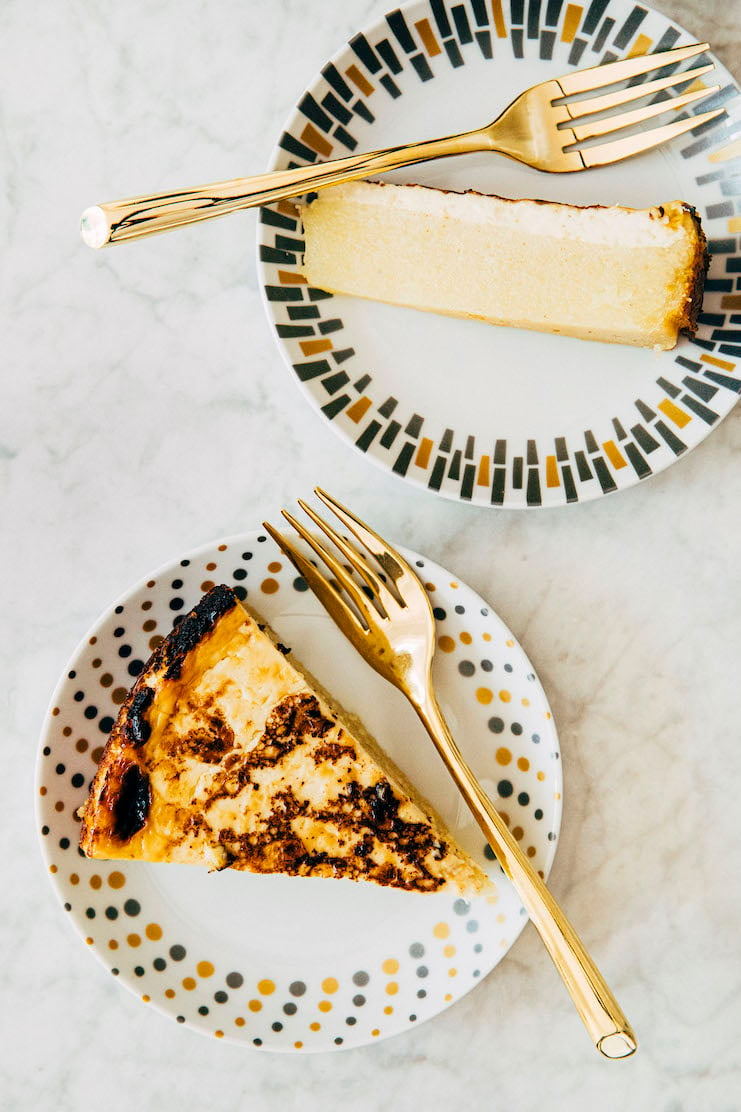
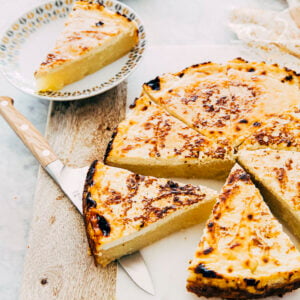
    Pour the custard topping over the cassava cake, and then stick the entire thing in the broiler until the custard gets molten and mottled. Broiling the cake gives it its unique appearance.
cassava cake

Recipe Troubleshooting and FAQ

FAQ: Tools to Make Cassava Cake

I don’t have a 10-inch springform pan. Can I bake this cassava cake in another cake pan instead?

Yes! Check out the “Best Cassava Cake Recipe Tips” below (in the yellow box) for more information on how to bake this cassava cake recipe in different cake pans. I give you options for a 9 x 13-inch cake pan and an 8 x 8-inch cake pan.

Can I use a glass cake pan for this recipe?

Although it’s what’s recommended for use in traditional Filipino cassava cake recipes, please avoid using a glass cake pan. Why? This recipe explicitly asks you to bake the cassava cake, then broil it. Glass pans are especially susceptible to sudden changes in temperature. That is, if you transfer a glass pan from a medium-warm oven (one that’s heated to 350°F, for example) to a very warm broiler (one that has a temperature of 450°F+), it could potentially break and shatter! Yes, this holds true for even enforced glass brands like Pyrex—please learn more in this Bon Appetit article.

What is a broiler?

Most ovens have two mechanisms: baking/roasting, and broiling. These mechanisms are typically powered by either a gas or electric heat source. The difference between the two depends on the location of the heat source. When baking or roasting, the heat source is located underneath the dish you’re cooking. Specifically, heat rises up from the heat source to bake/roast your dish. When broiling, the heat source is located above the dish you’re cooking.

According to this article in The Kitchn, most traditional ovens have a broiler function. Why? Broiling is powered by the same mechanism that heats your oven for baking or roasting. So please: check your oven. In some cases, the broiler element is on top of the oven. If that’s the case, you’ll need to adjust one of the racks in the oven so that it’s as close to it as possible (typically, 3 to 4 inches away from the broiler). In other ovens, the broiler element is a separate compartment underneath the oven. It looks a little bit like a drawer for storing pans. Although there’s less flexibility with how close or far away you can position your food underneath the heating element, there should still be enough room to place a typical casserole or cake pan about 3 to 4 inches way from the heat source.

Can I make this cassava cake recipe without a broiler?

If you’ve confirmed that your oven does NOT have a broiler, okay. According to this Reddit thread, you can fake it! Position a rack in the oven as high up as it can go, then crank the oven temperature up as high up as it can go as well (most ovens max out at either 500°F or 550°F). Place what you’re trying to broil on a sheet pan to block out the heat below and stick it on the top rack. In theory, the heat reflected from the top of the oven should broil the dish. That being said, I’ve never personally tried this method, so I cannot guarantee its results! Report back in the comments if you do.

FAQ: How to Serve Cassava Cake

When to eat cassava cake

In the Philippines, cassava cake is typically served as a mid-day or mid-afternoon snack (“merienda“), or for dessert after gatherings and special occasions.

Do I eat cassava cake warm, at room temperature, or cold?

All of the above! Although my family has always served cassava cake cold, you can also enjoy it slightly warmed, or at room temperature. The only thing that I’d be wary of is cutting into the cassava cake while it’s still pretty fresh from the oven. Why? Similar to pumpkin pie and other custard based pies, cassava cake needs time to set after baking. Cutting it too soon will end up in a goopy cake that won’t hold its shape.

To serve cassava cake warm, cool the cassava cake on a wire rack for at least 1 hour before slicing. The cake pan should still feel slightly warm to the touch, but not so warm that you need to handle it with pot holders. Alternatively, you can cool the cassava cake completely. Slice the cassava cake into squares for serving. Microwave the slices for 15 to 20 second intervals until slightly warm.

FAQ: Cassava Cake Storage

How to store cassava cake

Store cassava cake in its cake pan, tightly covered in plastic wrap, for up to 1 day at room temperature. After that, slice the cassava cake into squares and store in an airtight container in the refrigerator for up to 5 more days.

How long does cassava cake last?

Cassava cake lasts for up to 1 day at room temperature, and for up to 5 days in the refrigerator.

Should cassava cake be refrigerated?

Yes! If you live in a warm climate, I recommend refrigerating cassava cake. I store mine at room temperature the day it’s made, then cover it with plastic wrap and refrigerate it up to 5 days after.

Can I freeze cassava cake?

Yes! You can freeze cassava cake. Follow the recipe instructions to bake the cassava cake. Cool the cassava cake completely to room temperature on a wire rack. Then, wrap the entire thing in plastic wrap for up to 3 months. When ready to eat, thaw the cassava cake the night before serving. Follow the recipe instructions to make and broil the cassava cake custard topping.

If you choose to go this route, I suggest buying a disposable cake pan (one of those ones made from stiff aluminum foil) and making the cassava cake in it instead. Why? That way your regular cake pan isn’t in the freezer for months and months!

Best Recipe Tips

Best Ingredient Tips

  • The recipe below splits up one can of coconut milk and one can of evaporated milk in half to make the cake batter, then the custard topping. What does that mean? It means when creating a shopping list for this recipe, you only need to purchase 1 (14-ounce) can coconut milk and 1 (12-ounce can) evaporated milk.

  • When prepping both the canned coconut milk and evaporated milk, give their cans a good shake before opening! This is important since you’ll be dividing the milks in half to use in different parts of the recipe (the first half will be used to make the cassava cake, the second half for the cake’s custard topping). If you’re measuring the ingredients by weight, you’ll notice that both cans contain slightly more than the amount listed on their cans. Just weigh out the full thing and divide the full amount evenly between the cake and custard topping!

  • If you’re measuring the ingredients by volume, I instruct you to weigh out a “scant” cup of coconut milk. What does that mean? Typically, when weighing out a liquid ingredient in a liquid measuring cup, you pour the ingredient into the measuring cup until the bottom of its meniscus reaches just *ABOVE* the desired marking. A scant cup means pouring the ingredient until its meniscus reaches just *BELOW* the desired marking.

Best Equipment Tips

  • The original recipe calls for a 9 x 11-inch pan, which isn’t a very common pan size in the United States. As a result, I’ve adapted the recipe to be made in a 9- or 10-inch springform pan. You can also bake the pan in a 9 x 13-inch cake pan for 40 to 45 minutes (not including broil time), or an 8 x 8-inch square cake pan for 50 to 55 minutes (not including broil time).

  • Most broiler functions have two settings: ON/OFF. If you’re lucky, you might have a slightly fancier broiler with two settings: “LOW” and “HIGH”. So it was especially baffling when the original recipe instructed me to broil the cassava cake at 400°F!

    My own oven has the “LOW” and “HIGH” broiler settings. After messing around with an external oven thermometer, I discovered that “LOW” was stable at a temperature between 425°F and 450°F, whereas “HIGH” was stable at 500°F+. I ended up broiling my cassava cake on the “LOW” setting for 15 to 20 minutes.

    That being said, broilers are notoriously finnicky to work with! So please keep an eye on your cake when broiling it in the oven! I recommend checking it every 5 minutes to make sure the top of the cake doesn’t burn to a crisp.

More Simple Cake Recipes

More Filipino Inspired Dessert Recipes
(okay, mostly ube recipes… lol)

Get the Recipe: Cassava Cake Recipe

Cassava cake is a traditional Filipino snack cake made with grated cassava, coconut milk, and a layer of molten custard on top. The cake has a soft, slightly chewy texture similar to Hawaiian mochi butter cake and is gluten-free.
(4.88 stars) 8 reviews
Leave a Review

Ingredients

For the Cassava Cake

  • 1 ½ cups (10.5 ounces or 298 grams) granulated sugar
  • ¼ teaspoon kosher salt
  • 2 large eggs
  • a scant 1 cup (7 ounces or 198 grams) canned coconut milk (don't discard the rest—you'll need it for the topping!)
  • ¾ cup (6 ounces or 170 grams) evaporated milk (don't discard the rest—you'll need it for the topping!)
  • 1 (16-ounce) pack frozen grated cassava, thawed overnight and drained if necessary

For the Cassava Cake Custard Topping

  • a scant 1 cup (7 ounces or 198 grams) canned coconut milk
  • ¾ cup (6 ounces or 170 grams) evaporated milk
  • ¼ cup (2.5 ounces or 71 grams) sweetened condensed milk
  • 1 large egg
  • 1 teaspoon pure vanilla extract
  • 2 Tablespoons (1 ounce or 28 grams) unsalted butter, melted

Instructions
 

For the Cassava Cake

  • First, make the cake. Position a rack in the center of the oven and preheat the oven to 350°F. Generously spray a 9- or 10-inch round springform cake pan with cooking spray and place it in the middle of a half sheet pan lined with parchment paper.
  • In a medium bowl, whisk together the sugar, salt, and eggs. Pour in the coconut milk and evaporated milk, and whisk to combine. Finally, whisk in the cassava.
  • Pour the batter into the prepared pan and use an offset spatula to smooth its top if necessary.
  • Bake the cake. Bake for 45 to 50 minutes, or until the sides of the cake are set and the center of the cake bounces back when gently pressed. A skewer inserted into the center of the cake should come out with a few crumbs attached. Cool slightly on a wire rack while you make the custard topping.
  • Next, make the custard topping. Position a rack as close as possible to the broiler's heat source and preheat for 10 minutes.
  • In a medium bowl, whisk together the coconut milk, evaporated milk, condensed milk, egg, and vanilla. Pour the filling over the baked cassava cake, then drizzle the melted butter on top.
  • Broil the cake. Broil for 15 to 20 minutes, or until the custard starts to sizzle and becomes mottled and molten. Cool completely on a wire rack before slicing.
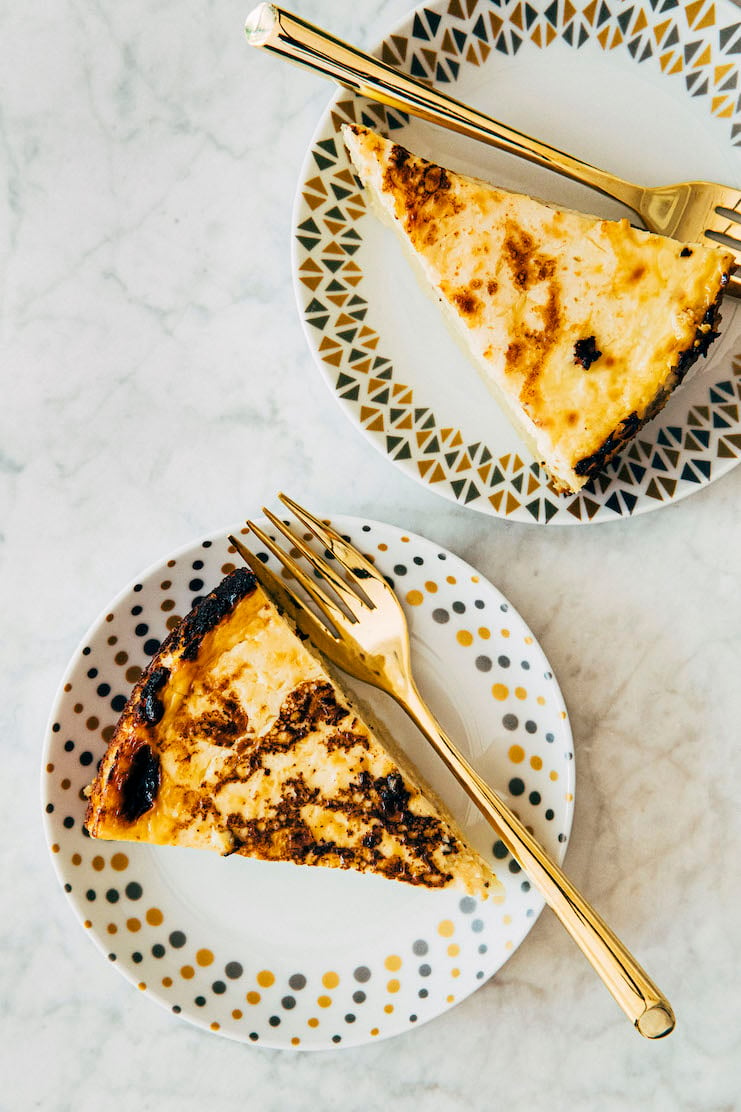
  • Serve and store. Run an offset spatula around the outer edge of the cake before unmolding the cake pan's sides. Slice into wedges and serve slightly warmed, or at room temperature. The cassava cake can be stored at room temperature, loosely covered in plastic wrap, for up to 1 day. After that, place in an airtight container and refrigerate for up to 5 days.

Notes

  • Cassava cake recipe adapted from The Happy Home Cook via Positively Filipino
  • The recipe below splits up one can of coconut milk and one can of evaporated milk in half to make the cake batter, then the custard topping. What does that mean? It means when creating a shopping list for this recipe, you only need to purchase 1 (14-ounce) can coconut milk and 1 (12-ounce can) evaporated milk.
  • When prepping both the canned coconut milk and evaporated milk, give their cans a good shake before opening! This is important since you’ll be dividing the milks in half to use in different parts of the recipe (the first half will be used to make the cassava cake, the second half for the cake’s custard topping). If you’re measuring the ingredients by weight, you’ll notice that both cans contain slightly more than the amount listed on their cans. Just weigh out the full thing and divide the full amount evenly between the cake and custard topping!
  • If you’re measuring the ingredients by volume, I instruct you to weigh out a “scant” cup of coconut milk. What does that mean? Typically, when weighing out a liquid ingredient in a liquid measuring cup, you pour the ingredient into the measuring cup until the bottom of its meniscus reaches just *ABOVE* the desired marking. A scant cup means pouring the ingredient until its meniscus reaches just *BELOW* the desired marking.
  • The original recipe calls for a 9 x 11-inch pan, which isn’t a very common pan size in the United States. As a result, I’ve adapted the recipe to be made in a 9- or 10-inch springform pan. You can also bake the pan in a 9 x 13-inch cake pan for 40 to 45 minutes (not including broil time), or an 8 x 8-inch square cake pan for 50 to 55 minutes (not including broil time).
  • Most broiler functions have two settings: ON/OFF. If you’re lucky, you might have a slightly fancier broiler with two settings: “LOW” and “HIGH”. So it was especially baffling when the original recipe instructed me to broil the cassava cake at 400°F! My own oven has the “LOW” and “HIGH” broiler settings. After messing around with an external oven thermometer, I discovered that “LOW” was stable at a temperature between 425°F and 450°F, whereas “HIGH” was stable at 500°F+. I ended up broiling my cassava cake on the “LOW” setting for 15 to 20 minutes. That being said, broilers are notoriously finnicky to work with! So please keep an eye on your cake when broiling it in the oven! I recommend checking it every 5 minutes to make sure the top of the cake doesn’t burn to a crisp.
Did you make this recipe?Please leave a star rating and review in the form below. I appreciate your feedback, and it helps others, too!
Michelle holding Weeknight Baking cookbook covering her face.

buy the book
Weeknight Baking:
Recipes to Fit your Schedule

Over the past several years of running Hummingbird High, I kept a crucial aspect of my life hidden from my readers: I had a full-time, extremely demanding job in the tech world. In my debut cookbook, Weeknight Baking, I finally reveal the secrets to baking delicious desserts on a tight schedule.