Photo of chocoflan bundt cake on a white plate.

About This Chocoflan Recipe

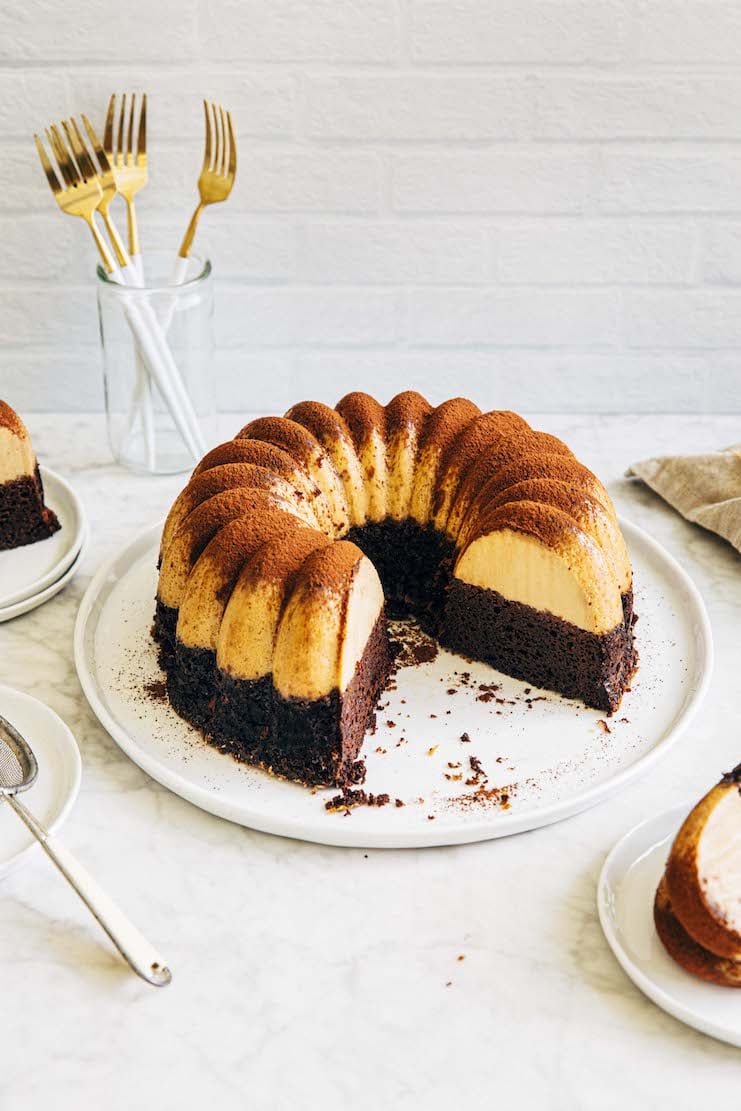
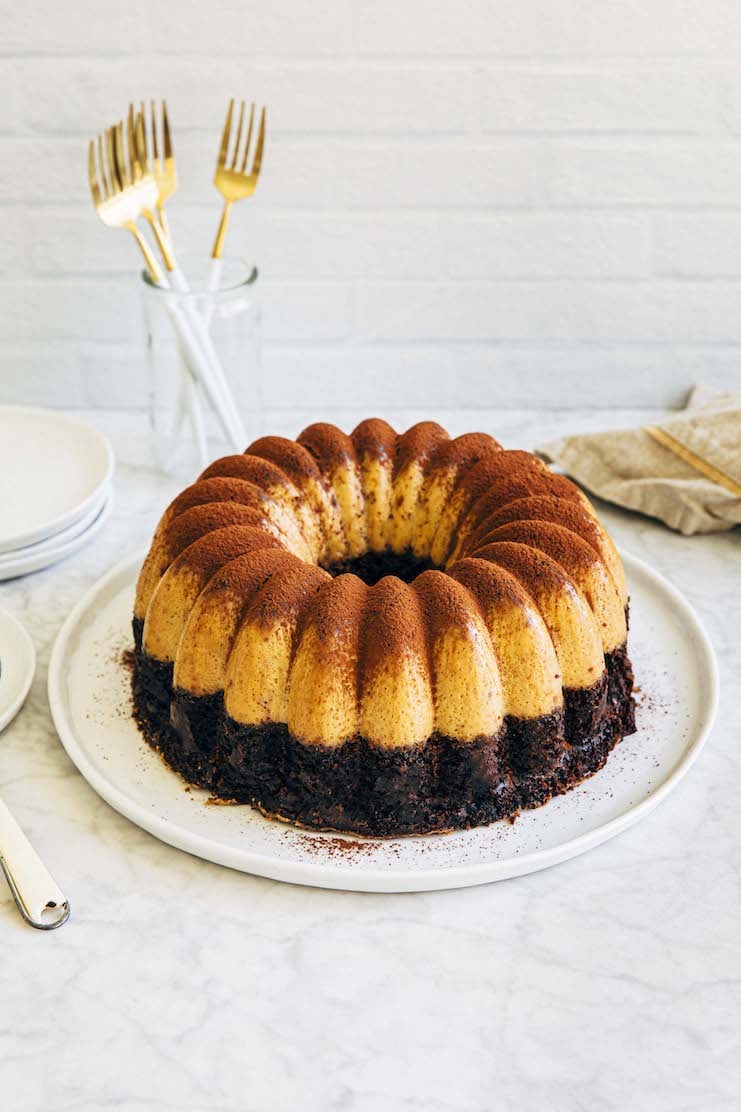
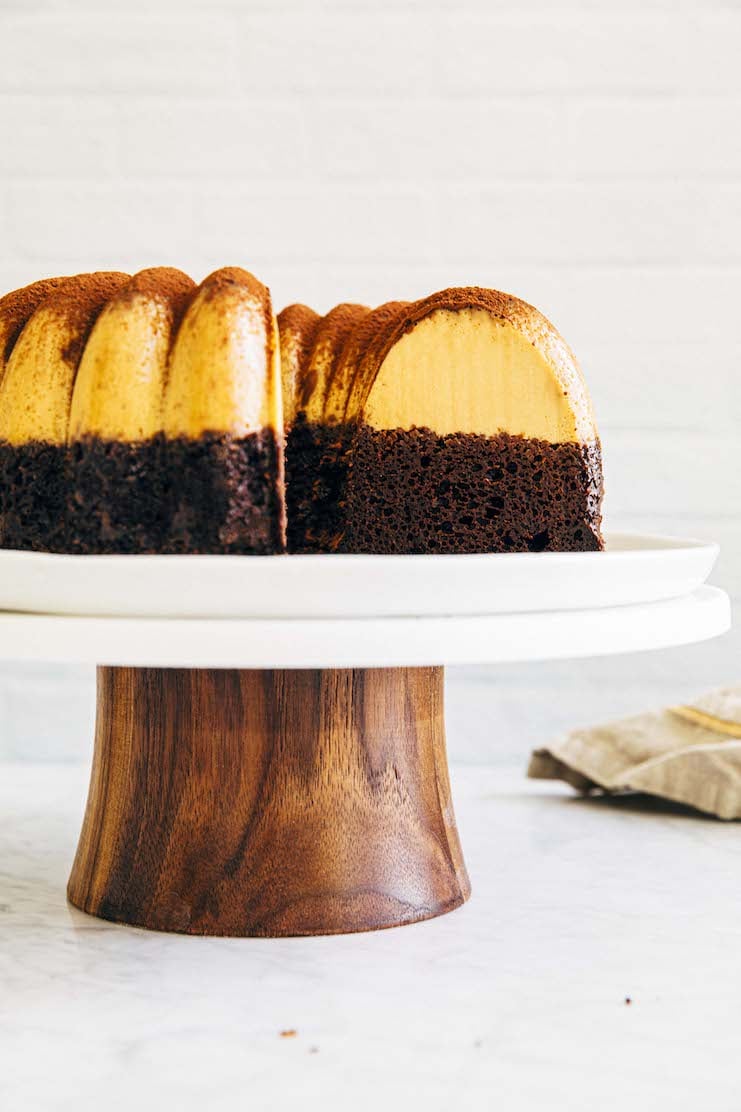
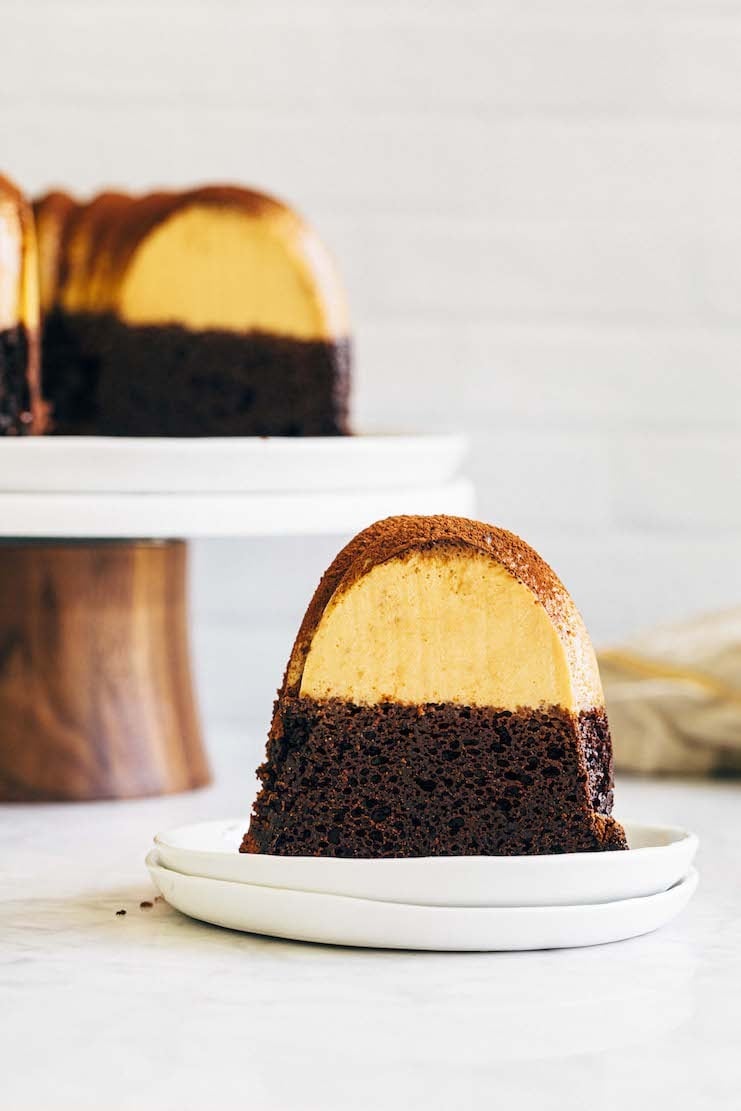
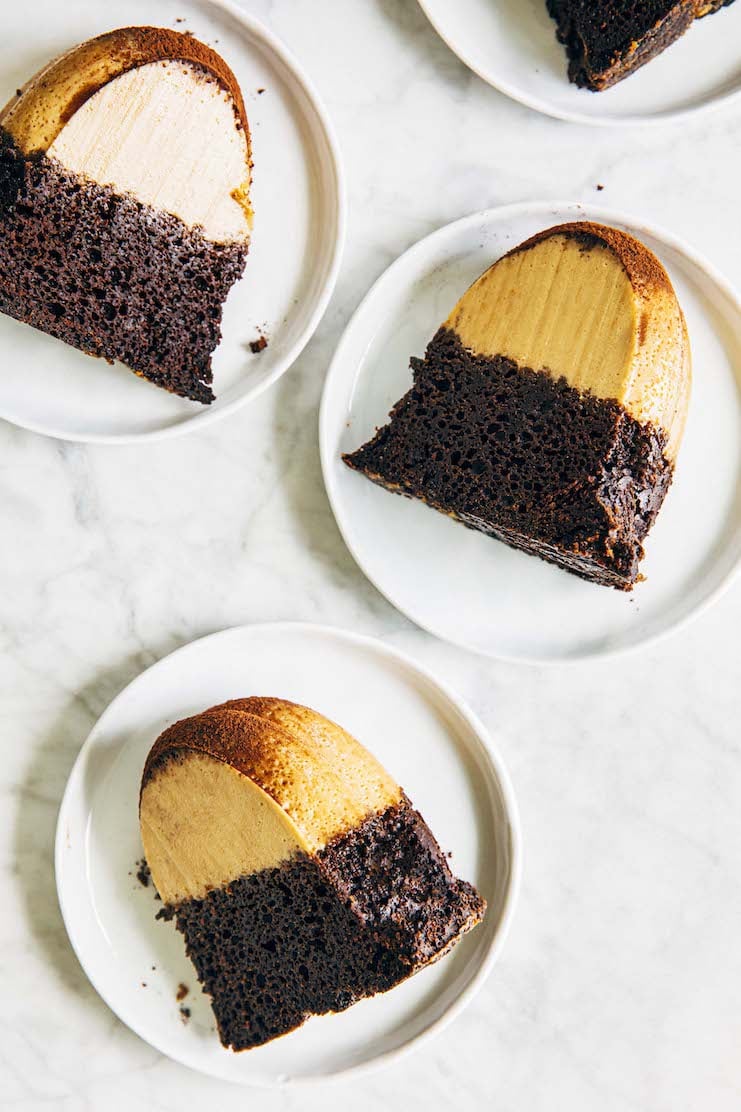
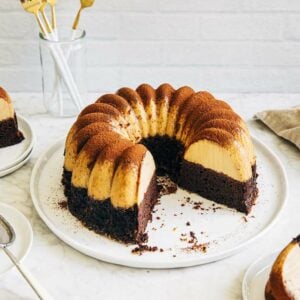
This chocoflan recipe is a delicious bundt cake recipe made from two layers: dulce de leche flan, super-moist cinnamon chocolate cake. My favorite part about this bundt cake is that it uses unique and fun techniques.

You assemble the cake by adding the chocolate cake batter in the bundt cake pan first, followed by the flan. While the chocoflan bakes, the batters swap places. That means that once the chocoflan is inverted, the flan is now on top of the chocolate cake!

Chocoflan is also known as “El Pastel Magico” (The Magic Cake) or “El Pastel Imposible” (The Impossible Cake) because of this unique technique.

Learn more in this post’s FAQ section below as to why the two batters swap places during the baking process!

For more unique and delicious bundt cake recipes, check out Hummingbird High‘s bundt cake recipe collection! I especially recommend My Best Banana Bundt Cake Recipe and this Kentucky Bourbon Butter Cake.

@hummingbirdhigh chocoflan is my new favorite #dessert! #baking #bakingrecipe #cincodemayo ♬ Paradise – Ikson
Picture of chocoflan cake on a white plate.

Why You Should Make The Recipe

Here are all the reasons to make this chocoflan recipe:

This chocoflan recipe is an authentic Mexican recipe adapted from Esteban Castillo, the famed blogger of Chicano Eats.

I first found out about this recipe from Esteban Castillo of Chicano Eats. He published it in his cookbook and The New York Times.

And according to many of my Mexican friends, chocoflan was a favorite dessert recipe in their households during birthday celebrations, holidays, and more.

This chocoflan recipe is a fun baking project perfect for those looking to learn more about baking science.

I mentioned earlier that this chocoflan is made with a really unique baking technique. You assemble it first by pouring the chocolate cake batter into the pan, followed by the flan.

However, when you turn out the chocoflan, the two layers have swapped places. It’s a really cool “magic” trick (one that kids will find especially impressive!).

In truth, the “magic” is actually just science.

The baked chocolate cake in a chocoflan recipe is lighter and much less dense than the baked flan. So as the entire bundt cake bakes, the lighter chocolate cake eventually floats to the top as the heavier flan sinks to the bottom.

This chocoflan recipe stores well.

The chocoflan contains two moist layers of dessert: dulce de leche flan and chocolate buttermilk cake. Because of this, it keeps fresh for days.

I actually find that the chocoflan tastes better the longer it sits!

After a few days, the dulce de leche in the flan becomes even more pronounced, and the two layers really infuse together.

Picture of chocoflan cake on a cake stand

Ingredients and Substitions

Now that I’ve convinced you to make chocoflan, here’s everything you need for the recipe:

Shopping List for Chocoflan Cake

  • dulce de leche
  • evaporated milk
  • cream cheese
  • pure vanilla extract
  • kosher salt
  • large eggs
  • all-purpose flour
  • granulated sugar
  • natural unsweetened cocoa powder
  • baking soda
  • baking powder
  • ground cinnamon
  • unsalted butter
  • buttermilk
  • coffee
  • nonstick baking spray

And let’s talk about some key ingredients and some potential substitutions:

Dulce De Leche

You need 1 (13-ounce) can dulce de leche to make the flan.

What is dulce de leche?

Dulce de leche is a Latin American caramel made from slow cooking sugar and milk. Slow cooking these two ingredients results in a spreadable, sauce-like caramel with a unique golden tan color.

These ingredients and slow cooking method differentiate dulce de leche from other caramel recipes. Often times, Western caramel recipes are cooked quickly on a stovetop and contain other ingredients like butter, heavy cream, and water.

What does dulce de leche taste like?

Dulce de leche has its own unique flavor. It tastes like an especially milky caramel with a taffy-like texture.

Where To Buy Dulce De Leche

You can often buy 13-ounce cans of dulce de leche at most international or Latin American supermarkets. My favorite brand of dulce de leche to buy is Nestle La Lechera Dulce De Leche. Some Target stores even carry it for half the price of what you can get online!

How To Make Dulce De Leche From Condensed Milk

If you can’t find any dulce de leche in stores or online, you can also make it at home. All you need is a pressure cooker and a can of sweetened condensed milk.

To make it, fill the pressure cooker pot with enough water to submerge the can of sweetened condensed milk. Remove the label from the can, then, pressure cook the entire thing (unopened) on high for 35 minutes. Allow the pressure cooker to release steam naturally. Once it does, remove the can from the water bath (careful—it will be hot!) and cool completely on a wire rack before using in this recipe.

Can I use a different kind of caramel to make this chocoflan recipe?

No, please don’t! Dulce de leche is key to making this chocoflan. It has unique properties from Western-made caramel. Besides—if you use a different kind of caramel, you’d be removing a big part of this dessert’s cultural identity and heritage.

It’s 2022. Let’s not do that anymore!

Evaporated Milk

You need one 12-ounce can of evaporated milk to make the flan for this chocoflan recipe.

What is evaporated milk?

Evaporated milk is milk that’s been cooked down to remove its water content. Doing so makes the milk more shelf-stable and last far longer than refrigerated milk. Additionally, this process gives evaporated milk its own distinct taste. Because it’s been cooked down, it is slightly heavier and has a very subtle toasted, caramelized flavor.

Can I use nonfat or low-fat/skim evaporated milk instead?

In theory, yes. But low- and nonfat milks will lead to a less flavorful chocoflan.

Do I have to use evaporated milk?

Technically, no, but I don’t recommend substituting it. In a pinch, You can get away with substituting the evaporated milk with the same amount of whole milk. You may need to increase the chocoflan’s Bake Time if you do.

That being said, remember what I wrote above about evaporated milk having its own, distinct toasted and caramelized flavor? You’d be removing this delicious flavor from your chocoflan, making it taste blander.

Evaporated milk is hard to find where I’m from. Can I make it at home?

In theory, yes. But I haven’t done it myself, so I can’t personally vouch for it.

That being said, there are many recipes online that teach you how to make evaporated milk at home. This method by Extra Crispy looks particularly interesting—all you need to do is simmer the milk until some of its water evaporates.

However, you’ll need to plan ahead if planning to use it in this chocoflan recipe. Simmering the milk can be a time-consuming process.

Kosher Salt

You need ¼ teaspoon kosher salt to make the flan, plus another ½ teaspoon for the chocolate batter in this chocoflan recipe.

Why You Should Use Kosher Salt When Baking

I like to use kosher salt (as opposed to table salt) when baking.

Its larger crystals make it difficult to confuse with granulated sugar. However, not all kosher salts are created equal. Some kosher salts have smaller granules than others, which will result in saltier tasting baked goods.

For consistency, I recommend sticking to one brand, and one brand only: Diamond Crystal kosher salt. It’s the only brand of salt I use when I develop recipes for Hummingbird High.

Why? Diamond Crystal kosher salt is one of the few 100% pure salts in the grocery store. Other brands have additives that can add unexpected flavors to your desserts.

I can’t find Diamond Crystal kosher salt. Is Morton’s Coarse kosher salt okay?

Yes, with reservations. Morton’s Coarse kosher salt granules are much smaller, denser, and crunchier than Diamond Crystal. According to this Food52 article, the two are different shapes and sizes because of how they’re made. Morton’s is made by flattening salt granules into large thin flakes by pressing them through high-pressure rollers, whereas Diamond Crystal is formed by a patented method in which “upside-down pyramids [are] stacked one over the next to form a crystal.” You can even see a visualization of the different sizes in this Cook’s Illustrated article.

Okay, but what does that mean, exactly? 1 teaspoon of Morton’s will taste saltier than 1 teaspoon of Diamond Crystal. Wild, right? So if you follow my recipes exactly as they are written but use Morton’s instead of Diamond Crystal, the results will come out saltier. In fact, sometimes they will come out TOO salty. So if you’re using Morton’s instead of Diamond Crystal, reduce the salt in the recipe by half.

Want to learn more about Diamond Crystal versus Morton’s Coarse kosher salt? Definitely check out the Food52 and Cook’s Illustrated articles I linked to above, as well as this Taste article.

I can’t find Diamond Crystal OR Morton’s Coarse kosher salt. Can I just use table salt?

Yes, with reservations. If you use table salt, you’ll need to reduce the recipe’s salt quantity by half.

If you read my little essay about Diamond Crystal and Morton’s, you learned that Diamond Crystal kosher salt granules are larger than Morton’s kosher salt granules. The same principle applies to table salt versus kosher salt. Table salt granules are much smaller than kosher salt granules. As a result, 1 teaspoon of table salt tastes much saltier than 1 teaspoon of kosher salt… simply because it can hold more granules! Wild, right?

So if you follow my recipes exactly as they are written but use table salt instead of kosher salt, the results will come out saltier. If you’re using table salt instead of kosher salt, I recommend reducing the salt in the recipe by half. 

Cocoa Powder

You need ½ cup natural unsweetened cocoa powder to make the chocolate cake in this chocoflan recipe, plus another 1 Tablespoon for garnishing it.

Natural Unsweetened Cocoa Powder versus Dutch-Processed Cocoa Powder

Cocoa powder, when used in baking recipes, often comes in two varieties: natural unsweetened, and Dutch-processed.

Natural unsweetened cocoa powder is more typical and is cocoa powder in its purest form. It is slightly reddish brown in color and results in deeply flavored chocolate goods. Because it is slightly acidic, it is often paired with baking soda in baking recipes to help create a chemical reaction that will cause the baked good to rise in the oven.

Dutch-processed cocoa powder is natural unsweetened cocoa powder that’s been treated with alkaline to neutralize its acidity, giving it a darker color and milder flavor. It is the cocoa powder that is used for making midnight-black baked goods like Oreos.

Can I use Dutch-processed cocoa powder instead?

Yes! Because the chocolate cake batter contains both baking soda AND baking powder, as well as buttermilk, you can use Dutch-processed cocoa powder instead of natural unsweetened cocoa powder.

However, if it had only contained baking soda, Dutch-processed cocoa powder would not have been an acceptable substitute. Why? I wrote earlier that Dutch-processed cocoa is treated with alkaline to neutralize its acidity.

That means that it won’t react with baking soda, a base, in the same way. Baking soda needs an acidic ingredient to activate and cause the cake to rise.

Buttermilk

You need ½ cup buttermilk to make the chocolate cake for this chocoflan.

I don’t have buttermilk. What can I use instead?

Make your own buttermilk with whole milk. Whisk together ½ cup (4 ounces or 113 grams) whole milk and 1 ½ teaspoons white vinegar or lemon juice in a small liquid measuring cup. Let sit for 5 minutes to thicken, then use as directed in the recipe. Although you can technically use non-fat or skim milk to make buttermilk, I don’t recommend it. These non- and low-fat versions will lead to less flavorful baked goods.

Alternatively, you can also make your own buttermilk with yogurt. I learned this neat trick from my friend Izy at Top with Cinnamon. She thins out ½ cup natural, unsweetened, and unflavored yogurt with ¼ cup water to use in place of buttermilk. She says that you can also use a thicker yogurt (like Greek yogurt), but you’ll likely need to use more water to get it to the consistency of buttermilk. Similar to my note above, use whole yogurt if possible. Non- and low-fat yogurts will result in less flavorful baked goods.

Can I use powdered buttermilk?

Yes! Follow the manufacturer’s instructions to make ½ cup buttermilk. Use as directed in the recipe.

Coffee

You need ½ cup coffee to make the chocolate cake for this chocoflan.

What kind of coffee do you recommend for this chocoflan?

Honestly, whatever coffee you have on hand works! I am lazy and hate making coffee at home. So I just heated up the pre-made coffee I had on hand: Stumptown Cold Brew Coffee. And when I don’t have that cold brew in stock, I literally just make coffee with an instant coffee brand like Folgers or Nescafé.

Can I use espresso instead of coffee?

Yes! If you are lucky enough to have an espresso maker at home, go for it. You may want to make an Americano type drink to make sure that you have the ½ cup of coffee you need for this recipe.

And yes, before you ask, you can also use instant espresso instead of instant coffee in this recipe, too.

I don’t like the taste of coffee and/or drink caffeine. Do I really need to use coffee in this chocoflan recipe?

If you don’t like the taste of coffee, rest assured that this chocoflan does NOT taste like coffee at all. Instead, the coffee is there to make the cake extra moist and enhance the chocolate flavors of the cake! It’s a common pastry school technique—similar to adding salt to savory foods, adding a little bit of coffee to chocolate makes it taste more flavorful.

However, if you’re completely caffeine averse, no worries! You can substitute out the coffee for the same amount of water…just know that your cake might not taste as chocolaty the original recipe.

Nonstick Baking Spray

You need nonstick baking spray to assemble the chocoflan.

What is nonstick baking spray?

Nonstick baking spray is similar to nonstick cooking spray. However, it typically includes flour mixed into the fat/oil of the spray. The flour helps prevents baked goods from sticking.

Is nonstick baking spray different from cooking spray?

Yes! Most nonstick cooking sprays don’t contain any flour. Instead, most nonstick cooking sprays are just some kind of fat (butter or a type of oil) placed in an aerosol container.

And while I recommend using nonstick cooking spray for most of my recipes, I don’t recommend doing so for this chocoflan recipe. I’ve never been successful in removing the chocoflan from the pan cleanly when I use cooking spray. The additional flour in the nonstick baking spray goes a long way!

The Best Nonstick Baking Spray

My favorite nonstick baking spray is this Bak-Klene ZT Nonstick Baking Spray that I get from Williams-Sonoma. It’s often used in professional bakeries. However, I’ve noticed it’s been out of stock a LOT (although you can still find it at professional restaurant retailers like Webstaurant.com).

So if that’s the case, stick with my second favorite: Baker’s Joy. The good news is that Baker’s Joy can be found in the baking aisles of most major supermarkets, too!

I can’t find/don’t want to buy nonstick baking spray. What can I use instead?

Some bakers use a homemade pan release “goop” for bundt cakes. These goops are made with equal parts melted shortening, oil, and flour. Instead of spraying the pan with cooking spray, bakers use a pastry brush to brush the goop on.

I’ve tried this method in the past, but found it didn’t work any better than my cooking sprays when it came to making bundt cakes. I’d rather skip the extra step and effort of making pan release goop and stick with my cooking spray. But again—if this is what has worked for you in the past, stick with it!

Photo of chocoflan slice on a white plate with the entire cake on the background.

How To Make The Recipe

Here are the basic steps to make chocoflan from scratch:

First, prep the ingredients for the chocoflan.

  1. Boil the water for the chocoflan’s water bath. (Prep Time: 10 minutes)
    You need to bake the chocoflan in a water bath made of very hot water. I like to multitask by boiling the water as I prep the rest of the ingredients. Just be sure to cover the water with a lid when done to prevent it from losing too much heat!

  2. Prep the ingredients for the flan batter. (Prep Time: 5 minutes)
    Measure out everything you need to make the flan for the chocoflan. Make sure both the cream cheese and eggs are at room temperature. If they’re cold, the flan batter might come out lumpy!

  3. Prep the ingredients for the chocolate cake batter. (Prep Time: 5 minutes)
    Again, measure everything you need to make the chocolate cake batter for the chocoflan. Note that you need melted butter for this recipe. I like to melt it first to give it time to cool slightly before using in the recipe.

Next, make the flan and chocolate cake batters.

  1. Make the flan. (Work Time: 5 minutes)
    The flan comes together super quickly and easily. Blend the dulce de leche, evaporated milk, cream cheese, vanilla, and salt. Then, add the eggs and blend until just combined. That’s it!

  2. Make the chocolate cake batter. (Work Time: 5 minutes)
    Similarly, the chocolate cake batter comes together quickly and easily. Whisk the dry ingredients in a medium bowl, then the wet ones in a large bowl. Then, mix the two together to make the chocolate cake batter. That’s it!

Then, assemble the chocoflan.

  1. Prep the bundt pan. (Work Time: <5 minutes)
    Most cake recipes instruct you to prep their baking pans first. However, it’s better to grease a bundt pan right before filling with batter. That’s because bundt pans require a LOT more grease than traditional cake pans. And all that grease has a tendency to slide down the sides of the pan and pool at the bottom. But by greasing the bundt pan immediately before filling it, you avoid that issue entirely!

  2. Fill the bundt pan. (Work Time: 10 minutes)
    Scrape the chocolate batter into the bundt pan. Then, carefully ladle the flan batter on top of it. Be slow and careful—you don’t want to disturb the chocolate batter at all!

  3. Prep the chocoflan for baking. (Work Time: <5 minutes)
    Tightly cover the top of the filled bundt pan with aluminum foil. Set it in the middle of a large roasting pan, then pour the boiled water (from the first step of prep!) into the pan. Make sure you have enough water to reach at least half way up the sides of the bundt pan. If you don’t, you can just use hot water from the sink.

Now, bake, cool, and chill the chocoflan.

  1. Bake the chocoflan. (Bake Time: 1 hour and 45 minutes)
    The chocoflan needs a shockingly long amount of time in the oven—at least 1 hour and 45 minutes! You’ll need to bake the chocoflan in the waterbath. Be careful when transferring it into the oven. It’ll be heavy!

  2. Cool the chocoflan to room temperature.
    Once the chocoflan is done, immediately remove the bundt pan from the water bath and set it on a wire rack. Uncover its top and cool completely on the wire rack.

  3. Chill the chocoflan. (Chill Time: 4 hours, preferably overnight)
    Once the chocoflan is cool, you need to refrigerate it to set the flan even more. Tightly cover the top of the bundt pan in plastic wrap. Refrigerate for at least 4 hours, but preferably overnight. At this point, you can refrigerate the chocoflan for up to 3 days before turning out and serving.

Finally, turn out, serve, and garnish the chocoflan.

  1. Boil the water for the chocoflan’s second water bath. (Prep Time: 10 minutes)
    Once you’re ready to serve the chocoflan, you’ll need to steam it in a water bath. Doing so will ensure that it comes out of the bundt pan whole. Boil enough water to create a water bath for the chocoflan once more.

  2. Steam the chocoflan to unmold it. (Thaw Time: 15 minutes)
    Remove the plastic wrap from the chocoflan and set it in the roasting pan once more. Pour the boiling water into the roasting pan again, ensuring that the water reaches at least halfway up the sides of the bundt pan.

    Dip the kitchen towel in the hot water (careful—it will be hot!). Wring it out over the sink or roasting pan (avoiding the bundt pan with the chocoflan) until it’s damp but not wet. This towel will act like a “lid” for the chocoflan, helping steam it out. Cover the chocoflan and roasting pan with the kitchen towel and let sit for 15 minutes.

  3. Unmold the chocoflan. (Work Time: <5 minutes)
    After 15 minutes, it’s time to unmold the chocoflan! Remove the bundt pan from the water bath. Place a serving plate over the bundt pan. Flip the bundt pan and plate upside down to turn the chocoflan out of the bundt pan.

  4. Garnish the chocoflan. (Work Time: <5minutes)
    Garnish the chocoflan with the remaining cocoa powder. Congratulations, you just completed this beast of a baking project. It’s time to reap your reward. Enjoy!
Photo of several chocoflan slices on white plates.

Recipe Troubleshooting and FAQ

FAQ: What Baking Equipment and Tools You Need For This Chocoflan Recipe

What baking equipment do I need?

You need the following kitchen tools to make this chocoflan:

  • a blender
  • a 10-cup bundt pan
  • a ladle
  • a roasting pan (large enough to bake the bundt pan in)
  • aluminum foil
  • a kitchen towel

Will a handheld immersion blender work in this chocoflan recipe?

Yes! You can use a handheld immersion blender to make the flan in this chocoflan recipe.

I don’t have a blender. What can I use instead?

If you don’t have a blender, you can use a food processor. Follow the recipe instructions to blend the ingredients for the flan, using a food processor instead of a blender.

What type of bundt pan did you use for your chocoflan?

I used this Nordic Ware Elegant Party Bundt pan. I used the same pan for this banana bundt cake recipe, too!

However, if I had infinite space in my kitchen and planned on making chocoflan regularly, I’d probably invest in a silicone bundt pan. The silicone pan’s flexible texture would make it SO easy to turn out the chocoflan!

Can I bake this chocoflan recipe in a 12-cup capacity bundt pan instead?

Yes, with reservations. You can bake this chocoflan in a 12-cup capacity bundt pan. However, let me warn you now—according to this King Arthur Flour blog post, small bundt cakes baked in large pans have a tendency to stick to the pan more.

I don’t have a bundt pan. Can I bake this chocoflan recipe in another kind of cake pan?

Yes, with reservations. In a pinch, a 9- or 10-inch tube pan (like the one you need for angel food cake recipes) works. Just note that these tube pans are designed to carry around 12 to 16 cups worth of batter. Like I said above, small bundt cakes baked in large pans have a tendency to get stuck in the pan more—so watch out!

I’ve also seen old articles where Martha Stewart and Rachael Ray “fake” a bundt pan. They place a tall, greased glass jar in the center of a 9- or 10-inch springform pan and pour the batter around the jar. However, because I haven’t tried this method myself, I can’t guarantee the results. So please report back in the comments if you do!

What kind of roasting pan do I need for this chocoflan recipe?

You need a roasting pan large enough to hold the 10-cup bundt pan, plus at least 2 to 3 inches of water (since you’ll be baking the chocoflan in a water bath). I used this All Clad roasting pan that I use to roast chickens and turkeys in—it measures something like 16 x 13-inches, with 3 inch tall sides.

That being said, you can also buy large disposable roasting pans in the baking aisles of most supermarkets. I like these aluminum roasting pans by Reynolds—you get three in one pack. Save them for future use!

FAQ: Chocoflan Recipe Techniques

Why do I need to bake the chocoflan in a water bath?

Great question! Flan batters don’t like extreme temperatures. It has a tendency to curdle and get lumpy if baked too hot. So the hot water in the bath surrounds the chocoflan batter and bakes it gently and evenly.

How? Water evaporates at its boiling point—212°F, or 100°C. That means that, if you’re baking the chocoflan at 350°F (like I instruct you to do so for this recipe), the water bath will never get warmer than 212°F (since the water will evaporate long before it reaches 350°F). This creates a much more temperature stable environment for the chocoflan to bake in.

Why does the chocolate cake and flan swap places?

The baked chocolate cake in a chocoflan recipe is lighter and much less dense than the baked flan. So as the chocoflan bakes, this lighter chocolate cake eventually floats to the top as the heavier flan sinks to the bottom. Cool, right?!

Why do you ladle in the chocolate batter, then the flan? What’s the point if they’re going to swap places in the oven, anyway?

When raw, the chocolate cake batter is much thicker and heavier than the raw flan batter (which is very liquidy, with a consistency similar to heavy cream). The raw flan batter is unable to hold the weight of the raw chocolate cake batter. As a result, it’s much easier and neater to ladle in the chocolate batter, then the flan.

FAQ: Troubleshooting

Help! My chocoflan got stuck in the pan. What did I do wrong?

Let’s chat about all the potential reasons why your cake got stuck:

Reason #1: You used a cooking spray instead of a baking spray.

In the Ingredients section above, I talked about the importance of using a nonstick baking spray as opposed to a nonstick cooking spray. Nonstick baking sprays contain flour in them. This flour goes a long way in preventing the chocoflan from getting stuck in the pan.

So if you used a cooking spray instead of a baking spray, you’re already at a major disadvantage. Furthermore, not all cooking sprays are created equal. Butter, coconut oil, and shortening based cooking sprays don’t work as well. Nonstick cooking sprays made from fats that are liquid at room temperature (like canola oil, vegetable oil, and so on) fare slightly better. However, they still won’t work as well as a nonstick baking spray.

Reason #2: You sprayed your bundt pan at the wrong time.

Most cake recipes instruct you to grease the baking pans in the first step of the recipe. After greasing the pans, the recipe instructs you to then make the cake batter. While this method works for almost every other cake recipe, it won’t work for a bundt cake.

A good bundt cake recipe will instruct you to grease the pan right before filling it. Why? Like I said above—you will need to grease your bundt pan with a LOT of cooking spray. So much that, if the pan sits for any more than a few seconds, all that cooking spray will slide down the pan’s sides and create big pools of oil at the bottom of the pan. Not only is this gross, but it also increases the likelihood of your cake getting stuck in the pan since all that oil is no longer coating the pan’s sides.

Reason #3: There was something wrong with your bundt pan.

Finally, let’s talk about your bundt pan. I also discussed the importance of using a nonstick bundt pan up top. But nonstick pans with scratched up surfaces don’t work as well as newer ones with smooth surfaces. Furthermore, if you don’t clean and maintain your nonstick pans properly, they have a tendency to accumulate grime and residue that can act like glue. Gross, right?

So the next time you make a bundt cake, test your bundt pan for grime. What does that mean? Run your fingers through all its nooks and crannies. If your pan is perfectly clean, your fingers should have no whatsoever. If they come off feeling (even just a little bit) greasy, wash your pan (preferably with a liquid grease dissolver like Dawn Dish Power Dissolver) and dry it thoroughly before using it in a bundt cake recipe.

Finally, bundt pan size matters. This chocoflan recipe makes about 10-cups of batter, perfect for a 10-cup capacity bundt pan. Baking the cake in a bundt pan with a smaller OR larger capacity will make it more likely for the cake to get stuck in its pan.

My chocoflan is really stuck in the pan! Is there anything I can do to get it out?

If you followed the recipe as written and steamed the chocoflan to unmold it, this shouldn’t be an issue for you.

But if you did and it’s still stuck, don’t panic! Instead, try the following tricks below to unstick the chocoflan:

1. First, unstick the edges of the chocoflan with a flexible offset spatula and give it a few jiggles.

Use a flexible offset spatula (one whose blade is made out of plastic or silicone, NOT metal) and run it around the edges of the pan and its center tube. Note that doing so only works for more “forgiving” bundt cake pan designs like the one I recommended for beginners. If you used a more elaborate pan with sharp edges and lots of nooks and crannies, you might accidentally ruin its design!

Nordic Ware also recommends (gently) shaking the cake in its pan side to side a few times in all directions. Doing so helps release the surface of the cake from its pan. You can also use a wooden spoon to tap the top and sides of the inverted cake to help release it.

2. Freeze the chocoflan.

Freeze the chocoflan uncovered for 1 to 2 hours, then try to invert it again. In theory, freezing the cake will help release the chocoflan from its greased sides and prevent you from damaging its design when you try and invert it.

However, don’t try this trick if you used butter, coconut oil, or shortening (all of which I specifically recommended against in this recipe) to grease your pan. Freezing solidifies those fats and will cause the cake to stick in the pan even more!

Why does my chocoflan have spots in its flan?

The flour in the nonstick baking spray can sometimes collect at the bottom of the bundt pan, leaving spots in the baked chocoflan (especially the flan part). Don’t worry about it too much! These spots don’t taste like anything, and you can cover them up with a generous garnish of cocoa powder.

FAQ: Storing

How to Store Chocoflan

The chocoflan can be stored in the refrigerator, tightly covered in plastic wrap or sliced in an airtight container, for up to 3 days.

Can you freeze chocoflan?

Yes! You can freeze the baked chocoflan. Tightly wrap the entire cake in two layers of plastic wrap and freeze for up to 3 months. To serve, thaw overnight in the refrigerator. Serve either chilled straight from the fridge or at room temperature.

Best Chocoflan Recipe Tips

  • You will need to bake the bundt pan in a water bath. To make a water bath, set the bundt pan in a roasting pan. Pour enough water into the roasting pan until water reaches halfway up the sides of the bundt pan. My roasting pan needed about 2 quarts of water. You may need more or less, depending on both your bundt pan and roasting pan.

  • When prepping ingredients for the chocolate cake batter, I melt the butter first. That way, it has time to cool while I prep the rest of the ingredients. Doing so ensures your butter isn’t too hot and won’t scramble the egg in the cake batter!

More Bundt Cake Recipes

Get the Recipe: Chocoflan Recipe

This chocoflan recipe makes a bundt cake made of two distinct layers: dulce de leche flan and moist buttermilk chocolate cake. The recipe also uses a unique technique of filling the bundt pan. During the baking process, the two layers swap places!
(4.91 stars) 30 reviews
Leave a Review

Ingredients

Assembly

  • 2 quarts water

For The Flan

  • 1 (13-ounce) can dulce de leche
  • 1 (12-ounce) can evaporated milk
  • 4 ounces (113 grams) cream cheese, at room temperature
  • 1 ½ teaspoons pure vanilla extract
  • ¼ teaspoon kosher salt
  • 5 large eggs, at room temperature

For The Chocolate Cake

  • 1 ⅓ cups (5.65 ounces or 160 grams) all-purpose flour
  • 1 cup (7 ounces or 200 grams) granulated sugar
  • ½ cup (1.75 ounces or 50 grams) natural unsweetened cocoa powder, sifted if necessary
  • 1 teaspoon baking soda
  • ½ teaspoon baking powder
  • ½ teaspoon ground cinnamon
  • ½ teaspoon kosher salt
  • ½ cup (4 ounces or 113 grams) buttermilk, at room temperature
  • ½ cup (4 ounces or 113 grams) coffee, at room temperature
  • 6 Tablespoons (3 ounces or 85 grams) unsalted butter, melted and cooled slightly
  • 1 large egg, at room temperature
  • 1 teaspoon pure vanilla extract

For Serving

  • 2 quarts water
  • 1 Tablespoon natural unsweetened cocoa powder

Equipment

  • a blender
  • a 10-cup bundt pan
  • nonstick baking spray
  • a ladle
  • a large roasting pan
  • aluminum foil
  • a kitchen towel

Instructions
 

  • Prep the oven. Position a rack in the center of the oven and preheat the oven to 350°F. Bring the water for assembly to boil and cover to keep warm while you prep the flan and chocolate cake.
  • Make the flan. In the blender pitcher, combine the dulce de leche, evaporated milk, cream cheese, vanilla, and salt for the flan. Blend on medium-high until smooth, about 30 seconds. Add the eggs for the flan and blend on medium-high until combined, another 10 to 15 seconds.
  • Mix the dry ingredients for the chocolate cake. In a large bowl, whisk together the flour, sugar, cocoa powder, baking soda, baking powder, cinnamon and salt.
  • Whisk the wet ingredients, then mix in the dry ingredients. In a large bowl, whisk together the buttermilk, coffee, butter, egg, and vanilla for the chocolate cake. Gradually whisk in the dry ingredients until just combined.
  • Prep and fill the bundt pan. Generously spray a 10-cup capacity bundt pan with nonstick baking spray.
    Immediately use a rubber spatula to scrape the chocolate cake batter into the prepared bundt pan. Use an offset spatula to smooth its top.
    Slowly ladle the flan batter over the chocolate batter, being careful not to disturb the batter.
    Set the filled bundt pan in the middle of a large roasting pan and tightly cover its top with aluminum foil. Pour the boiled water into the roasting pan until water reaches halfway up the sides of the bundt pan.
  • Bake the chocoflan. Bake for 105 to 120 minutes, or until a skewer inserted into the center of the cake comes out clean.
  • Cool the chocoflan. Remove the chocoflan from the water bath, uncover its top, and cool completely on a wire rack.
  • Chill the chocoflan. Once the chocoflan has cooled completely, tightly cover its top with plastic wrap. Refrigerate for at least 4 hours, preferably overnight.
  • Steam the chocoflan to unmold it. Set the bunt pan with the chocoflan in the middle of the roasting pan. Bring the water for serving to boil and immediately pour into the roasting pan until water reaches halfway up the sides of the bundt pan.
    Dip the kitchen towel in the hot water (careful—it will be hot!). Wring it out over the sink or roasting pan (avoiding the bundt pan with the chocoflan) until it's damp but not wet. Cover the chocoflan and roasting pan with the kitchen towel and let sit for 15 minutes.
    After 15 minutes, uncover the pans. Remove the bundt pan from the water bath. Place a serving plate over the bundt pan. Flip the bundt pan and plate upside down to turn the chocoflan out of the bundt pan. 
    Garnish immediately with the remaining cocoa powder.
  • Serve and store. Serve chilled, or at room temperature. The chocoflan can be stored in the refrigerator, tightly covered in plastic wrap or sliced in an airtight container, for up to 3 days.

Notes

  • You will need to bake the bundt pan in a water bath. To make a water bath, set the bundt pan in a roasting pan. Pour enough water into the roasting pan until water reaches halfway up the sides of the bundt pan. My roasting pan needed about 2 quarts of water. You may need more or less, depending on both your bundt pan and roasting pan.
  • When prepping ingredients for the chocolate cake batter, I melt the butter first. That way, it has time to cool while I prep the rest of the ingredients. Doing so ensures your butter isn’t too hot and won’t scramble the egg in the cake batter!
Did you make this recipe?Please leave a star rating and review in the form below. I appreciate your feedback, and it helps others, too!

Did you make this recipe?

Please leave a comment and rating for the recipe using the form below!

Your ratings make it easier to find the recipe online, and I’m always looking for ways to improve Hummingbird High.

Michelle holding Weeknight Baking cookbook covering her face.

buy the book
Weeknight Baking:
Recipes to Fit your Schedule

Over the past several years of running Hummingbird High, I kept a crucial aspect of my life hidden from my readers: I had a full-time, extremely demanding job in the tech world. In my debut cookbook, Weeknight Baking, I finally reveal the secrets to baking delicious desserts on a tight schedule.