

This post was done in partnership with Café Appliances, who sponsored this post by providing the compensation and appliances to make it happen! I’m incredibly lucky to be a member of the Café Collective, a group of nine women with impeccable style and expertise in home design, fashion, lifestyle, and food. Be sure to follow along the next few weeks to learn more — as always, all thoughts and opinions are my own, and thank you for supporting the sponsors that make Hummingbird High possible!
I cannot believe that, in my nearly eight years of blogging, I do not have a simple brown butter chocolate chip cookie recipe. I have all sorts of chocolate chip cookie recipes—one made with peanut butter cups, another with rainbow nonpareils, one made with just egg yolks, a slice-and-bake version, and even ones without any chocolate chips—but no brown butter. What on earth? Brown butter makes every dessert taste better, and chocolate chip cookies are no exception.

It’s funny because a few years ago, I just did not understand the hype around brown butter. It turns out it was me all along—the whole time I *thought* I was making brown butter, I was actually just melting it instead. Brown butter is made by melting butter and cooking it until the water in the butter evaporates and its milk solids caramelize. Most brown butter recipes come with intense warnings, telling you to watch what you’re doing like a hawk; just a few seconds too long on the burner will lead to burned butter. So being the insanely risk-averse person that I am, I skewed the opposite direction and never cooked the butter long enough for it to properly brown. It didn’t help that I had old-school electric coil burners on my range that took forever to heat up and cool down, despite how many times I fiddled with the knobs.


Finally switching to a gas range was such a godsend. Gas burners are a lot easier to control than their coil counterparts, with the size and heat of the flame easily controlled by knobs. My new Cafe Appliances range also has a whopping SIX burners, all of which are different sizes (including a large, pro-level, high-heat emitting one!) to really enable you to control your cooking. Browning butter has never been so easy—when I’m in a rush, I cook the butter on the high heat burner to melt it fast, then switch the pot over to one of the smaller, lower-heat burners to really control the color of the final product.


The best part? The Cafe range has two ovens, allowing me to cook multiple pans of cookies all at once. I know that most people just position their oven racks to be able to bake two pans at the same time, but I’m actually VERY against that—I find that the pan on the lower rack always leads to cookies with burned bottoms, while the upper pan takes forever to cook. I’m all about positioning the rack in the center of the oven and baking each pan on there one at a time. The problem is that most recipes make at least two to four trays of cookies, meaning that I’m stuck in the kitchen baking tray after tray. But with the new double oven, I’m able to cut this waiting time in half. Not to mention that my model is dual-fuel: whereas the burners are controlled by gas, the oven is powered by electricity, leading to much more consistent temperatures throughout the bake time.

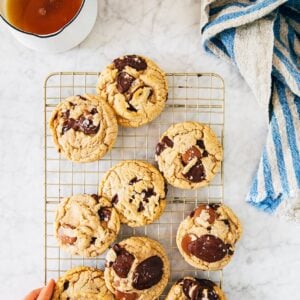
Everything I bake comes out perfectly, like these cookies: dense and chewy in the center, with crisp edges on their outer rings, all dotted with molten chocolate and the toasty, nutty flavor of brown butter. See what I mean? These really are the easiest brown butter chocolate chip cookies ever.
Some baker’s notes:
-
- When browning butter, it can be incredibly difficult to tell what color the butter is and accidentally go overboard. The mixture will get incredibly foamy, too. It’s best to use a light colored pan to help you control the color and see what’s going on. When all else fails, dip a light colored spoon into the mixture to check its color, or even simply spoon out a small amount on a light colored plate. The longer you cook the butter, the darker and more flavorful it will be. But watch out! There’s a fine line between brown butter and burnt butter; you don’t want to go too overboard.
- After you’ve browned the butter, you’ll see some dark flecks in the brown butter—these are the caramelized milk solids. Some folks like to strain out the solids and just use the butter, but I generally tend to keep them in since they tend to add more flavor to whatever I’m baking, too. To store brown butter, pour it into an airtight container and refrigerate for 1 to 2 weeks. You can use brown butter in place of butter in just about any recipe, both sweet and savory.
Get the Recipe: The Easiest Brown Butter Chocolate Chip Cookies Ever
Ingredients
- ½ cup (4 ounces) unsalted butter, cut into 1-inch cubes
- 1⅔ cup (7.5 ounces) all-purpose flour
- ½ teaspoon baking powder
- ½ teaspoon baking soda
- 1 teaspoon kosher salt
- ¾ cup tightly packed (5.65 ounces) dark brown sugar
- ¼ cup (1.75 ounces) granulated sugar
- 1 large egg
- 2 teaspoons pure vanilla extract
- 4 ounces dark chocolate (at least 70% cocoa), from whole fèves or a high quality chocolate bar, chopped into ½ to 1-inch pieces
- 4 ounces milk chocolate (at least 35% cocoa), from whole fèves or a high quality chocolate bar, chopped into ½ to 1-inch pieces
Instructions
- In a light-colored saucepan, melt the butter over medium-low heat, swirling the pan occasionally, until it starts to foam. Use a heatproof rubber spatula to scrape the bottom and sides of the pan occasionally to prevent the milk solids in the butter from burning. Cook for 5 minutes, or until the butter smells nutty and is amber with dark flecks at the bottom of the pan. Remove from the heat and immediately pour the brown butter into a liquid measuring cup. Set it on a wire rack to cool while you prep the other ingredients.
- Position a rack in the center of the oven and preheat the oven to 350°F. Line two half sheet pans with parchment paper.
- In a medium bowl, whisk together the flour, baking powder, baking soda, and salt. In the bowl of a stand mixer fitted with the paddle attachment, combine the sugars.
- Pour the brown butter over the sugar in the mixer bowl and beat on low until just combined. Add the egg and vanilla and beat until just combined. Use a rubber spatula to scrape down the bottom and sides of the bowl. With the mixer on low, gradually add the dry ingredients and beat until just combined. Scrape down the bottom and sides of the bowl once more, and beat on low for an additional 30 seconds. Increase the mixer to medium- low, add the chocolates all at once, and beat until the chocolate is evenly distributed throughout, about 1 minute.
- Use a 3-tablespoon cookie dough scoop to portion the cookie dough into balls, placing them at least 3 inches apart on the prepared sheet pans. Bake one pan at a time for 10 minutes, or until the edges have set but the centers are still gooey. The cookies will look puffed when you pull them out of the oven, but will fall and crack into the perfect cookies as they cool. Cool the cookies on the pan on a wire rack for 20 minutes, or until the edges and bottoms of the cookies have set and feel firm to the touch. Repeat with the remaining cookie dough (or freeze it to bake later). Serve warm or at room temperature. The cookies can be stored in an airtight container or zip-top bag at room temperature for up to 3 days.
Um, yum. These were perfect. I was looking for a fancy cookie recipe that still satisfied a craving while allowing me to at least kind of try a new technique!
Thanks for the detailed butter browning how-to!
These were perfect
So delicious and really fast and easy – I was a little too lazy to pull out my stand mixer so I did it all by hand to fulfill my post-workout cookie craving. Thanks for the great recipe!
Why is this dough so crumbly? I am following the recipe exactly.
Hmm, the dough shouldn’t be crumbly at all! If it is, it’s likely a result of too much flour (Are you using measuring cups to measure out the flour? If so, you are likely packing too heavy of a cup) or overmixing the dough.
It went much better this time. I think the mixing was the key. Thanks!!
This is truly the best chocolate chip ever. Who knew browned butter would be SO.MUCH.BETTER than the normal creamed butter? A+++ HBH!