
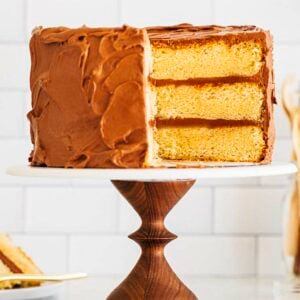
About My Best Yellow Cake With Chocolate Frosting
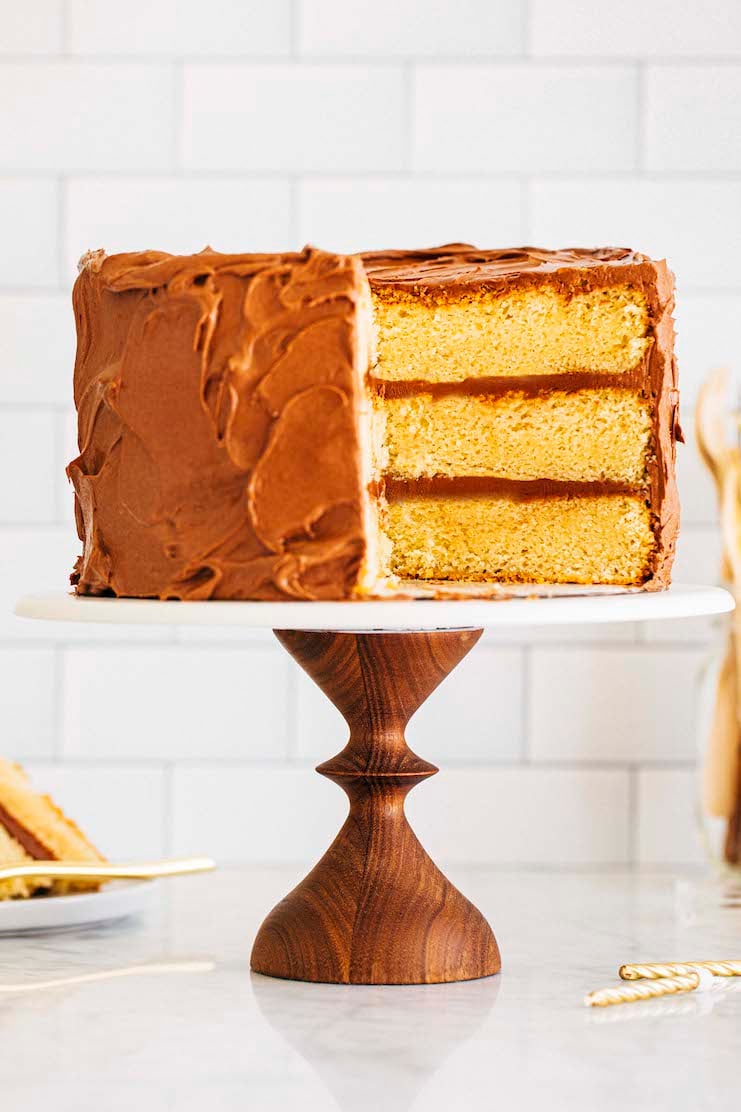
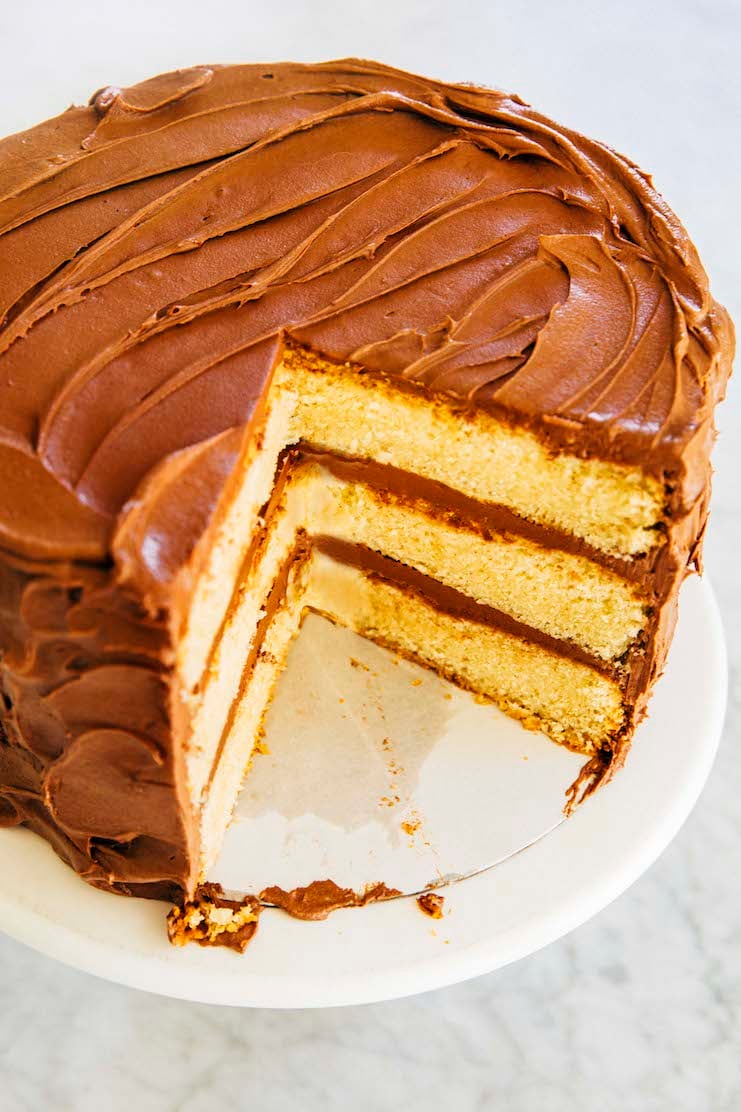
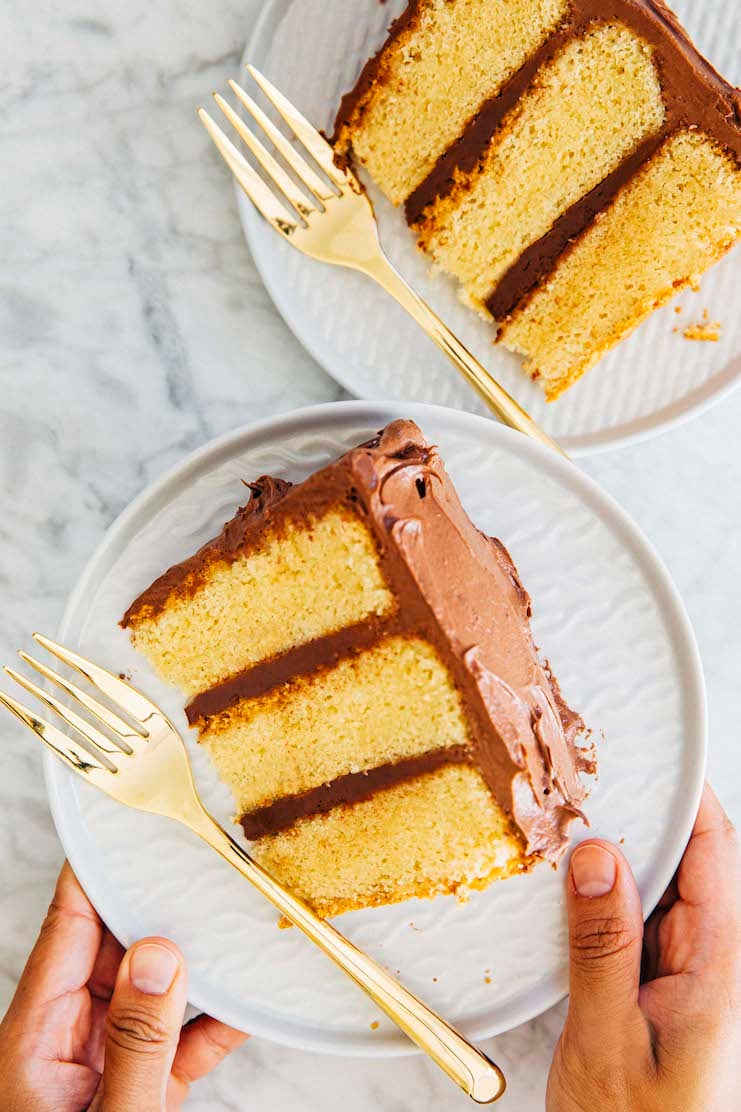
My best yellow cake with chocolate frosting recipe is made with three layers of an incredibly buttery and moist buttermilk yellow cake, all topped off with a creamy, dreamy chocolate fudge frosting. The chocolate fudge frosting is made with REAL chocolate, with a texture and flavor similar to your favorite chocolate fudge candy. This is the perfect yellow cake recipe for birthdays, special occasions, and other celebrations!
For more classic layer cake recipes, check out Hummingbird High‘s Cake Recipe archive! Popular recipes include My Best Chocolate Birthday Cake and this Vietnamese Iced Coffee Cake.
My best yellow cake with chocolate frosting recipe is adapted from my cookbook, Weeknight Baking, and fits easily into your schedule.
I first developed this recipe for my cookbook, Weeknight Baking. My book focuses on teaching bakers how to fit involved recipes—like ones for layer cakes, pies, and more—into their busy schedules. How? By splitting the recipe up and making some of its components ahead of time. Doing so ensures that you’re not in the kitchen for hours straight!
Although I wrote this recipe to be made all at once, I’ve incorporated plenty of tips throughout the post to help you fit the cake into your schedule more easily. And if you like my advice, be sure to check out my book!
Ingredients and Substitutions
Now that I’ve convinced you to make my best yellow cake with chocolate frosting, here’s your shopping list for the recipe:
Shopping List
Be sure to scroll down to the recipe card for the exact ingredient amounts and quantities:
- cake flour
- baking powder
- kosher salt
- unsalted butter
- granulated sugar
- brown sugar
- large eggs
- canola oil
- buttermilk
- pure vanilla extract
- unsweetened chocolate
- confectioners’ sugar
- whole milk
And let’s talk about some key ingredients and their potential substitutions:
Ingredient Sources and Substitutions
- Cake Flour. Don’t have cake flour at home? Check out my recipe on how to make cake flour with all-purpose flour and cornstarch!
- Kosher Salt. Kosher salt is the best salt for baking recipes—learn more in my post all about it! But if you don’t have any on hand, you can use table salt. Just use half the amount that’s listed in the recipe.
- Brown Sugar. Either light or dark brown sugar works in this recipe.
- Canola Oil. In a pinch, you can replace the canola oil with other neutral flavored oil like grapeseed, vegetable, and more.
- Buttermilk. Don’t have buttermilk at home? You can easily make some with ingredients like milk, vinegar, lemon juice, and more. Learn more in my recipe for homemade buttermilk!
- Vanilla Extract. You can also make vanilla extract at home.
- Unsweetened Chocolate. Unsweetened chocolate is chocolate made with 100% cocoa with no added sugar. If you don’t have unsweetened chocolate, you can use dark chocolate with at least 60% to 70% cacao instead. However, your chocolate frosting will likely be sweeter than mine—maybe even too sweet! There’s a reason why I used unsweetened chocolate for the recipe.
- Whole Milk. Use whole (not 2% or skim) milk for the most flavor. In a pinch, you can use plant-based milk like almond, coconut, oat, or soy (though your frosting might end up with those flavors).

How To Make The Recipe
Here are the basic steps to make the yellow cake with chocolate frosting from scratch:
First, make the yellow cake.
- Prep the ingredients for the cake. (Prep Time: 5 minutes)
Prepping the ingredients for the yellow cake is a breeze. All you need to do is measure out the quantities needed for the recipe. For best results, I recommend that the butter, eggs, and buttermilk are at room temperature. They’ll mix together faster and more easily! - Make the cake. (Work Time: 15 minutes)
To make the cake batter, you do the following: first, mix together the dry ingredients. Then, beat the butter and sugars together, add the eggs, oil, buttermilk, and vanilla. After 5 minutes, mix in the dry ingredients. That’s it!
After that, divide the batter between three cake pans. I like to use a digital scale to weigh out the batter into each pan, ensuring perfectly even cake layers. Check out the Baker’s Tips section for more specifics on how to do so! - Bake the cake. (Bake Time: 40 minutes)
The cakes need 40 to 45 minutes in the oven. When done, the cakes will be a light golden brown color. Their surfaces should bounce back when gently pressed with your finger. Don’t panic if the cake tops didn’t dome—that’s by design! The cake recipe bakes up flat so you don’t have to level the cakes when assembling them. Cool, right?
Let the cakes cool completely to room temperature before frosting and assembling the entire yellow cake.
Next, make the chocolate frosting.
- Prep the ingredients for the frosting. (Prep Time: 5 minutes)
When making the chocolate frosting, pay attention to the temperature of the ingredients listed in the recipe! You want the butter and milk to be COLD when you make the frosting. These cold ingredients will ensure that your frosting won’t come out too runny or melty.
And for best results, I recommend that you sift the confectioners’ sugar for the frosting. Doing so will ensure that your frosting will be completely smooth and lump-free. The easiest way to sift confectioners’ sugar (especially the large amount needed for this recipe) is to place a large fine-mesh sieve over a large bowl. Dump the confectioners’ sugar into the sieve, and whisk it until it completely passes through the sieve. - Make the chocolate frosting. (Work Time: 15 minutes)
I’ll admit that there are easier frostings to make out there. But the payoff for this one is worth it, I promise! To make the chocolate frosting, melt the unsweetened chocolate in a double boiler. Let it cool slightly, then combine it with the rest of the ingredients for the frosting in a food processor. Blitz until a creamy, dreamy chocolate frosting forms.
Then, assemble the yellow cake with the chocolate frosting.
- Assemble the cake layers. (Work Time: 10 minutes)
Place one of the cake layers on a cake board (or a serving plate) in the middle of the rotating cake stand. Take an offset spatula and drop about ½ cup of the frosting right in the middle of the top of the cake. Spread it evenly all over the top, just like you would spread butter on toast. Repeat the process with a second layer of cake. Then, stack the third and last layer on top. There’s no need to frost this layer… yet. - Crumb coat the cake. (Work Time: 15 minutes)
A crumb coat is a thin layer of frosting that’s spread over the naked cake to trap crumbs. If you’ve ever tried to frost a cake without a crumb coat, you’ll know that crumbs can shake loose from the cake and get caught in the frosting, leaving your cake with unsightly bumps. The crumb coat seals in any crumbs, allowing you to apply thicker and smoother layers of frosting later.
To apply a crumb coat, follow the instructions to stack the cakes, layering frosting between each cake to “glue” them together. Cover the top and sides of the cake with a thin layer of frosting—this is the crumb coat. Use just enough frosting to cover the entire cake completely. There’s no need to spend the time to make it look pretty! You’ll end up covering the crumb coat later.
Then, refrigerate the whole thing for 10 to 15 minutes, just enough for the frosting to harden. You won’t need to refrigerate the cakes for too long because, in theory, the cakes are still chilled from the freezer.
Finally, finish frosting the cake.
- Make the cake pretty. (Work Time: 5 minutes)
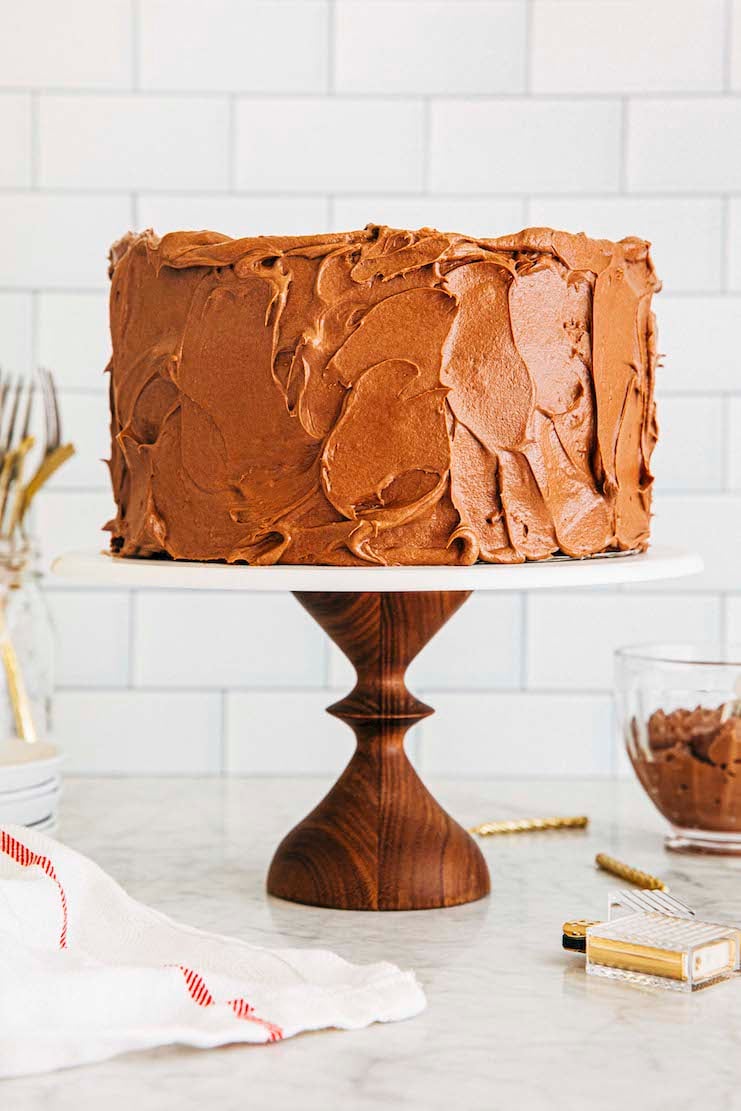
Use an offset spatula to cover the cake with the remaining chocolate frosting. Then, use the spatula to make large, random sweeping motions across the frosting on the top and sides of the cake. The sweeping motions will create swirls. Don’t overthink it! For this method, a little work goes a long way. I promise it’ll be beautiful no matter what you do.
Recipe Troubleshooting and FAQ
I don’t have a food processor. Can I still make the chocolate frosting?
Yes, with reservations. A food processor will make the creamiest, dreamiest chocolate frosting. But in a pinch, a stand mixer with the paddle attachment can work too!
To make the frosting in a stand mixer, follow the recipe instructions to melt and cool the unsweetened chocolate accordingly. Then, combine the confectioners’ sugar, butter, and salt in the stand mixer bowl and beat until creamy and combined, 2 to 3 minutes. Add the chocolate, milk, and vanilla and beat on medium-high until light, fluffy, and doubled in volume, at least 5 minutes.
Why do you recommend freezing the yellow cakes overnight before assembling and frosting?
Why do I recommend freezing the cakes overnight? Well, I already mentioned how doing so gives me more control of my time. Typically, you need to wait for cakes to cool completely before frosting them. Otherwise, the frosting will melt! And it can take a while to bring cakes down to room temperature. So making the cakes a day ahead means I don’t have to sit around for hours waiting. Instead, I can just frost and assemble the cakes any time I want on the next day!
Additionally, I advise you to frost the cakes when they are still chilled from the freezer. Doing so keeps the cake and its crumbs in tact while you frost the cake.
Help! My yellow cakes came out weird. They baked up pretty flat, without the traditional, slightly domed cake top. What did I do wrong?
Absolutely nothing! This yellow cake recipe is adapted from my cookbook, Weeknight Baking. In it, I specifically describe how I developed all the cake recipes in it to bake up super level, without any doming. Why? I personally hate leveling cakes—it can be a messy process, and mine usually come out uneven. So I figured it was best to come up with cake recipes that allowed me to skip the process entirely! Cool, right?
Help! I followed the recipe instructions for the chocolate frosting exactly, but my frosting came out melty and almost curdled. What did I do wrong?
Don’t panic—we can fix this! A melty frosting just means that the chocolate was still a little too hot when you combined it with the rest of the ingredients. Using cold butter and milk should help mitigate the issue (but it doesn’t always).
To fix the frosting, simply stick the frosting, still in the food processor bowl, in the fridge for 5 to 10 minutes. After that, mix it around with a rubber spatula or pulse it once or twice in the food processor. It should come together just fine!
Help! I froze the cakes like you instructed but now water is beading through the cake and frosting. What did I do wrong?
To answer this question, we need to understand where that water is coming from. That water is condensation from the frozen cake thawing as it comes to room temperature. It’s similar to how the outside of a glass full of ice water is wet on a hot day. Luckily, the cake is still perfectly safe to eat. The condensation just makes an ugly cake (lol).
And in the recipe below, I instruct you to start the cake assembling process by first removing the cakes from the freezer. Doing so allows them to thaw slightly while you make the frosting, helping prevent this condensation issue. If you skipped this step, you’re more likely to have this issue.
If you DID thaw the cakes slightly first, let me ask you this: is it a really hot day? Because this is an issue that is more likely to happen in the summer! If you plan on making this cake on a really hot day again, simply let the cakes thaw for longer before frosting. I recommend setting them out 15 to 20 minutes before frosting.
Can you freeze yellow cake with chocolate frosting?
Yes! You can freeze the yellow cake in the following ways:
Freeze the baked, unfrosted cake layers.
Follow the recipe instructions for making and baking the yellow cake layers. Once the layers have cooled, tightly wrap each cake layer in its own individual sheet of plastic wrap. Freeze for up to 3 months. To use in the recipe, there’s no need to thaw the cakes! Simply set the cake layers out on the counter as you make the frosting to let them thaw slightly. Use in the recipe as directed.
Freeze the entire assembled yellow cake with chocolate frosting.
You can freeze the entire assembled cake, too! However, doing so works best if you use a cake board. Follow the recipe instructions for making all the different components of yellow cake and assembling them together on a cake board. Refrigerate the entire assembled cake, uncovered, for a minimum of 4 hours. Doing so sets the frosting and preps it for freezing. After 4 hours, test the cake by gently poking the frosting with your finger. Poke it gently! You don’t want to leave an indent, you just want to swipe it gently to see if any frosting comes off. If no frosting comes off onto your finger, the cake is ready.
Carefully cover the whole thing—cake board and all—in two layers of plastic wrap. Freeze for up to 3 months. To serve, transfer to the refrigerator overnight to thaw, then let stand at room temperature for 1 to 2 hours before serving.
Freeze any leftover slices of yellow cake with chocolate frosting.
Tightly wrap any leftover slices of cake in plastic wrap and freeze for up to 3 months. Follow the instructions above to thaw and enjoy!
Best Recipe Tips
Tip To Make The Recipe Fit Within Your Schedule
- When making any kind of layer cake recipe, I always make the cake layers a day ahead of assembling the entire cake. Doing so ensures that I’m not stuck in the kitchen all day waiting for the layers to cool in order to frost and assemble the entire thing!
If you want to take this route, I suggest making the cake layers a day ahead of making the frosting and assembling the cake. Let the cakes cool to room temperature, then wrap them in two tight layers of plastic wrap. Freeze overnight. Freezing the cakes will keep them fresh, and make the cakes easier to work with when assembling the cake the next day. And when ready to assemble the next day, thaw the cakes slightly by placing them on the counter at room temperature while you make the frosting.
PS—if you like this kind of make-ahead, splitting-the-work-up-so-you’re-not-stuck-in-the-kitchen-all-day, DEFINITELY check out my cookbook. Recipes for intermediate bakes like layer cakes, pies, and more are written this way to help you bake around your schedule!
Ingredient Tips
- The yellow cake recipe instructs you to use 1 ½ Tablespoons of pure vanilla extract. Unfortunately, most teaspoon measuring sets don’t come with a 1 ½-Tablespoon measure (although you can buy one individually online). If your measuring set doesn’t have a 1 ½-Tablespoon measure, use its equivalent in teaspoons! 1 ½ Tablespoons of pure vanilla extract equals 4 ½ teaspoons of pure vanilla extract.
- For this recipe, it’s especially important to pay attention to the temperatures of the ingredients, especially when it comes to the chocolate frosting. The frosting comes together best when both the butter and milk are still cold from the fridge. Why? You’re combining these ingredients with warm, melted chocolate. If they are already at room temperature, the frosting has a tendency to get too runny and melty. If you find yourself with this issue, check out the FAQ and Troubleshooting section on how to fix it!
Technique Tips
- For even cake layers, I like to actually weigh out the layers with a digital kitchen scale to make sure they’re even. The easiest way to do this is to set a prepared cake pan on a digital scale and tare it to “0”. Pour batter into the pan until the scale registers the weight listed in the recipe (because yes, I’ve included the approximate weight of the batter needed for each pan!). Repeat with the second and third cake pans.
- For best results, use the chocolate frosting immediately after making it. The frosting will start out with an incredibly silky, creamy, and easy-to-smooth texture. However, as it cools, it will eventually harden into a fudge-like texture. It’s best to work with it when it’s still soft and creamy!
Get the Recipe: My Best Yellow Cake With Chocolate Frosting Recipe
Ingredients
For The Yellow Cake
- 3 cups (12 ounces or 340 grams) cake flour
- 1 ½ teaspoons baking powder
- 1 ½ teaspoons kosher salt
- 1 cup (2 sticks or 8 ounces or 227 grams) unsalted butter, at room temperature
- 2 ½ cups (17.5 ounces or 496 grams) granulated sugar
- ½ cup tightly packed (3.75 ounces or 106 grams) light OR dark brown sugar
- 6 large eggs, at room temperature
- 1 cup (8 ounces or 227 grams) canola oil
- 1 cup (8 ounces or 227 grams) buttermilk, at room temperature
- 1 ½ Tablespoons pure vanilla extract
For The Chocolate Fudge Frosting
- 6 ounces (170 grams) unsweetened chocolate, from a high-quality chocolate bar, hand broken into pieces
- 4 ½ cups (18 ounces or 510 grams) confectioners' sugar, sifted
- 1 ½ cups (3 sticks or 12 ounces or 340 grams) cold unsalted butter
- 6 Tablespoons (3 ounces or 85 grams) cold whole milk
- 1 Tablespoon pure vanilla extract
- ¼ teaspoon kosher salt
Equipment
- A food processor
- a 8-inch or 9-inch round cake board
- a rotating cake stand
- an offset spatula
Instructions
For The Yellow Cake With Chocolate Frosting
- First, make the cake. Position a rack in the center of the oven and preheat the oven to 350°F. Generously spray three 8-inch cake pans with cooking spray and line the bottom of each with a parchment paper circle. Spray the parchment, too.
- Mix the dry ingredients. In a medium bowl, whisk together the flour, baking powder, and salt.
- Cream the butter and sugars. In the bowl of a stand mixer fitted with the paddle attachment, combine the butter and sugars. Beat on medium until light, fluffy, and doubled in volume, 3 to 4 minutes, using a rubber spatula to scrape down the bottom and sides of the bowl as necessary.
- Add the eggs, then the buttermilk and vanilla. Reduce the mixer to low and add the eggs one at a time, adding the next egg only after the previous one has been fully incorporated, scraping down the bottom and sides of the bowl after each addition. With the mixer on low, slowly pour in the oil, followed by the buttermilk and vanilla, and beat until the mixture is smooth, 3 to 4 minutes.
- Add the dry ingredients. Gradually add the dry ingredients and beat until just combined. Scrape down the bottom and sides of the bowl once more, and beat on low for an additional 30 seconds.
- Assemble the cake layers for baking. Divide the batter evenly between the pans; if using a digital scale to measure out layers, note that this recipe makes around 66.5 ounces (1885 grams) of batter—pour 22.15 ounces (628 grams) of batter into each cake pan. Use an offset spatula to spread the cake batter evenly inside the pans and smooth their tops.
- Bake and cool the cake layers. Bake for 40 to 45 minutes. When done, the top of the cake should bounce back when gently pressed and a skewer inserted into the center of the cake should come out with a few crumbs attached. Cool completely in the pans on a wire rack before frosting.
- Prep and melt the chocolate for the frosting. In a food processor, pulse the chocolate for a few seconds at a time until chopped into 1- to 2-inch pieces. Transfer the chocolate to the top of a double boiler or to a heatproof bowl set over a medium, heavy-bottomed saucepan filled with a few inches of simmering water (be sure the bottom of the bowl does not touch the water). Cook over medium heat, using a heatproof rubber spatula to stir the mixture and scrape the sides of the bowl occasionally, until the chocolate has melted, about 10 minutes. Set the top of the double boiler or the bowl on a wire rack and let the chocolate cool while you prep the other ingredients.
- Make the chocolate frosting. In the food processor, combine the confectioners’ sugar, butter, milk, vanilla, and salt. Pour in the melted chocolate and pulse briefly to combine, then process until the frosting is creamy, smooth, and light brown in color, about 5 minutes. Scrape down the bottom and sides of the bowl with a rubber spatula, then process for an additional 30 seconds.
- Assemble the cake. If necessary, level the top of the cakes. Place one of the cake layers on a cake board or serving platter in the center of a rotating cake stand. Use a rubber spatula or cookie dough scoop to drop ½ cup of frosting in the middle of this cake layer. Use an offset spatula to spread it evenly all over the top, just like you would spread butter on toast. Place the second cake on top of this frosting, stacking it evenly on top of the first cake. Use the rubber spatula or cookie dough scoop to drop another ½ cup of frosting in the middle of this cake layer. Spread it evenly all over the top. Finally, place the third cake on top of this frosting, stacking it evenly on top of the first two cakes.
- Next, crumb coat the cake. Use the offset spatula to cover the surface of the entire layer cake with a thin layer of frosting. Use just enough frosting to cover the entire cake completely. Refrigerate, uncovered, for 10 to 15 minutes to stiffen and "set" the frosting.
- After the crumb coat sets, finish frosting the cake. Use the offset spatula to cover the cake with the remaining frosting. Then, use the spatula to make large, random sweeping motions across the frosting on the top and sides of the cake. The sweeping motions will create swirls.
- Serve and store. Serve immediately. The assembled yellow cake with chocolate frosting can be stored at room temperature, under a cake dome or a large bowl turned upside down, for up to 1 day. Press a sheet of plastic wrap against any cut surfaces to prevent the cake from drying out. After that, cover the entire cake loosely with plastic wrap and refrigerate for up to 2 days.
Did you make this recipe?
Please leave a comment and rating for the recipe using the form below!
Your ratings make it easier to find the recipe online, and I’m always looking for ways to improve Hummingbird High.
get new recipes via email:

buy the book
Weeknight Baking:
Recipes to Fit your Schedule
Over the past several years of running Hummingbird High, I kept a crucial aspect of my life hidden from my readers: I had a full-time, extremely demanding job in the tech world. In my debut cookbook, Weeknight Baking, I finally reveal the secrets to baking delicious desserts on a tight schedule.
I made this yesterday to turn into cupcakes for a get-together today. They came out a lovely little golden color, and I baked each dozen (and there were were about 4 of those) for around 17 minutes; YMMV.
The taste was subtly buttery, which was complemented nicely by the dark chocolate I used in the frosting. I used the food processor as directed and it was kind of amazing to watch everything come together and blend well; kitchen science rocks.
Recommended for sure as cupcakes to feed a large crowd. Seriously considering going back and making the layer cake next.
Can I make this cake in a sheet pan? If so, what size can I use? I have an 11x17x2 inch pan, and wondering if I have to change the amount of the ingredients? I plan to make for a large crowd.
Thank you!
Hi,
I’m not sure! I’ve only made it as a layer cake or in a 9 x 13 inch pan. But my friend Erin has this awesome calculator that lets you convert recipe pan sizes—all you need to do is plug in the measurements and the pan you want to use: https://cloudykitchen.com/calculators-and-converters/
Made this for a family member’s birthday. It was a MASSIVE hit. I filled the center with a brown sugar cream cheese frosting. Will definitely be using this recipe again!
I just wanted to know if you meant to add the one cup of oil in addition to the already added cup of butter of your recipe. I would thing that the cake would be kind of heavy. No? Yes?
The 1 cup oil is a substitute for what should be 2 cups of butter! It actually keeps it lighter and moister than using all butter.
Just made this as a birthday cake for my hubs. Was a detailed recipe and while I have no issues with the following instructions because am an avid baker always looking for recipes to make from scratch versus boxed-I am disappointed with how this initially came out. Hope that the cooling and melding of flavors will magically create something close to any of the reviews that I read that led me to choose to invest in this one……stay tuned for the frosting and actual layered cake tasting tomorrow on birthday day……
I love your recipes and I’ve had wonderful success with more than a few of them. Unfortunately, this one ain’t one of them. This has the weirdest texture of any cake I’ve ever made, it is somehow both dense and airy and oily, the mouth-feel is just OFF. The flavour is actually fine but the texture is very off putting. I can’t fault my oven or my technique in this instance as I measured every ingredient as opposed to relying on cups, so unfortunately in this instance I won’t be remaking this cake. I do appreciate the fact that this recipe was so detailed and practically every question that came up in the process was already answered.