
Chocolate Birthday Cake for TEN Years of Hummingbird High
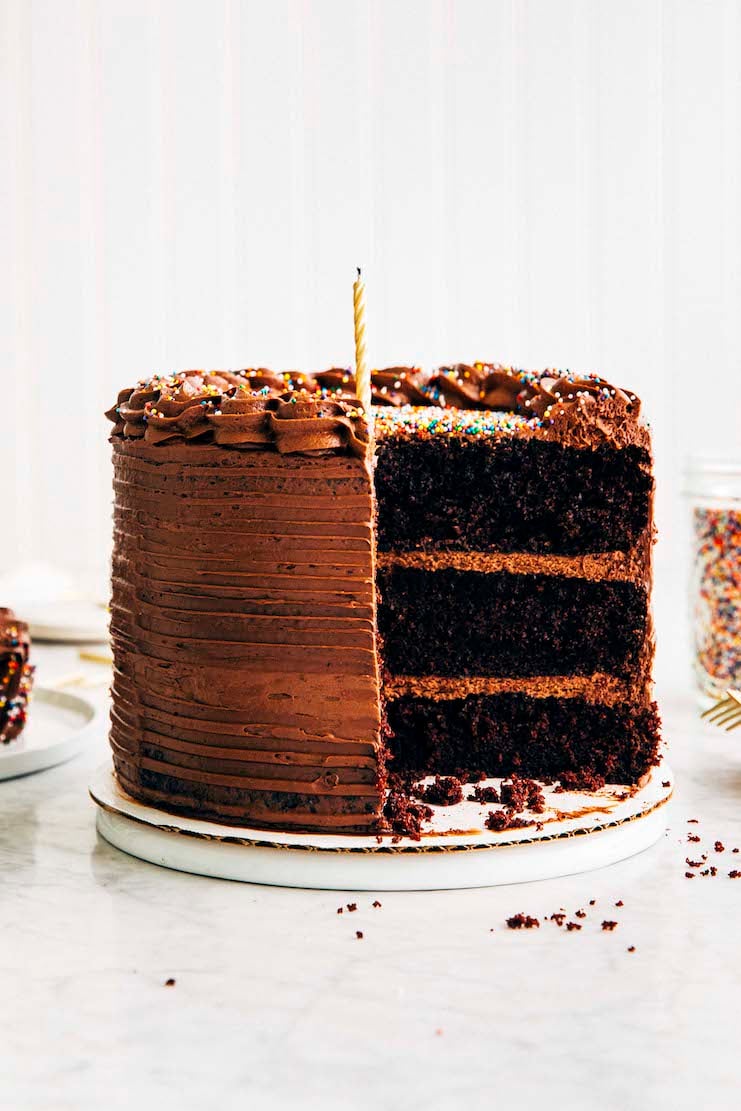
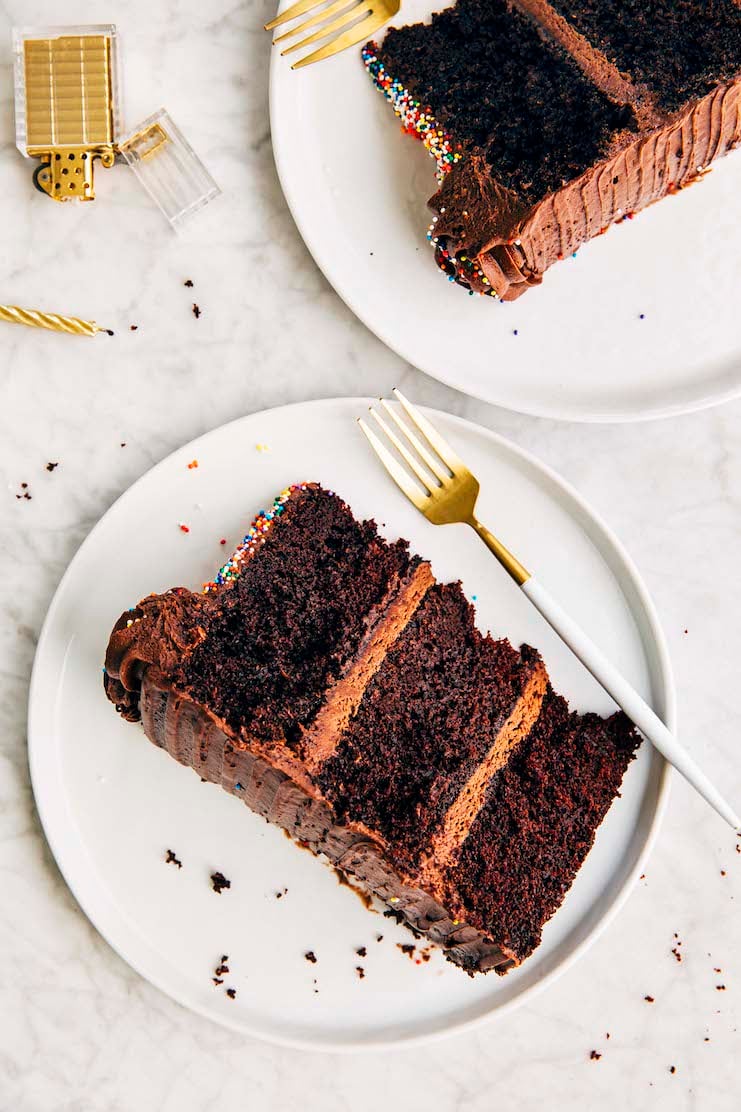
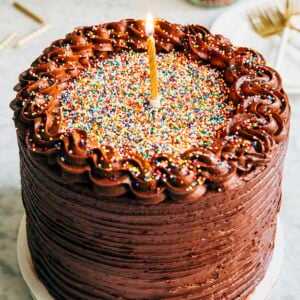
This chocolate birthday cake recipe is made with three layers of the moistest, lightest chocolate cake you will ever taste. The best part? The recipe is almost one bowl, and only requires two bowls and a whisk to bring the batter together. The cake is then covered with a creamy, luscious, and fudgy chocolate cream cheese frosting that will be a hit at any birthday!
For more epic layer cakes, check out Hummingbird High‘s Cake Recipe collection! Popular recipes include this Milk Bar Banana Layer Cake and this Hershey’s Perfectly Chocolate Cake.
A Chocolate Birthday Cake For A Special Occasion
I made the chocolate birthday cake recipe in honor of Hummingbird High‘s TENTH birthday. Ten years ago on this very day, I opened up Blogger (yes, Blogger—not even WordPress!) to start this baking blog. I had no idea that it would eventually lead to a full-time career with my recipes and baking advice being featured in places like The New York Times and Bon Appetit, as well as my very own cookbook!
I know everybody’s here for the recipe, but today’s a special occasion! So please allow me to look back on ten years of Hummingbird High. But if you’re here just to bake use this link to jump directly to the recipe!
Ten Years of Hummingbird High
2011
In November, 2011 I start Hummingbird High on a whim. I had just moved to Denver, Colorado a few months earlier for a job in finance/management consulting. I was absolutely miserable. At the time, I told folks that I started Hummingbird High to learn more about high altitude baking by baking my way through my favorite cookbook at the time, The Hummingbird Bakery Cookbook. But really, it was a way to escape the drudgery of my job.
2012
In early 2012, I hit a first milestone for Hummingbird High. One of my first original recipes gets accepted for publication on foodgawker.com! Some context: this was pre-Pinterest days. Back then, foodgawker.com was how food bloggers got seen and discovered. To wit, my recipe’s publication on foodgawker.com led to republication on The Huffington Post. And as a result, this was the first time folks beyond my immediate friends and family started reading Hummingbird High!
After that, I get officially hooked on blogging. I splurge on my very first KitchenAid stand mixer. I start baking more recipes beyond the ones in The Hummingbird Bakery Cookbook. All this creative energy inspires me to take a risk in my professional life. I leave my finance job to accept an internship in marketing for a tech startup in Portland, Oregon.
2013
This is the first year that Saveur Magazine selects Hummingbird High as a finalist for their “Best Food Blog Awards” in the “Best Baking and Desserts Blog” category. I think the awards are defunct now, but at the time, they were a HUGE deal.
I was over the moon! Despite still working my day job (after a summer internship, I was officially hired on to be a part of the startup’s marketing team), the nomination motivates me to blog harder. I begin to get serious about Hummingbird High. I buy my first Big Girl DSLR (I believe it was a Canon Rebel? Or maybe this was when I upgraded from a Rebel to a Canon 5D Mark II?). I take photo editing classes at a local media center.
On the more personal side of things, I buy my first house in Portland!
2014
Looking back, I think this is the year that food blogging became less anonymous. That is, it became more of a “real” community. Many of us food bloggers started talking to each other—either through social media (because Instagram was really starting to blow up around this time), comments on each other’s blogs, emails, and eventually text messages—and became “IRL” friends. In fact, I’m still friends with many of these folks today!
So if I had to pick a favorite year of blogging, 2014 would probably be it. My food blogger friends and I still treated our blogs like journals. Our posts were super personal and filled with colorful, intimate details of our lives. Our recipes weren’t beholden to the demands of SEO and sponsors. People (even the ones we didn’t know personally, and had just stumbled on our blogs accidentally) enjoyed reading these stories.
This really felt like the year in which we were living in a wonderful, creative community based on food and friendship. Because even beyond other food bloggers, many of you were baking from the blog. And even more of you were following along with the personal stories, cheering me on when I hit accomplishments and commiserating and relating with the struggles of being a young-20-something.
This was also the first year in which my work was published in another website. Food52 reached out and commissioned me to develop a recipe for them—one for homemade sprinkles! David Leibovitz then shared the recipe on his Facebook page, and I just about died of happiness.
2015
2015 was a BIG deal for Hummingbird High. Once again, Saveur Magazine selects Hummingbird High as a finalist for their “Best Food Blog Awards” in the “Best Baking and Desserts Blog” category. Since I was unable to make the awards ceremony the first time around, I make it my utmost priority to attend this one. It was a BLAST (especially since many of my friends were also nominated for awards)!
This was also the year in which Instagram highlights my account, @hummingbirdhigh, as one to follow. In the course of a few days, my account skyrockets from around 20,000 followers to over 100,000! A talent agent from Digital Brand Architects (one of the most prestigious agencies representing influencers) to ask if I wanted them to represent my work. My response? Hell yeah!
But things are rocky on the personal front. I’m still at the tech startup, but unhappy in my day-to-day. Although I think I’m doing a good job balancing my job with Hummingbird High, I can tell that management is suspicious and questioning my commitment. I switch teams within the company to a more technical role. Although my new manager is more understanding and flexible about Hummingbird High, a recruiter comes knocking on my door.
The recruiter wants me to come work for a bigger, more established, and well known tech company for double my salary at the startup. The only catch? The job is in San Francisco. At the same time, my longtime partner Erlend had just been accepted to grad school in New York City. We decide to do long distance—I accept the job in San Francisco on the condition I get transferred to the company’s New York office within a year.
2016
Things work out—I move to New York City! I am still balancing Hummingbird High with my day job at the tech company. But it’s working out better than it did at the old startup in Portland.
That is, until I meet one of my food blogger friends for lunch. She’s in town from Los Angeles to sell her cookbook proposal to major book publishers in the city. Although I’d never seriously considered writing a cookbook, our conversation inspires me. I begin interviewing with different literary agents and working on a cookbook proposal.
This is also the first year in which I get to travel extensively for Hummingbird High. I attend the Copenhagen Cooking and Food Festival with two other food blogger friends, quickly followed by a brief trip to Hershey, Pennsylvania to tour the Hershey chocolate factory. Less than two weeks later, I fly out to Washington State to tour an apple farm and learn more about the industry. I then travel back to Portland to attend Feast Portland.
It’s the first year I really feel the pressure and time crunch of doing both my day job and blogging at Hummingbird High.
2017
My cookbook went to auction in the summer of 2017. At this point, I realize I can’t continue to do my day job in tech AND blog AND write a cookbook. I make the commitment to blog full-time at Hummingbird High and begin working on my cookbook, Weeknight Baking.
As part of my decision to work on Hummingbird High, Erlend and I decide to move back to my old house in Portland. We weren’t sure if we would be able to afford our cost-of-living in New York without my fancy tech job. And our move worked out just in time for Erlend’s graduation, too!
2018
Looking back, I now realize that this year was a blur. I’d vastly underestimated the amount of work that it takes to write a cookbook. I spend the majority of the year focusing on my book and not much else. As a result, I neglect a lot of things: my health (I gained something like 20lbs during the cookbook writing process!), some friendships, a part-time job as a food photographer I’d foolishly accepted before I realized that the cookbook was going to take everything over. For the first time, I even neglect Hummingbird High.
Despite it all, I find solace and happiness in the recipe development process for Weeknight Baking. This year taught me SO much. I would make so many different recipes of the same baked good to compare them all and learn what I like best about each. In doing so, I learned so many new tips, techniques, and tricks along the way. I would make the same recipe over and over again, just to make sure that it worked before I immortalized it in my cookbook.
And finally, throughout it all, I come to realize that one of the things I really, truly love about food blogging is simply that: the food and the baking. I credit this year and my writing my book for teaching me how to become the baker I am today.
2019
This is the year that my cookbook, Weeknight Baking, got officially published! It was released on October 29, 2019. I wish I could say that the process was worth it, but honestly, I’m not sure I would do it over again. Instead, I decide to focus 100% of my time and energy on Hummingbird High.
And the next thing I write probably shows how clueless I was then, but here goes: this is the first time I realize blogging has changed a lot. Like, a lot LOT. I realize that most of my food blogger friends from 2013 to 2015 had either slowed down OR ramped up considerably. There was no in-between. I no longer recognized many of their blogs. Gone were the personal stories and photos. Instead, posts were focused exclusively on the recipes, providing tons of technical information and not much else.
As for the folks who weren’t blogging in this way, they had mostly stopped. Instead, they were now mostly on platforms like Instagram and even TikTok, sharing the colorful details of their lives in photos, videos, and Stories on those apps.
If not that, they were longer blogging.
And it was also around this time that I had a serious, candid conversation with one of my food blogger friends. She explained to me that, over the last few years, she and others had faced mounting criticism that their blog posts were too long, too intimate, too personal, etc. I just hadn’t noticed because I was too busy working on my book!
Something clicked. I ran my first (and so far, only, because quite frankly this experience shook me, lol) reader survey on Hummingbird High. I asked you guys what you wanted to see and read on Hummingbird High. Your responses were incredibly insightful, useful, but also damning. My friend was right. Many of you responded that the recipes I’d published on Hummingbird High were too complicated and time-consuming, with ingredients that were too obscure and hard to find. Others commented that my writing was too long and unwieldy. The majority of folks also didn’t want to read through a post that had nothing to do with what they wanted to bake.
Like I said, I was SHOOK. I realized that if I wanted to keep blogging for Hummingbird High full time, I needed to take this criticism and feedback seriously.
2020
I started the year, guns blazing, with a content calendar for Hummingbird High full of simple baking recipes that I hope you guys will find more accessible and enticing to bake. All is well—until the pandemic hits.
From a business point of view, COVID was an odd time for Hummingbird High. With everybody stuck at home, folks were cooking and baking from scratch more than ever. As a result, especially in the months of March and April, traffic numbers for Hummingbird High were WILD. So many people were making my recipes! In 2020, my site almost crashed twice from all the traffic. The first time it happened, many of you guys were going crazy for this dalgona coffee recipe (a.k.a. the quarantine drink of 2020). The second time was the day before Thanksgiving (which makes sense, since many of you were prepping Thanksgiving desserts on that day). Furthermore, my focus on simple, accessible recipes like Small Batch Brownies and Banana Bread With Sour Cream were a resounding success.
You’d think that all that traffic would amount to crazy earnings from ads on Hummingbird High. Unfortunately, this was not the case—as a response to COVID, many companies had halted their ad spend. What did that mean? In previous years, a visitor clicking on an ad in my blog would earn me something like $1 to $5 per click. But in 2020, a visitor clicking on that very same ad would only earn me .01 to .05 cents. Yes, you read that right! So I was in an odd position: although SO many people were making my recipes, I was getting paid literal pennies for it.
Panicked about the ability to pay my mortgage, I decided to start a Patreon (which I still run today). Many of you were SO supportive, understanding, and signed up for memberships. I cannot tell you how grateful I am for this support!
2021
I’m still here, recovering from the rollercoaster that was the last year and a half. But similar to 2019, I’m looking around and wondering if I’m behind again. At this point, it’s no secret that blogs are no longer the thriving communities they once were. First, Instagram had taken over their relevance; now, TikTok.
I love TikTok, but speaking frankly, my recipes and the kind of content I like to make (pretty static photos, long-form and detailed writing) don’t suit the platform at all. In many ways, TikTok feels like it was created in direct opposition to the kind of content I make. On TikTok, you need to be “real” (that is, nothing too pretty or staged), funny, and brief.
And as you can tell from this post, I am none of those things.
Many of my peers are once again pivoting to keep up with the times, but I’m more reluctant to do so. Back in 2019, it made sense for me to do so—many of you had started following along on my journey because of the recipes, and I wasn’t doing a good enough job with that.
But this time feels different. Correct me if I’m wrong, but it seems that many of you don’t really care about watching my social media videos. And that’s totally okay! They’re not my favorite, either—I myself get more inspiration from seeing a beautiful photo of a recipe than watching somebody make it in a video. So this time, it feels more like I’m appeasing social media platforms and algorithms that don’t care a lick about me.
And I talked about this in last year’s anniversary post, but it doesn’t feel sustainable to keep changing things up to “stay relevant”. Because in doing so, I feel like I start to lose why folks are even here in the first place: the recipes, and our shared love of baking.
The way I see it, I stand at a fork in the road. I can bow down to the pressure of the changing times and grind the kind of content I need to make in order to “stay relevant”, keep growing my audience (if I can, and that’s a big “IF”), and as a result, sustain a livable income. But in doing so, I feel like I will lose the joy I get from Hummingbird High. It will feel more like a regular job in which I’m struggling to get through something I don’t enjoy.
Alternatively, I continue doing what I do now, creating the kind of long form content I enjoy making, but with the full knowledge that it likely won’t be financially sustainable. That Hummingbird High will continue on, but likely in a reduced capacity as I go back to the corporate world and restart a more traditional career.
Maybe I’m being dramatic. Maybe there’s a middle ground. I’m experimenting with a TikTok account that DOES showcase the kind of video content I like to make and enjoy myself—a cookbook review TikTok! You can check it out here (and please, give me a follow). And maybe I could spend more time and energy on Patreon. My work there has always been about the recipes and having direct conversations with you guys about them.
In the end, this is what I’m hoping—that I’ll find a middle ground between the two paths. But I’ll be honest. The middle ground seems murky. Because last year, I talked about trying to figure it out, too. It’s literally one year later, and I am no closer to any clarity.
Except one: whatever happens, I can’t deny that it’s been an impressive ten years of Hummingbird High. Thank you for following along on my journey, especially if you’ve been here since the beginning and watched me evolve and grow over the years.
Now let’s eat some cake.
Ingredients and Substitutions
Now that I’ve convinced you to make this chocolate birthday cake recipe, here’s everything you need to make the recipe:
- Cake Flour: You can make cake flour at home with all-purpose flour and cornstarch—check out my recipe for Homemade Cake Flour!
- Cocoa Powder: Either natural unsweetened or Dutch-processed cocoa powder works in this recipe. Natural unsweetened cocoa powder gives the cake a reddish color and subtly bitter flavor. Dutch-processed cocoa powder gives the cake a midnight black color (similar to Oreos) and smoother chocolate flavor.
- Kosher Salt: Kosher salt is the best salt for baking recipes—learn more in my post all about it! But if you don’t have any, you can table salt. Just use half the amount listed in the recipe.
- Buttermilk: Need a quick substitute? Check out my post on how to make buttermilk with the ingredients you already have in your fridge and pantry!
- Canola Oil: You can use any neutral flavored oil (like corn, grapeseed, vegetable) instead. In a pinch, flavored oils like coconut or olive oil work too. You’ll just taste those flavors in the cake too, so plan accordingly!
- Vanilla Extract: I love using my recipe for Homemade Vanilla Extract!
- Whole Milk: You can substitute the whole milk for low or nonfat milks; just note that doing so makes the frosting less flavorful. You can also use a plant-based alternative. But similar to the oil, strongly flavored plant-based milks will infuse the frosting with their flavor.
Recipe Troubleshooting and FAQ
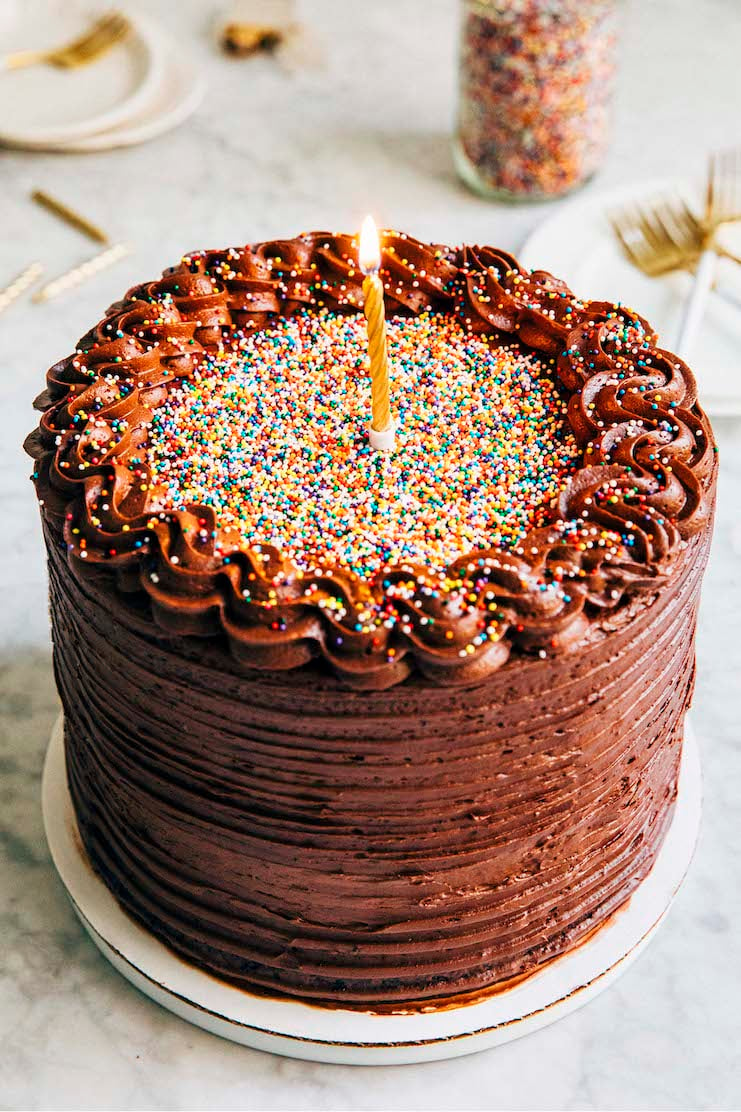
What star tip did you use for your chocolate birthday cake recipe?
I used this closed star Ateco 847 tip from this Ateco Jumbo Tip Set. But really, any star piping tip—opened or closed—will do!
Why do I need to add boiling coffee to the cake batter?
Great question! I’ve been doing a lot of research to answer this question for some time now. I believe it’s a trick gleaned from old-fashioned chocolate cake recipes.
First of all, coffee and chocolate are frequently paired together in desserts. Even if a chocolate recipe doesn’t use coffee, the recipe still frequently instructs bakers to use espresso powder. Why? Coffee/espresso enhances the chocolate flavor, making it taste more intense and rich (without making it taste like coffee).
And according to my research, the hot coffee helps get rid of any stubborn lumps in the cocoa powder. Most old-fashioned chocolate cake recipes instruct you to make the batter by hand with a whisk. And if you’re a seasoned baker, you know how hard it can be to whisk lumps out of batter!
Furthermore, the hot coffee “blooms” the cocoa powder, deepening the cocoa powder’s chocolate flavor. It’s similar to how coffee and tea become more flavorful when steeped in hot water.
And finally, all that extra water makes the cake super moist.
Help! I made the chocolate cake layers but their tops came out weird. The tops aren’t smooth; their centers are bumpy and almost bubbly-looking. What did I do wrong?
That bumpy top usually means that the cake batter was undermixed! After mixing together the batter, you will then pour a generous amount of coffee into it. If this coffee isn’t mixed into the batter properly, it will separate from the rest of the batter, bubble up and cause that texture on the cakes.
Don’t worry about it too much—the cakes will still be edible, and you can level off that part of the cakes. But if you plan on making this recipe again, be sure to follow the recipe’s instructions to mix the batter for at least 2 to 3 minutes after adding the coffee.
My Best Recipe Tips
About Ingredients
- Make sure that the coffee is very hot, as close to freshly boiled as possible, when you add it to the cake batter. This is the secret to a super moist and fluffy cake! To ensure that my coffee stays very hot, I pour it into an insulated mug right after boiling. Then, I place a ceramic plate on top of the mug to act as a makeshift lid to trap heat inside.
And Making Perfect Layers
- For even cake layers, I like to actually weigh out the layers with a digital kitchen scale to make sure they’re even. The easiest way to do this is to set a prepared cake pan on a digital scale and tare it to “0”. Pour batter into the pan until the scale registers the weight listed in the recipe (because yes, I’ve included the approximate weight of the batter needed for each pan!). Repeat with the second and third cake pans.
All About That Frosting
- At first glance, it will seem like there’s too much frosting for this recipe. Why? You need a whopping 7 cups of confectioners’ sugar to make it! But don’t worry. The recipe makes fairly tall layers, resulting in a tall cake that requires lots of frosting. You’ll end up using most of it to assemble and frost the cake. There will be a generous but reasonable amount left for piping and decorating the cake.
And if you STILL find yourself with too much, you can always freeze the leftovers for another baking project. The frosting will keep in the freezer for up to 3 months after making. - I recently discovered that you don’t really need to sift cocoa powder or confectioners’ sugar when making frosting. Because you’ll be mixing the frosting at high speed, most of the lumps in these ingredients work themselves out pretty easily! Save yourself time and energy—don’t bother sifting these ingredients.
That being said, DON’T apply this advice to other recipes beyond American buttercream . I still encourage you to sift these ingredients (ESPECIALLY if they look really lumpy) when making baked goods with delicate crumbs like angel food cake, or even the chocolate cake for this birthday cake recipe. You’ll also need to sift confectioners’ sugar when making royal icing.
More Hummingbird High Anniversary Posts
- Strawberry Yellow Sheet Cake for Nine Years of Hummingbird High
- Red Velvet Cupcakes for Eight Years of Hummingbird High
- Ube Layer Cake for Seven Years of Hummingbird High
- Hummingbird Cake for Six Years of Hummingbird High
- The Best Red Velvet Cake for Five Years of Hummingbird High
- A Naked Red Velvet Cake for Four Years of Hummingbird High
- Homemade Funfetti Cake for Three Years of Hummingbird High
- Pink Champagne Cupcakes for Two Years of Hummingbird High
- Confetti Cookies for One Year of Hummingbird High
Get the Recipe: My Best Chocolate Birthday Cake Recipe
Ingredients
For the Chocolate Cake
- 3 cups (12 ounces or 340 grams) cake flour
- 3 cups (21 ounces or 595 grams) granulated sugar
- 1 cup plus 2 Tablespoons (3.35 ounces or 95 grams) cocoa powder, sifted if lumpy
- 1 Tablespoon baking soda
- 1 ½ teaspoons baking powder
- 1 ½ teaspoons kosher salt
- 1 ½ cups (12 ounces or 340 grams) buttermilk, at room temperature
- ¾ cup (6 ounces or 170 grams) canola oil
- 3 large eggs, at room temperature
- 2 teaspoons pure vanilla extract
- 1 ½ cups (12 ounces or 340 grams) freshly made and still very hot coffee
For the Chocolate Cream Cheese Frosting
- 1 cup (2 sticks or 8 ounces or 227 grams) unsalted butter, at room temperature
- ¾ cup (6 ounces or 170 grams) cream cheese, at room temperature
- 1 Tablespoon pure vanilla extract
- 1 cup (3 ounces or 85 grams) cocoa powder
- 4 teaspoons light corn syrup
- 7 cups (28 ounces or 794 grams) confectioners' sugar
- ¼ teaspoon kosher salt
- 6 Tablespoons (3 ounces or 85 grams) whole milk, at room temperature
Assembly
- sprinkles, for garnish
Instructions
For the Chocolate Birthday Cake
- First, make the chocolate cakes. Position a rack in the center of the oven and preheat the oven to 350°F. Generously spray three 8-inch cake pans with cooking spray and line the bottom of each with a parchment paper circle. Spray the parchment, too.
- Mix the dry ingredients. In a medium bowl, whisk together the flour, sugar, cocoa powder, baking soda, baking powder, and salt.
- Whisk the wet ingredients, then mix in the dry ingredients and coffee. In a large bowl, whisk together the buttermilk, oil, eggs, and vanilla. Gradually whisk in the dry ingredients until just combined. Slowly pour in the coffee. The batter will be fairly runny; use a rubber spatula to scrape down the bottom and sides of the bowl. Use the rubber spatula to finish mixing until smooth and well combined, 2 to 3 minutes more.
- Divide the cake batter between the pans. Divide the batter evenly between the pans; if using a digital scale to measure out layers, note that this recipe makes around 72 ounces (2041 grams) of batter—pour 24 ounces (680 grams) of batter into each cake pan.
- Bake and cool the cakes. Bake for 35 to 40 minutes. When done, the top of the cake should bounce back when gently pressed and a skewer inserted into the center of the cake should come out with a few crumbs attached. Cool completely in the pans on a wire rack before frosting.
For the Chocolate Cream Cheese Frosting
- Make the frosting. In the bowl of a stand mixer fitted with the paddle attachment, combine the butter, cream cheese, and vanilla. Beat on medium-low until soft and creamy, about 1 minute. Scrape down the bottom and sides of the bowl with a rubber spatula.With the mixer on low, add the cocoa powder and corn syrup. Beat on medium until combined. Scrape down the bottom and sides of the bowl. With the mixer on low, gradually add the confectioners' sugar and salt. Beat until combined, then add the milk and beat until just incorporated.Scrape down the bottom and sides of the bowl once more, then beat on medium-high until the frosting is creamy and smooth, 2 to 3 minutes. Use immediately.
Assembly
- Prep the cake layers for assembly. If necessary, level the top of the cakes. Place one of the cake layers on a cake board or serving platter in the center of a rotating cake stand. This will be the first layer of the cake.
- Build the layers. Use a rubber spatula or cookie dough scoop to drop a slightly heaping ½ cup of the frosting in the middle of the first cake layer. Use an offset spatula to spread it evenly all over the top, just like you would spread butter on toast. Place the second cake on top of this frosting, stacking it evenly on top of the first layer. Use the rubber spatula or cookie dough scoop to drop another ½ cup of the frosting in the middle of this cake layer. Spread it evenly all over the top. Finally, place the third cake on top of this layer, stacking it evenly on top of the first two cakes.
- Next, crumb coat the cake. Use the offset spatula to cover the surface of the entire layer cake with a thin layer of frosting. Use just enough frosting to cover the entire cake completely. Refrigerate, uncovered, for 10 to 15 minutes to stiffen and "set" the frosting.
- After the crumb coat sets, finish frosting the cake. Transfer about ¼ to ⅓ cup of the remaining frosting to a piping bag fitted with a star tip. Use the offset spatula to cover the cake with the remaining frosting. Once the cake is completely covered, hold the twines of a fork against the frosting as you rotate the cake stand to smoothen it. Alternatively, you can use the offset spatula to create swirls or patterned lines in the frosting.
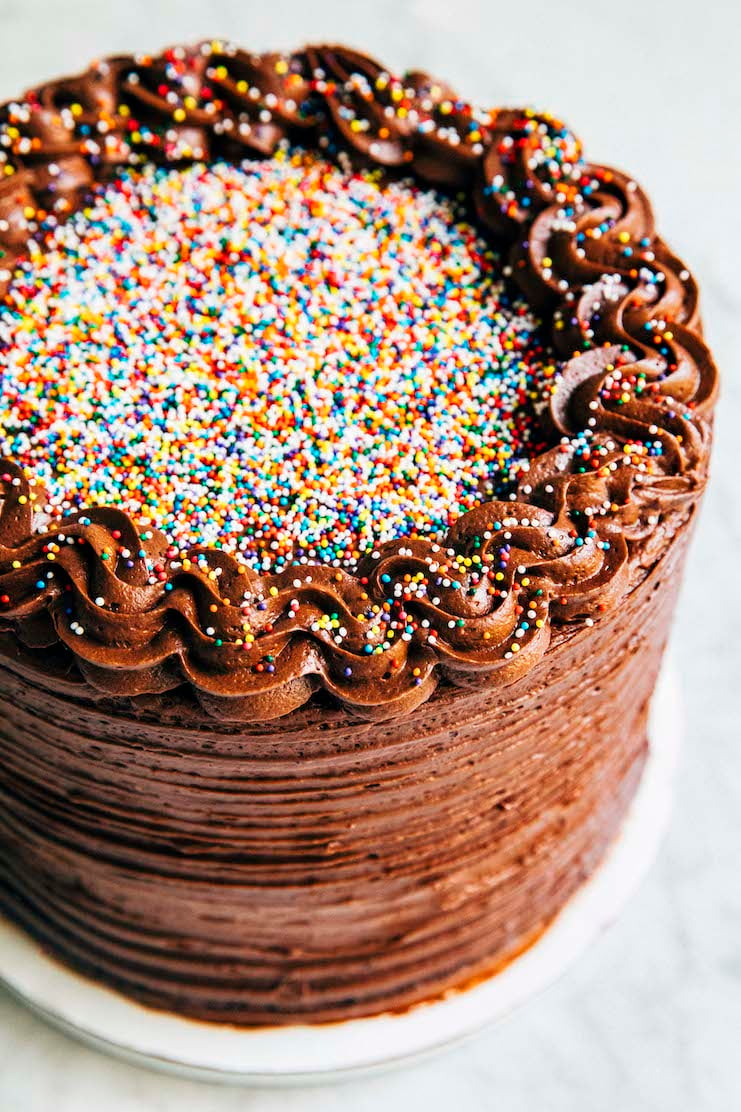
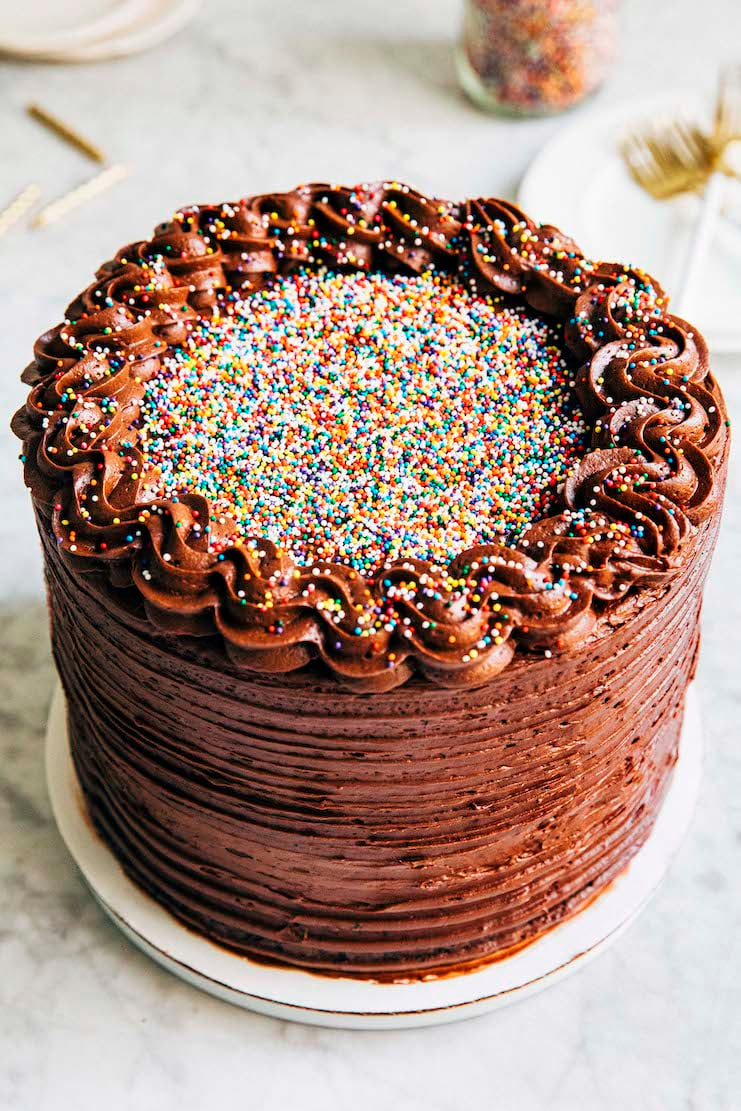
- Decorate the cake. Use the piping bag to pipe a border around the top edge of the cake—doing so results in an empty circle in the middle of the frosting. Fill the circle with sprinkles.
- Serve and store. Serve immediately. The assembled chocolate birthday cake can be stored at room temperature, under a cake dome or a large bowl turned upside down, for up to 1 day. Press a sheet of plastic wrap against any cut surfaces to prevent the cake from drying out. After that, cover the entire cake loosely with plastic wrap and refrigerate for up to 3 days.
Notes
Can you freeze the chocolate birthday cake?
Yes! You can freeze the cake in the following ways:Freeze the baked, unfrosted chocolate cake layers and the frosting.
Follow the recipe instructions for making and baking the chocolate cake layers. Once the layers have cooled, tightly wrap each cake layer in its own individual sheet of plastic wrap. Freeze for up to 3 months. To use in the recipe, there’s no need to thaw the cakes! Simply set the cake layers out on the counter 20 minutes before assembling the cake. Use in the recipe as directed. You can also freeze the chocolate cream cheese frosting. Follow the recipe instructions to make the frosting. Transfer to a ziptop bag and squeeze any extra air out of the bag. Freeze for up to 3 months. To use in this recipe, transfer to the refrigerator to thaw overnight the day before assembling the cake. Then, thaw at room temperature to soften. Beat on medium-high in a stand mixer for 2 to 3 minutes to make it creamy again. Use in the recipe as directed.Freeze any leftover slices of chocolate birthday cake.
Tightly wrap any leftover slices of cake in plastic wrap and freeze for up to 3 months. To serve, transfer to the refrigerator to thaw overnight. Rewarm for 10 to 20 second intervals in the microwave until room temperature.Did you make this recipe?
Please leave a comment and rating for the recipe using the form below!
Your ratings make it easier to find the recipe online, and I’m always looking for ways to improve Hummingbird High.
get new recipes via email:

buy the book
Weeknight Baking:
Recipes to Fit your Schedule
Over the past several years of running Hummingbird High, I kept a crucial aspect of my life hidden from my readers: I had a full-time, extremely demanding job in the tech world. In my debut cookbook, Weeknight Baking, I finally reveal the secrets to baking delicious desserts on a tight schedule.
Love this recipe. & as a reader, I miss the old food blogging days… congrats on 10 years!
I do NOT understand how tik tok recipes became a thing! I don’t want to replay a video 40 times to get the ingredients list, wth. I DO like videos for showing complex baking/cooking things. I think that’s why people like cookie and cake decorating videos. You can get the concept of the motions someone takes to achieve the desired affect without having to read text on the video.
I agree with you though, the current state of blogs is kind of sad and sucks. The ones I enjoy the most are the ones that still include personal life stories but I get the need to follow the ways that make the money. I bet it would be weird to go back to a regular corporate job after all of this, but it also would probably feel almost refreshing. Either way I hope you still keep posting some recipes even if you do have to scale back. I’ve learned about a lot of new ingredients and techniques from you over the years!!
Congratulations, Michelle!! 10 years is such a milestone, and you’ve accomplished so much in that time!! I have so many opinions about where the blogging world has come to since the olden days, but for better or worse, many of the changes that have occurred have allowed many bloggers to make money and even a career of it, and that at least is good that you’re able to be compensated for the hard work and creativity. I, as a dinosaur avid blog reader since the mid-2000s, have always loved reading all the stories (even if they have absolutely nothing to do with the recipe! Shout out to Peabody) and the commentary on the taste, so length of posts don’t bother me per se, but I was sort of frustrated (and confused) that many blogs started the listing out all the ingredients over and over in the preamble to the recipe, and then it dawned on me that this was what people were talking about – “SEO”. Anyway, I hope you will continue to be able to stay true to yourself but keep your business sustainable. I, for one, will never complain about the personal stories and recipe development behind the scenes, because they’re fun to read, but also that’s how I figure out which bloggers I can trust their baking skill and approach, and also some insight into what kind of a person they are and what values they have. Your leadership and courage in championing social justice issues this year has been super inspiring, and I’m proud to be a part of your readership and community ❤️ Here’s to many more years of Hummingbird High to come!!
I just wanted to say that I LOVED how honest and real you were in this post, and it inspired me to become a Patron 🙂 I’m on the younger side but I don’t use TikTok and I still value old-school style blog posts with longform writing and gorgeous photography!
Aw, thank you for your support! xo
It’s crazy to think I found your blog through the 2013 Saveur awards!!! I love your personal touches, though the recipes are also always fantastic. No matter where you go from here, I am immensely grateful for all of the work you’ve put into HH for this long.
I may seem to be in the minority, but I love your long blog posts and am a devoted blog reader of a number of blogs despite the increasing popularity of other social media platforms. While Instagram and TikTok can be entertaining for a few moments, they do not offer the deeper exploration of ideas, experiences, or recipes that a blog can. As a result, I find the content quite superficial and get bored easily. I certainly hope that you continue blogging, as I know I can always find some baking inspiration here, even if I don’t make your exact recipe, and I love all of your insights and tips, as well as your personal stories. I have been increasingly unhappy at my own job, and particularly enjoy the experiences you share regarding your own career choices and changes, as they help me to consider my own options as I consider the risks and benefits of quitting my university teaching job and starting my own instruction online. As a whole, I find your blog unique, insightful, and inspiring, and particularly enjoy the connection I feel as I read about your own journey (and common love of baking as a creative outlet!) as we attempt to navigate our way through the increasing isolation of the modern digital world. I know my opinion may not count for much, but I plan to remain reading blogs in spite of the shift to new social media trends, and I find it sad that so many people seem to disregard the value of the content you prefer to produce!
I baked this cake and it was AMAZING! First time I ever successfully baked a chocolate cake AND the leftovers lasted a whole week and were delicious to the end.
Thanks for the extensive Q&A section – it’s awesome to know a little more about the science behind things like cake flour and the super hot coffee.
For the curious, I decided to bake this last minute and was only able to find 6″ pans to borrow, but there were 5 of them! So still ended up with a good sized cake for three. 🙂 It used about half the batter (the extras went in muffin tins – also delish!) and most of the icing. I don’t remember the bake time, but tbh I don’t think it changed much (I checked at 15m and added 5m a few times).
This cake was amazing! My 9 year old wanted to make her dad a chocolate cake for his birthday. This recipe was easy for her to follow (with some adult help) and so amazingly delicious! The whole family loved the cake. We highly recommend this recipe.
Can I make the cream cheese frosting ahead of time and just rewhip it on the day of frosting?
Thank you.
Yes, that should work!
Can you recommend changes to the frosting recipe or a different frosting recipe if I need a white colored frosting?
Yes! This is a quick and easy white colored frosting that would go well with the cake: https://www.hummingbirdhigh.com/2020/06/rainbow-unicorn-cake.html#wprm-recipe-container-13327
I made this cake for my boss’s birthday. I knew from the title that this recipe was no hyperbole, but 100% truth! Michelle’s recipes are tried and true and this is no different, so I felt confident that this recipe would turn out as amazing as I expected. The cake ingredients are simple and it yields such a moist cake. The crumb is fine and delicate so I chose to freeze the cake layers to help make frosting the cake easier, which I highly recommend. The addition of the corn syrup to the frosting makes the consistency smooth and easy to apply on the cake. The frozen cake was thawed out for about 20 mins and the cool cake helped make applying the frosting easier.
I’m personally not a chocolate-on-chocolate fan but this cake and frosting combo will be my go-to for any occasion where chocolate cake is requested. Truly THE BEST DAMN CHOCOLATE CAKE & CHOCOLATE CREAM CHEESE FROSTING EVER. I was afraid the 7 cups of powdered sugar would make the frosting cloyingly sweet but it complements the cake so well. The cream cheese adds a creaminess and balances the sweetness.
Bookmark this recipe and go make it. You do not need a special occasion to make it. It’s truly spectacular!
I would like to make 6 inch cake layers and also would like to do cupcakes with this recipe. How do I adjust the cook time or should I just continually monitor to see how they are cooking?
If making 3 6-inch layers, you can find the Bake Time instructions here: https://www.hummingbirdhigh.com/2021/03/6-inch-german-chocolate-cake-recipe.html
For the cupcake version, you can find the Bake Time instructions in my cookbook!
This is a great cake… is it possible to make it as a sheet cake for a crowd
Yes! This recipe is very similar and makes a sheet cake of the same cake recipe: https://www.hummingbirdhigh.com/2019/08/potluck-chocolate-sheet-cake.html
Is it possible to make this as a 10 inch 3 layer cake if the ingredients are scaled up? Would the bake time be affected?
This cake is fabulous! I am not a big coffee fan so I have been reluctant to try a chocolate cake recipe with it. I am so glad I stopped being a baby and made this cake. Does not have a strong coffee flavor at all. Was one of the best cakes I’ve ever made (my husband said it was the actual best one). And the frosting was off the charts. Thank you!
Absolutely amazing!!!!!!!
Can you substitute 2% milk for whole milk?
Yes!