

About This Salted Honey Parker House Rolls Recipe
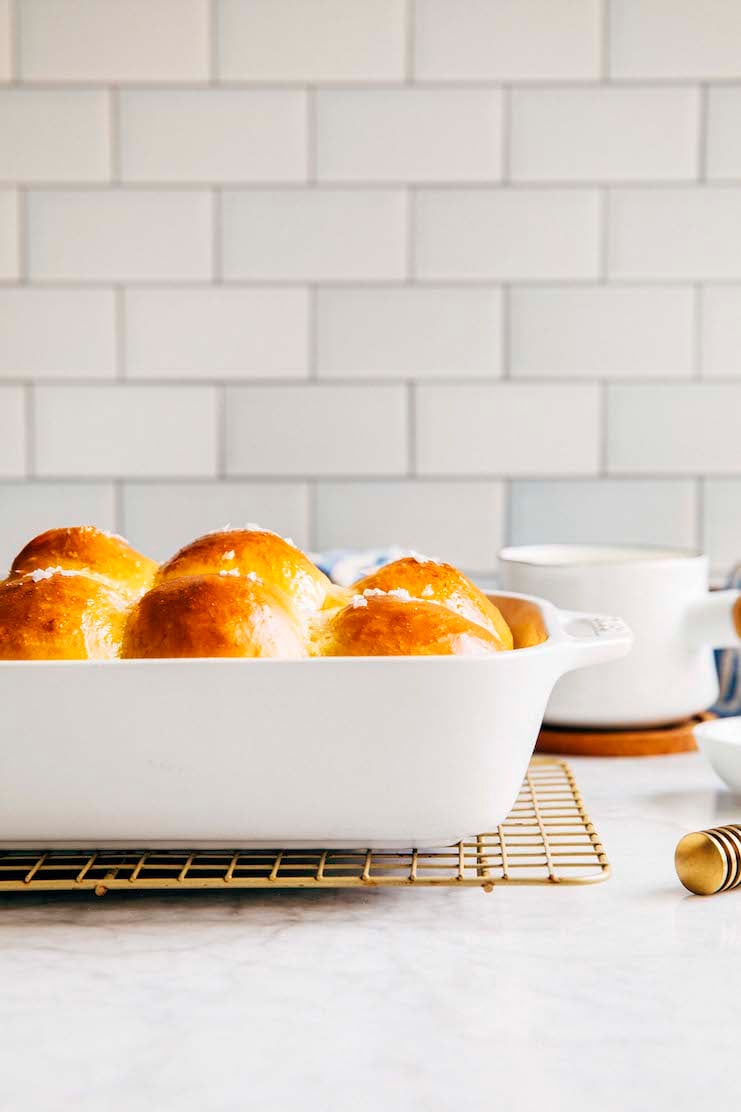
This salted honey Parker House rolls recipe is a modern update on a classic recipe! The Parker House rolls are light, fluffy, and drenched in a generous amount of salted honey butter. The honey, sea salt, and salted butter together makes an utterly addicting salty-sweet flavor combo that works well as a side dish to almost every main!
For more easy bread roll recipes on Hummingbird High, check out these Soft and Fluffy Milk Bread Rolls!
Why You Should Make The Recipe
These salted honey Parker House rolls are a modern update on a classic recipe.
Earlier, I wrote that the original Parker House rolls have a distinct “pocket book” shape similar to that of a Chinese bao bun. However, my salted honey Parker House rolls do NOT have this folded shape.
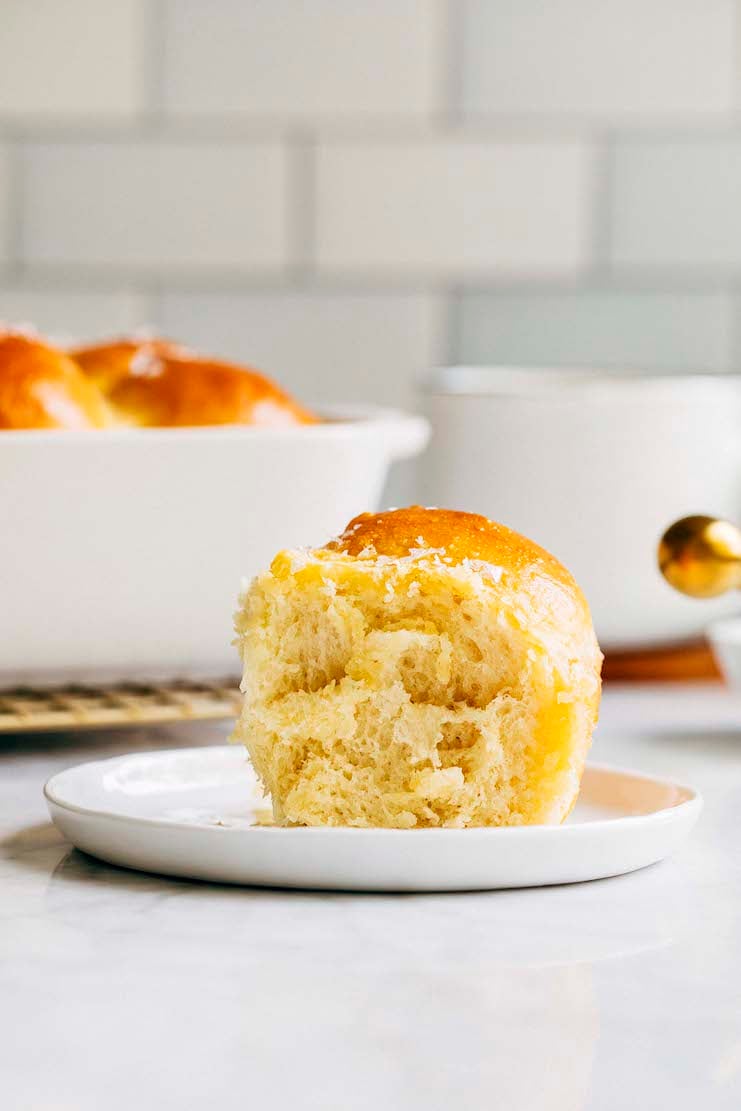
Instead of folding the dough, I roll the dough into small balls to make more traditional dinner buns. I find that doing so allowed the Parker House rolls to soak up the salted honey butter topping more easily!
The rolls recipe is designed to be made ahead.
I love making bread and yeasted baked goods like babka, cinnamon rolls, and more. That being said, I DON’T love how long the recipes take to make. Almost all bread recipes instruct you to proof the dough for at least 1 hour to let the bread rise. Others require at least two 1-hour sessions! As a result, a yeasted dough recipe will easily keep you in the kitchen for at least 2 hours.
But what if I told you there was a better way? When writing my cookbook, Weeknight Baking, I discovered that you could break the work up overnight. That is, you would make the dough the night before planning on baking the bread and stick it in the fridge to rise slowly in its cooler temperature. The next morning, the dough would be proofed and ready for the next stage of rising and baking. Dividing up the work this way meant you wouldn’t be stuck in your kitchen waiting for the dough—you could get other things done (like get a good night’s sleep, lol).
But what does that mean for these salted honey Parker House rolls? Well, I usually like to serve them as a side with Thanksgiving dinner. I make the dough the night before, and proof the dough in the refrigerator overnight. On Thanksgiving, I shape the rolls and let them rise again for their second proofing while I prepare the other menu items. Doing so saves me time and allows me to focus on the other recipes!
How To Make The Recipe
Here are the basic steps to make salted honey Parker House rolls from scratch:
First, make the dough.
- First, prep the ingredients for the dough. (Prep Time: 10 minutes)
For this recipe, it’s important that all its ingredients are at the temperature listed in the recipe. Why? First of all, remember that yeast is a living thing. If you activate the yeast with water that’s too warm, you might accidentally kill the yeast and end up with a dough that doesn’t rise.
However, on the flip side, the yeast won’t activate if other ingredients—like the milk and egg—are too cold. So, to really set yourself up for success, take the extra 5 minutes to make sure all the ingredients are measured out and are at the right temperatures! - Next, activate the yeast. (Work Time: 5 minutes)
In a small liquid measuring cup, whisk together the water and yeast. Set aside for 5 minutes, or until bubbly and foamy, while you prep the other ingredients. - Then, make the dough. (Work Time: 10 minutes)
Once the yeast is foamy, make the dough. Whisk together the milk, melted butter, honey, and salt. Add the yeast and egg, then the flour. Mix with a rubber spatula until a shaggy dough forms, and then knead for 5 minutes. After 5 minutes, the dough will be smooth and elastic, but still sticky. That’s totally normal, I promise! - Let the dough rise. (Rise Time: Overnight)
Once the dough is ready, cover the bowl with plastic wrap and stick it in the refrigerator. The fridge’s cooler temperature enables the dough to rise at a slower pace than it otherwise would at room temperature. The next morning, you end up with a perfectly risen dough that’s perfect for shaping and baking!
Then, shape the salted honey Parker House rolls.
- Shape the dough into rolls. (Work Time: 10 minutes)
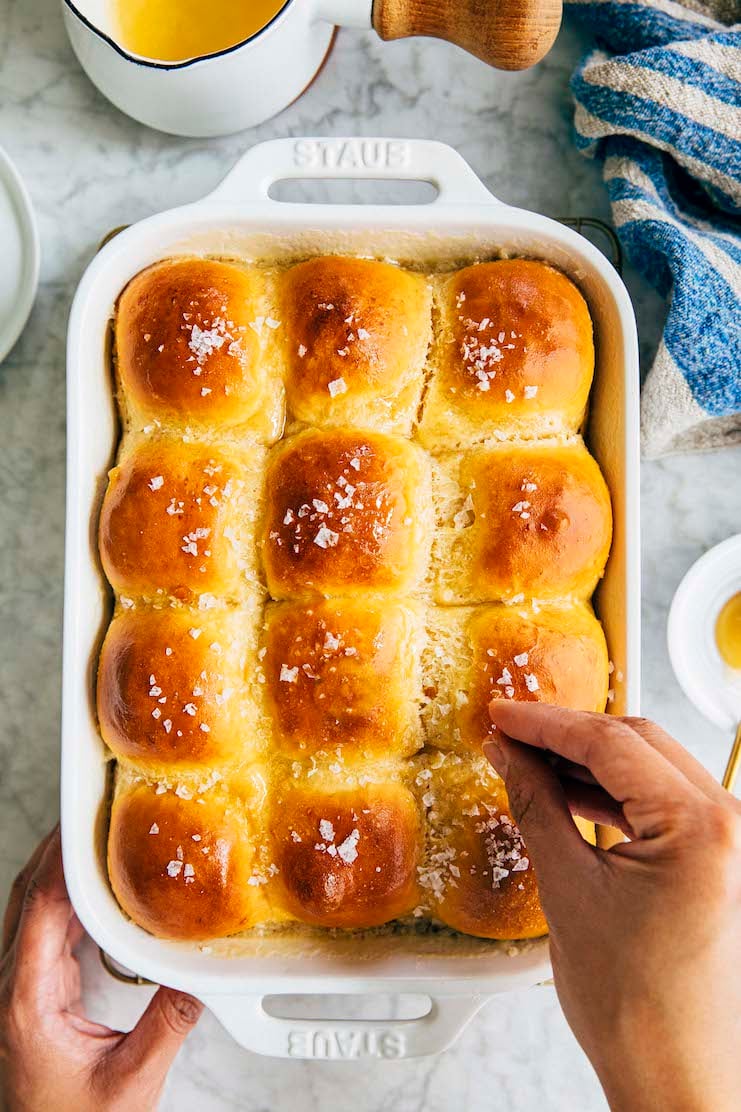
For beginner bakers, shaping the dough is the most time-consuming and challenging part of this salted honey Parker House rolls recipe. Punch down the dough and divide it into 12 even portions. You can eyeball it, but I like to use a digital scale to weigh out the dough (each bun requires 2.5 ounces or 71 grams of dough).
Once you’ve divided the dough, roll each piece into a small ball. The easiest way to do it is to roll the dough between your palms like you would Play-Doh. However, there are also a ton of YouTube tutorials online that demonstrate different methods. I’m partial to this pinching and claw rolling method myself. - Let the dough rise again. (Rise Time: 1 hour)
Place the buns on a greased baking pan or sheet pan. Cover with plastic wrap and let rise in a warm, draft-free spot for 1 hour. Halfway through this rise time, preheat the oven to 375°F. That way, the oven is ready to go right when the rolls are finished proofing!
Finally, bake the rolls and make the salted honey topping.
- Eggwash the rolls. (Work Time: 5 minutes)
Make the eggwash by whisking together 1 large egg and 1 teaspoon of water. Use a pastry brush to brush the mixture on top of each roll. Be careful not to push on the rolls too hard—you don’t want to deflate them! - Bake the rolls. (Bake Time: 30 minutes)
The buns don’t need a lot of time in the oven. Bake the buns for 30 minutes, or until the edges are golden brown. A skewer inserted into the center of a roll should come out clean. You can also use a thermometer to test for doneness—when done, the center of each roll should read 200°F. - While the rolls are baking, make the salted honey topping. (Work Time: 5 minutes)
When there’s 5 to 10 minutes left on the oven timer, make the salted honey topping. In a small saucepan over medium heat, melt the butter for the topping. Whisk in the honey for the topping to combine. Keep the mixture warm over very low heat until the rolls are ready. - Drench the rolls. (Work Time: <5 minutes)
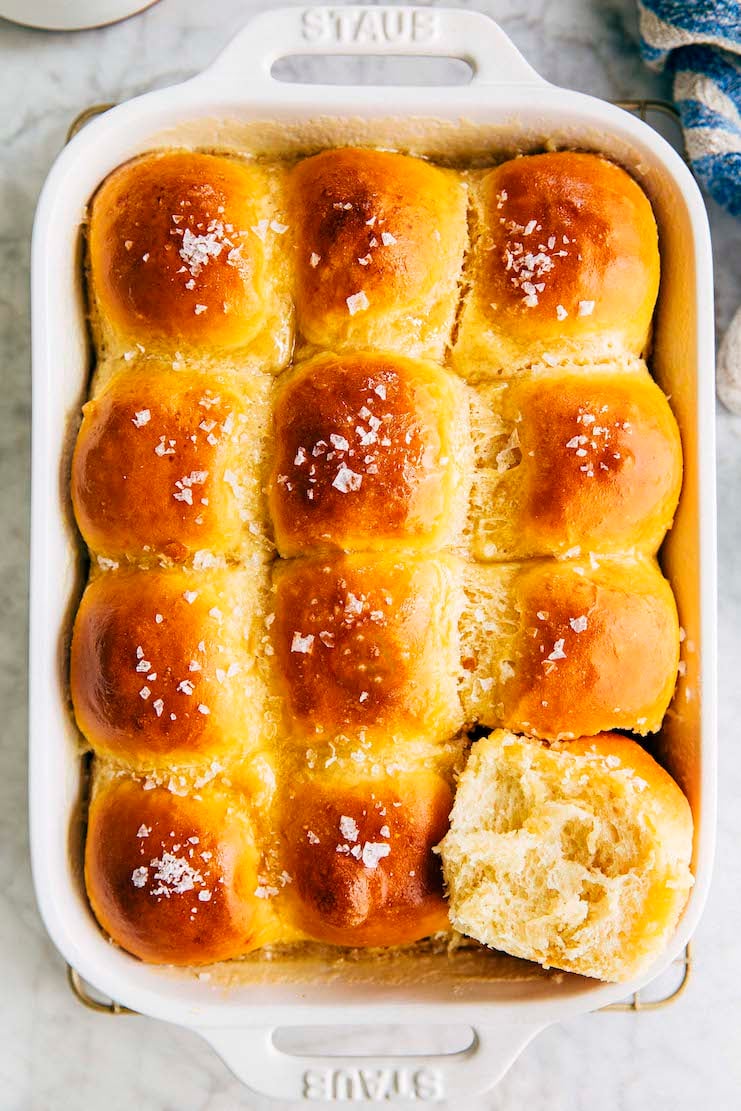
After pulling the rolls out of the oven, immediately brush the top of each roll with the salted honey topping. It will seem like there’s too much of it, but just keep brushing the rolls repeatedly until they absorb the topping. That’s the secret to super tasty and delicious salted honey Parker House rolls!
Recipe Troubleshooting and FAQ
What kind of baking pan did you use?
Although I used this specialty 6 x 8-inch roasting pan, you can actually bake the buns in a variety of pans. I recommended a 8- or 9-inch square baking pan in the recipe, but you can use whatever you prefer. In the past, I’ve made similar bun/roll recipes in a 10-inch cast iron skillet, and a 10-inch round deep dish pie plate.
Help! My rolls didn’t rise and/or don’t look as tall and fluffy as yours. They are much smaller and denser. What did I do wrong?
First things first: did you pay attention to the temperature of the ingredients listed in the recipe? I mentioned earlier that, for these rolls, it’s super important to prep your ingredients to the temperature listed in the recipe. If the water or butter is too hot, it will kill the yeast—your rolls won’t rise and/or be as tall and fluffy as mine. If the milk and eggs are too cold, it won’t activate the yeast—your buns won’t rise and/or be as tall and fluffy as mine, either.
Second: did you proof the dough right? Typically, bread recipes for buns and rolls like these salted honey Parker House ones need to be proofed twice. The second rise allows the rolls to develop an airy crumb, with a light and chewy texture that is the hallmark for good bread. If you don’t proof the rolls properly, especially during the second rise, they’ll come out small and dense.
So how do you tell if you’ve proofed the dough right? Press the top of a roll gently with your finger. If the dough springs back right away, it needs to be proofed more. But if it springs back slowly and leaves a small indent, it’s ready to bake! You can learn more about this troubleshooting process in this Cook’s Illustrated article.
Best Recipe Tips
Tips To Make This Recipe Fit In Your Schedule
- You can skip the overnight rise and make the rolls all in one day. Follow the recipe instructions to make the dough and place it in a bowl covered with plastic wrap. However, instead of proofing the dough in the refrigerator overnight, let the dough rise for 1 to 2 hours in a warm, draft-free spot. Once puffy and doubled in size, follow the recipe instructions to punch down the dough, shape it into rolls, rise again, and bake accordingly.
- Alternatively, you can make the dough up to 3 days ahead of shaping them into rolls and baking them. Simply keep covered and refrigerated for up to 3 days, then follow the recipe instructions to shape the dough into rolls, proof again, and bake accordingly.
Ingredient Tips
- Just another friendly reminder to make sure to pay attention to the ingredients and the temperatures they’re listed at in the recipe. Yeast is a living thing and you can easily kill it by mixing it in water that’s too hot. You want the temperature to be similar to that of a warm bath and no more.
- The dough recipe also instructs you to use butter that’s melted and cooled slightly. What does that mean? Similar to the water for the recipe, its temperature should feel like a warm bath. When I’m prepping ingredients for this recipe (and others that uses melted and slighted cooled butter), I like to melt the butter first (either over a gentle heat on the stovetop, or short bursts in the microwave to ensure it doesn’t get too hot). Once it’s melted, I prep the rest of the ingredients. That gives it enough time to cool slightly—by the time I’m done prepping the ingredients and ready to start the recipe, it should be at the right temperature!
- Also, make sure to use milk and eggs that are at room temperature rather than straight from the fridge. Milk and eggs straight from the fridge will be too cold and lower the temperature of the overall mixture, risking dropping it to a point where the yeast won’t activate properly.
Technique Tip
- Dough rises fastest and best on warm, humid days. Although you can get the same effect on cold, dry days, it can take two to three times as long to proof dough. This is why professional bakeries have dedicated drawers to proof dough. The proofing drawer mimics the environmental conditions of a warm, humid day. And guess what? You can do that at home too, with the oven you already have.
First, if your oven has a pilot light, turn it on—doing so increases the temperature inside the oven by about five degrees. Next, bring 2 to 4 cups of water to a boil and pour it into a heatproof glass or ceramic bowl. Place the bowl of water in the oven, then place the dough you’re trying to proof next to it. The warmth from the light and moisture from the steaming, hot water will create a warm, humid environment in the oven to proof the dough faster.

Get the Recipe: Salted Honey Parker House Rolls Recipe
Ingredients
For the Dough
- ¼ cup (2 ounces or 57 grams) water, warmed to between 110° to 115°F
- 1 (0.25-ounce) packet active dry yeast
- 1 cup (8 ounces or 227 grams) whole milk, at room temperature
- 4 Tablespoons (2 ounces or 57 grams) salted butter, melted and cooled slightly
- 1 Tablespoon honey
- 1 ½ teaspoons kosher salt
- 1 large egg, at room temperature
- 3 ½ cups (15.75 ounces or 447 grams) all-purpose flour
For Assembly
- 1 large egg, at room temperature
- 1 teaspoon water
- 2 Tablespoons (1 ounces or 28 grams) salted butter
- 2 Tablespoons (1.5 ounces or 43 grams) honey
- flaky salt, for garnish
Instructions
For the Salted Honey Parker House Rolls
- First, activate the yeast. In a small liquid measuring cup, whisk together the water and yeast. Set aside for 5 minutes, or until bubbly and foamy, while you prep the other ingredients.
- Make the dough. In the bowl of a stand mixer, whisk together the milk, melted butter, honey, and salt. Add the yeast mixture and the egg all at once and mix with a rubber spatula until just combined. Add the flour and mix until a shaggy dough forms, about 1 minute.
- Knead the dough. Affix the bowl to the stand mixer with a dough hook. Knead on medium-low for 5 minutes, or until the dough is smooth and elastic.
- Proof the dough overnight. Tip the dough out onto a lightly floured counter and use the spatula to scrape down the bottom and sides of the bowl for any stuck dough. Use your hands to knead the dough lightly and bring it together, about 1 minute. Lightly spray the stand mixer bowl with cooking spray and place the dough back in the bowl. Cover with plastic wrap and refrigerate overnight.
- Shape the dough and proof again. Once the dough has doubled overnight, lightly spray an 8-inch square pan with cooking spray. Uncover the dough and discard the plastic wrap. Punch down the dough and tip it onto a floured counter. Use a bench scraper to divide the dough into 12 equal pieces, about 2.5 ounces (71 grams) each. Shape each piece into rough ball and place in the prepared baking pan, arranging the balls in three rows of four. Loosely cover with plastic wrap and let rise for 1 hour.
- Prep the oven. About 30 minutes into the second rise, position a rack in the center of the oven and preheat the oven to 375°F.
- Make the egg wash. In a small bowl, whisk together the remaining egg and water. Use a pastry brush to brush the top and sides of each roll with the egg wash.
- Bake the rolls. Bake for 30 to 35 minutes, or until the tops of each roll are golden brown. An instant thermometer inserted into the center of roll should read 200°F.
- Make the salted honey topping. In a small saucepan over medium heat, melt the butter for the topping. Whisk in the honey for the topping to combine. Use a pastry brush to brush the top of each roll with the salted honey topping immediately after pulling out the rolls from the oven. Garnish with flaky salt.
- Serve and store. Serve immediately. The rolls can be stored in an airtight container or zip-top bag at room temperature for up to 2 days.
Notes
Can you freeze the rolls BEFORE Baking?
Yes! Follow the instructions to make the dough, proof it the first time around, then shape it into rolls. After shaping the rolls, place them on a sheet pan, loosely cover with plastic wrap, and freeze or at least 4 hours or until frozen solid. Transfer the rolls to a ziptop bag and freeze for up to 1 year. When ready to bake, arrange the frozen rolls in an 8-inch square pan. Let the rolls come to room temperature and double in size, then follow the recipe’s instructions to egg wash the buns, bake them, and make the salted honey topping. But let me warn you now—this takes a decent amount of time, especially if your kitchen runs cold. I actually defrost my frozen buns by letting them sit and rise at room temperature overnight. In the morning, I find that the rolls are perfect for baking.Can you freeze the rolls AFTER Baking?
Yes! You can freeze the rolls after they’ve been baked. Tightly wrap any leftover rolls in plastic wrap. Freeze for up to 3 months. To serve, thaw overnight in the refrigerator and rewarm in the oven or microwave.Did you make this recipe?
Please leave a comment and rating for the recipe using the form below!
Your ratings make it easier to find the recipe online, and I’m always looking for ways to improve Hummingbird High.
get new recipes via email:

buy the book
Weeknight Baking:
Recipes to Fit your Schedule
Over the past several years of running Hummingbird High, I kept a crucial aspect of my life hidden from my readers: I had a full-time, extremely demanding job in the tech world. In my debut cookbook, Weeknight Baking, I finally reveal the secrets to baking delicious desserts on a tight schedule.
These look amazing! If I want to double the recipe, will it require any changes with regards to kneading or rising time? Or should I make 2 separate batches?
Hm, I only recommend doubling the recipe if you have a mixer that can handle that amount of dough (like one of those 6- or 7-quart KitchenAid ones!) or are planning on kneading it by hand. Otherwise it might be too much for a 5-quart mixer to handle!
Hello! I just finished a trial run of the Salted Honey Parker House Rolls to see if they will be in our thanksgiving spread this year. First let me say these rolls are delicious and I will make them again with the following changes.
I used avocado oil spray to oil my 8×8 glass pyrex dish and I think that was a mistake. the rolls stuck on the bottom and sides and I have never had rolls stick in this dish so probably the oil choice.
I will use a 8×10 baking dish next time. The rolls were too squished together in the recommended 8×8 size so they went the only way they could and that was up up up during the second rising and baking causing too much loft. The honey butter just dribbled down the sides of the baking dish making a huge sticky mess.
In my opinion the amount of honey butter was too much. I would cut this in half next time. It may be because there was less surface area in the 8×8 dish and with an 8×10 it would be perfect but I am not sure without testing that out.
I would also let them sit 10 minutes or more before digging in to them because the knife drug through making them not as pretty as they should be.
All the recipe timing was spot on from rise time to oven time and temped at 200 degrees as per recipe and my picky 11yo son inhaled 3 of them in a row. I Cannot wait to they them again!
I’m planning on baking these this Saturday and freezing for thanksgiving. Would you brush on the honey butter prior to freezing? Or wait until defrosted and brush after warming them up? Thanks!
No, don’t freeze them with the honey butter! Freeze the rolls unadorned, then defrost them and brush them with the butter RIGHT before (or as close as you can get to) serving.
Made these rolls for a dinner party without trial-ling the recipe because of my blind faith in HH and SHE CAME THROUGH!! These were such a hit. So easy to make as well. I only have 2 questions:
1. my dough was really sticky so at the 13 min mark I had to add about 3 extra tbsps of AP flour to get the dough to start “coming off” from the sides of the bowl. is this normal?
2. the amount of honey butter used to brush the finished bread rolls is A LOT. there was so much leftover! so I wanted to know whether we are actually meant to finish using it on all the rolls?
Thanks!
Sticky dough is normal! I also typically reserve some of the honey butter to serve with the rolls as a side.
My rolls were more dense and not as light and fluffy as I had hoped. Is it possible that the water I used to activate the yeast was too hot? Or would using a different type of flour yield fluffier results?
Lovely soft and fluffy rolls. Baked them in a 9×13 pan so they’d have room to grow. Also halved the salted butter topping after reading other reviews– would reduce down to 1/4 recipe next time if I’m not planning to use the extra as dip or spread.
Hi! I live at 6800 ft above sea level. Would you recommend this as written or should I make any adjustments? Thank you!
Hi! I’m not as good at adjusting bread at a high altitude, but from my understanding, it usually takes half as long to proof bread at high altitude. I think the recipe still works with an overnight rise, but for the second rise, I would check to see if the rolls have doubled earlier (maybe after 30 minutes as opposed to the 1 hour in the original recipe) and potentially bake then.