About This Hershey’s Perfectly Chocolate Cake Recipe
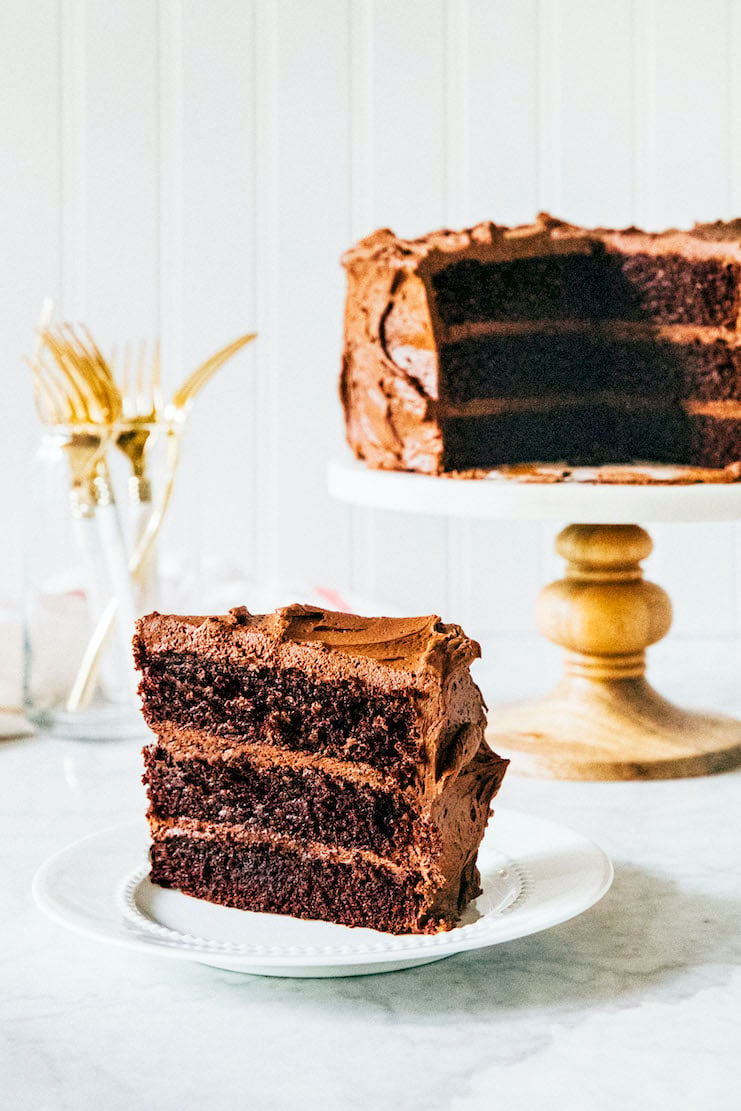
Many of us are familiar with the Hershey’s Perfectly Chocolate Cake recipe. This is the chocolate cake recipe printed on the back of the Hershey’s Cocoa box. The recipe makes a GREAT chocolate cake with a super soft, moist, and ultra plush crumb. The cake is then finished with a super creamy chocolate frosting made with lots of cocoa powder and milk.
I’m sharing the Hershey’s Perfectly Chocolate Cake recipe today, but with a few cake baking tips and tricks I’ve learned over the years. Because what if I told you that, with a little bit of extra work and patience, you could make the chocolate cake even better?!
For more delicious homemade layer cake recipes on Hummingbird High, check out my Cake Recipe collection! Popular recipes include this Pistachio Pudding Layer Cake and this Vietnamese Iced Coffee Cake.
Why I Love The Hershey’s Perfectly Chocolate Cake Recipe
Before I share my wealth of knowledge with y’all, I wanted to talk about my personal history with the recipe. I’ve had a soft spot for the Hershey’s Perfectly Chocolate Cake recipe for some time now. Years ago, I partnered with Hershey’s to showcase some of their baking ingredients. They flew me and a handful of other food bloggers to their test kitchen in Pennsylvania. There, we baked different versions of the Hershey’s Perfectly Chocolate Cake together. It was my first time making the recipe, and I loved learning about it from recipe developers who had worked in the Hershey test kitchens for many years. (In fact, I’ve incorporated some of their tips and tricks in my version of the recipe below!)
A few months later, I was first re-introduced to the recipe in a cake making class with famed wedding cake maker Ron Ben-Israel. Ron Ben-Israel is known for beautiful wedding cakes topped with elaborate sugar paste flowers. He runs a pastry school in New York City where people come from all over the world to learn how to make wedding cakes like him. He was also the judge of the Food Network baking show, Sweet Genius, and a guest judge on Netflix’s Nailed It! baking competition. Simply put, he’s a big deal.
So imagine my surprise when, during our class, he admitted that the chocolate cake recipe he uses for his thousand dollar wedding cakes is, well, the Hershey’s Perfectly Chocolate Cake recipe. Ron explained that he’d tried many chocolate cake recipes throughout the years. Then he smiled and said that the one on the back of this box was best. He was holding up a box of Hershey’s cocoa powder.
Putting the Hershey’s Perfectly Chocolate Cake Recipe To The Test
The Hershey’s Perfectly Chocolate Cake recipe continues to bubble up on my radar. In 2018, I researched many cake recipes as part of the recipe development process for my cookbook, Weeknight Baking. I baked the Hershey’s Perfectly Chocolate Cake recipe and was happy to find that it held up well when compared with other chocolate cake recipes. And with my tricks below, it gets even better!
Making The Recipe Even Better
My version of the recipe instructs you to freeze the cakes overnight.
Although I was impressed with the original Hershey’s Perfectly Chocolate Cake recipe, there’s online criticism that the cake is hard to frost. Why? The cake’s crumb is REALLY soft and moist. It can be hard to frost the cake without indenting it and/or loosening crumbs into the frosting.
Freezing the cakes overnight solves this issue. A cake that’s been frozen solid is much easier to frost than a room temperature one. Crumbs are less likely to shake loose, and the cake will hold its shape under a generous amount of frosting.
In general, I always recommend making the cakes for a layer cake ahead of when you’re planning on assembling and frosting everything. Doing so gives you more control over your schedule. Why? Typically, cakes need to be cooled completely before frosting. However, cooling a cake completely can take HOURS. It turns a simple layer cake recipe into a full day of waiting and working in the kitchen.
But if you freeze the cakes overnight (or longer), you can pick up the project any time that works best for you. Pro-tip: if you’re into this kind of recipe time management, I highly encourage you to check out my cookbook, Weeknight Baking. All cake recipes are broken down in this way!
My version of the recipe tweaks the chocolate frosting.
Some online reviews also argue that its frosting is too sweet. I also found myself agreeing with this critique. I was surprised to find that the original recipe contained no salt at all!
In general, a little salt goes a long way in baked goods. The salt balances out the sugar, and can make other flavors in the recipe more flavorful. I ended up adding a whopping ½ teaspoon of kosher salt to the frosting. That may seem like a lot, but it really helped tone down the sweetness without any coffee (more on that in a second).
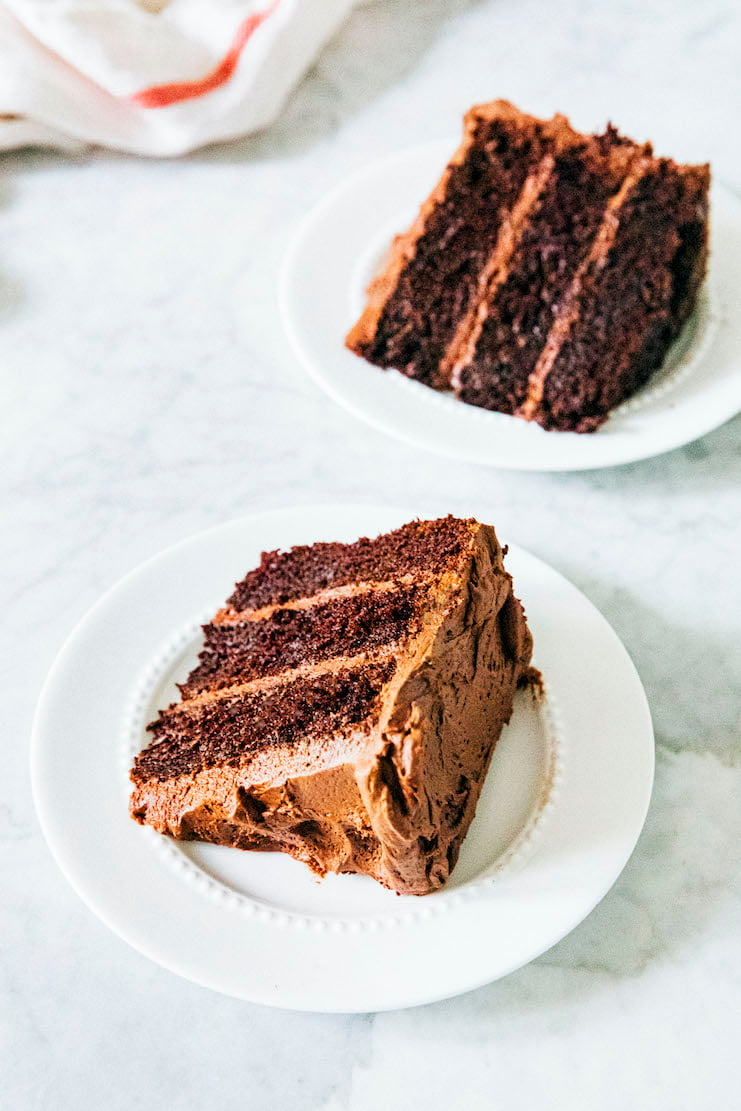
I also found that the recipe didn’t make enough for a 3 layer, 8-inch cake. But that made sense. Because although Hershey’s gives you the option to make the recipe in different cake pans, the original recipe is for a 2 layer, 9-inch cake. As a result, I’ve tweaked the frosting quantities below to be more suitable for a 3 layer cake. However, definitely check out the FAQ below if you want to make this recipe in other cake pans.
Ingredients and Substitutions
Now that I’ve convinced you to make the Hershey’s Perfectly Chocolate Cake recipe, let’s talk about some key ingredients and their substitutions:
- Cocoa Powder. Cocoa powder, when used in baking recipes, often comes in two varieties: natural unsweetened, and Dutch-processed. When testing this recipe, I found that you can use either in this recipe. But Dutch-processed cocoa powder will give your cake a darker color (similar to an Oreo cookie) and milder chocolate flavor.
- Kosher Salt. In my cookbook, I argue that kosher salt is the best salt for baking recipes—learn more in my post! But if you don’t have any on hand, you can use table salt. Just use half the amount listed in the recipe instead.
- Whole Milk. Whole milk makes the most flavorful cake and frosting, but while testing this recipe, I found that you can use skim or nonfat milk in a pinch. You can also use plant-based alternatives like almond, coconut, soy, or oat milk. Just note that if you use a milk with a strong flavor, your cake will taste like that flavor too.
- Canola Oil. In a pinch, you can replace the canola oil with other neutral flavored oil like grapeseed, vegetable, and more. My personal fave is canola oil though!
How To Make The Hershey’s Perfectly Chocolate Cake
Whenever I bake a layer cake, I break down the recipe to make its different components over multiple days. Why? It can be really time-consuming to make the cake all in one day! First, you need to bake the cakes and wait for them to cool completely. Then, you need to make the frosting, assemble the layers and frost a crumb coat, and wait for it all to set. After that, you need to finish decorating the whole thing! You can see how this recipe is turning into a full day’s worth of work.
To make sure I’m not stuck in the kitchen all day, I broke down the work for the Hershey’s Perfectly Chocolate Cake recipe over two days. Here’s what I did:
- Day 1: Made the chocolate cake layers. Making the chocolate cake layers a day before assembling and frosting the cake gives you more time. Why? Doing so allows the cake to cool fully to room temperature—that way, you won’t have to worry about frosting a potentially warm cake and melting the frosting!
I also like to go the extra mile and freeze the cakes overnight. That makes it easier to frost the next day! - Day 2: Made the frosting and assembled the cake. It can be pretty time consuming to assemble and frost a cake, especially if you’re using a crumb coat. I like to save it for the next day so I can dedicate all my time to it and feel like I wasn’t in the kitchen for four hours straight!
Recipe Troubleshooting and FAQ
Why do I need to add boiling water to the cake batter?
Great question! I’ve been doing a lot of research to answer this question for some time now. I believe it’s a trick gleaned from old-fashioned chocolate cake recipes. According to my research, the hot water helps get rid of any stubborn lumps in the cocoa powder. Most old-fashioned chocolate cake recipes instruct you to make the batter by hand with a whisk. And if you’re a seasoned baker, you know how hard it can be to whisk lumps out of batter.
Furthermore, the hot water “blooms” the cocoa powder, deepening the cocoa powder’s chocolate flavor. It’s similar to how coffee and tea become more flavorful when steeped in hot water.
And finally, all that extra water makes the cake super moist.
Help! My cake came out weird. Its top looks bubbly in the center. What did I do wrong?
Ah! I’m so excited to answer this question because I learned the answer straight from bakers at Hershey’s test kitchens themselves! And according to them, this texture comes from undermixing the cake.
Specifically, after adding the hot water to the recipe, you need to whisk the batter for the amount of time listed in the recipe. Seriously—set a timer. It helps! Whisk at a steady pace that’s neither too fast or too slow. At the end, the batter will be thin in texture but uniform in color. There should be no streaks or differing shades of brown. If it looks even a little bit streaky, the batter needs more whisking!
Help! I froze the cakes like you instructed but now water is beading through the cake and frosting. What did I do wrong?
To answer this question, we need to understand where that water is coming from. That water is condensation from the frozen cake thawing as it comes to room temperature. It’s similar to how the outside of a glass full of ice water is wet on a hot day. Luckily, the cake is still perfectly safe to eat. The condensation just makes an ugly cake (lol).
And in the recipe below, I instruct you to start the cake assembling process by first removing the cakes from the freezer. Doing so allows them to thaw slightly while you make the frosting, helping prevent this condensation issue. If you skipped this step, you’re more likely to have this issue.
If you DID thaw the cakes slightly first, let me ask you this: is it a really hot day? Because this is an issue that is more likely to happen in the summer! If you plan on making this cake on a really hot day again, simply let the cakes thaw for longer before frosting. I recommend setting them out 15 to 20 minutes before frosting.
Best Recipe Tips
Ingredient Tips
- If you don’t have an electric kettle to boil water and need to boil it in the microwave or stovetop, prep the water first. Specifically: bring the water to a boil WHILE you prep and measure the ingredients needed for the cake. By the time you finish prepping the ingredients for the cake, the water should be ready! Multitasking saves you time in the kitchen.
- Make sure that the water is very hot, as close to freshly boiled as possible, when you add it to the cake batter. This is the secret to a super moist and fluffy cake! To ensure that my water stays very hot, I pour it into an insulated mug right after boiling. Then, I place a ceramic plate on top of the mug to act as a makeshift lid to trap heat inside.
Cake Making Technique Tips
- For even cake layers, I like to actually weigh out the layers with a digital kitchen scale to make sure they’re even. The easiest way to do this is to set a prepared cake pan on a digital scale and tare it to “0”. Pour batter into the pan until the scale registers the weight listed in the recipe (because yes, I’ve included the approximate weight of the batter needed for each pan!). Repeat with the second and third cake pans.
- Use a large, fine-mesh sieve to sift ingredients for the frosting. It’s the fastest and easiest way to sift ingredients! All you need to do is place the fine-mesh sieve over a bowl. Then, dump the ingredients that need to be sifted into the sieve. Use a whisk to stir the ingredients until they pass through the bottom of the sieve and into the bowl below.
Get the Recipe: The Hershey’s Perfectly Chocolate Cake Recipe
Ingredients
For the Hershey's Perfectly Chocolate Cake
- 2 cups (14 ounces or 397 grams) granulated sugar
- 1 ¾ cups (7.85 ounces or 223 grams) all-purpose flour
- ¾ cup (2.25 ounces or 64 grams) natural unsweetened cocoa powder, sifted if necessary
- 1 ½ teaspoons baking powder
- 1 ½ teaspoons baking soda
- 1 teaspoon kosher salt
- 1 cup (8 ounces or 227 grams) whole milk, at room temperature
- ½ cup (4 ounces or 113 grams) canola oil
- 2 large eggs, at room temperature
- 2 teaspoons pure vanilla extract
- 1 cup (8 ounces or 227 grams) boiling water
For the Hershey's Perfectly Chocolate Frosting
- 4 ½ cups (18 ounces or 510 grams) confectioners' sugar
- 1 cup (3 ounces or 85 grams) natural unsweetened cocoa powder
- ½ teaspoon kosher salt
- ½ cup (4 ounces or 113 grams) whole milk
- 1 ½ teaspoons pure vanilla extract
- ¾ cup (6 ounces or 170 grams) unsalted butter, at room temperature
Equipment
- three 8-inch round cake pans (see FAQ for other cake pan variations)
- a digital kitchen scale
- a cake board
- a rotating cake stand
- an offset spatula
Instructions
Day 1: Make the Chocolate Cake
- Prep your oven and pans. Position a rack in the center of the oven and preheat the oven to 350°F. Generously spray three 8-inch round cake pans with cooking spray and line the bottom of each with a parchment paper circle. Spray the parchment, too.
- Make the cake batter. In a medium bowl, whisk together the sugar, flour, cocoa powder, baking powder, baking soda, and salt.
- In a large bowl, whisk together the milk, oil, eggs, and vanilla. Gradually whisk in the dry ingredients until just combined. Slowly pour in the water. The batter will be fairly runny; use a rubber spatula to scrape down the bottom and sides of the bowl. Use the rubber spatula to finish mixing until smooth and well combined, 2 to 3 minutes more.
- Divide the batter evenly between the pans; if using a digital scale to measure out layers, note that this recipe makes around 48 ounces (1361 grams) of batter—pour 16 ounces (454 grams) of batter into each cake pan.
- Bake the cakes. Bake for 30 to 35 minutes. When done, the top of the cake should bounce back when gently pressed. A skewer inserted into the center of the cake should come out with a few crumbs attached. Cool completely in the pans on a wire rack before frosting.
- Store the cakes. Once the cakes are cool, tightly wrap each cake layer in its own sheet of plastic wrap. Freeze overnight, or up to 3 months.
Day 2: Make the Chocolate Frosting and Assemble The Hershey's Perfectly Chocolate Cake
- Thaw the cakes. When ready to assemble the cake, remove the cakes from the freezer. Unwrap each cake and discard the plastic wrap. Set aside to thaw slightly while you make the frosting.
- Prep the ingredients for the chocolate frosting. Sift together the confectioners' sugar, cocoa powder, and salt into a medium bowl. In a small liquid measuring cup, whisk together the milk and vanilla.
- Make the chocolate frosting. In the bowl of a stand mixer fitted with the paddle attachment, beat the butter on medium-low until smooth and creamy, about 1 minute. Reduce the mixer to low and gradually add the dry ingredients, beating until combined. Scrape down the bottom and sides of the bowl with a rubber spatula. With the mixer on low, slowly pour in the milk and vanilla and beat until just combined. Scrape down the bottom and sides of the bowl once more, then beat on medium-high until the frosting is creamy and smooth, 2 to 3 minutes. Use immediately.
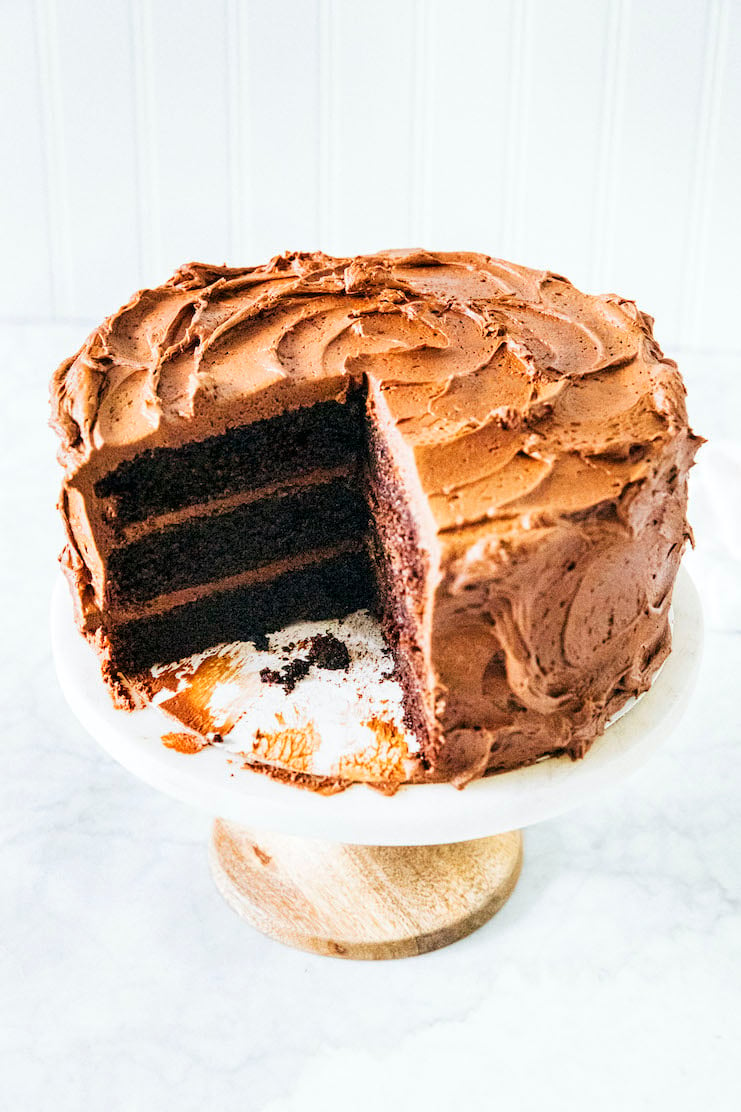
- Assemble the cake. If necessary, level the top of the cakes. Place one of the cake layers on a cake board or serving platter in the center of a rotating cake stand. Use a rubber spatula or cookie dough scoop to drop ½ cup of frosting in the middle of this cake layer. Use an offset spatula to spread it evenly all over the top, just like you would spread butter on toast. Place the second cake on top of this frosting, stacking it evenly on top of the first cake. Use the rubber spatula or cookie dough scoop to drop another ½ cup of frosting in the middle of this cake layer. Spread it evenly all over the top. Finally, place the third cake on top of this frosting, stacking it evenly on top of the first two cakes.
- Next, crumb coat the cake. Use the offset spatula to cover the surface of the entire layer cake with a thin layer of frosting. Use just enough frosting to cover the entire cake completely. Refrigerate, uncovered, for 10 to 15 minutes to stiffen and "set" the frosting.
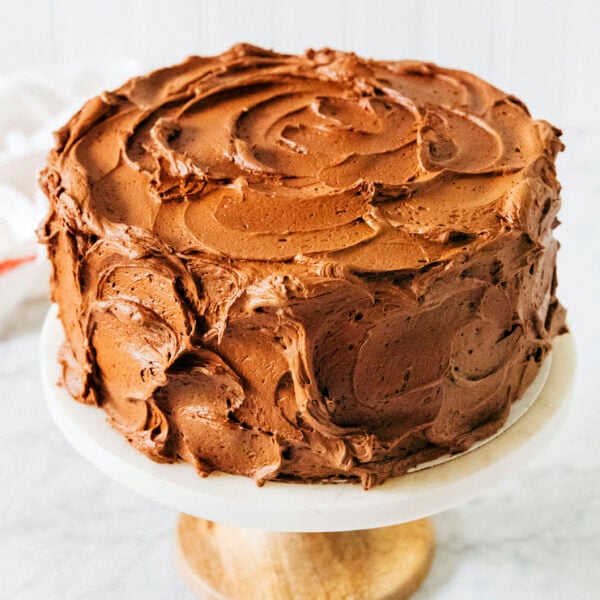
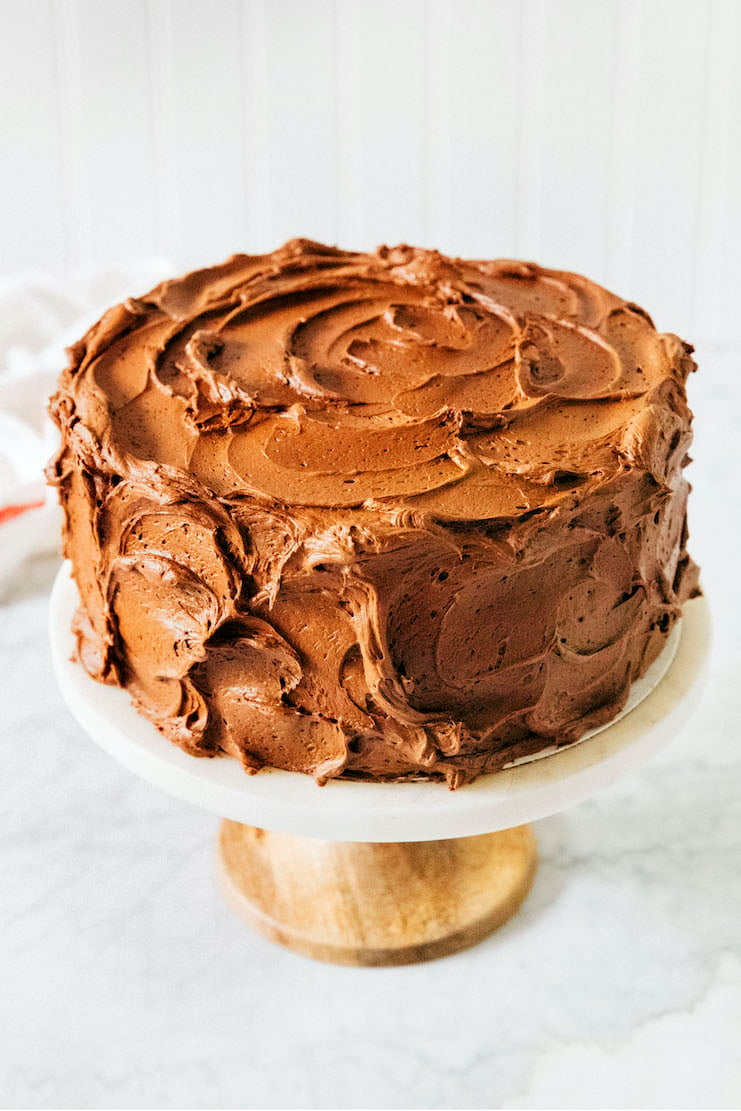
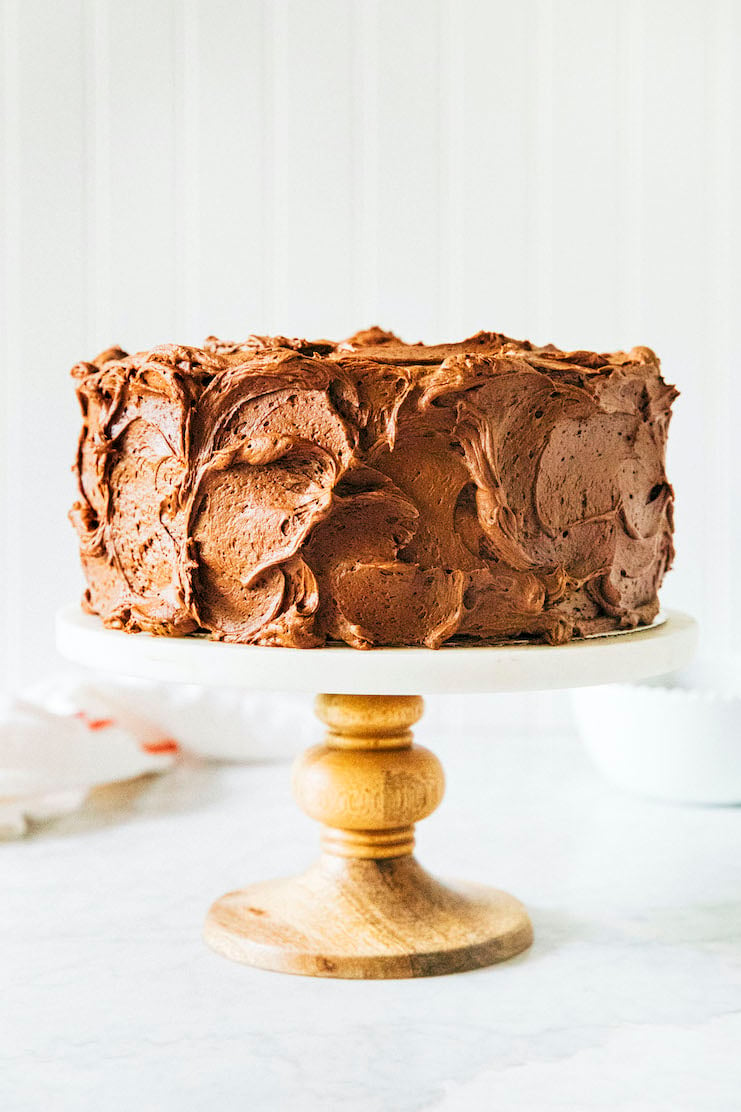
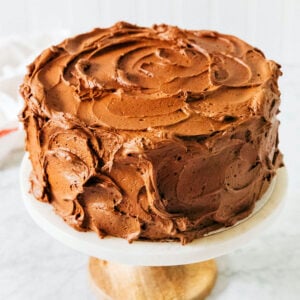
- After the crumb coat sets, finish frosting the cake. Use the offset spatula to cover the cake with the remaining frosting. Then, use the spatula to make large, random sweeping motions across the frosting on the top and sides of the cake. The sweeping motions will create swirls.
- Serve and store. Serve immediately. The assembled Hershey's Perfectly Chocolate Cake can be stored at room temperature, under a cake dome or a large bowl turned upside down, for up to 1 day. Press a sheet of plastic wrap against any cut surfaces to prevent the cake from drying out. After that, cover the entire cake loosely with plastic wrap and refrigerate for up to 2 days.
Notes
Can you freeze Hershey’s Perfectly Chocolate Cake?
Yes! You can freeze the Hershey’s Perfectly Chocolate Cake in the following ways:Freeze the baked, unfrosted chocolate cake layers.
Follow the recipe instructions for making and baking the chocolate cake layers. Once the layers have cooled, tightly wrap each cake layer in its own individual sheet of plastic wrap. Freeze for up to 3 months. To use in the recipe, there’s no need to thaw the cakes! Simply set the cake layers out on the counter as you make the frosting to let them thaw slightly. Use in the recipe as directed.Freeze the entire assembled Hershey’s Perfectly Chocolate Cake.
You can freeze the entire assembled Hershey’s Perfectly Chocolate Cake, too! However, doing so works best if you use a cake board. Follow the recipe instructions for making all the different components of Hershey’s Perfectly Chocolate Cake and assembling them together on a cake board. Refrigerate the entire assembled cake, uncovered, for a minimum of 4 hours. Doing so sets the frosting and preps it for freezing. After 4 hours, test the cake by gently poking the frosting with your finger. Poke it gently! You don’t want to leave an indent, you just want to swipe it gently to see if any frosting comes off. If no frosting comes off onto your finger, the cake is ready. Carefully cover the whole thing—cake board and all—in two layers of plastic wrap. Freeze for up to 3 months. To serve, transfer to the refrigerator overnight to thaw, then let stand at room temperature for 1 to 2 hours before serving.Freeze any leftover slices of Hershey’s Perfectly Chocolate Cake.
Tightly wrap any leftover slices of cake in plastic wrap and freeze for up to 3 months. Follow the instructions above to thaw and enjoy!get new recipes via email:

buy the book
Weeknight Baking:
Recipes to Fit your Schedule
Over the past several years of running Hummingbird High, I kept a crucial aspect of my life hidden from my readers: I had a full-time, extremely demanding job in the tech world. In my debut cookbook, Weeknight Baking, I finally reveal the secrets to baking delicious desserts on a tight schedule.
This post was last updated on 9/22/2020.
My sister and I were just talking about this cake. She is not a crazy obsessed baker and always makes this one. I think my top contenders for chocolate cake are Ina’s and Sarah Kieffer’s, which are really similar in proportions (and both use buttermilk and coffee).
My fave is Ina’s, followed by this recipe. But I was actually shocked by how similar Ina’s recipe is to this Hershey one! I did some research and found that Ina got her recipe from somebody named Beatty. And there’s speculation that Beatty adapted the recipe from Hershey’s lol. But the coffee and buttermilk in Ina/Beatty’s recipe goes a long way though!
Michelle, I JUST started (as in today!) the process of looking for a good three-layer chocolate cake recipe for an October birthday, and … I think I’ve found it! Thank you so much for posting this. I can’t wait to give it a try!
It’s kismet!!! Don’t forget to check out the FAQ section of this post, too! I give options to bake this cake as a 2 layer cake, sheet cake, in 9 inch cake pans, etc.
This is always my go-to chocolate cake and everyone loves it. I have even made it with Bob’s Red Mill Gluten free 1 to 1 baking flour and my celiac friends have said it’s their favorite chocolate cake. Hope that helps!!
OMG! thank you!!! i get so many questions about using GF 1-1 flour but i never have any on hand! really appreciate you sharing!!! xo
Baked this cake for my birthday and it was an absolute hit! So moist and tasty. Thank you for doing what you do
chocolate cake is love, I love baking cakes at home. I have tried many recipes. Some of the recipes turn out good while some failed.
I’ve made this cake 4 times and my cakes always sink in the middle. I live in a high altitude area. what do you think I’m doing wrong? I’ve also tried baking the cakes at 325 instead of 350. Should I add just 1 tsp of baking powder and baking soda instead of the 1 1/2 tsp since I live in a high altitude area?
Hi, I’m so sorry! You need to adjust the recipe to work at high altitude. I unfortunately live at sea level so this recipe is designed for that! Have you checked King Arthur Flour’s guide to high altitude baking? They’ll have some useful tips/conversions: https://www.kingarthurbaking.com/learn/resources/high-altitude-baking
This cake was amazing and I don’t usually like chocolate cake. Very moist, fluffy, light with a perfect density. Used almond milk instead of whole, coconut oil instead of canola, and added 1 1/2 tsp espresso powder with the boiling water. Filled with homemade Nutella Italian meringue buttercream plus chopped hazelnuts and frosted with vanilla bean Italian meringue buttercream. We couldn’t stop eating it. Thanks for the awesome recipe!
Hi Michelle,
can you bake this cake in a bundt pan? Thank you.
Yes! I haven’t done it myself but the bundt instructions are available on the Hershey’s box too:
Bundt Cake: Preheat the oven to 350°F (180°C). Grease and flour a 12-cup (3 L) Bundt pan. Pour batter into prepared pan. Bake for 50 to 55 minutes or until wooden pick inserted in centre comes out clean. Cool in pan for 15 minutes. Remove cake from pan to a rack; cool completely. Frost with “PERFECTLY CHOCOLATE” Chocolate Frosting.
Love all the info you have in this post about making cakes! But I do have a couple of questions. When you were talking about it being almost too sweet, is it the cake itself or the frosting that’s a bit too sweet? I absolutely hate the taste of coffee in chocolate cakes!!! So if it’s the cake that’s too sweet, will reducing the amount of sugar “hurt” the overall taste/texture of the cake? Changing out the frosting to a cream cheese or buttercream is easy enough to “unsweetened” it somewhat.
The cake itself isn’t that sweet—the frosting is sweeter!
How can I make into cupcakes?
Line muffin cups (2-1/2 inches in diameter) with paper cups. H Fill cups 2/3 full with batter. Bake 22 to 25 minutes. Cool completely. Frost.
Hi! I appreciate you including the bubbling center issue in your FAQs. After lots of whisking and trials and errors, I still find the same issue occurring where the batter almost shrinks in the center, bubbles and slightly sinks. I whisked well after the hot water addition and the batter looked homogenous, yet when I went to pour the batter in the pan, the last bits of batter were kind of streaky in nature.. So even if the batter looks homogenous, it doesnt mean it is?
My 13×9 sank😕 But it tastes delicious
When I made the cake and put it in my cake tins it started leaking, so I took it out and put more layers of baking paper at the bottom but it leaked again? Did anyone else have this problem? BTW I have the cake tins where you can push the bottom out to make it easier to take the cake out.
I was so relieved to find this recipe published! I purchased a cookbook from a fund raiser 22 yrs ago.
This recipe is in it. I’ve been making it since! I had to look it up as I’m not home. So whew! Thank you for publishing the recipe and tips!
* I usually microwave my water in a glass measuring cup. Boiling water is best to bring out all the gooey goodness!
The recipe rating is Fantastical.
I make mine in a Bundt cake pan.
Cool on a rack , flip on a platter & keep covered.
I don’t usually frost it, but have for birthdays!
I put a cup of water in the microwave then when it’s time to beat my cake for 2 minutes I turn the microwave on then it’s ready to fold boiling water into my cake it takes 2 minutes to boil the water in the microwave . I have made this cake dozens of times and it’s always perfect!
Too funny. I began making this cake many years ago and I never needed any tricks to make it come out perfectly every time. I stopped using a mixer and found that using a whisk is simple with less fuss. I often use a 13 X 9 cake pan and even cupcakes with no trouble. I’ve added hot coffee instead of hot water. I’ve added cinnamon to the batter and once I had to take the cake out of the oven to add the forgotten hot water. It still came out perfect. As for frosting, I have never frozen my cake but did refrigerate it so I could frost it sooner. I’ve used many different frosting flavors, from the original to carmel, coconut, butter creme, and most often peanut butter, which is the family favorite and again had no trouble frosting ever. Sometimes those little bubbles in the frosting can come from too much butter or over whipping the frosting, not the cake. And if you see a few crumbs, just plop on a bit more frosting. I tell everyone that this cake is almost as easy as a box cake and the taste cannot compare.
I have made this cake for my birthday for 53 years now without fail it’s perfect Everytime
I’ve been making this cake for years, and everyone loves it because it’s incredibly moist and the frosting is not too sweet. My sister shared the recipe with me many years ago, and it’s become my go-to, default dessert.
I keep it simple: I bake the cake, let it cool completely, and then frost it. I don’t bother with all the extra recommended steps. One trick I always use, though, is placing wax paper under the edges of the cake before frosting. I cut the wax paper in half, slide each piece under the cake, and once I’m finished frosting, I gently pull them out—leaving a perfectly clean cake plate with no frosting mess.
The only problem? If there’s any left, I have absolutely no self-control. I just can’t stop eating it.