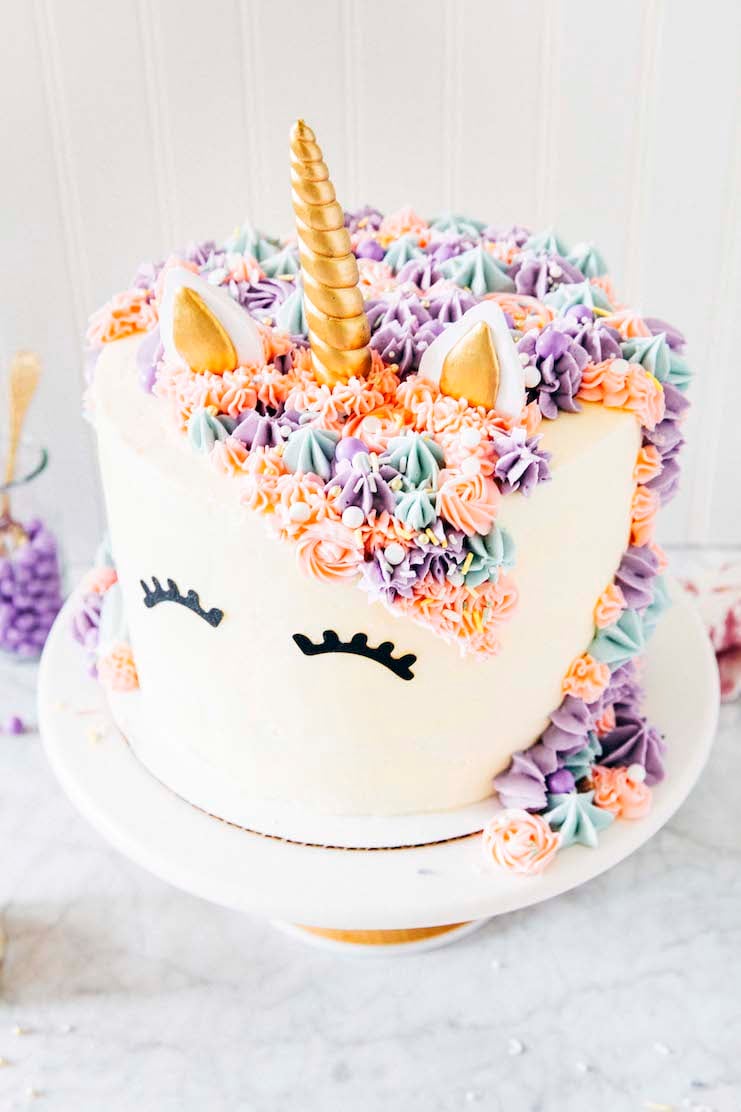
About This Rainbow Unicorn Cake
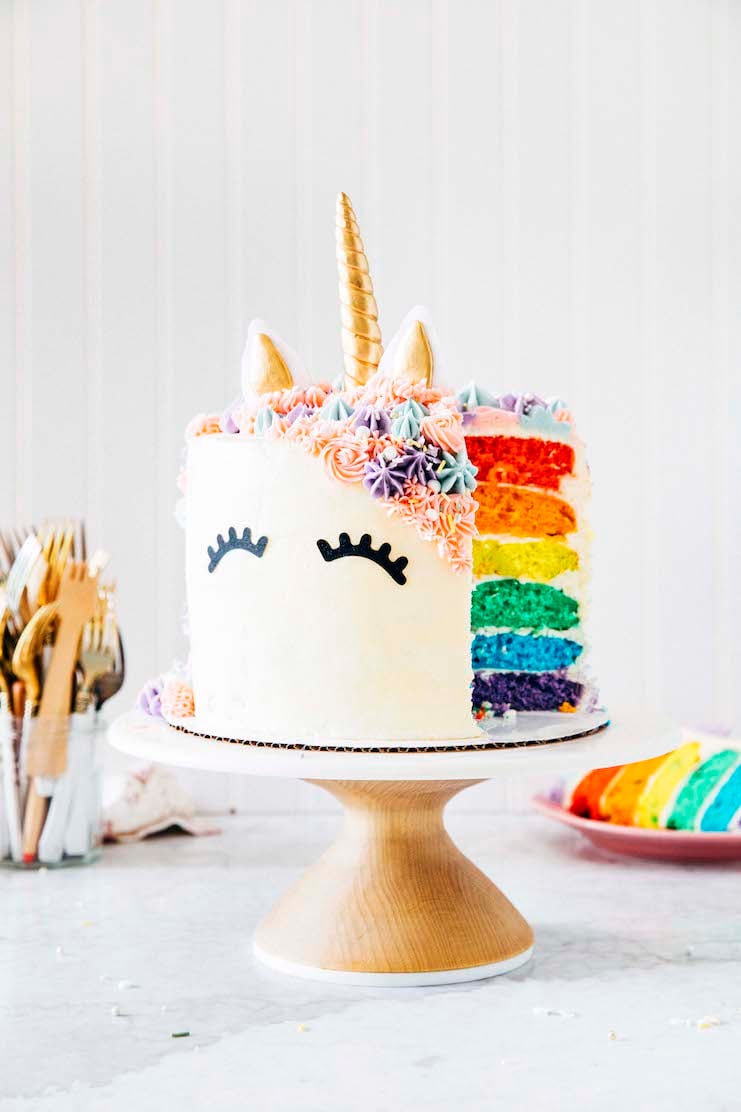
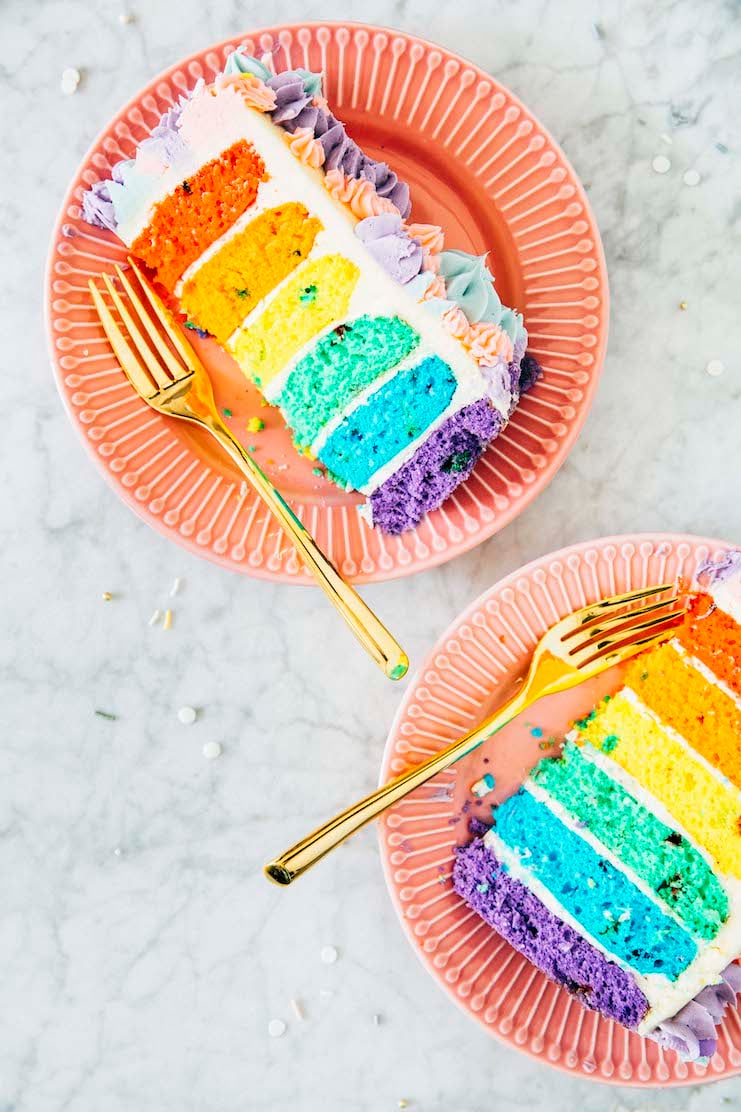
This rainbow unicorn cake is made with 2 boxes of funfetti cake mix, divided into 6 colorful cake layers. Each cake layer is dyed the color of the rainbow: red, orange, yellow, green, blue, and violet. The layers are then stacked and covered with a quick American buttercream frosting that’s incredibly easy to pipe!
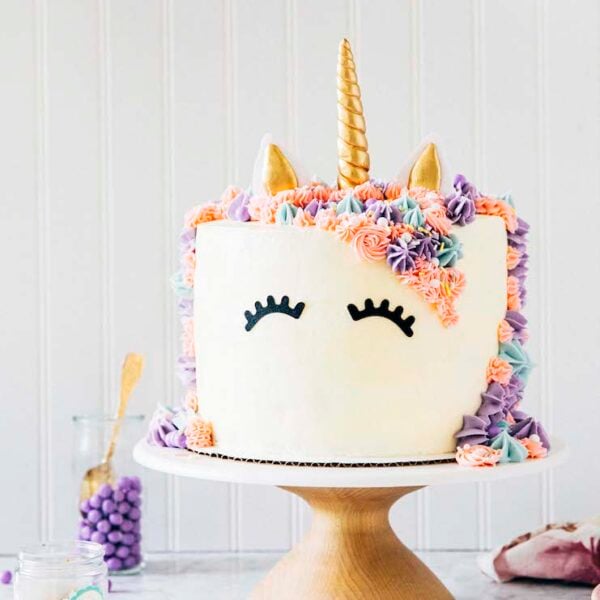
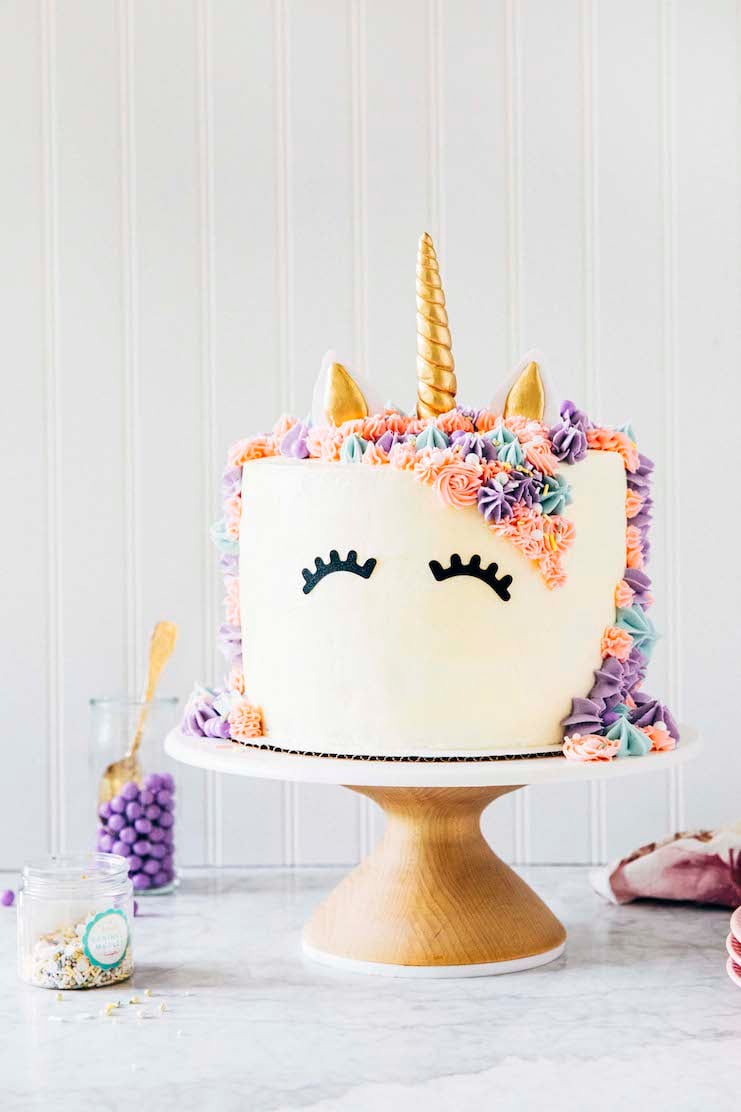
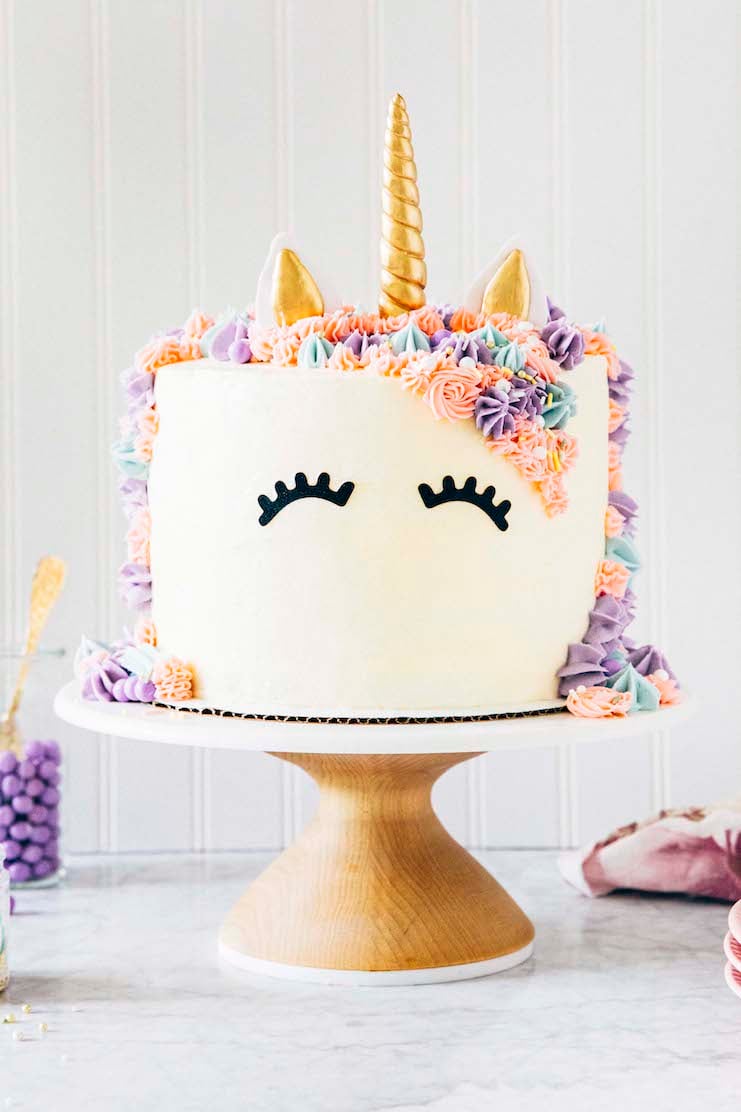
The cake is then decorated to look like a unicorn, complete with a horn and colorful mane made out of the buttercream frosting.
For more unique layer cake recipes, check out Hummingbird High‘s Cake Recipe Collection! Popular recipes include this Thai Tea Layer Cake, this Pistachio Pudding Layer Cake, and this Vietnamese Iced Coffee Cake.
How to Make an Easy Rainbow Unicorn Cake
Okay, you read all of that and thought that it all sounded like a lot of work. And I’m not going to lie: baking and decorating six different colored layer cakes is “A Commitment”. Making this cake definitely took the majority of my day!
So, I decided to take shortcuts where I could. Instead of making the cake from scratch, I decided to use one of my favorite cake mixes: Pillsbury Funfetti. This boxed mix makes a super moist white cake studded with colorful rainbow sprinkles.
Why You Should Make This Recipe
Different parts of this rainbow unicorn cake recipe can be made ahead to fit your schedule.
I’m not going to lie—most layer cake recipes take all day to make. First, you make the cakes and wait for them to cool completely before assembling and decorating. Next, you make the frosting and assemble the cake. And if you’re using a complicated frosting like Swiss meringue buttercream, it can take up to a full half hour to make the frosting!
Decorating the cake can be time-consuming, too. Fancy cake designs (like this Christmas wreath cake, this fault line cake, and this geode cake) can take hours to put together.
Luckily, this recipe is pretty forgiving and flexible. The cake can be made ahead far ahead of serving. Simply freeze the layers until you’re ready to assemble the cake. Be sure to check out more of my notes on how to make this cake fit into your schedule (and, spoiler alert: if you’re into this kind of time management, definitely check out my cookbook).
And despite the fancy look of the unicorn cake’s buttercream fringe and mane, it actually doesn’t take that long to put together—I promise! With the right piping tips (which I discuss in the blog post below), all you need to do is pipe little dots of frosting. In no time at all (okay, maybe 10 to 15 minutes worth of work), you’ll have an adorable unicorn mane!
Tools You Need
Now that I’ve convinced you to make this rainbow unicorn cake, let’s talk about the tools you need to make it!
Everything You Need To Make The Rainbow Unicorn Cake Layers
featured:
kitchen scale || food coloring set || cake pans
- A digital kitchen scale. Although I instruct you to use cake mix to make this cake, you still need a scale. For even cake layers, use the scale to divide one box of cake batter between three different bowls. Add a different color of food coloring into each bowl and mix it into the batter to create the different colored layers of the rainbow unicorn cake.
- Food coloring. This AmeriColor Student Kit gel food coloring kit comes with all the colors you need for a rainbow, plus a few extra pastels (which are perfect for the unicorn cake’s buttercream mane!) and solids like black and brown. I personally have the professional AmeriColor “Nifty-Fifty” kit that comes with 50 colors. Although it’s a little on the spendy side, I cannot say enough good things about my set. However, if you’re on a budget, I also recommend this Wilton 8-Count Gel Icing Color Set. It also comes with all the colors you need for the rainbow cake layers, as well as a pastel pink that would be perfect for the unicorn cake’s buttercream mane.
- Three 8-inch round cake pans. I recommend using light-colored, metal baking pans with straight sides, preferably all from the same brand. I use the pans from Williams-Sonoma’s Goldtouch® Nonstick line.
It’s also important to use cake pans with straight sides, as opposed to slanted sides. Although they take up much more space in your cupboard (since they’re unstackable), they produce straight-sided cakes that are much easier to layer and frost.
Everything You Need To Decorate The Rainbow Unicorn Cake
featured:
cake boards || rotating cake stand || offset spatula
unicorn cake topper || piping bag and tips set
- 9- or 10-inch Cake Board. It’s easier for beginners and novice bakers to use a slightly larger cake board (e.g. pairing an 8-inch round cake with a 9-inch round cake board). Doing so makes it easier to pick the cake up for transfer. In fact, I recommend using a slightly larger cake board for this unicorn cake recipe. That way, you can pipe some of the fringe onto the board to make it look like the unicorn mane is cascading down the cake stand!
- Rotating Cake Stand/Turntable. I found my rotating cake stand at a local restaurant professional supply store; however, this Ateco model is very similar. If you’re on a budget, opt for this cheaper, lightweight plastic version by Wilton. I also like this rotating cake stand from Food52. It looks like a regular cake stand, so there’s no need to put yourself through the scary task of moving your beautiful, finished cake onto a serving platter!
- Offset Spatula. For this rainbow unicorn cake, I recommend using a long offset spatula (like this one that is almost 10 inches!) to help you frost the cake’s tall sides.
- Unicorn Cake Topper Accessories. Amazon has a wide selection of inexpensive-yet-really-cute unicorn cake toppers available. I personally went with this unicorn cake topper kit. I liked that it was fairly minimalist; some kits already come with flowers and decorations. It also came with everything: a unicorn horn, ears, AND eyes. Some kits only come with a horn and ears.
- Piping Bags and Piping Tips. For this unicorn cake, I used the following piping tips: Ateco #825, Ateco #847, and Wilton #30.
How to Make a Rainbow Unicorn Cake
To make a rainbow unicorn cake, we start by making the different colored funfetti cake layers. Here are the basic steps to make all the cake layers for a rainbow unicorn cake:
First, make the rainbow cake layers:
- Prep your ingredients for the funfetti cake mix. (Prep Time: <5 minutes)
Okay, most cake mixes don’t actually require that much prep beyond opening the box. But Pillsbury Funfetti cake mix gives you the option of using 3 large whole eggs or 4 large egg whites to use in its mix. This unicorn rainbow cake recipe works best with the egg white variation. It makes a really good white cake batter that’s easy to dye and makes the colors pop! This prep time accounts for separating the eggs. - Make the cake batter. (Work Time: 5 minutes)
I make the cake mix by mixing together the liquid ingredients—the egg whites, oil, and water—in a large bowl, then mixing in the cake mix. - Divide the cake batter and dye it different colors. (Work Time: 10 minutes)
Use the digital scale to divide the cake batter evenly between three bowls. Add a drop of food coloring in each and use a rubber spatula to mix in the dye until homogenous and fully saturated. - Bake the cake layers. (Bake Time: 18 minutes)
Pour the dyed batter into three prepared cake pans and bake for 18 minutes. Pillsbury Funfetti cake mix actually instructs you to bake for longer (34 to 38 minutes for 8-inch round cake pans, 29 to 33 minutes for 9-inch round cake pans). But because we’re dividing the batter into THREE pans, we end up making much thinner layers that require a shorter Bake Time in the oven.
Note that you’ll be going through the process I just described TWICE. To make a rainbow unicorn cake, we need to bake TWO boxes of funfetti cake mix. The first box of cake mix makes the red, orange, and yellow cake layers. The second box of cake mix makes the green, blue, and violet layers.
How to Make Icing for a Rainbow Unicorn Cake
After the rainbow cake layers are baked and cooled to room temperature, make the frosting! This rainbow unicorn cake uses a basic, American buttercream frosting from scratch.
Next, make the buttercream frosting:
- Prep your ingredients for the buttercream frosting. (Prep Time: 5 minutes)
When making frosting, it’s especially important to make sure that your butter is at room temperature and that the confectioners’ sugar is sifted. Cold butter and unsifted confectioners’ sugar makes lumpy frosting that is difficult to frost and riddled with bumps! - Make the buttercream frosting. (Work Time: 5 minutes)
After you’ve prepped your ingredients, making the buttercream frosting is an easy process. Simply beat the butter until creamy, then gradually add the confectioners’ sugar and a splash of vanilla. Easy, right?
Similar to the cake making process, you’ll actually need to make the buttercream frosting twice. Make the first batch of buttercream frosting once the cakes have cooled completely and you’re ready to assemble and crumb coat the cake (more on that in a second). Once the cake is crumb coated, place it in the refrigerator and chill for at least 30 minutes. Towards the end of this chill time (around 20 minutes in), make the second batch of buttercream frosting to finish assembling and decorating the cake.
How to Decorate a Rainbow Unicorn Cake
The most time-consuming part of this unicorn cake recipe is actually assembling and decorating the cake itself.
First, start by assembling the rainbow unicorn cake:
- Assemble the cake layers. (Work Time: 15 minutes)
Place the violet cake layer on a cake board (or a serving plate) in the middle of the rotating cake stand. Take an offset spatula and drop about ½ cup of the frosting right in the middle of the top of the cake. Spread it evenly all over the top, just like you would spread butter on toast. Place the blue cake layer on top of this frosting, stacking it evenly on top of the violet cake. Repeat the process I just described with the remaining green, yellow, orange, and red layers (yes, in that order!). - Crumb coat the cake. (Work Time: 30 minutes)
A crumb coat is a thin layer of frosting that’s spread over the naked cake to trap crumbs. If you’ve ever tried to frost a cake without a crumb coat, you’ll know that crumbs can shake loose from the cake and get caught in the frosting, leaving your cake with unsightly bumps. The crumb coat seals in any crumbs, allowing you to apply thicker and smoother layers of frosting later.
To apply a crumb coat, follow the instructions to stack the cakes, layering frosting between each cake to “glue” them together. Then cover the surface of the entire layer cake with a thin layer of frosting—this is the crumb coat! Use just enough frosting to cover the entire cake completely. Refrigerate for 30 minutes, just enough for the frosting to harden.
If you have no idea what I’m talking about, check out this tutorial on the Wilton YouTube channel for a visual representation:
Then, finish frosting the rainbow unicorn cake:
- Once the crumb coat is close to set, make the second batch of buttercream frosting. (Work Time: 5 minutes)
Remember I told you that you’d need to make TWO batches of buttercream frosting? About 20 minutes into the crumb coated cake’s chill time, make the second batch of buttercream frosting to prep yourself for finishing the unicorn rainbow cake. - Cover and smooth the cake completely with the buttercream frosting. (Work Time: 30 to 60 minutes)
Use the offset spatula to spread the frosting all over the top and sides of the cake evenly. Once the cake is completely covered, hold the length of the offset spatula’s blade against the frosting as you rotate the cake stand. Doing so will smoothen out the frosting. Check out the video tutorial below from my friend Tessa from Style Sweet on how to do so (she also has an awesome blog post with more details). Although she uses a cake comb/scraper in her video, her technique also works with an offset spatula:
Finally, decorate the rainbow unicorn cake:
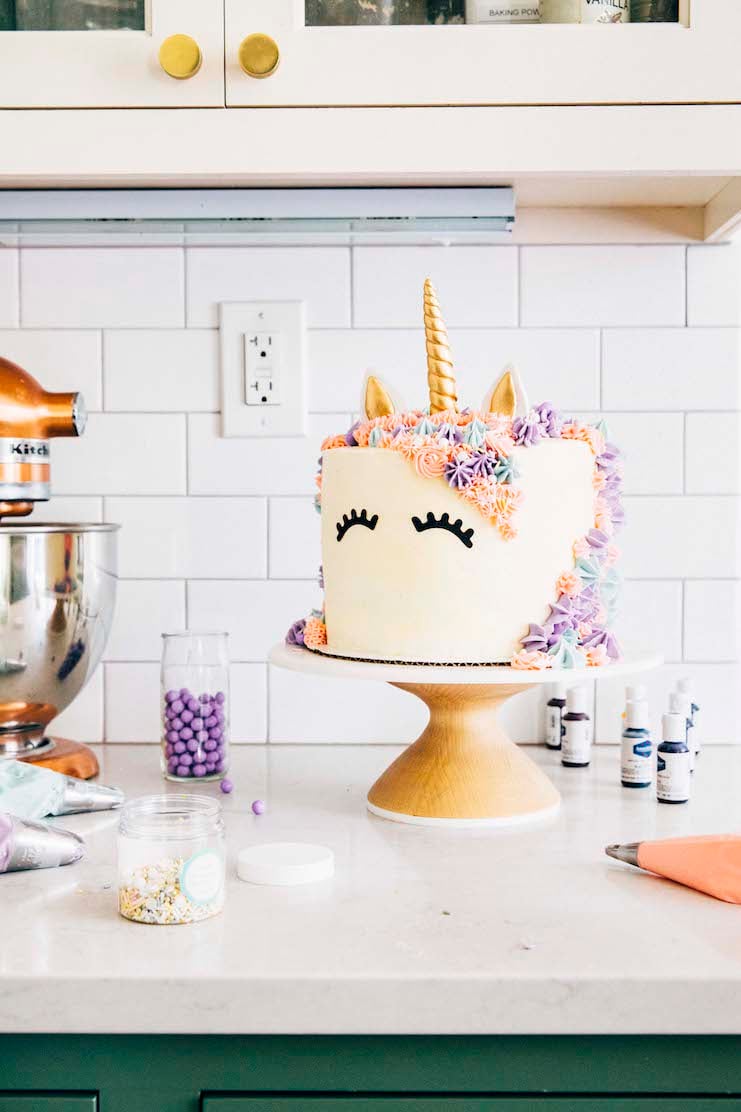
- Divide the remaining frosting between three bowls and dye each bowl with a different color of pastel food coloring. (Work Time: 10 minutes)
Unlike when measuring cake layers, there’s no need to be precise here. I eyeballed dividing the frosting into three bowls. To dye the frosting, add 1 to 2 drops of food coloring to each bowl. Then, use a small rubber spatula to mix the dye into the frosting until completely homogenous and saturated. - Transfer each dyed buttercream into its own piping bag with its own tip. (Work Time: 5 minutes)
Wilton also has a great video tutorial on how to fill piping bags with buttercream frosting. If you’re a beginner, I recommend only filling each bag with a small amount of frosting. It makes it easier to control the bag and pipe cleaner designs! - Arrange the unicorn cake toppers on top of the cake. (Work Time: 5 minutes)
Arrange the unicorn horn and ears on top of the cake. The unicorn set I recommended comes with little plastic sticks that hold the accessories in place. You can cover these plastic bases with piped frosting. - Pipe the buttercream frosting mane on the unicorn cake. (Work Time: 20 minutes)
Now comes the fun part! Use the different piping bags to pipe little dollops of frosting on top of the cake and down one side of the cake in a cascading fashion. Don’t forget to keep one side of the cake completely free of frosting—this is the the unicorn cake’s face! Carefully place the unicorn eye stickers on the side of the cake with no frosting to create a unicorn face.
Recipe Troubleshooting and FAQ
Why does your rainbow unicorn cake only have six layers? Doesn’t a rainbow have SEVEN colors?
Bahahah, I was waiting for somebody to ask this question. Because yes, technically a rainbow has seven colors: red, orange, yellow, green, blue, indigo, and violet. One of my original plans for this recipe was to grab two boxes of funfetti, make them all in one bowl, and divide the whole thing between seven cake pans to make a 7-layer cake.
But then I started researching “rainbow” cakes and noticed that a LOT of them just had six layers. Many skipped indigo and just featured a violet layer after the blue layer. Later, when I was reading the Wikipedia page for rainbows (yes, this is the sort of thing I do in my spare time apparently), I learned that the inclusion of indigo as its own color in the rainbow is actually controversial! Specifically:
“It is customary to list indigo as a color lying between blue and violet, but it has never seemed to me that indigo is worth the dignity of being considered a separate color. To my eyes it seems merely deep blue.”
– Isaac Asimov
Whoa there, Isaac. Those are some harsh words!
While I’m not 100% sure I agree with Isaac and his harsh stance on the harmless color, I decided to forgo the indigo layer. I wanted to make the rainbow unicorn cake recipe as easy as possible for you guys! Making three layers at a time for a 6-layer cake is the best way to do that.
Can you freeze rainbow unicorn cake?
Yes! You can freeze rainbow unicorn cake in two different ways:
Freeze the baked, unfrosted rainbow cake layers. I mentioned earlier that most baked cakes freeze really well. Once the cake layers have cooled to room temperature, tightly wrap each layer in its own sheet of plastic wrap and freeze. The cake is best within 3 months of making, but can be frozen for a full year after. Be sure to check out the section above on how to use the frozen cake layers to build this rainbow unicorn cake!
Freeze slices of the assembled rainbow unicorn cake. Similar to how couples freeze a slice of wedding cake to enjoy on their anniversary, you can do the same with this cake! Tightly wrap individual slice of rainbow unicorn cake in plastic wrap and freeze. Similar to my advice above, the cake tastes best within 3 months o making, but can be frozen for a full year. If you’re planning on storing it long term, double wrap each slice in plastic wrap AND a layer of aluminum foil. The aluminum oil prevents the frosting from absorbing any weird odors or flavors in the freezer.
To serve frozen rainbow unicorn cake, thaw overnight in the fridge, then on the counter at room temperature for 1 to 2 hours before serving.
Best Recipe Tips
Technique Tips
- For even cake layers, I like to divide the batter by weighing out the layers with a digital scale to make sure they’re even. The easiest way to do this is to set a prepared cake pan on a digital scale and tare it to “0”. Pour batter into the pan until the scale registers the weight listed in the recipe (because yes, I’ve included the approximate weight of the batter needed for each pan!). Repeat with the second and third cake pan.
- However, if you’re using a different cake mix other than Pillsbury Funfetti cake mix, the weights listed in my recipe likely won’t work. I only provided instructions for Pillsbury Funfetti cake mix! Don’t fret, though. You can still figure out the right amounts yourself with whatever cake mix you choose. Simply weigh out the (empty) mixing bowl you’re planning to make the cake with and write its weight on a piece of paper. Keep it close! You’ll need it soon. After you’ve made your cake mix in the bowl, weigh the bowl WITH the cake mix once more. Subtract the bowl’s empty weight from this figure and divide it by 3. The resulting amount is the weight of the batter you’ll need for 3 cake pans.
Cake Dyeing Tips
- I didn’t include exact teaspoon measures for the food coloring in this recipe. Why? The amount of food coloring you use will vary and depend on whether you went with a water-based or gel-based dye (learn more by scrolling up to the Ingredients section of this blog post). Add food coloring to the cake layers, either by squirting drops or using a ¼ teaspoon measure, and mix. Keep going until you achieve a bright, saturated color. Don’t be afraid to use more than you think you need (especially with the darker colors like red, blue, green, and purple). The cake batter’s colors tend to become less saturated after being baked. However, don’t go too overboard, either. Some food dyes can affect the taste of the cake. I wouldn’t add more than 1 teaspoon of food coloring to each layer (especially if you are using a gel-based dye).
- The easiest way to dye the cake layers is to pour the batter into small bowls (I used cereal bowls) and mix with a small rubber spatula (I recommend this Norpro set) or spoon. If you want to minimize the amount of dirty dishes to clean up, I recommend using the same spatula to mix all the layers. However, this only works if you pair similar colors and start with dyeing the lighter colors. For instance—make the red, orange, and yellow layers from the same box mix. Dye the first cake layer yellow, then orange, then red. You’ll only need to use one spatula for the job! You can also almost get away with this technique for the green, blue, and violet layers. Dye the first cake layer blue, then purple. Rinse the spatula off and then dye the remaining layer green.
Frosting Making Tips
- If the buttercream frosting is too stiff to spread or or pipe, a touch of milk (around 1 to 2 teaspoons) will help loosen it a little. I personally didn’t need to use any when I made this cake, but it was also an unseasonably warm day, lol. Again, don’t be afraid to use your judgement here!

Get the Recipe: Rainbow Unicorn Cake Recipe
Ingredients
For the Red, Orange, and Yellow Rainbow Funfetti Cake Layers
- 1 box Pillsbury Funfetti Cake Mix
- 1 ¼ cup (10 ounces or 283 grams) water, at room temperature
- ½ cup (4 ounces or 113 grams) neutral (like canola, grapeseed, vegetable) oil
- 4 large egg whites, at room temperature
- yellow food coloring
- orange food coloring
- red food coloring
For the Green, Blue, and Violet Rainbow Funfetti Cake Layers
- 1 box Pillsbury Funfetti Cake Mix
- 1 ¼ cups (10 ounces or 283 grams) water, at room temperature
- ½ cup (4 ounces or 113 grams) neutral (like canola, grapeseed, vegetable) oil
- 4 large egg whites, at room temperature
- blue food coloring
- purple food coloring
- green food coloring
For the Simple Buttercream Frosting (First Batch for Assembly and Crumb Coat)
- 2 cups (16 ounces or 454 grams) unsalted butter, at room temperature
- 2 teaspoons pure vanilla extract
- pinch of kosher salt
- 4 cups (16 ounces or 454 grams) confectioners' sugar, sifted
- 1 to 2 teaspoons whole milk (see baker's notes)
For the Simple Buttercream Frosting (Second Batch for Decorating)
- 2 cups (16 ounces or 454 grams) unsalted butter, at room temperature
- 2 teaspoons pure vanilla extract
- pinch of kosher salt
- 4 cups (16 ounces or 454 grams) confectioners' sugar, sifted
- 1 to 2 teaspoons whole milk (see baker's notes)
- blue food coloring
- red (or pink) food coloring
- purple food coloring
Instructions
For the Rainbow Unicorn Cake
First, make the red, orange, and yellow cake layers:
- Prep your oven and pans. Position a rack in the center of the oven and preheat the oven to 350°F. Generously spray three 8-inch round cake pans with cooking spray and line the bottom of each with a parchment paper circle. Spray the parchment, too.
- Make the cake batter. Place the Pillsbury Funfetti cake mix in a large bowl. Use a tall glass to press down into the center of the mix to make a "well".
- Pour the water, oil, and egg whites into the well and mix with a rubber spatula until just combined. At this point, your batter will likely still be lumpy—that's okay, I promise!
- Set a small bowl on a digital scale and tare it to “0”. Pour batter into the pan until the scale registers 11 ounces (312 grams). Repeat with a second and third bowl. If necessary, redistribute any leftover batter evenly between the three bowls. Each bowl should contain between 11 ounces (312 grams) to 11.15 ounces (316 grams) of batter.
- Add yellow food coloring, either with a ¼ teaspoon measure or 1 to 2 generous drops at a time, to one bowl of cake batter. Mix with a small rubber spatula or spoon until completely combined. Keep adding food coloring until the cake batter is bright yellow and very saturated (but be sure not to add more than 1 teaspoon of food coloring—see baker's notes for more info). Once done, pour the batter into one of the prepared cake pans.
- Add orange food coloring, either with a ¼ teaspoon measure or 1 to 2 generous drops at a time, to a second bowl of cake batter. Mix with a small rubber spatula or spoon until completely combined. Keep adding food coloring (however, no more than 1 teaspoon of food coloring) until the cake batter is bright orange and very saturated. Once done, pour the batter into one of the prepared cake pans.
- Add red food coloring, either with a ¼ teaspoon measure or 1 to 2 generous drops at a time, to the last bowl of cake batter. Mix with a small rubber spatula or spoon until completely combined. Keep adding food coloring (however, no more than 1 teaspoon of food coloring) until the cake batter is bright red and very saturated. Once done, pour the batter into the remaining prepared cake pans.
- Bake the cakes. Bake for 16 to 18 minutes, or until the top of each cake bounces back when gently pressed. A skewer inserted into the center of the cake should come out with a few crumbs attached. Cool the cakes in their pans on a wire rack for 20 minutes, then turn out onto the wire rack and cool completely. The cakes can be stored unfrosted, wrapped tightly in plastic wrap, at room temperature for up to 2 days and in the freezer for up to 3 months.
Next, make the green, blue, and violet cake layers:
- Prep your oven and pans. Position a rack in the center of the oven and preheat the oven to 350°F. Generously spray three 8-inch round cake pans with cooking spray and line the bottom of each with a parchment paper circle. Spray the parchment, too.
- Make the cake batter. Place the Pillsbury Funfetti cake mix in a large bowl. Use a tall glass to press down into the center of the mix to make a "well".
- Pour the water, oil, and egg whites into the well and mix with a rubber spatula until just combined. At this point, your batter will likely still be lumpy—that's okay, I promise!
- Set a small bowl on a digital scale and tare it to “0”. Pour batter into the pan until the scale registers 11 ounces (312 grams). Repeat with a second and third bowl. If necessary, redistribute any leftover batter evenly between the three bowls. Each bowl should contain between 11 ounces (312 grams) to 11.15 ounces (316 grams) of batter.
- Add blue food coloring, either with a ¼ teaspoon measure or 1 to 2 generous drops at a time, to one bowl of cake batter. Mix with a small rubber spatula or spoon until completely combined. Keep adding food coloring until the cake batter is bright blue and very saturated. Once done, pour the batter into one of the prepared cake pans.
- Add purple food coloring, either with a ¼ teaspoon measure or 1 to 2 generous drops at a time, to a second bowl of cake batter. Mix with a small rubber spatula or spoon until completely combined. Keep adding food coloring (however, no more than 1 teaspoon of food coloring) until the cake batter is bright purple and very saturated. Once done, pour the batter into one of the prepared cake pans.
- Add green food coloring, either with a ¼ teaspoon measure or 1 to 2 generous drops at a time, to the last bowl of cake batter. Mix with a small rubber spatula or spoon until completely combined. Keep adding food coloring (however, no more than 1 teaspoon of food coloring) until the cake batter is bright green and very saturated. Once done, pour the batter into the remaining prepared cake pans.
- Bake the cakes. Bake for 16 to 18 minutes, or until the top of each cake bounces back when gently pressed. A skewer inserted into the center of the cake should come out with a few crumbs attached. Cool the cakes in their pans on a wire rack for 20 minutes, then turn out onto the wire rack and cool completely. The cakes can be stored unfrosted, wrapped tightly in plastic wrap, at room temperature for up to 2 days and in the freezer for up to 3 months.
Now, make the first batch of frosting to assemble and crumb coat the cake:
- Make the frosting. In the bowl of a stand mixer fitted with the paddle attachment, beat the butter, vanilla, and salt on medium-low until smooth and creamy, about 1 minute. Increase the mixer to high and beat until light and fluffy, 2 to 3 minutes, using a rubber spatula to scrape down the bottom and sides of the bowl as necessary.
- Reduce the mixer to low and add the confectioners' sugar 1 cup at a time, beating until combined. Scrape down the bottom and sides of the bowl with a rubber spatula. If the frosting seems too stiff, add 1 to 2 teaspoons of the milk and beat on low just to incorporate the liquid. Scrape down the bottom and sides of the bowl once more, then beat on high until the frosting is creamy and smooth, 2 to 3 minutes.
Next, assemble and crumb coat the cake:
- Place the purple cake layer on a cake board or serving platter in the center of a rotating cake stand. Use a rubber spatula or cookie dough scoop to drop ½ cup of frosting in the middle of the cake. Spread it evenly all over the top, just like you would spread butter on toast. Place the blue cake layer on top of the frosting, stacking it evenly on top of the first cake. Drop another ½ cup of frosting in the middle of the cake and spread it evenly. Repeat this process of positioning the layers and frosting them in this order: green, yellow, orange, and red on top.
- Cover the surface of the entire layer cake with a thin layer of frosting. Use just enough frosting to cover the entire cake completely. Refrigerate, uncovered, for 30 minutes to stiffen and "set" the frosting.
While the crumb coat sets, make the second batch of frosting:
- Make the frosting. In the bowl of a stand mixer fitted with the paddle attachment, beat the butter, vanilla, and salt on medium-low until smooth and creamy, about 1 minute. Increase the mixer to high and beat until light and fluffy, 2 to 3 minutes, using a rubber spatula to scrape down the bottom and sides of the bowl as necessary.
- Reduce the mixer to low and add the confectioners' sugar 1 cup at a time, beating until combined. Scrape down the bottom and sides of the bowl with a rubber spatula. If the frosting seems too stiff, add 1 to 2 teaspoons of the milk and beat on low just to incorporate the liquid. Scrape down the bottom and sides of the bowl once more, then beat on high until the frosting is creamy and smooth, 2 to 3 minutes.
Then, finish frosting the cake:
- Remove the cake from the refrigerator and place it back in the center of the rotating cake stand. Cover the cake completely with the remaining frosting, using an offset spatula to spread the frosting all over the top and sides of the cake evenly. Once the cake is completely covered, hold the length of the offset spatula's blade against the frosting as you rotate the cake stand to smoothen the frosting. Once the frosting is perfectly smooth, refrigerate the cake while you prepare to make the unicorn cake's buttercream mane.
- Divide the remaining frosting between three small bowls. Add 1 to 2 small drops of blue food coloring to one bowl of frosting. Mix with a small rubber spatula or spoon until completely combined. The frosting should be a pale, pastel blue. Once done, transfer to a piping bag fitted with an open star tip.
- Add 1 to 2 small drops of red or pink food coloring to a second bowl of frosting. Mix with a small rubber spatula or spoon until completely combined. The frosting should be a pale, pastel pink. Once done, transfer to a piping bag fitted with a small closed star tip.
- Add 1 to 2 small drops of purple food coloring to the final bowl of frosting. Mix with a small rubber spatula or spoon until completely combined. The frosting should be a pale, pastel lavender. Once done, transfer to a piping bag fitted with a closed star tip.
- Remove the cake from the refrigerator and place it back in the center of the rotating cake stand. Arrange the unicorn horn and ears on top of the cake. Use the different piping bags to pipe little dollops of frosting on top of the cake and down one side of the cake in a cascading fashion. Keep one side of the cake completely free of frosting—this is the the unicorn cake’s face! Carefully place the unicorn eye stickers on the side of the cake with no frosting to create a unicorn face.
- Serve and store. Serve immediately. The assembled unicorn rainbow cake can be stored at room temperature, under a cake dome or a large bowl turned upside down, for up to 1 day. Press a sheet of plastic wrap against any cut surfaces to prevent the cake from drying out. After that, cover the entire cake loosely with plastic wrap and refrigerate for up to 2 days.
Notes
get new recipes via email:

buy the book
Weeknight Baking:
Recipes to Fit your Schedule
Over the past several years of running Hummingbird High, I kept a crucial aspect of my life hidden from my readers: I had a full-time, extremely demanding job in the tech world. In my debut cookbook, Weeknight Baking, I finally reveal the secrets to baking delicious desserts on a tight schedule.
Aaahhhhhhhh this is such a great post! You’ve outdone yourself, Michelle – beautiful cake, a dash of nostalgia, lots of information and explanation! I sure hope this is one of your birthday cakes!
The perfect cake for the month! And you have explained everything perfectly. Amazing post! Thank you for sharing 🙂
Super informative. First time making a themed cake for one of mY daughters and she loved it! I didn’t do the rainbow fillings, but I did use a lot of the advice you provided to help guide me…. thanks a bunch!