
About These Small Batch Cinnamon Rolls
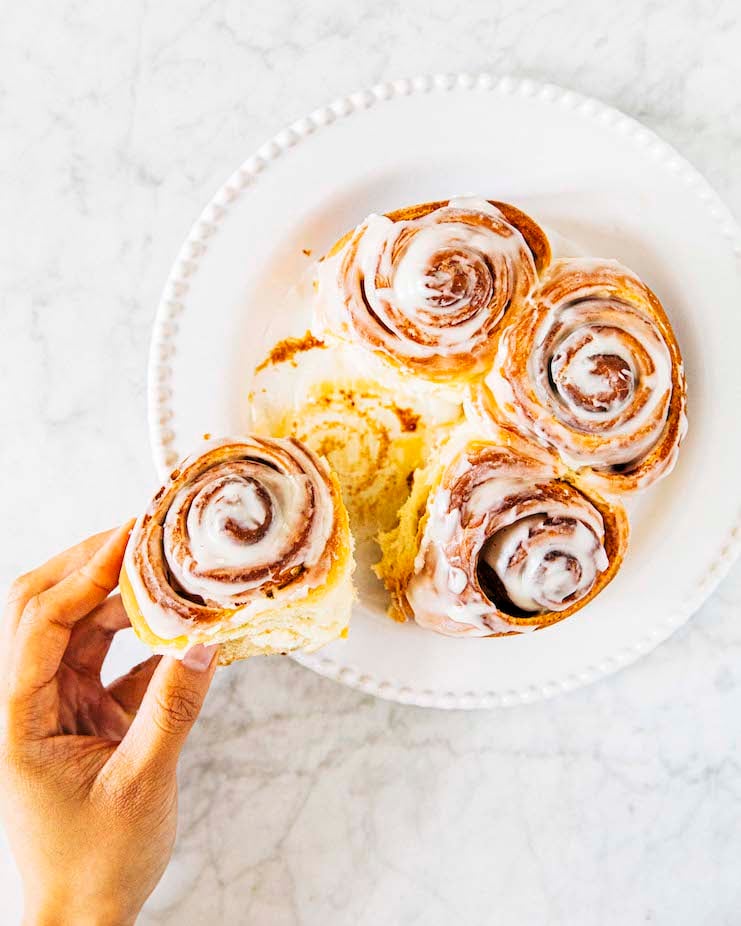
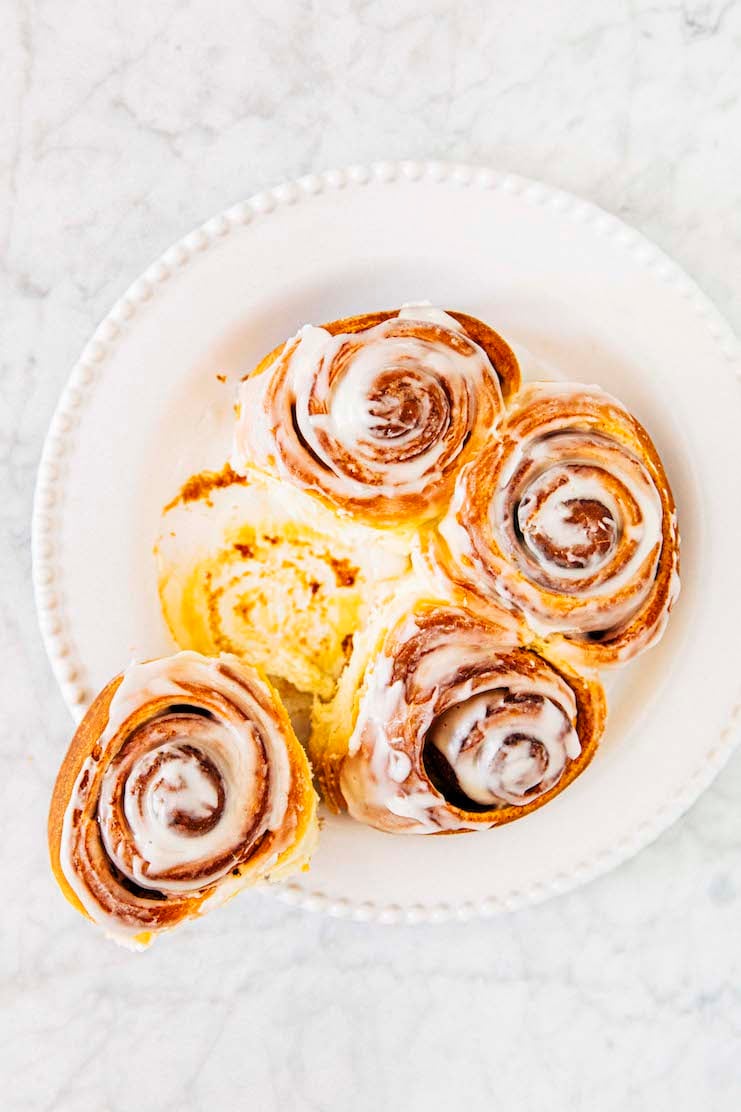
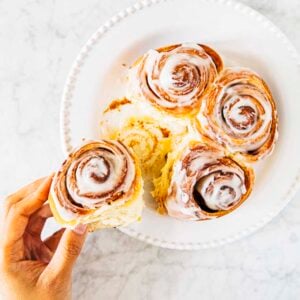
This small batch cinnamon rolls recipe makes only FOUR cinnamon rolls, making it a very small batch version of this vintage buttermilk cinnamon cinnamon roll recipe on my blog. It’s truly the best cinnamon roll recipe I’ve ever made.
The recipe makes the lightest, fluffiest, and pillowy-soft rolls you’ll ever taste. The cinnamon rolls are made with both buttermilk and cream cheese frosting, giving them a subtle-yet-flavorful tang.
Although my friend Noah first introduced me to the recipe back in 2013, the recipe has become one of my standbys over the years. I even included a “small batch” version of the recipe (that yields six rolls!) in my cookbook!
Why You Should Make The Recipe
The recipe is very small batch.
Most small batch cinnamon roll recipes still make 6 to 8 cinnamon rolls. This recipe, however, only makes FOUR. It’s the perfect size for small households!
The recipe proofs the dough overnight and ensures you’re not stuck in the kitchen all day.
This small batch cinnamon rolls divides the work over the course of two days.
On the first day, the recipe instructs you to make the dough (a process that only takes 10 to 15 minutes!). You then proof the dough overnight and let it rise in the refrigerator. On the second day, the recipe instructs you to roll out the dough, assemble, and bake the rolls.
Dividing the work over two days ensures that you’re not stuck in the kitchen all day, waiting for the dough to rise. Letting the dough rise in the fridge overnight also helps the dough develop yeasty, bread flavors we all know and love!
The recipe can be adjusted to fit your schedule easily.
However, if you want small batch cinnamon rolls RIGHT NOW, the recipe also provides instructions on how to make the rolls in one day. You know I have your back no matter what!
Ingredients and Substitutions
Now that I’ve convinced you to make this small batch cinnamon rolls recipe, here’s everything you need to make it:
Shopping List For Small Batch Cinnamon Rolls Recipe
- all-purpose flour
- granulated sugar
- instant yeast
- kosher salt
- buttermilk
- canola oil OR unsalted butter*
- large eggs
- ground cinnamon
- confectioners’ sugar
- cream cheese
- whole milk
And let’s talk about some key ingredients and potential substitutions:
Common Ingredient Substitutions For The Recipe
Here are common substitutions for the ingredients in the recipe:
- All-Purpose Flour. Substitute the all-purpose flour with your favorite 1-1 Gluten Free All Purpose Flour (I like the ones by Bob’s Red Mill and King Arthur Baking Company) to make the rolls gluten-free!
- Instant Yeast. You can replace the instant yeast in the recipe with the same amount of active dry yeast. However, you’ll need to change the way you activate the yeast.
- Kosher Salt. Kosher salt is the best salt for baking recipes—learn more! But if you don’t have any, you can replace the kosher salt in the recipe with a pinch of table salt.
- Buttermilk. Check out my blog post about the best Buttermilk Substitutes in baking recipes.
- Whole Milk. You can also use 2%, skim, or the plant-based milk of your choice to make the glaze. Doing so won’t affect the flavor and texture of the glaze too much.
Using Oil versus Unsalted Butter To Make Cinnamon Rolls
The recipe below states that you can use either 2 Tablespoons (1 ounce or 28 grams) canola oil OR melted unsalted butter to make the cinnamon rolls.
Using oil will make the rolls chewier and springier. Using melted butter will make the rolls softer and richer.
Both are tasty either way. However, when using melted butter, make sure that the butter has cooled to between 120°F and 130°F (which, FYI, is also the temperature that the buttermilk needs to be). Using butter that’s too warm will potentially kill the yeast and prevent your dough from rising, so watch out!
Recipe Troubleshooting and FAQ
Help! My dough didn’t rise. What did I do wrong?
- First, be patient! Cold temperatures make dough rise slower. If your house runs cold, this is the likely culprit. If making the rolls all in one day, make sure to let the dough rise for the full 2 hours both before shaping them into rolls AND after.
- Don’t panic! “Doubled in size” is a relative term, especially after you’ve shaped the dough in to rolls. If you rolled out your dough on the shorter side (the 12 inch length as opposed to the 15 inch length), your rolls likely won’t have doubled in size. Expect a 30-50% growth in size instead. A better way to judge if the rolls are rising properly is to look at their edges. The edges should be puffy and rounded.
My house runs cold. Is there anything I can do to make the dough proof faster?
Yes! You can MacGyver your oven into a proofing box. Proofing boxes are used by professional bakeries and simulate ideal environmental conditions (think: warm and humid) for dough to rise quickly and evenly.
First, start with a completely cool oven (this trick won’t work if your oven is too hot). Then, if your oven has a pilot light, turn it on. Doing so will raise the temperature inside the oven by about 5 degrees. Place the dough, in its bowl or pan covered in plastic wrap, inside the oven along with a bowl full of steaming hot (preferably freshly boiled) water. Close the oven door. The oven will trap the residual heat and steam from the water inside, creating ideal proofing conditions for your dough!
I usually keep my dough inside this proofing box until half an hour before the rise time ends (e.g. if a recipe tells me to let the dough rise for 2 hours, I take out the dough and water bowl at 1 ½ hours). I then preheat the oven in the last half hour, keeping the dough close by and ready to go.
Best Recipe Tips
About Ingredients
- When working with yeast, it’s important to remember that yeast is a living thing that needs to be treated with care. Pay attention to the temperature of the buttermilk that’s listed in the recipe—this is what activates the yeast. If the buttermilk is too cold, it won’t activate the yeast properly and your dough won’t rise. If the buttermilk is too hot, it will kill the yeast and your dough won’t rise, either. You want the temperature of the buttermilk to be similar to that of a warm bath (it should be comfortable to stick your finger in it!) and no more.
- Similarly, if using melted butter, make sure that the butter has cooled to between 120°F and 130°F (which, FYI, is also the temperature that the buttermilk needs to be). Using butter that’s too warm will potentially kill the yeast and prevent your dough from rising, so watch out!
Best Technique Tip
- Because this is a small batch recipe, the mixer has a harder time reaching down the bottom of the bowl and kneading the smaller quantity of dough. Make sure you knead the dough for the full 10 minutes listed in the recipe, and to knead on medium-low.
If using a KitchenAid mixer, that means kneading on speeds 2 and 4. I also like to start out on 4 to bring the dough together, then knead the rest of the time on 2. I find that the slower speed really incorporates the dough more fully. Any faster means that your dough hook misses a lot of the dough at the bottom of the bowl!
Get the Recipe: Small Batch Cinnamon Rolls Recipe
Ingredients
For the Dough
- 1 cup plus 2 Tablespoons (5.15 ounces or 146 grams) all-purpose flour
- 1 Tablespoon granulated sugar
- ½ teaspoon instant yeast
- pinch kosher salt
- ⅓ cup (2.65 ounces or 75 grams) buttermilk, warmed to between 120°F and 130°F
- 2 Tablespoons (1 ounce or 28 grams) canola oil OR melted unsalted butter (slightly cooled to between 120°F and 130°F)
- 1 large egg yolk, at room temperature
For The Cinnamon Filling
- 1 Tablespoon (0.5 ounces or 14 grams) unsalted butter, melted and cooled slightly
- 2 Tablespoons granulated sugar
- ½ teaspoon ground cinnamon
For The Cream Cheese Frosting
- ¼ cup (1 ounce or 28 grams) confectioners’ sugar, sifted if necessary
- 1 Tablespoon (0.5 ounces or 14 grams) cream cheese, at room temperature
- 1 teaspoon whole milk
- ¼ teaspoon pure vanilla extract
Equipment
- stand mixer with a dough hook
- rubber spatula
- cooking spray
- plastic wrap
- 6-inch round cake pan
- Rolling Pin
- serrated knife
- offset spatula
Instructions
Make the dough the night before you plan to serve the cinnamon rolls.
- Mix the dry ingredients for the dough. In the bowl of a stand mixer fitted with the dough hook, whisk together the flour, sugar, yeast, and salt. Use a tall glass to press down into the center of the dry ingredients to make a “well”.
- Add the wet ingredients, then knead the dough. Pour the buttermilk, oil or melted butter, and egg yolk into the well and mix with a rubber spatula until it turns into a shaggy dough, about 1 minute. Nestle the bowl into the stand mixer and knead on medium-low for 10 minutes, or until smooth and elastic, using the rubber spatula to scrape down the bottom and sides of the bowl as necessary.
- Proof the dough overnight. Tip the dough out onto a lightly floured counter. Dust your hands with flour and knead the dough once or twice into a rough ball. Scrape down the bottom and sides of the bowl to remove any excess dough. Spray the bowl with cooking spray and place the dough back in the bowl. Cover with plastic wrap. Refrigerate overnight.
The next morning, shape, bake, and glaze the rolls.
- Prep the dough and pan. Uncover the dough and discard the plastic wrap. Tip it onto a lightly floured counter. Line a 6-inch cake pan with parchment paper.
- Make the cinnamon filling. Melt the butter in the microwave (or in a small, heavy-bottomed saucepan over medium-low heat). In a small bowl, whisk together the sugar and cinnamon.
- Roll out and fill the dough. Use a rolling pin to roll the dough into a large rectangle about 6 inches wide and between 12 to 15 inches long. Press a bench scraper against the sides of the dough to create straight edges. Pour the melted butter into the center of the dough and use a pastry brush or an offset spatula to spread it evenly to the edges. Sprinkle the cinnamon sugar mixture evenly over the butter.
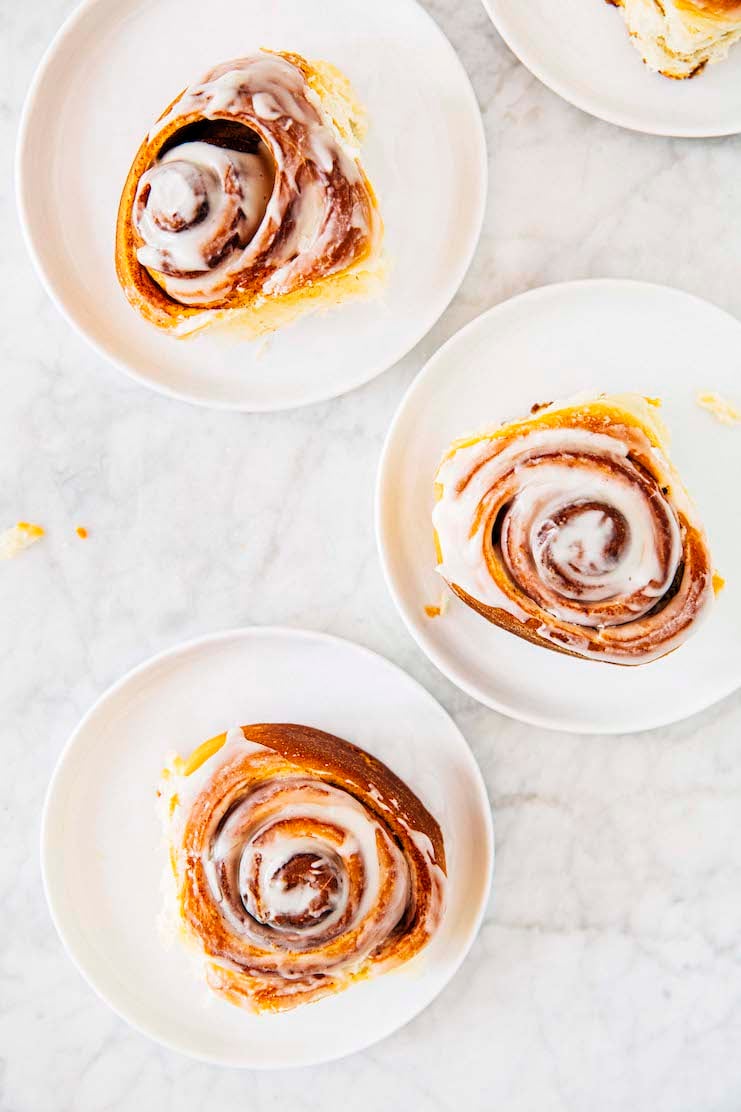
- Slice and prep the cinnamon rolls for baking. Starting from one of the short ends, roll the dough into a log. Use a serrated knife to cut the log crosswise into 4 rolls, each about 2 inches wide. Place the rolls cut-side up and at least 3 inches apart in the prepared cake pan.
- Proof the cinnamon rolls. Place the rolls cut-side up and at least 3 inches apart in the prepared cake pan.Cover with plastic wrap and let sit in a warm spot for 1 to 2 hours, or until doubled in size.
- Preheat the oven and make the frosting. About 30 minutes into the second rise, position a rack in the center of the oven and preheat the oven to 350°F.Meanwhile, make the frosting. Use a rubber spatula to mix together the confectioners’ sugar, cream cheese, milk, and vanilla until smooth.
- Bake the cinnamon rolls. Bake the rolls for 25 to 30 minutes, or until the edges are golden brown and a skewer inserted into the center of a roll comes out clean.
- Frost the cinnamon rolls. Immediately use an offset spatula to spread a generous amount of the glaze over the top of each cinnamon roll—the residual heat will help melt and spread the glaze. .
- Serve and store. Serve warm or at room temperature.The cinnamon rolls can be stored at room temperature, under a cake dome or a large bowl turned upside down, for up to 1 day. After that, transfer the cinnamon rolls to an airtight container and refrigerate for up to 2 days more.
Notes
- When working with yeast, it’s important to remember that yeast is a living thing that needs to be treated with care. Pay attention to the temperature of the buttermilk that’s listed in the recipe—this is what activates the yeast. If the buttermilk is too cold, it won’t activate the yeast properly and your dough won’t rise. If the buttermilk is too hot, it will kill the yeast and your dough won’t rise, either. You want the temperature of the buttermilk to be similar to that of a warm bath (it should be comfortable to stick your finger in it!) and no more.
- imilarly, if using melted butter, make sure that the butter has cooled to between 120°F and 130°F (which, FYI, is also the temperature that the buttermilk needs to be). Using butter that’s too warm will potentially kill the yeast and prevent your dough from rising, so watch out!
- Because this is a small batch recipe, the mixer has a harder time reaching down the bottom of the bowl and kneading the smaller quantity of dough. Make sure you knead the dough for the full 10 minutes listed in the recipe, and to knead on medium-low. If using a KitchenAid mixer, that means kneading on speeds 2 and 4. I also like to start out on 4 to bring the dough together, then knead the rest of the time on 2. I find that the slower speed really incorporates the dough more fully. Any faster means that your dough hook misses a lot of the dough at the bottom of the bowl!
get new recipes via email:

buy the book
Weeknight Baking:
Recipes to Fit your Schedule
Over the past several years of running Hummingbird High, I kept a crucial aspect of my life hidden from my readers: I had a full-time, extremely demanding job in the tech world. In my debut cookbook, Weeknight Baking, I finally reveal the secrets to baking delicious desserts on a tight schedule.
Those wouldn’t last more than a few minutes here at best. They look incredible!
These look so scary delicious Michelle!
Love the small batch recipes! Quick question: when I assemble the rolls, could I put them in the fridge overnight after they’ve proofed a second time? Then take them out in the morning to bake?
Sadly no—I think they’ll come out flat. I think America’s Test Kitchen just did a science post showing how some bread rolls made with the method you described came out flatter than the ones proofed at room temp.
The icing steps calls for vanilla, but I don’t see it in the list of ingredients. How much vanilla should be added? Thanks!
1/4 teaspoon should do the trick!