
Fault Line Cake
I mentioned in my geode cake tutorial that I was seriously researching wedding cake designs on both Instagram and Pinterest. One of the most popular designs to emerge in the last few years is the fault line cake. To me, fault line cakes are a variation of geode cakes, but with significantly more pizzaz and flair. Instead of filling the cake’s cut-outs with rocks (which, if you follow me on Instagram and read my geode cake tutorial, I was actually VERY opposed to because I was worried about chipping a tooth), you can fill them other ingredients: candy bars, cookies, fruit, sprinkles, and even buttercream flowers.
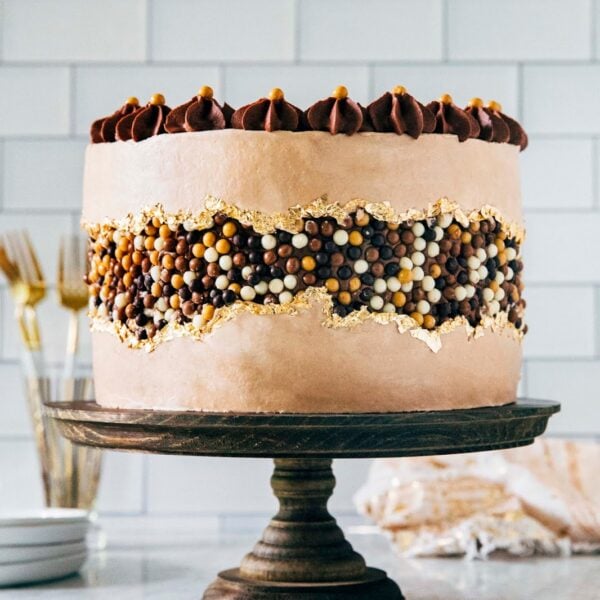
Chocolate Fault Line Cake
Although I wasn’t sure if I wanted a fault line cake for my wedding cake (they seemed too casual and too trendy; I wanted something more timeless), looking at all the different designs inspired me to try making one at home for my mom’s birthday. I used the yellow cake recipe from my cookbook, Weeknight Baking, and combined it with a Nutella Swiss meringue buttercream—because what better combination is there than yellow cake and chocolate frosting, right?

Fault Line Cake Tutorial
Below are the key ingredients you need to make a fault line cake, along with a step-by-step photo tutorial of the frosting process:
Ingredients to Make a Fault Line Cake
A Really Good Cake Recipe
I mentioned this in my geode cake tutorial too, but good cake designs should ALWAYS start off with good cake recipes. For my fault line cake, I went with the yellow cake recipe in Weeknight Baking. The yellow cake is incredibly moist and flavorful because it uses both butter and oil; it also has buttermilk to keep it from being too sweet. Despite all this liquid and fat in the butter, the cake has a wonderful, sturdy crumb that’s a breeze to frost.
Swiss Meringue Buttercream Frosting
A big part of what determine’s a fault line cake’s overall “lewk” is the contrast between the craggy middle and the rest of the smoothly frosted cake. And I don’t know about you guys, but frosting a cake smoothly is one of my least favorite baking-related tasks. It always takes ages, and you need a lot of practice and experience to make it really smooth!
That being said, there are techniques to help any baker along the way. One of them is to use a frosting like Swiss meringue buttercream. Swiss meringue buttercream is incredibly easy to work with, smoothing well, piping beautifully, and holding its overall shape really well. For my fault line cake, I used a Swiss meringue buttercream frosting that I flavored with Nutella.
Nutella
Most chocolate Swiss meringue buttercreams are typically flavored with cocoa powder or some kind of melted chocolate; for this cake, however, I had the brilliant idea of flavoring it with Nutella. Just between you and me, the Nutella flavor in the buttercream was just a touch TOO subtle. I think that it’s overall a good thing because an intensely Nutella-flavored frosting combined with the cake would have been too sweet? But still—for a Nutella fiend like me, I couldn’t help but feel like I wanted more.
As a result, I decided to use Nutella in the fault line, too! Specifically: the chocolate pearls (more on that in a second) in the center of the cake are being suspended by a spread of Nutella. Most fault line cakes actually use frosting to do the job, but I found that the extra Nutella in its place gave my overall cake the chocolate hazelnut flavor it was missing from the buttercream.
Valrhona Chocolate Pearls
A few weeks ago, Valrhona, one of my favorite chocolate makers and long-time blog partners, sent me bags of chocolate pearls to celebrate my engagement. If you guys have never had their chocolate pearls, you’re in for a treat! They’re basically chocolate-covered crunchies that you can sprinkle on any dessert (or, if you’re like me, shove into your mouth by the handful). I filled my fault line crack with dark chocolate, dulcey chocolate, caramel milk chocolate, and white chocolate Valrhona pearls. I know that these are kind of pricey, but I promise they are absolutely WORTH IT.
Edible Gold Leaf
To make the fault line of the cake really stand out, I traced its edges with edible gold leaf (similar to how I made this pattern on this mint chocolate kintsugi cake and this ube kintsugi cake). I’m not going to lie—it was time consuming, especially since I used tweezers to place the gold leaf. If you don’t have all the time in the world, you can skip this step completely (I’ve seen other fault line cakes without this border; they’re definitely more rustic, but still look great!). There are also other tutorials that instruct you to use a paintbrush to paint gold dust on instead—I just personally can’t vouch for this route since I didn’t do it myself.
How to Make a Fault Line Cake
To make a fault line cake, you’ll need a rotating cake stand (this will help you frost the sides smoothly) and an offset spatula. Although you can use a large offset spatula, I actually found that a smaller offset spatula was easier to work with (since you’re only be smoothening part of the cake at a time).
1. Start by assembling your layer cake and use the Nutella Swiss meringue butter cream to give it a crumb coat.

A crumb coat is a thin layer of frosting that’s spread over a cake to help trap crumbs. If you’ve ever tried to frost a cake without a crumb coat, you’ll know that crumbs can shake loose from the cake and get caught in the frosting, leaving your cake with unsightly bumps. The crumb coat seals in any crumbs, allowing you to apply thicker and smoother layers of frosting later.
2. Frost the middle of the cake with Nutella.

Frost a thin layer of Nutella only around the middle of the cake, leaving the top third and bottom third of the cake exposed. I used around ½ cup of Nutella for the job; it’s best to scoop the Nutella into a bowl and microwave on low for 20 seconds to get it really spreadable. You don’t need to worry about perfectly smoothing the Nutella since you’ll be covering the majority of it with chocolate pearls, but you do want it to be somewhat even on the cake. This’ll make frosting the upper and bottom parts of the cake easier later.
3. Apply the chocolate pearls to the Nutella.


Watch out—this part can get messy! Place a baking sheet underneath your cake stand to help catch any pearls that fall.
4. Apply frosting to the top and bottom halves of the cake.


Use an offset spatula to cover the top and bottom halves of the cake with the rest of the frosting, making sure to keep the pearl-covered area uncovered. You want to add enough buttercream to cover the halves evenly and completely, as well as ensure that these layers will be thicker than the layer of chocolate pearls. The thicker layers will ensure that your offset spatula won’t get caught in the chocolate pearls as you smooth the frosting in the next step.
5. Use the offset spatula to smooth the top and bottom halves of the cake perfectly, being careful not to touch the chocolate pearls.

Use an offset spatula and your rotating cake stand to smooth the top and bottom half of the cake. At this point, it’s helpful to dip the offset spatula in hot water—the hot water will help smoothen it. I like to have a pint glass of boiling water nearby, dip the blade of the offset spatula in it for a few seconds (mind you—make sure your offset spatula is made of a heatproof material like metal!), wipe it dry quickly, then use it on the cake immediately.

Make It Weeknight Baking
Similar to other elaborately decorated cakes, I broke down the work for this cake over the span of multiple days. That’s because it can be REALLY time-consuming to make a fault line cake—in fact, it took me almost the entire afternoon to assemble, apply the fault line, and frost the cake! And it would have taken longer if I’d made the cake in the same day too. But to make sure I wasn’t stuck in the kitchen all day, I actually ended up dividing the recipe over like this:
- Day One: Make the Cake! (around 1 hour, including Bake Time)
Follow the instructions in the recipe below to cool the cakes to room temperature, then turn each layer out into its own individual sheet of plastic wrap. Cover tightly with the plastic wrap and freeze overnight—do NOT refrigerate! Refrigerating cakes dries them out, while freezing the cakes locks the moisture in. In a pinch, I’d rather you leave the cakes wrapped at room temperature. - Day Two: Make the Frosting, Assemble, and Crumb Coat the Cake (around 1 to 1 ½ hours)
One of the biggest bummer about working with Swiss meringue buttercream frosting is how time consuming it is to actually make the stuff. You’ll first need to cook the egg whites and sugar to a specific temperature to make meringue (around 15 minutes), whip it until it reaches room temperature (another 10 minutes), then slowly add butter to make the buttercream (around 15 minutes). That’s more than 30 minutes of work going into freaking buttercream!!! People who say that Swiss meringue buttercream comes together quickly are LIARS.But the good thing about Swiss meringue buttercream is that, once it’s made, it keeps really well in the refrigerator. Once I make the buttercream, I assemble and crumb coat the cake. Depending on your experience, it can take anywhere from as little as 30 minutes, to a full hour. I then let the covered cake chill in the fridge for 20 minutes to set it or so, before covering it with plastic wrap (pro-tip: a chilled cake will be easier to frost the next day, and at this point, the buttercream-covered cake won’t dry out as easily than if it were naked). I then transfer the rest of the buttercream to an airtight container and (gasp!) leave it out at room temperature for use until tomorrow. Caveat: my house tends to run cold (in the winter, we’re lucky if the house gets to 60°F), so I can defs get away with keeping it at room temp. - Day Three: Make the Fault Line Cake (around 1 to 1 ½ hours) and Serve!
Alright, you still with me? Follow the tutorial above to complete your fault line cake. You’ll need to re-whip the Swiss meringue buttercream before using on the cake—simply scrape it into the bowl of a stand mixer fitted with the paddle attachment, and beat on medium-high for 2 to 3 minutes.
Of course, the schedule above is kind of dragged out. If you want to shorten it to a two day timeline, I suggest making the cakes the day before and then making the frosting, assembling, and decorating the cake all on the second day.
And if you liked the way I broke it out above, be sure to check out my cookbook, Weeknight Baking—literally all the cake recipes in the book are designed this way!

Best Tips for Making a Fault Line Cake
- {Cake Making Tip} If I had to do it all again, I’d probably bake the cakes in 6-inch pans and opt for a 4 layer cake (the recipe will make enough batter for this, too). Why? Those dimensions will make for a cake that will make it faster to decorate (since a 6-inch cake has a smaller circumference than an 8-inch cake) and will result in a taller cake that will show off the fault line more! Next time, next time.
- {Cake Making Tip} For even cake layers, I like to actually weigh out the layers with a digital scale to make sure they’re even. The easiest way to do this is to set a prepared cake pan on a digital scale and tare it to “0”. Pour batter into the pan until the scale registers the weight listed in the recipe (because yes, I’ve included the approximate weight of the batter needed for each pan!). Repeat with the second and third cake pan.
- {Styling Tip} For a sturdy cake with even amounts of buttercream between each layer, level your cakes. Most cakes, when they bake, will dome slightly in the center (this is because the sides of the cake tend to cook faster and set more quickly than their middles). Use a serrated knife to lop those domes off before assembling the cake. Trust me—I was lazy and didn’t level the first two layers of my cake. You can kinda tell from the photo, too. See how the buttercream filling between those two layers is much more uneven than the buttercream filling between the middle and top layer (which I leveled)? It makes a difference!
- {Styling Tip} Don’t panic if you get a little bit of frosting on some of your chocolate pearls—most folks won’t even notice, I promise! But if you’re type A (like me) and it’s really bothering you, know this: the chocolate pearls are super forgiving, and any buttercream frosting that accidentally gets on them can be gently wiped or dabbed off with a paper towel.

Get the Recipe: FAULT LINE CAKE RECIPE
Ingredients
For the Yellow Cake
- 3 cups (12 ounces or 340 grams) cake flour
- 1 ½ teaspoons baking powder
- 1 ½ teaspoons kosher salt
- 1 cup (8 ounces or 227 grams) unsalted butter, at room temperature
- 2 ½ cups (17.5 ounces or 496 grams) granulated sugar
- ½ cup (3.75 ounces or 106 grams) light brown sugar
- 6 large eggs, at room temperature
- 1 cup (8 ounces or 227 grams) canola oil
- 1 cup (8 ounces or 227 grams) buttermilk, at room temperature
- 1 tablespoon pure vanilla extract
For the Nutella Swiss Meringue Buttercream Frosting
- 1 ½ cups (10.5 ounces or 298 grams) granulated sugar
- ⅔ cups (6 ounces or 170 grams) egg whites, from about 5 to 6 large eggs
- ½ teaspoon kosher salt
- ¼ teaspoon cream of tartar
- 2 cups (16 ounces or 454 grams) unsalted butter, at room temperature and cut into 1-inch cubes
- ¼ cup (2.5 ounces or 71 grams) Nutella
Instructions
For the Yellow Cake
- Position a rack in the center of the oven and preheat the oven to 350°F. Generously spray three 8-inch cake pans with cooking spray and line the bottom of each with a parchment paper circle. Spray the parchment, too.
- In a medium bowl, whisk together the flour, baking powder, and salt.
- In the bowl of a stand mixer fitted with the paddle attachment, combine the butter and sugars. Beat on medium until light, fluffy, and doubled in volume, 3 to 4 minutes, using a rubber spatula to scrape down the bottom and sides of the bowl as necessary. Reduce the mixer to low and add the eggs one at a time, adding the next egg only after the previous one has been fully incorporated, scraping down the bottom and sides of the bowl after each addition. With the mixer on low, slowly pour in the oil, followed by the buttermilk and vanilla, and beat until the mixture is smooth, 3 to 4 minutes. Gradually add the dry ingredients and beat until just combined. Scrape down the bottom and sides of the bowl once more, and beat on low for an additional 30 seconds.
- Divide the batter evenly between the pans; if using a digital scale to measure out layers, note that this recipe makes around 66.5 ounces of batter—pour 22.15 ounces of batter into each cake pan. Bake for 40 to 45 minutes. When done, the top of the cake should bounce back when gently pressed and a skewer inserted into the center of the cake should come out with a few crumbs attached. Cool completely in the pans on a wire rack before frosting.
For the Nutella Swiss Meringue Buttercream Frosting
- Whisk together the egg whites, sugar, salt, and cream of tartar in the top pan of a double boiler (or, make a homemade version by placing a heatproof bowl over a sauce pan filled with 2 to 3 inches of simmering water, ensuring that the bottom of the bowl does not touch the water). Cook over medium-high heat, whisking intermittently, until the mixture registers 160°F on a candy thermometer.
- Once the mixture reaches 160°F, immediately pour into the bowl of a stand mixer fitted with a whisk attachment. Whisk on high speed for 8 to 10 minutes, or until the mixture has turned into a meringue that holds medium-stiff peaks. When done, the outside of the mixer bowl should be at room temperature and no residual heat should be escaping the meringue out of the top of the bowl. Stop the mixer and use a rubber spatula to scrape down the whisk and the bottom and sides of the bowl. Replace the whisk attachment with the paddle attachment.
- With the mixer on low speed, add the butter, a few cubes at a time. Once incorporated, increase the mixer speed to medium-high and beat until the buttercream is silky smooth, 3 to 5 minutes. Use a rubber spatula to scrape down the paddle and bottom and sides of the bowl. With the mixer on medium-low, add the Nutella. Scrape down the bottom and sides of the bowl once more, then beat on medium-high until the frosting is creamy and smooth, 2 to 3 minutes.
I have been made this yellow cake (i try yellow cake recipe on ur fault line cake).
The yellow cake it is turn out dense, the top of the cake not bounce back, and its oily. So sorry if i have so many question.
Hope u can make a video of your cake, so we can see clearly how you make it 🙂
There is other subtitute to replace buttermilk? In your yellow cake?
I would make my own buttermilk: you can add 1 tablespoon of white vinegar to 1 cup whole milk and let sit for five minutes to thicken. That’ll make 1 cup of buttermilk. You can also thin out some unsweetened, full fat yogurt with water.
Hi, can i replace canola oil with vegetable oil? Is it make the cake texture diffrent? Thankyou xoxo
You can replace the canola oil with vegetable oil, no problem! It won’t have any effect on the cake texture. 🙂
The cake looks stunning, I’m gonna try to bake it! Wish me luck!
wooohoo! report back. i’d love to see the results!
Hello
Is there a substitute for cake flour?
Can’t find cake flour where I live 🙁
Can’t wait to try this cake. It looks lovely
You can substitute the cake flour in this recipe with 2 2/3 cups (11.85 ounces) all purpose/plain flour instead.
Nice !!! I love cake.
The cake is completely sunk! What a waste of time and money. I followed it exactly. To the letter. It’s greasy, but quite a nice nutty flavour, yellow so dipped in each centre that I doubt it’ll be able to use it and will have to resort to the cakes I know work well. Shame.
Can I substitute chocolate for nutella? Dealing with a nut allergy here.
Yes! Chocolate sauce or a spreadable ganache will work in its place.