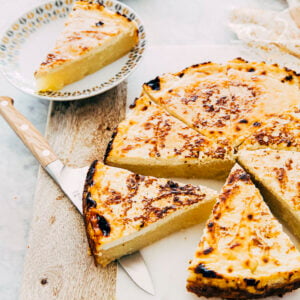
Get the Recipe: Cassava Cake Recipe
Cassava cake is a traditional Filipino snack cake made with grated cassava, coconut milk, and a layer of molten custard on top. The cake has a soft, slightly chewy texture similar to Hawaiian mochi butter cake and is gluten-free.
Ingredients
For the Cassava Cake
- 1 ½ cups (10.5 ounces or 298 grams) granulated sugar
- ¼ teaspoon kosher salt
- 2 large eggs
- a scant 1 cup (7 ounces or 198 grams) canned coconut milk (don't discard the rest—you'll need it for the topping!)
- ¾ cup (6 ounces or 170 grams) evaporated milk (don't discard the rest—you'll need it for the topping!)
- 1 (16-ounce) pack frozen grated cassava, thawed overnight and drained if necessary
For the Cassava Cake Custard Topping
- a scant 1 cup (7 ounces or 198 grams) canned coconut milk
- ¾ cup (6 ounces or 170 grams) evaporated milk
- ¼ cup (2.5 ounces or 71 grams) sweetened condensed milk
- 1 large egg
- 1 teaspoon pure vanilla extract
- 2 Tablespoons (1 ounce or 28 grams) unsalted butter, melted
Instructions
For the Cassava Cake
- First, make the cake. Position a rack in the center of the oven and preheat the oven to 350°F. Generously spray a 9- or 10-inch round springform cake pan with cooking spray and place it in the middle of a half sheet pan lined with parchment paper.
- In a medium bowl, whisk together the sugar, salt, and eggs. Pour in the coconut milk and evaporated milk, and whisk to combine. Finally, whisk in the cassava.
- Pour the batter into the prepared pan and use an offset spatula to smooth its top if necessary.
- Bake the cake. Bake for 45 to 50 minutes, or until the sides of the cake are set and the center of the cake bounces back when gently pressed. A skewer inserted into the center of the cake should come out with a few crumbs attached. Cool slightly on a wire rack while you make the custard topping.
- Next, make the custard topping. Position a rack as close as possible to the broiler's heat source and preheat for 10 minutes.
- In a medium bowl, whisk together the coconut milk, evaporated milk, condensed milk, egg, and vanilla. Pour the filling over the baked cassava cake, then drizzle the melted butter on top.
- Broil the cake. Broil for 15 to 20 minutes, or until the custard starts to sizzle and becomes mottled and molten. Cool completely on a wire rack before slicing.
- Serve and store. Run an offset spatula around the outer edge of the cake before unmolding the cake pan's sides. Slice into wedges and serve slightly warmed, or at room temperature. The cassava cake can be stored at room temperature, loosely covered in plastic wrap, for up to 1 day. After that, place in an airtight container and refrigerate for up to 5 days.
Notes
- Cassava cake recipe adapted from The Happy Home Cook via Positively Filipino
- The recipe below splits up one can of coconut milk and one can of evaporated milk in half to make the cake batter, then the custard topping. What does that mean? It means when creating a shopping list for this recipe, you only need to purchase 1 (14-ounce) can coconut milk and 1 (12-ounce can) evaporated milk.
- When prepping both the canned coconut milk and evaporated milk, give their cans a good shake before opening! This is important since you'll be dividing the milks in half to use in different parts of the recipe (the first half will be used to make the cassava cake, the second half for the cake's custard topping). If you're measuring the ingredients by weight, you'll notice that both cans contain slightly more than the amount listed on their cans. Just weigh out the full thing and divide the full amount evenly between the cake and custard topping!
- If you're measuring the ingredients by volume, I instruct you to weigh out a "scant" cup of coconut milk. What does that mean? Typically, when weighing out a liquid ingredient in a liquid measuring cup, you pour the ingredient into the measuring cup until the bottom of its meniscus reaches just *ABOVE* the desired marking. A scant cup means pouring the ingredient until its meniscus reaches just *BELOW* the desired marking.
- The original recipe calls for a 9 x 11-inch pan, which isn’t a very common pan size in the United States. As a result, I’ve adapted the recipe to be made in a 9- or 10-inch springform pan. You can also bake the pan in a 9 x 13-inch cake pan for 40 to 45 minutes (not including broil time), or an 8 x 8-inch square cake pan for 50 to 55 minutes (not including broil time).
- Most broiler functions have two settings: ON/OFF. If you’re lucky, you might have a slightly fancier broiler with two settings: “LOW” and “HIGH”. So it was especially baffling when the original recipe instructed me to broil the cassava cake at 400°F! My own oven has the “LOW” and “HIGH” broiler settings. After messing around with an external oven thermometer, I discovered that “LOW” was stable at a temperature between 425°F and 450°F, whereas “HIGH” was stable at 500°F+. I ended up broiling my cassava cake on the “LOW” setting for 15 to 20 minutes. That being said, broilers are notoriously finnicky to work with! So please keep an eye on your cake when broiling it in the oven! I recommend checking it every 5 minutes to make sure the top of the cake doesn’t burn to a crisp.
Did you make this recipe?Please leave a star rating and review in the form below. I appreciate your feedback, and it helps others, too!
