
About This Burnt Basque Cheesecake Recipe
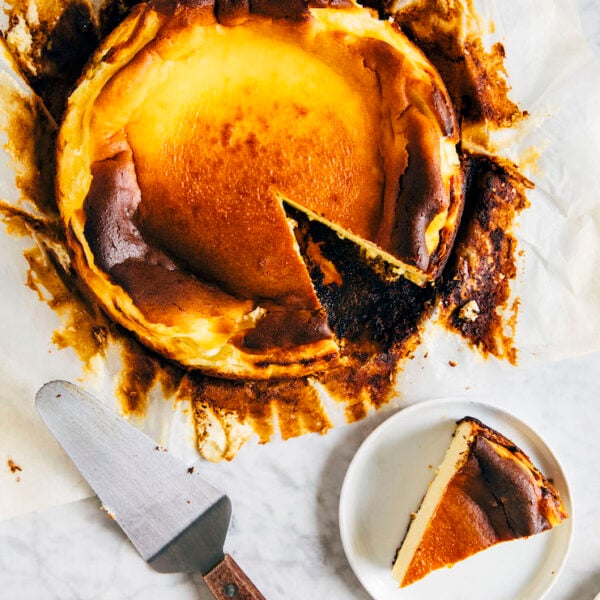
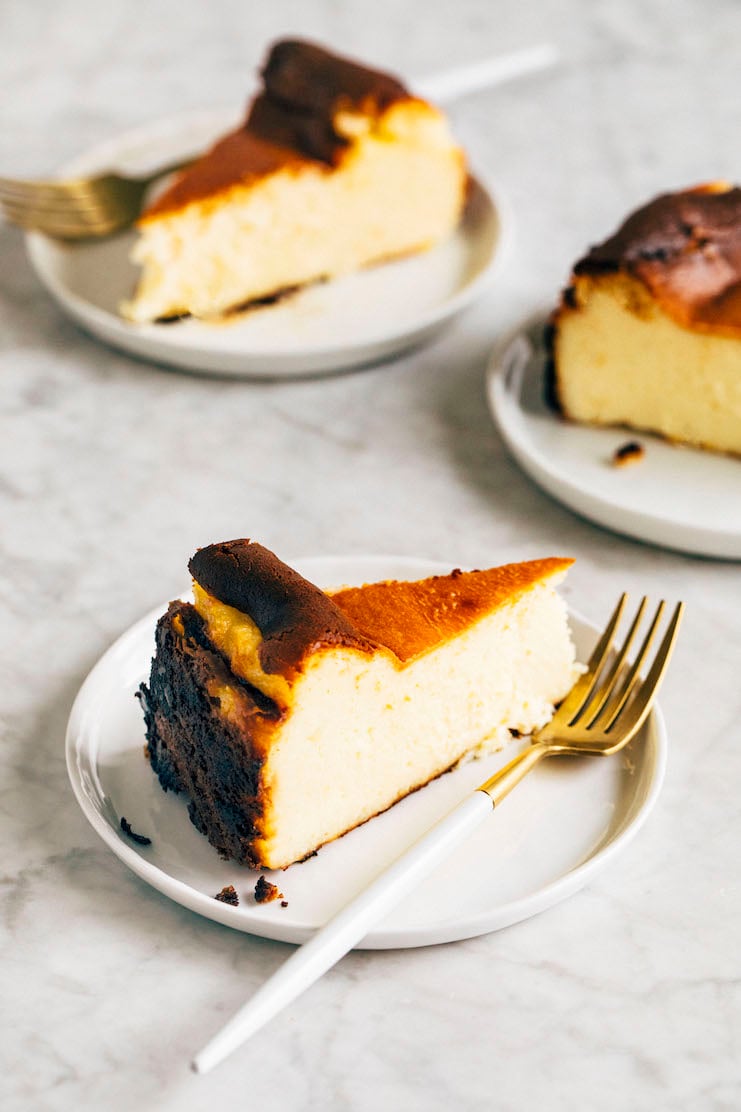
Burnt basque cheesecake is a specialty dessert from the Basque region of Spain. Unlike New York-style cheesecake, which is pale, dense, and creamy, burnt basque cheesecake comes out super dark and caramelized. In fact, it almost looks burnt—hence its name! But don’t let its torched appearance fool you. This recipe makes a delightfully light cheesecake, with a texture halfway between a light and airy soufflé and creamy cheesecake.
@hummingbirdhigh guys you have to try this recipe #bakingtiktok #cooking #tiptok #dinnerrecipe #treatyourself #recipes #baking ♬ Just a Cloud Away – Pharrell Williams
What does burnt basque cheesecake taste like?
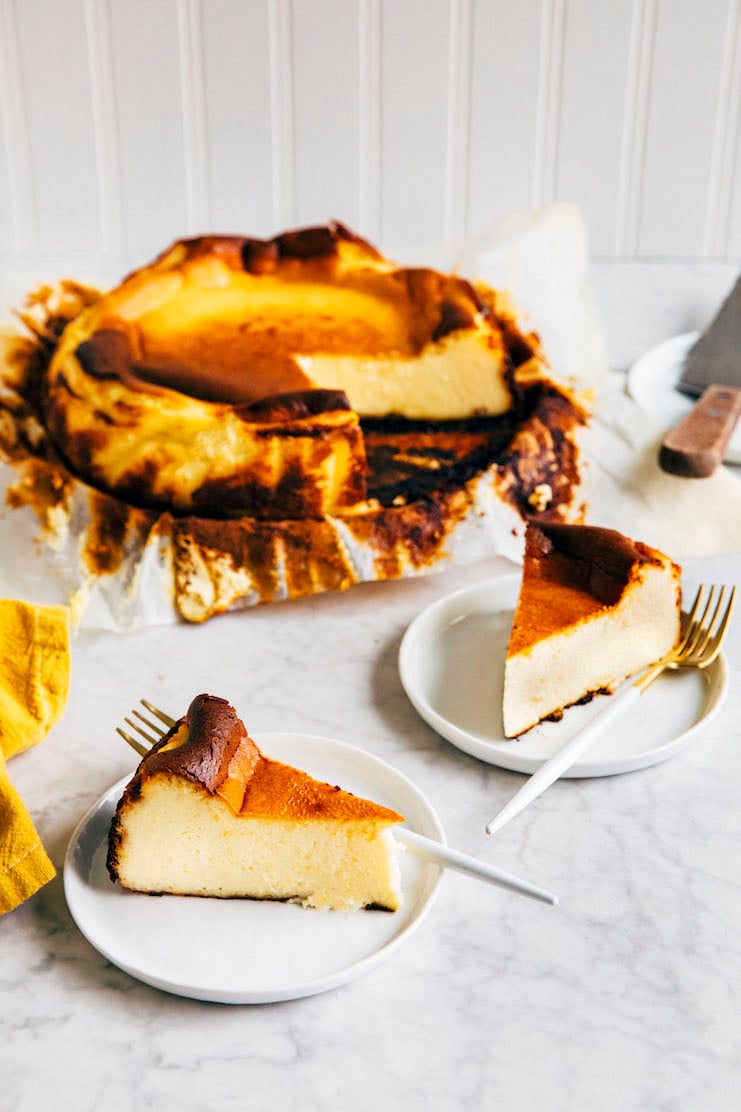
Burnt basque cheesecake tastes like a very light cheesecake. Its texture is much lighter than New York-style cheesecake, with an airy, souffle-like cream cheese-based batter. I like to think of it as the halfway point between super airy and bouncy Japanese cheesecake, and super dense and creamy New York-style cheesecake.
Unlike New York-style cheesecake, burnt basque cheesecake typically doesn’t have a crust. That means that every bite is light and almost mousse-like. And unlike New York-style cheesecake, which has perfectly smooth sides, burnt basque cheesecake has wrinkled sides. This rustic look is thanks to the recipe’s unique technique of baking the batter inside several sheets of parchment paper.
For more delicious homemade cheesecake recipes, check out Hummingbird High‘s Cake Recipe collection! Popular cheesecake recipes include this 6 Inch Cheesecake Recipe and these Creamy and Colorful Ube Cheesecake Bars.
The Easiest Cheesecake You’ll Ever Make
Real talk: most cheesecakes recipes—Japanese, New York-style, whatever else—are a pain to make. These cheesecakes are known for their pristine appearances with light colors, smooth sides, and even smoother tops. Often times, the recipes instruct you to bake them in water baths, and provide complicated instructions on how to cool them properly. Without these measures, the cheesecakes come out too tough, too dark, and with giant cracks!
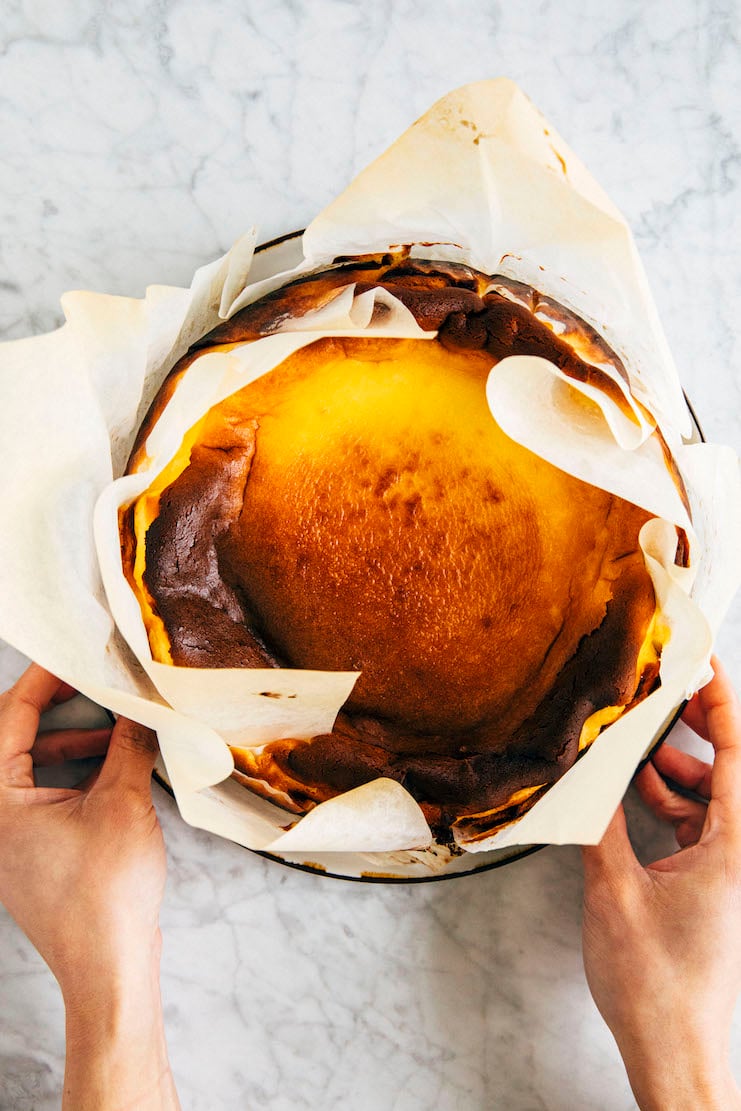
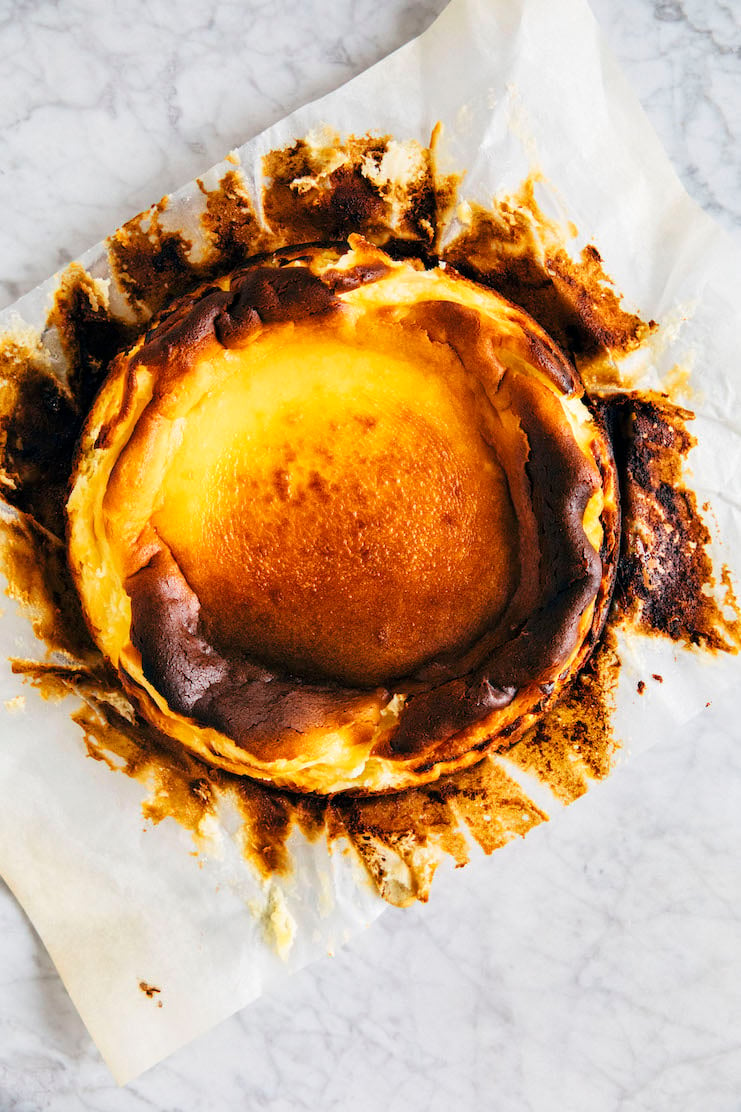
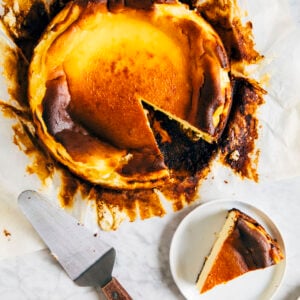
But you don’t need to worry about any of that with this burnt basque cheesecake recipe. To get its signature torched appearance, the cheesecake is baked at high heat WITHOUT a water bath. Burnt basque cheesecakes are also known for their craggy sides (thanks to a unique trick of baking the cake in parchment paper), and tops that are higher around the edges and sunken in the center. It’s an incredibly forgiving and easy-to-achieve look!
What You Need
Ingredient Sources, Recommendations, and Substitutions
- Cream Cheese. Use full-fat cream cheese for this recipe. Using low-fat cream cheese leads to a less flavorful cheesecake!
- Heavy Cream. In a pinch, you can also use light whipping cream or whole milk. However, I do not recommend using low- or nonfat milk. If you do, it’s likely that the cheesecake won’t set properly. You’ll also likely end up with a less flavorful cheesecake. That being said, I really recommend sourcing heavy cream for the recipe. It makes it so much better!
- All-Purpose Flour: You can use a 1-1 gluten free all purpose flour replacer to make the recipe gluten free. I like Bob’s Red Mill Gluten Free 1 to 1 Baking Flour or King Arthur Flour Gluten Free All Purpose Flour.
- Kosher Salt: Kosher salt is the best salt for baking recipes. But you can replace the kosher salt in the recipe with table salt. Just use half the amount listed in the recipe when you do!
Recipe Troubleshooting and FAQ
My cheesecake didn’t brown as much as yours. What did I do wrong?
In the section on “How To Make Burnt Basque Cheesecake” above, I recommend preheating the oven for at least 1 hour before baking. Although you can get away without this long preheat time (that’s why the recipe doesn’t explicitly instruct you to do so), you may need it if you have an large, older, or generally unreliable oven with hot spots. The longer preheat guarantees the signature burnt look of the cheesecake.
Although it may be tempting to crank up the heat in the last few minutes of baking to get the burnt look, I don’t recommend it. Doing so puts you at risk for overcooking your cheesecake, leading to a curdled, lumpy batter!
My cheesecake cracked. What did I do wrong?
Incorporating too much air into cheesecake batter also causes cracks in the cheesecake. If using a KitchenAid stand mixer, only mix the cheesecake batter on speed “2” or lower after adding the eggs to the batter. Doing so prevents overbeating and/or overmixing the cheesecake batter.
My cheesecake has weird white lumps in it. What did I do wrong?
The white lumps are typically small lumps of cream cheese that didn’t mix properly with the rest of the ingredients. To prevent them, make sure all your ingredients are at room temperature. Check out the Baker’s Tips below for my best tricks to bring cream cheese, eggs, and cream to room temperature quickly! And by room temperature, I mean between 65° and 70°F—so if it’s a cold winter’s day, you may need to go even warmer than room temperature!
Additionally, you’ll need to scrape down the bottom and sides of your bowl a LOT when making the cheesecake batter. The cream cheese has a tendency to clump in the bottom of the bowl. If you pour these clumps into the pan, they’ll show up as the white lumps in your baked cheesecake. So make sure you are scraping the bottom and sides of the mixer bowl repeatedly as you make the batter! Don’t forget to scrape down your paddle attachment, too.
Can you freeze burnt basque cheesecake?
Yes!
You can freeze in the following ways:
Option 1: Freeze the whole cheesecake.
Cool the baked cheesecake in its pan completely on a wire rack. Unlatch the springform pan and lift the sides of the pan away from the bottom of the pan. Place the cheesecake on a plate, uncovered, and freeze until solid, 1 to 2 hours.
Once solid, tightly wrap the cheesecake in two layers of plastic wrap. If storing long term (that is, for longer than 1 month), wrap in a layer of aluminum foil. The aluminum foil helps prevent the cake from absorbing flavors and odors in the freezer. Freeze for up to 6 months.
When ready to serve, transfer the cheesecake to the refrigerator to thaw overnight. Before serving, unwrap the cheesecake and thaw at room temperature for 30 minutes before slicing.
Option 2: Freeze individual slices of the cheesecake.
Tightly wrap any leftover slices of cheesecake in two layers of plastic wrap. Freeze for up to 3 months. Follow the instructions above to thaw and enjoy!
Best Recipe Tips
Ingredient Tips
- Make sure that all your ingredients are at the temperatures specified in the recipe before starting any of its steps. Cold ingredients don’t mix together easily, creating a lumpy cheesecake batter prone to cracking.
- To bring cream cheese to room temperature quickly, slice the cream cheese into 1- to 2-inch cubes. Place the cream cheese cubes in a microwave-safe bowl and microwave in 10- to 15-second intervals until the cubes have softened. It should take around 1 minute or so. Perfectly softened cream cheese should still be slightly cool to the touch. If you want to be technical about it, use a digital thermometer— a thermometer inserted into the center of a cream cheese cube should read between 65° and 70°F.
- To bring eggs to room temperature quickly, fill a small bowl with warm water. The temperature of the water should feel like a warm bath (one that’s not too hot—you don’t want to accidentally boil the eggs!). Carefully place the eggs in the water and let them sit for 5 to 10 minutes. I like to do this at the beginning of prepping my ingredients since the eggs will be at room temperature right when I finish prepping and measuring everything out.
- To bring cream to room temperature quickly, pour the amount needed for the recipe into a microwave-safe liquid measuring cup like these ones by Pyrex. Heat at 10- to 15-second intervals until the cream has warmed to room temperature. Be careful not to heat unattended for longer periods—when warmed, cream has a tendency to foam up and out of its container!
Technique Tips
- Although this isn’t a strict requirement, I like to preheat my oven for an hour before baking the burnt basque cheesecake. I find that doing so ensures that the burnt basque cheesecake comes out evenly burnt!
- To make the cheesecake, you need to line the springform pan with 2 large sheets of parchment paper. Press the parchment down into the bottom of the pan, making sure that it sticks up at least 2 inches taller than the pan’s sides. That’s because the cheesecake will rise significantly over the pan’s sides as it bakes. The parchment paper prevents the cheesecake from overflowing out of the pan! Don’t fold the parchment over the pan; it won’t be able to catch this rising batter if you do. Note that the parchment paper won’t lie flat against the sides of the pan. This is by design, too. In fact, this quality creates the burnt basque cheesecake’s cheesecake’s signature craggy sides!
- If your burnt basque cheesecake doesn’t look “burnt” enough after the recommended Bake Time of 50 to 55 minutes, try broiling it! Right after baking, broil the cheesecake for 1 to 2 minutes to toast its top. Just watch it carefully—you don’t want to overdo it!
Serving Tip
- To get straight edges and smooth sides when you slice the cheesecake, use a hot serrated knife. Fill a tall, heatproof glass with VERY hot water. Place the blade of the serrated knife in the water for 20 seconds. Use a kitchen towel to dry the knife. Use it to slice the cheesecake, dipping the knife into the water and drying it ever so often, especially if the filling starts sticking to the blade.
Get the Recipe: Perfectly Light and Airy Burnt Basque Cheesecake Recipe
Ingredients
For the Burnt Basque Cheesecake
- 4 (8-ounce) boxes cream cheese, at room temperature
- 1 ½ cups (10.5 ounces or 298 grams) granulated sugar
- 5 large eggs, at room temperature
- 1 ½ cups (12 ounces or 340 grams) heavy cream, at room temperature
- ¼ cup (1.15 ounces or 33 grams) all-purpose flour
- 1 teaspoon kosher salt
Equipment
- a 9-inch springform pan OR a 9-inch pan with at least 3 inch tall sides
- parchment paper
Instructions
For the Burnt Basque Cheesecake
- Prep your oven and pan. Position a rack in the center of the oven and preheat to 400°F. Lightly spray a 9-inch springform cake pan with cooking spray and line the bottom with two sheets of parchment paper, making sure that the paper sticks up 2 inches above the sides of the pan. The parchment paper won't lie flat—that's totally okay, I promise!
- Beat the cream cheese and sugar. In the bowl of a stand mixer fitted with the paddle attachment, beat the cream cheese on medium until soft and creamy, 1 to 2 minutes. Reduce the mixer to low and add the sugar and beat until light and fluffy, about 1 minute, using a rubber spatula to scrape down the bottom and sides of the bowl as necessary.
- Add the eggs and the cream. With the mixer on low, add the eggs one at a time, adding the next egg only after the previous one has been fully incorporated, scraping down the bottom and sides of the bowl after each addition. Slowly pour the cream down the side of the bowl and beat until combined, about 1 minute.
- Add the flour and salt. With the mixer on low, gradually add the flour and salt and beat until just combined. Scrape down the bottom and sides of the bowl once more, and beat on low for an additional 30 seconds.
- Prep for baking. Pour the batter into the prepared pan. Pick up the pan and whack it a few times on your kitchen counter to allow the batter to fill the the pan more evenly.
- Bake the cheesecake. Bake for 50 to 55 minutes, or until the edges of the cheesecake are set but the center still wobbles slightly. Cool completely in its pan on a wire rack before slicing.
- Serve and store. To serve, unlatch the springform pan and lift the sides of the pan away from the bottom of the pan. Use a hot knife to slice and serve. Serve slightly warm, at room temperature, or chilled from the refrigerator. The burnt basque cheesecake can be kept at room temperature, under a cake dome or a large bowl turned upside down, for 1 day. After that, place any leftover slices in an airtight container in the refrigerator for up to 3 days.
Notes
- Make sure that all your ingredients are at the temperatures specified in the recipe before starting any of its steps. Cold ingredients don’t mix together easily, creating a lumpy cheesecake batter prone to cracking.
- To make the cheesecake, you need to line the springform pan with 2 large sheets of parchment paper. Press the parchment down into the bottom of the pan, making sure that it sticks up at least 2 inches taller than the pan’s sides. That’s because the cheesecake will rise significantly over the pan’s sides as it bakes. The parchment paper prevents the cheesecake from overflowing out of the pan! Don’t fold the parchment over the pan; it won’t be able to catch this rising batter if you do. Note that the parchment paper won’t lie flat against the sides of the pan. This is by design, too. In fact, this quality creates the burnt basque cheesecake’s cheesecake’s signature craggy sides!
- If your burnt basque cheesecake doesn’t look “burnt” enough after the recommended Bake Time of 50 to 55 minutes, try broiling it! Right after baking, broil the cheesecake for 1 to 2 minutes to toast its top. Just watch it carefully—you don’t want to overdo it!
- To get straight edges and smooth sides when you slice the cheesecake, use a hot serrated knife. Fill a tall, heatproof glass with VERY hot water. Place the blade of the serrated knife in the water for 20 seconds. Use a kitchen towel to dry the knife. Use it to slice the cheesecake, dipping the knife into the water and drying it ever so often, especially if the filling starts sticking to the blade.
get new recipes via email:

buy the book
Weeknight Baking:
Recipes to Fit your Schedule
Over the past several years of running Hummingbird High, I kept a crucial aspect of my life hidden from my readers: I had a full-time, extremely demanding job in the tech world. In my debut cookbook, Weeknight Baking, I finally reveal the secrets to baking delicious desserts on a tight schedule.
Did you make this recipe?
Please leave a comment and rating for the recipe using the form below!
Your ratings make it easier to find the recipe online, and I’m always looking for ways to improve Hummingbird High.
I have made Basque cheesecake twice. I realize European cream cheese is saltier than Philadelphia, but i am concerned that your recipe calls for too much salt. I would imagine 1 tsp. would be appropriate if the cheese was unsalted but most cream cheese (even the natural ones) have some salt. I would suggest 1/2 tsp. salt for this recipe. You just want to amp it up a little, not a lot. Otherwise, the recipe is a winner. Note: if you bake it a bit hotter, say 450 F., you get a lovely brown crust all over the top. If that is not your aim, 400 F. is fine. I ate at La Vina in 2019, and had their cheesecake twice in one day (oh, the happy calories). Their cakes resembled the photos in your recipe. Well done!
Hi Manya,
I used 1 teaspoon kosher salt, which is equivalent to about 1/2 teaspoon table salt. Table salt has smaller granules than kosher salt, and tastes saltier as a result. You can learn more here:
https://www.bonappetit.com/story/what-is-kosher-salt
I also use Diamond Crystal kosher salt, which tastes less salty per teaspoon than Morton’s salt. You can learn more here:
https://food52.com/blog/16824-you-re-not-crazy-there-is-a-difference-between-morton-s-and-diamond-crystal
Cook’s Illustrated also provides a conversion guide between the different salts:
https://www.cooksillustrated.com/how_tos/10416-table-salt-versus-kosher-salt
I don’t bake with kosher salt, having learned the hard way by baking sourdough bread with it that turned out insipid. I use sea salt instead, which seems to behave more like table salt. Thanks for the clarification.
We loved this! So easy and so good !
I am about to make the cake … and I am sure it will be fabulous. But one thing flummoxes me: the 9 inch cakepan is supposed to have a 4 inch rim – but there is no rim height recommendation for the springform. keep fingers crossed that my generic springform with 9 inch diameter and the 2.5 inch rim height works out!
Hi!
I didn’t include height recommendations for springform pans because most springform pans usually have 2.5- to 3-inch tall sides! I think your current pan will work well 🙂
If I want to make a smaller version of this (6″ ), would it work to follow the directions as written here, but using the ingredient amounts in the 6″ cheesecake on your blog ( without the crust and topping, obviously)?
I realllly want to say yes to this, because in theory, it *could* work. However since I’ve never done it myself I can’t guarantee any results! There are enough differences between the two cheesecakes that I’d be wary—for instance, this cheesecake recipe uses flour, while the 6-inch one does not. I think a better bet would be halving this recipe and trying it in a 6-inch pan… you’d also need to mess with the Bake Time some to adjust for the smaller pan…
Thank you! Cutting it in half was my first instinct, but I noticed the 6″ recipe was similar. I completely overlooked the flour though. I’ll just go with my initial instinct and adjust the time. Thanks so much! I’m excited to try this one!
Hi Michelle! I just moved to Denver and this will be my first high altitude bake. I’m excited to finally be moved in enough to start baking again but more than a little nervous about the altitude. Are there any adjustments I should make based on the altitude? Love the blog and can’t wait to try this recipe!
Hi! It’s been a long time since I’ve lived anywhere high altitude, so I’m probably not the best at giving advice for that kind of baking anymore. But have you checked out King Arthur Flour’s high altitude baking guide? I used it a lot when I lived in Denver, it was a lifesaver: https://www.kingarthurbaking.com/learn/resources/high-altitude-baking
Thank you, Michelle! For this cake, I ended up putting a pan of water in the oven (a tip I read in a Denver Post article on high altitude cheesecakes) and extended the baking time by 15 or so minutes. It turned out great! I’ll keep that KA Flour link bookmarked for any future troubleshooting.
Mine didn’t get burnt, so I tried the broiling method. The parchment paper caught fire. I’ll let you know if the burnt paper affected the flavor.
I followed the instructions and after 55 minutes in the oven the top was golden brown but the middle was still super creamy it didn’t cook 🙁 I’m now trying to put it back in for another 30 minutes maybe?
Thank you for this amazing recipe and the detail which makes following it easy.
Could I please ask that you include metric measurements as well? I believe it is possible to include a toggle that will do that, such as in the ‘Just One Cookbook” Japanese cookery site.
Best and easiest recipe! Thank you for this, everyone loved the cheesecake when I made it and now I’m making it a second time. Thanks again!
Wonderful recipe! Could you tell me how to modify it for a chocolate cheesecake version?
Hm, I’m not sure—I’ve never made a chocolate version!
My go to recipe! My cheesecake always comes out PERFECT. I substituted the cream for coconut cream just to make it “healthier” and everyone loves it so been doing that ever since! Thank you for this, my cheesecake is always a hit!
I followed the recipe to the T and the cake sunk way too much. It came out nothing like the the picture
Making this now… batter chilling in ice bath, oven pre-heating…
Quick question: Is there any reason one couldn’t put a 9″ piece of circular parchment in the bottom of the pan (nonstick spray on both surfaces) and then put a ring of parchment around the sides, pushing the bottom edge flush with the bottom parchment (again, with nonstick on pan and on front of parchment)? Is the little crack around the bottom between the two pieces of parchment ok?