
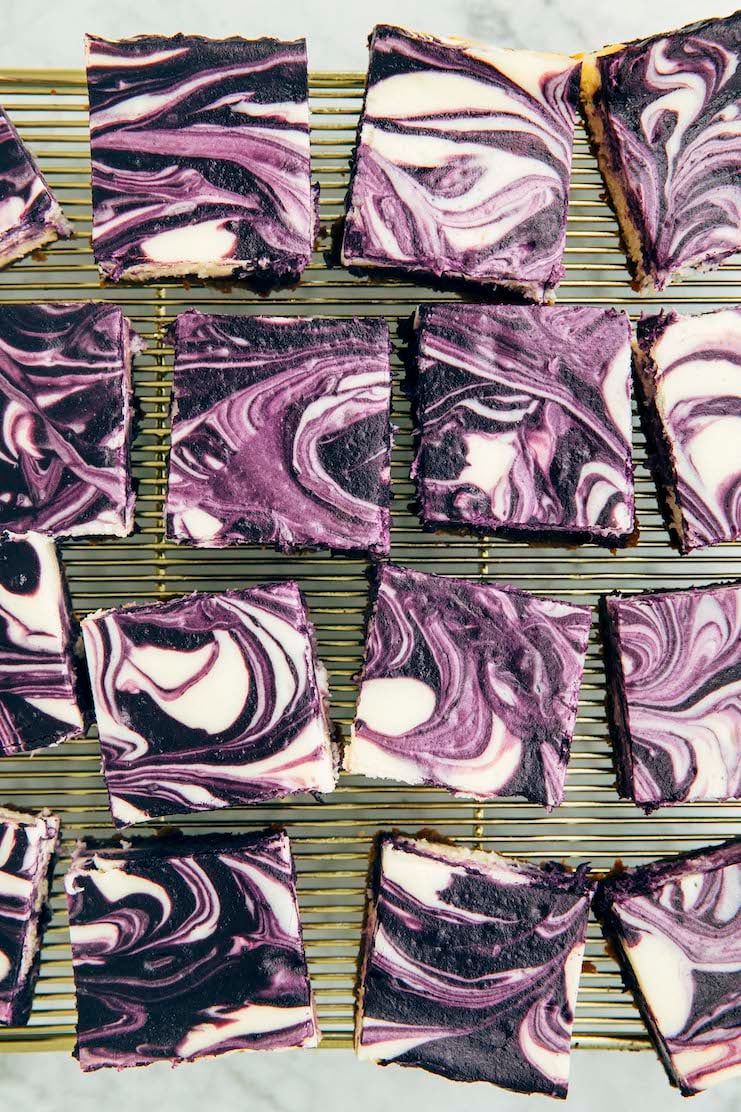
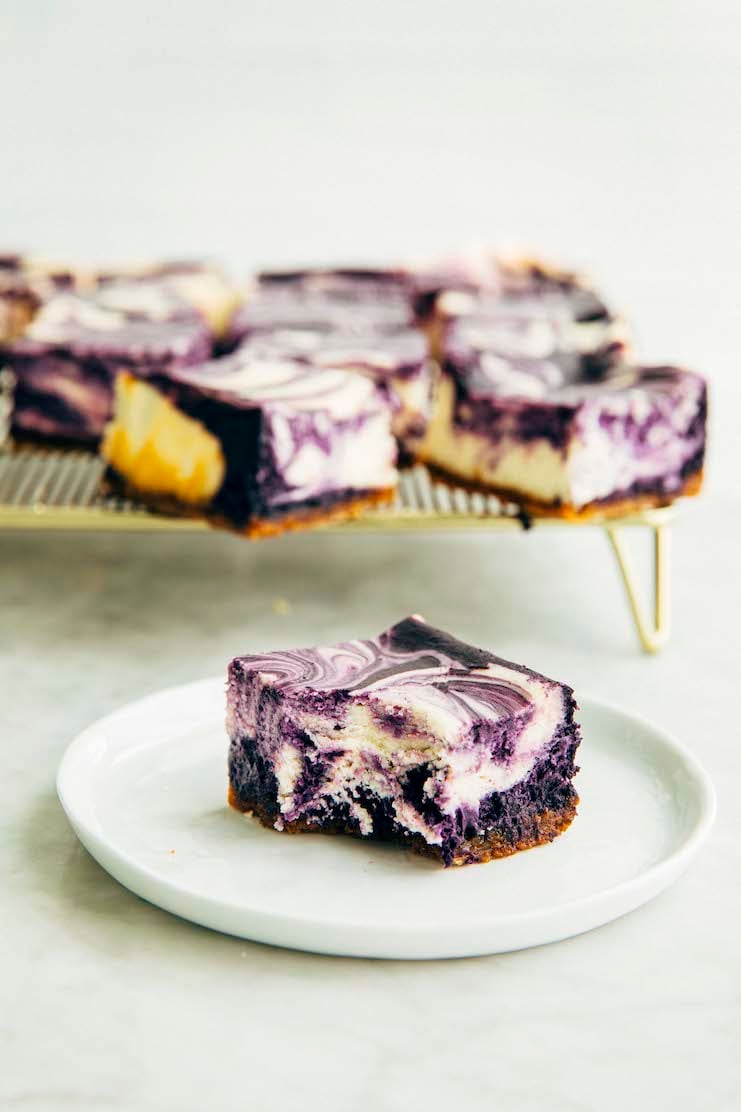
About These Ube Cheesecake Bars
These ube cheesecake bars are made with smooth and creamy cheesecake filling laced with vibrant purple ube cheesecake swirls. The ube cheesecake is made with ube halaya jam, a jam made from a Filipino yam with a sweet and mild flavor. It tastes like a cross between vanilla and pistachio and brings a wonderful nutty flavor to complement the tangy cheesecake.
For even more ube recipes, check out these ube crinkle cookies (one of the most popular recipes on this site), ube mochi donuts, and a round-up of ube dessert recipes on Hummingbird High!
@hummingbirdhigh #ube all day baby #desserttiktok #bakingtiktok ♬ Lavender Haze – Taylor Swift
Ingredients and Substitutions
Now that I’ve convinced you to make these ube cheesecake bars, et’s talk about some key ingredients and potential substitutions:
- Graham Crackers. You can substitute the graham cracker crumbs with other cookie crumbs made from Nilla vanilla wafers, Oreos, or my personal favorite, speculoos cookies from Trader Joe’s. You can also use gluten free graham crackers to make these ube cheesecake bars gluten free.
- Kosher Salt. I think that kosher salt is the best salt for baking recipes. But you can replace the kosher salt in the recipe with table salt. Just use half the amount listed in the recipe when you do!
- Unsalted Butter. While recipe testing, I found that you can substitute the unsalted butter with salted butter without any noticeable difference in taste.
- Sour Cream. No sour cream? No problem. I tested and found that you can swap the sour cream for the same amount of unflavored yogurt (Greek or regular) or crème fraîche!
- Ube Halaya Jam and Extract. Check out my post on where to buy ube halaya jam and extract. I’ve also included instructions on how to make ube halaya jam at home if you can’t find it/want to make it from scratch!
How To Make Ube Cheesecake Bars
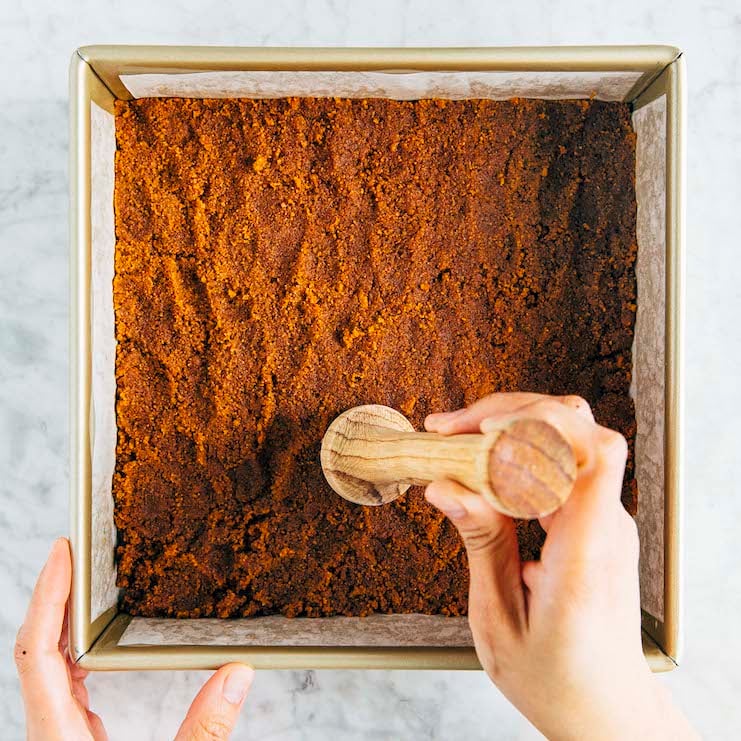
When making the graham cracker crust, it’s important to apply pressure when pressing it into the pan. Doing so is what enables the crust to hold its shape.
At first, it will seem like there aren’t enough crumbs to spread across the bottom of the pan:
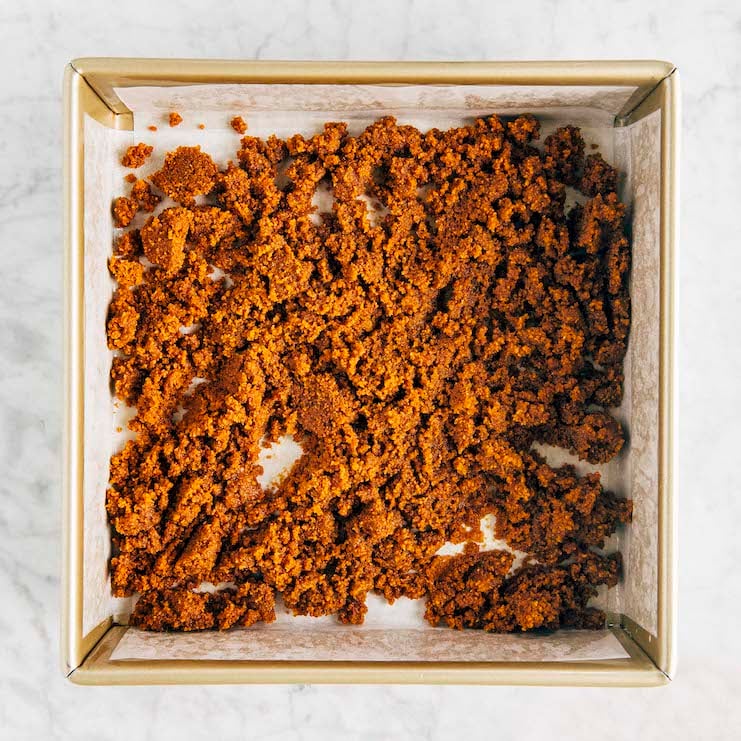
But as you press the crumbs into place, they will spread enough to fill the bottom of the pan. I used this tart tamper to help with the task, but you also use the bottom of a coffee mug or a heavy glass to pound the crumbs in place:
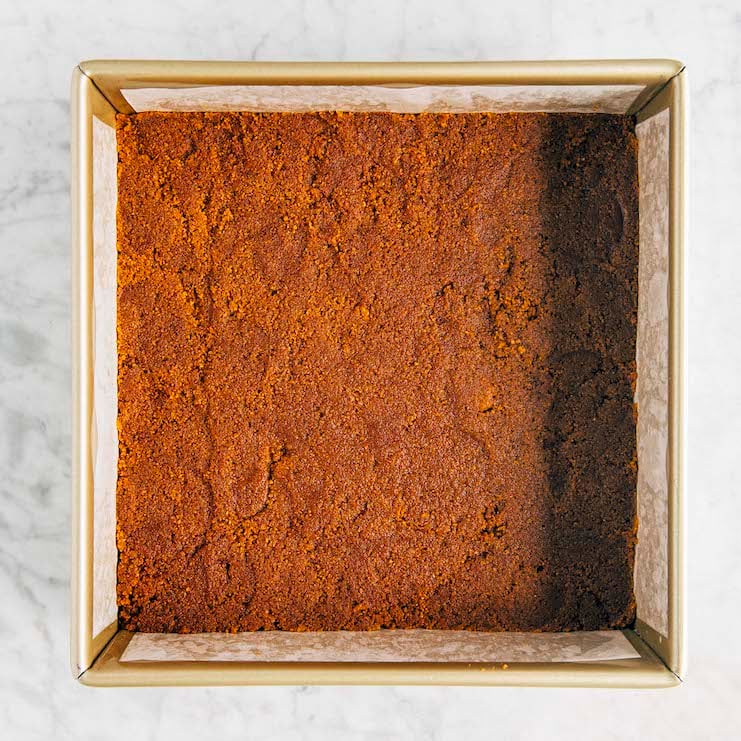
When done, the crust will look like the photo below. Some folks like to press the crumbs half way up the sides of the pan as well to create a crust for the bars’ sides, but I like to keep my crust at the bottom of the bars. But it’s up to you if you want to customize the bars!
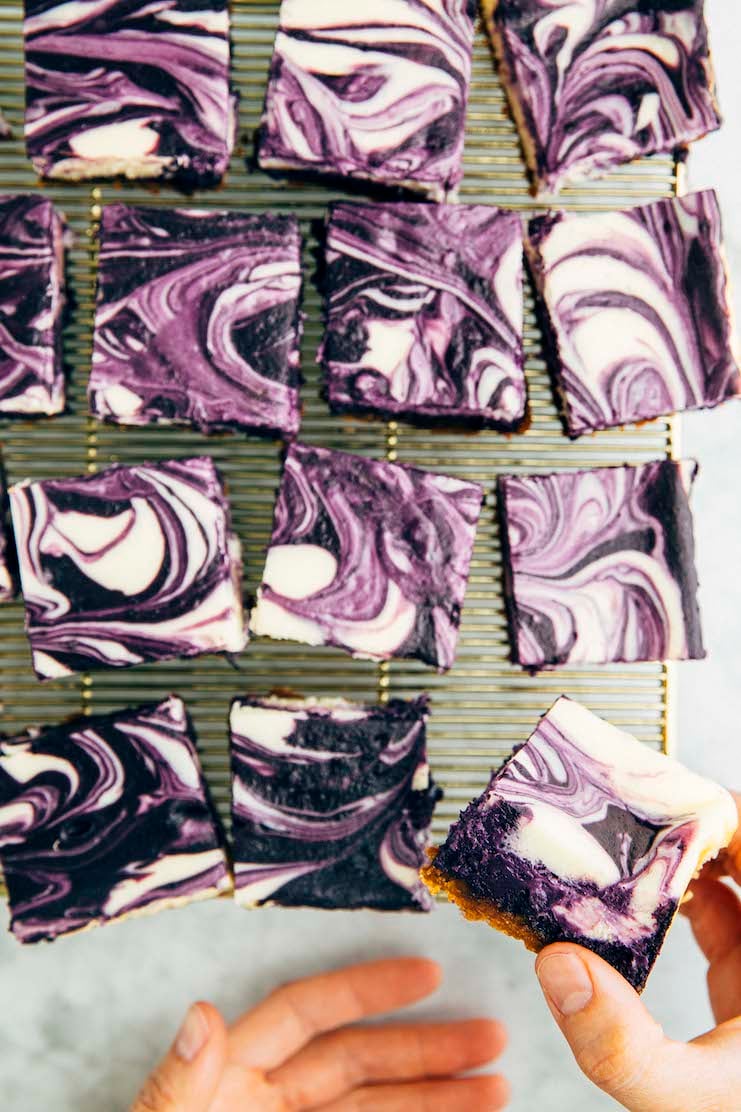
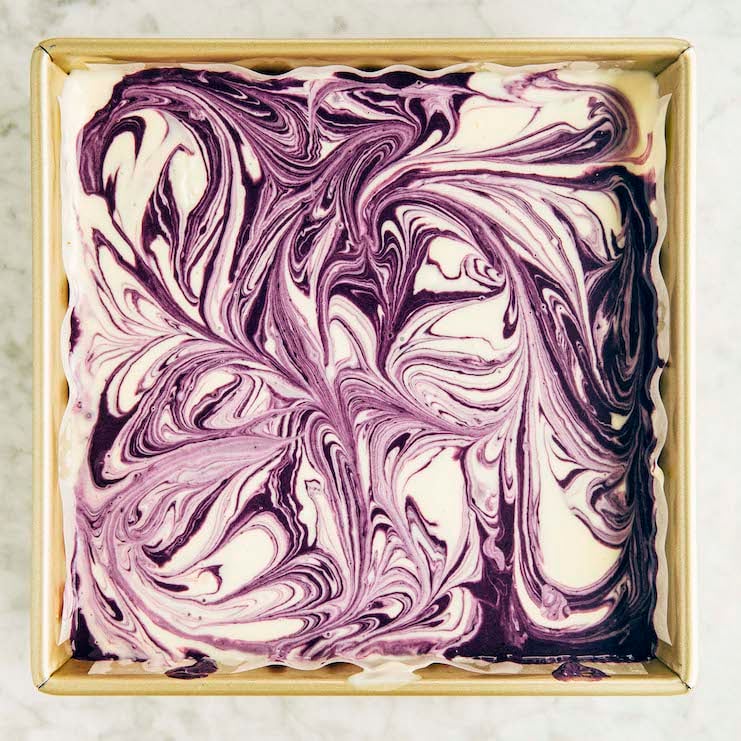
How To Swirl The Cheesecake Filling (With Photos!)
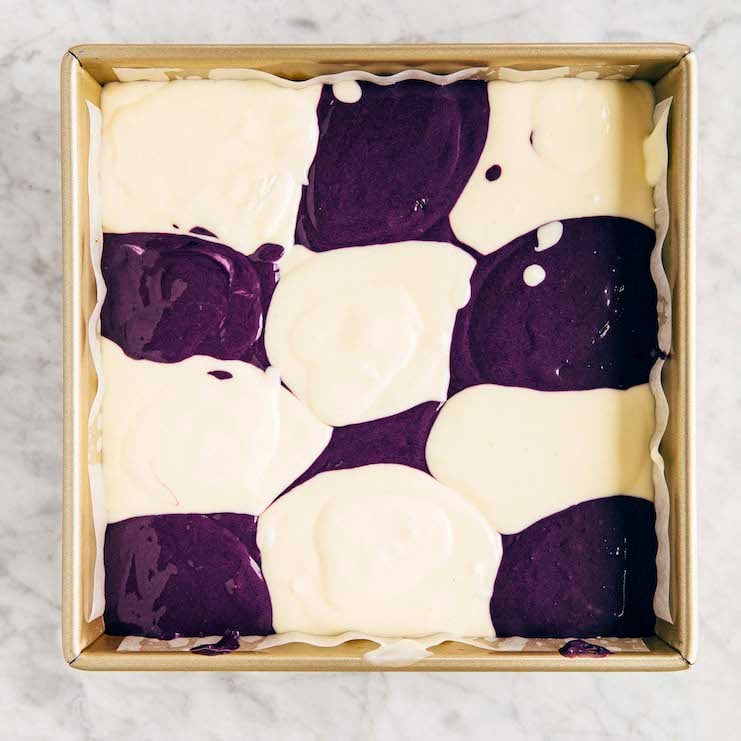
The recipe instructs you to alternate spooning generous dollops of the two cheesecake batters over the prepared crust—the photo below shows what this step looks like. Don’t worry if you get drops of cheesecake into the ube filling, and vice versa. It all gets swirled together in the end!
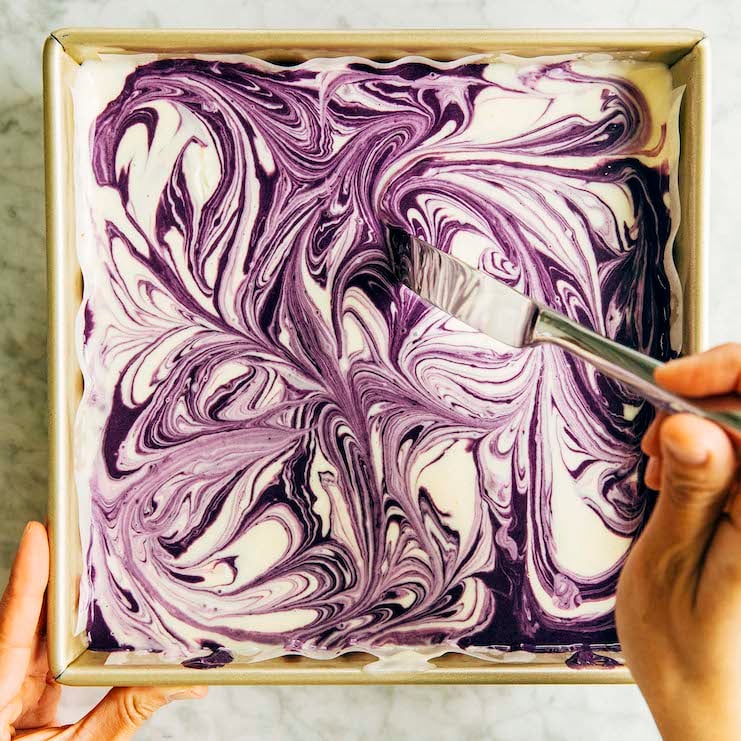
After you’ve filled the pan in this way, take a butter knife and swirl the two fillings together. Be careful not to overmix! You want the two fillings to still be distinct from one another:
Recipe Troubleshooting & FAQ
I don’t have a 9-inch square pan for these ube cheesecake bars. What can I use instead?
If you don’t have a 9-inch square pan, you can use the following instead:
- An 8-inch square pan. You’ll likely need to increase the Bake Time of the recipe by 5 to 10 minutes.
- A 9 x 13-inch pan. You can double the recipe quantities and bake the cheesecake in a 9 x 13-inch pan. You’ll end up with twice as many cheesecake bars. Bake Time should stay the same.
Most cheesecake recipes instruct me to bake the cake in a water bath. So why don’t I need a water bath for cheesecake bars?
Recipes instruct you to bake traditional 9- or 10-inch round cheesecakes in a water bath (also known as a bain-marie) for many reasons. The water bath helps the cheesecake bake evenly, ensuring that the outside edges bake at the same time as the center. Doing so prevents the cheesecake from puffing up around the edges, as well as cracking and/or sinking in the middle.
But because cheesecake bars are thinner and contain less batter than traditional cheesecakes, they bake faster and more evenly even without a water bath.
My cheesecake bars cracked! What did I do wrong?
Cheesecake bars can still crack for the the following reasons:
- You didn’t use room temperature ingredients. Ingredients like cream cheese, eggs, and cream mix together better when they’re at room temperature. This is especially important for cheesecake—you don’t want any lumps of unmixed cream cheese or eggs in the batter. These lumps could potentially cause cracks in the cheesecake. So make sure that all your ingredients are at the temperature listed in the recipe before beginning any of the recipe steps.
- You overmixed the cheesecake filling. Incorporating too much air into cheesecake batter also causes cracks in the cheesecake. If using a KitchenAid stand mixer, only mix the cheesecake batter on speed “2” or lower after adding the eggs to the batter. Doing so prevents overbeating and/or overmixing the cheesecake batter.
- You didn’t cool it slowly after baking. Cheesecakes crack when they are exposed to sudden temperature changes. One of the most common causes of cracking comes from moving the hot cheesecake into a cold room.
If your house runs cold, you can still cool the cheesecake slowly by leaving it in the oven after it’s done baking. Turn off the oven, crack open the oven door so that warm air can escape, and leave the bars in the oven for 30 minutes. After 30 minutes, open the oven door fully and allow the cheesecake to cool to room temperature completely before chilling.
Can you freeze ube cheesecake bars?
Yes! Ube cheesecake bars freeze wonderfully. You can freeze the cheesecake bars unsliced or sliced.
To do so, chill the cheesecake bars in the pan for at least 4 hours, but preferably overnight. Once chilled, lift the cheesecake bars using the parchment paper as handles.
If freezing unsliced, place the cheesecake on a plate, uncovered, and freeze until solid, 1 to 2 hours. If freezing sliced, slice the cheesecake bars now and freeze until the slices are solid.
Once solid, tightly wrap the cheesecake in two layers of plastic wrap. If storing long term (that is, for longer than 1 month), wrap in a layer of aluminum foil. The aluminum foil helps prevent the cake from absorbing flavors and odors in the freezer. Freeze for up to 6 months.
When ready to serve, transfer the cheesecake to the refrigerator to thaw overnight. Before serving, unwrap the cheesecake and thaw at room temperature for 30 minutes before slicing.
Best Recipe Tips
Tips About Ingredients
- To make graham cracker crumbs, use a digital scale to weigh out as many crackers as needed to match the weight listed in the recipe. Use a food processor to pulse the crackers into fine crumbs.
- Make sure that all your ingredients are at the temperatures specified in the recipe before starting any of its steps. Cold ingredients don’t mix together easily, creating a lumpy cheesecake batter prone to cracking. Check out my article in Bon Appetit about how to bring baking ingredients to room temperature quickly!
Best Tip For Slicing And Serving The Bars
- To get straight edges and smooth sides when you slice the cheesecake, use a hot serrated knife. Fill a tall, heatproof glass with VERY hot water. Place the blade of the serrated knife in the water for 20 seconds. Use a kitchen towel to dry the knife. Use it to slice the cheesecake, dipping the knife into the water and drying it ever so often, especially if the filling starts sticking to the blade.
Get the Recipe: Ube Cheesecake Bars Recipe
Ingredients
For The Graham Cracker Crust
- 2 cups (7 ounces or 198 grams) graham cracker crumbs
- ½ cup (1 stick or 4 ounces or 113 grams) unsalted butter, melted and cooled slightly
- 2 Tablespoons granulated sugar
- ¼ teaspoon kosher salt
For The Cheesecake Filling
- 3 (8-ounce) boxes cream cheese, at room temperature
- 1 cup (7 ounces or 198 grams) granulated sugar
- 3 large eggs, at room temperature
- ½ cup (4 ounces or 113 grams) sour cream, at room temperature
For The Ube Cheesecake Filling
- ¾ cup (6 ounces or 170 grams) ube halaya jam
- 1 ½ teaspoons ube extract
Equipment
- A food processor
- 1 (9-inch) square pan (preferably metal)
- a tart tamper
Instructions
- Prep the oven and pan. Position a rack in the center of the oven and preheat the oven to 325°F. Line a 9-inch square cake pan with parchment paper, leaving at least a 2-inch overhang on two opposite sides. Layer a second sheet of parchment paper on top, perpendicular to the first, leaving a 2-inch overhang on the remaining sides.
- Make the graham cracker crust. In a medium bowl, combine the graham cracker crumbs, melted butter, sugar, and salt. Mix with a rubber spatula until the mixture looks like wet sand.Pour the mixture into the prepared pan and use a tart tamper or your hands to press it evenly over the bottom of the pan, all the way to the edges. (You can also use the bottom of a coffee mug or a heavy glass to pound the crumbs in place—you want to apply some pressure here so the crust holds its shape.)
- Bake the graham cracker crust. Bake for 15 minutes. The crust will look underbaked and feel soft to the touch when you remove it from the oven, but will firm up as it cools. Cool the crust on a wire rack while you make the cheesecake fillings—be sure to keep the oven on!
- Make the cheesecake filling. In the bowl of a stand mixer fitted with the paddle attachment, beat the cream cheese on medium-low until soft, about 1 minute. Add the sugar and beat until light and fluffy, about 1 minute, using a rubber spatula to scrape down the bottom and sides of the bowl as necessary.Reduce the mixer to low and add the eggs one at a time, adding the next egg only after the previous one is fully incorporated, scraping down the bottom and sides of the bowl after each addition. With the mixer on low, add the sour cream all at once and beat until combined, about 1 minute. Scrape down the bottom and sides of the bowl once more, and beat on medium-high for an additional 30 seconds.
- Make the ube cheesecake swirl. Pour 1 ½ cups (12 ounces or 340 grams) of the cheesecake filling into a medium bowl. Add the ube halaya jam and ube extract, and whisk until just combined.
- Assemble the ube cheesecake bars. Alternate spooning generous dollops of the two cheesecake batters over the prepared crust. Then, use a butter knife to combine the two—be careful not to overmix! Tap the pan on the counter 1 to 2 times to smooth the filling top.
- Bake the ube cheesecake bars. Bake for 40 to 45 minutes, until the edges are set but the center still wobbles slightly.
- Cool the ube cheesecake bars. Once the bars are done, turn off the oven's heat. Open the oven door just a crack, propping it open with a heatproof cooking utensil like a wooden spoon. Leave the bars in the oven for 30 minutes.After 30 minutes, remove the bars from the oven and place on a wire rack. Run a butter knife or offset spatula around the edge of the pan to loosen the cheesecake. Cool the bars completely in the pan on the wire rack.
- Chill the ube cheesecake bars. When the bars are cool, cover loosely with plastic wrap and refrigerate until the filling is firm, at least 4 hours, preferably overnight.
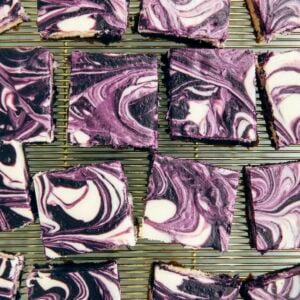
- Serve and store. Run a butter knife or offset spatula along the edges of the pan. Use the overhanging parchment paper as handles to lift the bars out of the pan and onto a cutting board. Use a hot knife to slice 2.25-inch squares and serve. The cheesecake bars can be stored in an airtight container in the refrigerator for up to 3 days.
Notes
- To make graham cracker crumbs, use a digital scale to weigh out as many crackers as needed to match the weight listed in the recipe. Use a food processor to pulse the crackers into fine crumbs.
- Make sure that all your ingredients are at the temperatures specified in the recipe before starting any of its steps. Cold ingredients don’t mix together easily, creating a lumpy cheesecake batter prone to cracking. Check out my article in Bon Appetit about how to bring baking ingredients to room temperature quickly!
- To get straight edges and smooth sides when you slice the cheesecake, use a hot serrated knife. Fill a tall, heatproof glass with VERY hot water. Place the blade of the serrated knife in the water for 20 seconds. Use a kitchen towel to dry the knife. Use it to slice the cheesecake, dipping the knife into the water and drying it ever so often, especially if the filling starts sticking to the blade.
Did you make this recipe?
Please leave a comment and rating for the recipe using the form below!
Your ratings make it easier to find the recipe online, and I’m always looking for ways to improve Hummingbird High.
get new recipes via email:

buy the book
Weeknight Baking:
Recipes to Fit your Schedule
Over the past several years of running Hummingbird High, I kept a crucial aspect of my life hidden from my readers: I had a full-time, extremely demanding job in the tech world. In my debut cookbook, Weeknight Baking, I finally reveal the secrets to baking delicious desserts on a tight schedule.
Delicious and easy to make! Everyone in my office loved them and wanted the recipe. I will definitely be making them again. Thank you!
Can this be done as individual cupcake tin sizes? If so what would the bake time be?
Thank you!
I’m not sure—I’ve never tried it in a cupcake pan before!
These are absolutely delicious AND beautiful! The purple swirls are so fun. If you’re an ube fan, definitely give these creamy, decadent bars a try.
Hello! I was wondering will this recipe work without the crust?
I think so, but I’ve never done it myself so I can’t guarantee the results. The Bake Time would likely change, too!
I made this recipe for my friend’s birthday, and not only did it come out amazingly good, but everyone raved about it.
I also made this with two changes, and everyone found it just as wonderful. Usually for cheesecake I replace the white sugar with sweetened condensed milk (one 14oz can for one cup sugar). It works wonderfully, but it *always* means you need to cook the cheesecake longer. I doubled the cooking times and it worked perfectly.
I’m going to keep both versions of this recipe in my box from now on.
So flavorful and easy !! Everyone loves it !
Awesome recipe! I used a silicone cupcake pan and made 18 mini cheesecakes that turned out PERFECT!!! Put a dollop of stabilized ube whipped cream on top. Beautiful and so good!!
everyone loved it!! great recipe! it is now my go to recipe!
Super easy recipe to follow. I replaced the graham crust with Oreo instead though. This recipe has just the right amount of ube without being too “earthy”. My boyfriend is not a dessert lover, but absolutely loves these and could eat a whole tray himself. Will happily make this recipe over and over again.
Sooooo I’m not sure how, but I have a BUNCH of the cheesecake filling leftover. What should I do with them? 😬😬😬😬😬 Otherwise loved how easy this recipe was, especially when it came with instructions on how to slowly cool down the cheesecake.
WOW~!
That is all I can say. This recipe was a showstopper at a potluck that I attended with friends and will 100% be used again.
It was a little challenging finding the ube extract and jam, so if you do plan on making this recipe keep in mind to have all ingredients sourced before starting 🙂
I don’t often leave reviews, but this recipe was too wonderful not to share my thoughts. Thank you, Michelle, for a wonderful showstopper!
I bookmarked this recipe over two years ago and finally made it for Christmas! Our large family loved the ube bars!! Crust and filling both so perfect. I did use nonfat greek yogurt and they were so good! Thanks for the meticulous instructions. I ended up using the food processor to mix the batter and find leaving half the batter to add the ube halaya helps create a smoother “purple batter”.
Always reach for this recipe. Everyone loves the ube as its flavor profile is like vanilla and pistachios. But for the single recipe use 9×13 pan. To get true bars.