

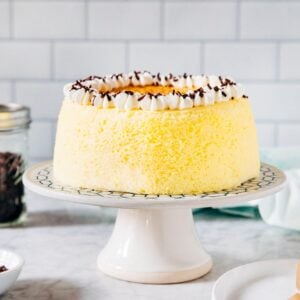
If you follow me on Instagram, you’ll know that I’ve spent the last few months testing a Japanese cotton cheesecake recipe. Japanese cotton cheesecakes are a cross between the creamy, regular ol’ cheesecake that we know and love and a light and airy Genoise sponge cake. As opposed to being dense and creamy like a New York cheesecake, they’re tall and airy with the subtle flavor of cream cheese. They taste exactly what I imagine a cheesecake flavored soufflé would be like, with a light and fluffy texture similar to cotton (which explains its name, I guess).
I’m not exactly sure how I first found out about Japanese cotton cheesecakes, or why I got the idea to make one in the first place — it must have been a stray image on Pinterest that inspired me? Or maybe one of these cakes when idly browsing Goldbelly for what else I could add to my order of Russ and Daughters lox? Eitherway, researching recipes led me down a rabbit hole of YouTube videos of folks making the Japanese cheesecake and poking them to show the cakes’ signature jiggle. This is now my second favorite YouTube genre of videos ever, right after the genre of “small girls beating up men trying to rob them”. Anyway, search “Japanese cotton cheesecake jiggles” on YouTube. You heard it here first.


If I’m being honest with you guys, this is not the easiest recipe to make at home. To get the cheesecake’s signature height and jiggle, you’ll need to invest in a pan with 4-inch sides. Most Japanese recipes also appear to be made in a 7-inch cake pan, which is not a standard pan size in the United States — and unfortunately, my attempts at making the pan in more commonly available pans led to cracked tops (when baked in the 6-inch pan) and dense cakes (when baked in the 8-inch pan). It also requires the use of several bowls, an oven proof cocotte (more on that later), and the technical knowledge of how to fold a batter without deflating too much air (which I personally think is one of the hardest techniques in baking). I can tell you’re exhausted already, and I’m sorry.

I realize that a complicated recipe like this one goes exactly against my New Year’s resolution of simplifying my recipes and making them more accessible to folks who don’t have 30 cake pans in their possession (cough) or have boxes of Valrhona feves in their basement (cough cough). And I have a ton of those planned this year too, I promise! You’ll have more recipes like chocolate chip cookies and banana bread waffles in your hands soon. But right now, it’s proving surprisingly hard to reign in my urge to pretend like I’m on the showstopper challenge of the Great British Bake-Off finale and come up with all sorts of crazy bakes. So tell me: WHAT KINDS OF RECIPES ARE YOU LOOKING FOR? Do you want more solid, delicious basics, or are you okay with reading about more complicated recipes like this one if they’re full of handy knowledge and research? Tell me in my reader survey (or learn more about why I’m doing one in the first place), and for now, enjoy this jiggly cheesecake.
Some baker’s notes:
-
- Because this recipe is a little on the complicated side, it’s best if you prep the ingredients beforehand by measuring them out before starting any of the recipe’s steps. Bring a kettle of water to boil first and set aside while you prep the other ingredients. Prep the eggs — you’ll need six eggs total, with the whites and yolks separated into two different bowls for use in the recipe later.
-
- Similarly, set yourself up for success by prepping the equipment needed for the recipe before starting any of its steps. You’ll need a 7-inch cake pan with 4-inch sides; I used this pan from Fat Daddio’s. In a pinch, you can substitute with an 8-inch pan with 3-inch sides, but your cheesecake simply won’t be as tall and won’t have the signature jiggle. Once you have the pan, it needs to be lined in a specific and slightly complicated way — I’ve tried to describe it as best as I could in the recipe steps, but if you need visuals, be sure to check out Just One Cookbook’s recipe (which part of this recipe was adapted from) where she has step-by-step photos showing you how to line the pan. And finally, you’ll need to prepare a water bath for the cake pan to bake in. Traditionally, water baths are made by placing the cake pan in a large roasting pan and pouring water into the roasting pan until the water reaches halfway up the sides of the pan. Because the cake pan used for this recipe has such tall sides, I found it cooked better if I stuck the cake pan in a deep Dutch oven (I used a 7-quart cocotte from Staub) and poured enough water for it to reach three-quarter’s of the way up the cake pan. In a pinch, you can use a large roasting pan, especially if you’re using an 8-inch cake pan instead.
- When fresh out the oven, the cheesecake should have a puffed and slightly domed top; however, as the cheesecake cools, the top will deflate and wrinkle. This is totally normal, I promise. If you find that your cheesecake top has cracked, you likely folded the mixture a little too rigorously and caused the batter to deflate — be careful when folding the batter to make sure that it stays light and airy!
Get the Recipe: Japanese Cheesecake
Ingredients
- 1 cup plus 2 tablespoons (9 ounces) cream cheese, cut into 1- to 1 1/2-inch chunks
- 1/4 cup (2 ounces) unsalted butter, cut into 1- to 1 1/2-inch chunks
- 1/2 cup a scant (3.35 ounces) whole milk
- 6 large egg yolks, at room temperature (see baker's notes)
- 1/2 cup (2 ounces) cake flour
- 1/4 cup (1 ounce) cornstarch
- 1/4 teaspoon kosher salt
- 1 tablespoon fresh lemon juice
- fresh zest from 1 medium lemon
- 6 large egg whites, at room temperature (see baker's notes)
- 1/4 teaspoon cream of tartar
- 3/4 cup (5.25 ounces) granulated sugar
Equipment
- Special Equipment: a 7 x 4-inch cake pan (see baker’s notes for substitutions)
- a large cocotte similar to a Le Creuset or Staub (see baker’s notes for substitutions)
Instructions
- Bring a full kettle of water to boil and set aside to cool slightly while you work through the recipe. Center a rack in the lower third of the oven and preheat to 350 (F). Prepare a 7 by 4-inch cake pan by spraying the bottom and sides of the pan with cooking spray. Prepare your parchment paper by cutting a circle that is 7-inches wide, and two rectangular strips measuring 2 x 18-inches. Place the two rectangular strips criss-cross on the bottom of the cake pan, folding any excess paper to the other side of the cake pan to create an overhang. Place the parchment paper circle on top of the criss-cross. Spray the parchment paper and set aside.
- Combine 1 cup plus 2 tablespoons cream cheese, 1/4 cup unsalted butter, and a “scant” 1/2 cup whole milk in a double boiler (or, make your own by placing a heatproof bowl over a saucepan containing 2-inches of water, ensuring that the bottom of the bowl does not touch the water). Cook over medium heat, whisking occasionally, until the cream cheese and butter is completely melted and the mixture is completely pale yellow.
- Remove the bowl from heat and whisk in 6 large egg yolks, one at a time, only adding the next egg yolk when the previous one is fully incorporated. Once all the eggs are added, use a rubber spatula to gently mix in 1/2 cup cake flour, 1/4 cup cornstarch, and 1/4 cup teaspoon kosher salt. Continue stirring until well combined, and pour the mixture over a fine-mesh sieve over a large bowl. Discard any lumps in the sieve. Gently mix in 1 tablespoon fresh lemon juice and fresh zest from 1 medium lemon into the mixture and set aside.
- In the bowl of a freestanding electric mixer fitted with a whisk attachment, combine 6 large eggs and 1/4 teaspoon cream of tartar. Whisk on medium-high speed for 1 to 2 minutes or until the mixture is foamy. Lower the mixer speed to its slowest setting and slowly pour in 3/4 cup granulated sugar. Turn the mixer up back to medium-high and keep whisking until the mixture becomes a pure white foamy meringue that forms soft peaks, around 2 to 3 minutes.
- Carefully spoon 1/3 of the meringue over the cream cheese mixture and use a rubber spatula to fold the meringue into the cream cheese mixture. Once the meringue is incorporated, spoon a second third of the meringue over the cream cheese mixture and repeat the folding process. Finally, spoon the final third of the meringue over the cream cheese mixture and repeat the folding process one last time — at this point, the mixture should be light, airy, and completely homogenous. There should be no yellow or white streaks in the mixture.
- Carefully spoon the mixture into the prepared pan, being careful not to deflate the mixture too much. Tap the pan once or twice against your kitchen counter to release any air pockets in the batter. Place in the center of a cocotte and pour the warm water from the kettle into the pan so that the warm water goes three-quarters of the way up the sides of the pan. Carefully transfer to the preheated oven. Reduce the oven temperature to 325 (F) and bake for 70 to 75 minutes, or until a skewer inserted into the cake comes out clean. After 70 to 75 minutes, turn off the oven completely but leave the cheesecake (sitting in the waterbath and all) inside, using a heatproof spatula or wooden spoon to leave the oven door ajar. Cool inside the oven completely, until both the oven and the cheesecake are at room temperature, around 2 to 3 hours.
- Once the cake is cool, run an offset spatula around the edges of the cake to loosen it from the pan. Use the parchment paper overhangs to carefully lift the cake from the pan. Peel the parchment paper handles away from the sides of the cake before serving.
get new recipes via email:

buy the book
Weeknight Baking:
Recipes to Fit your Schedule
Over the past several years of running Hummingbird High, I kept a crucial aspect of my life hidden from my readers: I had a full-time, extremely demanding job in the tech world. In my debut cookbook, Weeknight Baking, I finally reveal the secrets to baking delicious desserts on a tight schedule.
Did you make this recipe?
Please leave a comment and rating for the recipe using the form below!
Your ratings make it easier to find the recipe online, and I’m always looking for ways to improve Hummingbird High.
Is this recipe for high altitude?
No, sorry, the only high altitude recipes on my blog are marked as such: https://www.hummingbirdhigh.com/category/high-altitude-baking
The most complicated cake from the beginning, with so much heart bumping while waiting for the process… But no matter how the end is, it is my most favorite cake 😀
I used to substitute the butter with vegetable oil and it works as well as the butter. Never use cream of tartar either, but the white eggs still successfully turn out to be a beautiful meringue
Made this tonight after dinner on a whim and the taste was spot on! I only had oat milk on hand and was too lazy to sieve the mixture but the cakes turned out delightful!
Definitely let the cakes cool in the oven. They shrink away from the sides quite a bit and do lose a fair amount of volume if you forget like me and accidentally take the cakes out of the oven and set them on your stove.
Used PAM baking spray and parchment paper in two 6×3” rounds and a silicone pan of petite loaves. The mini loaves popped right out, I could’ve gobbled up 10 of them.
Made this again (second time this winter!) and microwaved the cream cheese, milk, and butter instead of setting up a double boiler—worked just as well.
Just as tasty as last time, and I forgot to note that both times I made it with just the 8oz pack of cream cheese because I usually only have one box on hand. It could probably use the extra 2T of cc but we don’t use much cc in our household so I don’t bother buying the extra pack
Just baked up this recipe and I’m very excited to try it out! I live at about 5000 feet, but the cheesecake puffed up great. A few issues– I did beat the eggs to soft peaks, and the batter was gorgeous as I was putting into the pan. Once I filled my water bath with water, the cheesecake pan floated! Not sure what to do about it, I let it bake as it, but it cracked badly. I haven’t had this issue with regular cheesecakes… just wondering if you ever had, and if that’s what caused the cheesecake to crack since the water never came up high enough on the sides?
Strange that it floated! But yeah, that’s likely what caused the cheesecake to crack if it wasn’t submerged in the water bath…