
This chocolate peanut butter fudge cake uses a peanut butter and brown sugar cake base from my upcoming cookbook, Weeknight Baking, that comes together in a flash. The cake is then covered with an easy creamy, dreamy chocolate fudge frosting that requires no candy thermometers or fussing—jump to the recipe.

Chocolate Peanut Butter Cake
When I was writing Weeknight Baking, I made sure to develop recipes that used ingredients that most folks would have on hand in their pantry. The book is meant to save bakers time in the kitchen, and I figured that one of the easiest way to do so is to avoid sending folks out on a goose chase for rare ingredients. Yep, that meant actively skipping the specialty ingredients like tonka bean and fancy flavors like dried blackcurrant powder and yuzu zest that I occasionally splurged on for the recipes on Hummingbird High and instead focusing on the basics. In fact, I actually brainstormed a lot of the recipes for the book while standing in front of my own pantry and fridge to see what was already in there.
One thing that immediately became obvious to me was how many jars of nut butter Erlend and I hoarded for two people. On any given day alone, we had a massive, seemingly unending jar of peanut butter from Costco for use in breakfasts, snacks, and more. But peanut butter was an ingredient that would work well in desserts too. In particular, my friend Molly has a wonderful snack cake recipe in her book, Molly on the Range, that was so moist and flavorful from the generous amount peanut butter in the recipe. The best part was that she described the cake as “idiot proof” and “hangover proof”, which I took to mean as “perfect for weeknight baking.” And when paired with a chocolate frosting? It was absolutely delicious.

Easy Chocolate Fudge Recipe
In my experience, it’s hard to find a good chocolate frosting recipe. Most chocolate frosting recipes rely on cocoa powder to give the frosting a chocolate flavor. However, it’s hard to get the ratio of cocoa powder in the recipe correct. Too much, and the frosting turns out stiff and hard to work with, and too little leads to a bland and not chocolatey enough frosting. I wanted something that was incredibly chocolaty, but silky and creamy as well.
Luckily, I already had a solid chocolate fudge frosting recipe that I’d been making for years. Unlike most chocolate frostings, my fudge frosting recipe gets its flavor and texture from MELTED CHOCOLATE. The melted chocolate gives the frosting SO much flavor, and makes it a dream to work with. The resulting frosting is so silky and smooth that it’s almost like spreading a chocolate flavored cloud on the cake. As it cools, it hardens into a “fudge”-like texture that’s in between that of traditional American buttercream and cake fondant.
To me, this is some kind of magic—traditionally, fudge is a type of sugar candy that’s made with sugar, butter, and milk. You then need to cook it to what’s known as the “soft-ball stage”, a specific temperature that enables you to get the smooth, creamy consistency of the fudge. There’s a lot of futzing around with candy thermometers and whatnot. But there’s absolutely none of that with this recipe, despite having similar results.

Chocolate Peanut Butter Layer Cake… On A Weeknight!
Traditionally, layer cakes aren’t considered to be “weeknight baking friendly.” More elaborate cake designs can take hours to frost, and even more simple cakes like this one requires a ton of steps: making the cakes, waiting for them to cool, making the frosting, frosting a crumb coat, waiting for the crumb coat to set, etc, etc.
And here’s the cold, harsh, truth: for more elaborate desserts like this one, you have to run the race. There’s no fast and easy fix that will get you out the door with a beautifully frosted three layer cake in half an hour.
“So why is this recipe even in the book?” I hear you grumbling.
Well, similar to my pie recipe, this recipe works best if you divide the work over the series of a few days. In fact, here’s a secret: almost all the layer cake recipes on Hummingbird High were made in this way. Without dividing the work up, a layer cake recipe means you’d be stuck in the kitchen for hours at a time. But here’s how I do it:
-
- Day 1: I make the cakes.
-
- Day 2: I make the frosting, assemble the cake, and leave it with a crumb coat (a thin layer of frosting that not only keeps the cake moist overnight, but makes it easier to frost later as it “seals” the crumbs into the cake).
- Day 3: I finish frosting the cake and eat it!
Because most of cake and frosting recipes in my book take half an hour or less of Work Time (in fact, most of the frostings only take about 5 minutes or so), splitting it up over this schedule ensures that I’m only in the kitchen working for half an hour at a time. I am free to go live my life and do as I please, and, if I wanted to, could ostensibly bake a different cake every night of the week.
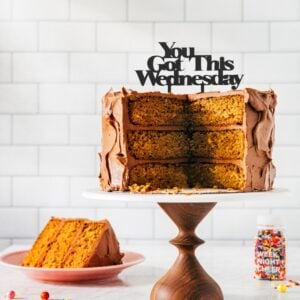
In fact, that’s the theory behind these new cake toppers that I designed with my friend, Amy, the talented artisan behind AHeirloom. You may already know her internet famous cake stands (including the one you see in these pictures!) and very adorable state-shaped cutting boards. Together, we designed these “Days of the Week” cake toppers featuring a different fun phrase for a new cake everyday of the week. Head on to my Instagram account, @hummingbirdhigh, to enter the sweepstakes to win a set (hint hint: if you pre-ordered a copy of Weeknight Baking, you get triple the chance to win by sending a copy of your receipt to michelle+AHPO@hummingbirdhigh.com) and watch me make this cake in Instagram Stories!

Chocolate Peanut Butter Cake Recipe Tips
-
- Although this recipe is for a chocolate PEANUT butter cake, you can actually go ahead and substitute with whatever nut butter you have on hand—I’ve made this cake with almond butter and cashew butter in the past, and was super pleased with the results. Whatever nut butter you decide, I recommend you go with the “all natural creamy” kind that doesn’t have any added sugar—there’s already a TON of brown sugar in this recipe, and I don’t want you to end up with something that’s too cloyingly sweet!
-
- Similarly, the recipe below calls for almond extract, which I always like to pair with nut butter to enhance its flavor. But if you don’t want to go out and buy almond extract, no worries! Just use vanilla extract instead. It’s just as tasty.
-
- To make the fudge frosting, you’ll be adding a warm melted chocolate mixture into some butter. There’s a chance that the chocolate will be too warm and lead to a frosting that’s a little too liquidy. If this happens, don’t panic! Just stick your frosting in the fridge for about 5 minutes to cool; it will firm up to the right texture. Just don’t leave it in there too long or you’ll need to warm it up to the right consistency once more.
- In my Instagram Stories and the recipe below, I skip the crumb coat and just frost the cake directly. That’s because not only is this frosting such a dream to work with, but I froze the cake overnight, too. Freezing the cake helps prevent crumbs from leeching into the frosting. If I were making a more elaborate frosting design, I wouldn’t recommend skipping the crumb coat, but because this frosting design (I dub it “rustic swirls” in the book) is so chill and easygoing, you can go ahead and skip crumb coating the cake! If you really have no idea what I’m taking about, head on over to Instagram Stories where I do a full demo of how to frost the cake.
Get the Recipe: Chocolate Peanut Butter Cake Recipe
Ingredients
For the Peanut Butter Brown Sugar Cake
- 2 ¼ cups (9 ounces or 255 grams) cake flour
- 2 cups tightly packed (15 ounces or 425 grams) light OR dark brown sugar
- 1 ½ teaspoons baking powder
- 1 ½ teaspoons baking soda
- 1 ½ teaspoons kosher salt
- 1 cup (9.5 ounces or 269 grams) unsweetened creamy natural peanut butter
- 1 cup (8 ounces or 227 grams) buttermilk
- ¾ cup (6 ounces or 170 grams) water
- ½ cup (4 ounces or 113 grams) canola oil
- 2 large eggs
- 2 teaspoons pure vanilla extract
For the Chocolate Fudge Frosting
- 6 ounces (170 grams) unsweetened chocolate, from a high-quality chocolate bar, hand broken into pieces
- 4 ½ cups (18 ounces or 510 grams) confectioners’ sugar, sifted
- 1 ½ cups (12 ounces or 340 grams) unsalted butter, at room temperature
- 6 tablespoons (3 ounces or 85 grams) whole milk
- 1 tablespoon pure vanilla extract
- ¼ teaspoon kosher salt
Equipment
- Special Equipment: a food processor
Instructions
Day 1: Make the Peanut Butter Brown Sugar Cake
- Position a rack in the center of the oven and preheat the oven to 350°F. Generously spray three 8-inch cake pans with cooking spray and line the bottom(s) with parchment paper (cut to fit). Spray the parchment, too.
- In a medium bowl, whisk together the flour, brown sugar, baking powder, baking soda, and salt.
- In the bowl of a stand mixer fitted with the whisk attachment, combine the peanut butter, buttermilk, water, oil, eggs, and almond extract. Whisk on low until the mixture is smooth and caramel in color, about 1 minute. Gradually add the dry ingredients, using a rubber spatula to scrape down the bottom and sides of the bowl as necessary. Take extra care here—a small amount of peanut butter always sticks to the bottom. Whisk on low until just combined.
- Pour the batter into the prepared pans. Note that this recipe makes around 54 ounces (1531 grams) of batter; pour 18 ounces (510 grams) into each cake pan and bake for 35 to 40 minutes. When done, the top of the cakes should bounce back when gently pressed and a skewer inserted into the center of each cake should come out with a few crumbs attached. Cool completely in the pans on a wire rack.
- Once cool, turn each cake out of its pan over a sheet of plastic wrap. Peel off the parchment paper and discard. Wrap each cake in the plastic wrap, ensuring that very inch of its surface area is covered tightly. Freeze overnight.
Day 2: Make the Fudge Frosting and Assemble the Cake
- Remove the cakes from the freezer and set aside at room temperature while you make the frosting.
- Make the frosting: In a food processor, pulse the chocolate for a few seconds at a time until chopped into 1- to 2-inch pieces. Transfer the chocolate to the top of a double boiler or to a heatproof bowl set over a medium, heavy-bottomed saucepan filled with a few inches of simmering water (be sure the bottom of the bowl does not touch the water). Cook over medium heat, using a heatproof rubber spatula to stir the mixture and scrape the sides of the bowl occasionally, until the chocolate has melted, about 10 minutes. Set the top of the double boiler or the bowl on a wire rack and let the chocolate cool while you prep the other ingredients.
- In the food processor, combine the confectioners’ sugar, butter, milk, vanilla, and salt. Pour in the melted chocolate and pulse briefly to combine, then process until the frosting is creamy, smooth, and light brown in color, about 5 minutes. Scrape down the bottom and sides of the bowl with a rubber spatula, then process for an additional 30 seconds.
- Unwrap one of the cakes and place on a serving plate or cake board. Scoop out ¾ cup of the frosting and drop it right in the middle of the top of the cake. Use an offset spatula to spread it evenly all over the top, just like you would spread butter on toast. There's no need to frost the sides of the cake just yet, so avoid frosting the sides—but also, don't worry if some frosting accidentally ends up there, too. We'll fix it later.
- Place your second cake layer on top of the first, adjusting it if it’s crooked—the layers should be stacked evenly on top of each other. Scoop another ¾ cup of the frosting and repeat the previous step on this layer. Finally, nestle the last layer on top of this frosting.
- Use an offset spatula to spread a thick, even layer of frosting all over the top and sides of the cake, adding a little bit of frosting at a time. Then use the spatula to make large, random sweeping motions across the frosting on the top and sides of the cake; the sweeping motions will create the swirls. Don’t overthink it! For this method, a little work goes a long way. I promise it’ll be beautiful no matter what you do.
Turned out great! I only had AP flour and 72% dark chocolate bars, so thats what I used…. also only had 9 inch pans, so cooked it for the least amount of cook time sonce the cakes were a bit thinner than if they were 8 inch. It came out moist and somewhat dense, with a nice balanced peanut butter brown sugar flavor. I am a newer baker, so this was the first time I made butter cream in a food processor and it was smooth and easy to spread… not too sweet and very fluffy… definitely will make again!
So so good! Imagine a Reese’s cup in CAKE form! The peanut butter not only gives it a great flavor but adds the perfect amount of fat to make this cake extremely moist. I used 2-8in rounds and had enough to make a double layer 6 in that I kept myself!! Highly recommend and will be making again!