

It’s funny to me that food, like clothes, TV, and everything else, has its own trends. Things that were cool yesteryear are no longer so: the jello puddings of the 1950s, the chocolate soufflé cakes of the 1980s, and so on. In a few years, it will be really interesting to see which food trends and flavors will define this time. My bet is that it will be salted caramel and/or pumpkin spice (eyeroll).
Growing up, my second favorite ice cream flavor was cookies and cream (also known as Cookies N Cream), which was second only to classic cookie dough ice cream. Maybe it’s because of the city and the neighborhood I live in, but these days, you’d be hard-pressed to find either flavor in an ice cream shop. The ice cream shop closest to me, a mere four blocks away, offers “standard” flavors of strawberry honey balsamic with black pepper and pear and blue cheese, whereas the second closest offers rosemary caramel and strawberry with rhubarb rose drinking vinegar. Don’t get me wrong! I’m a frequent visitor of both, and I’m all about these more unique, modern flavors. But sometimes, just sometimes, I need a dose of nostalgia and want a throwback to the more classic flavors of my childhood. Give me a scoop of cookie dough and cookies n cream, please and thank you.
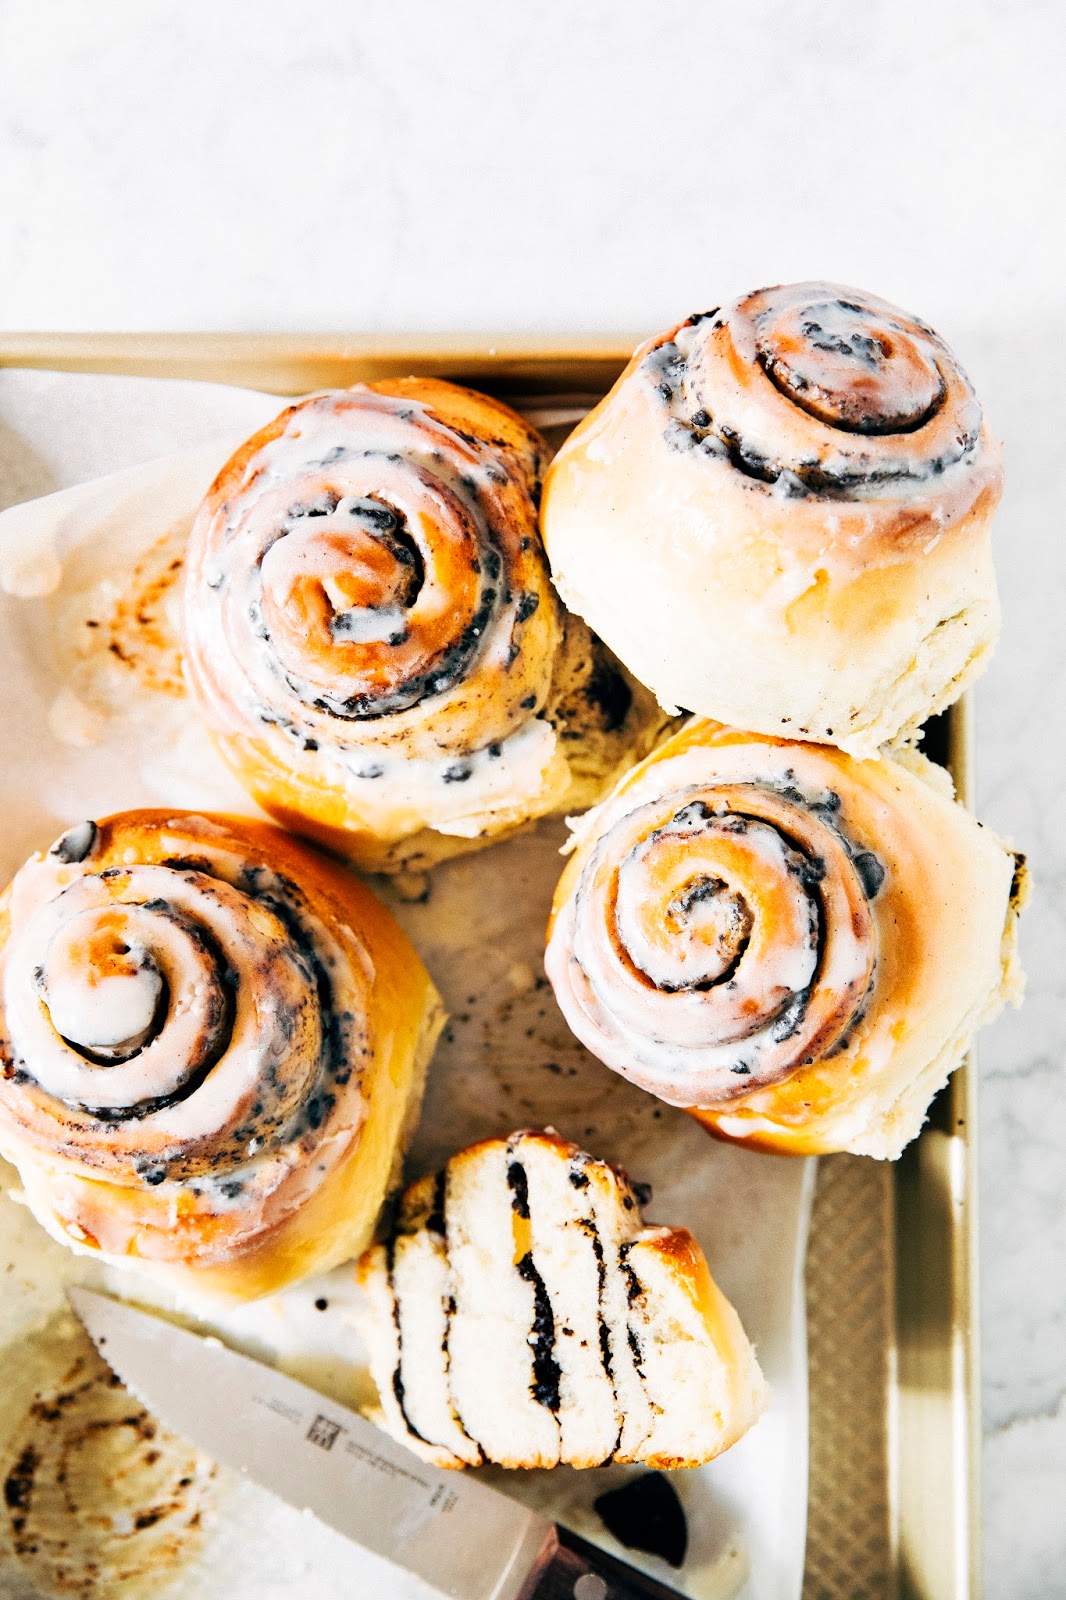
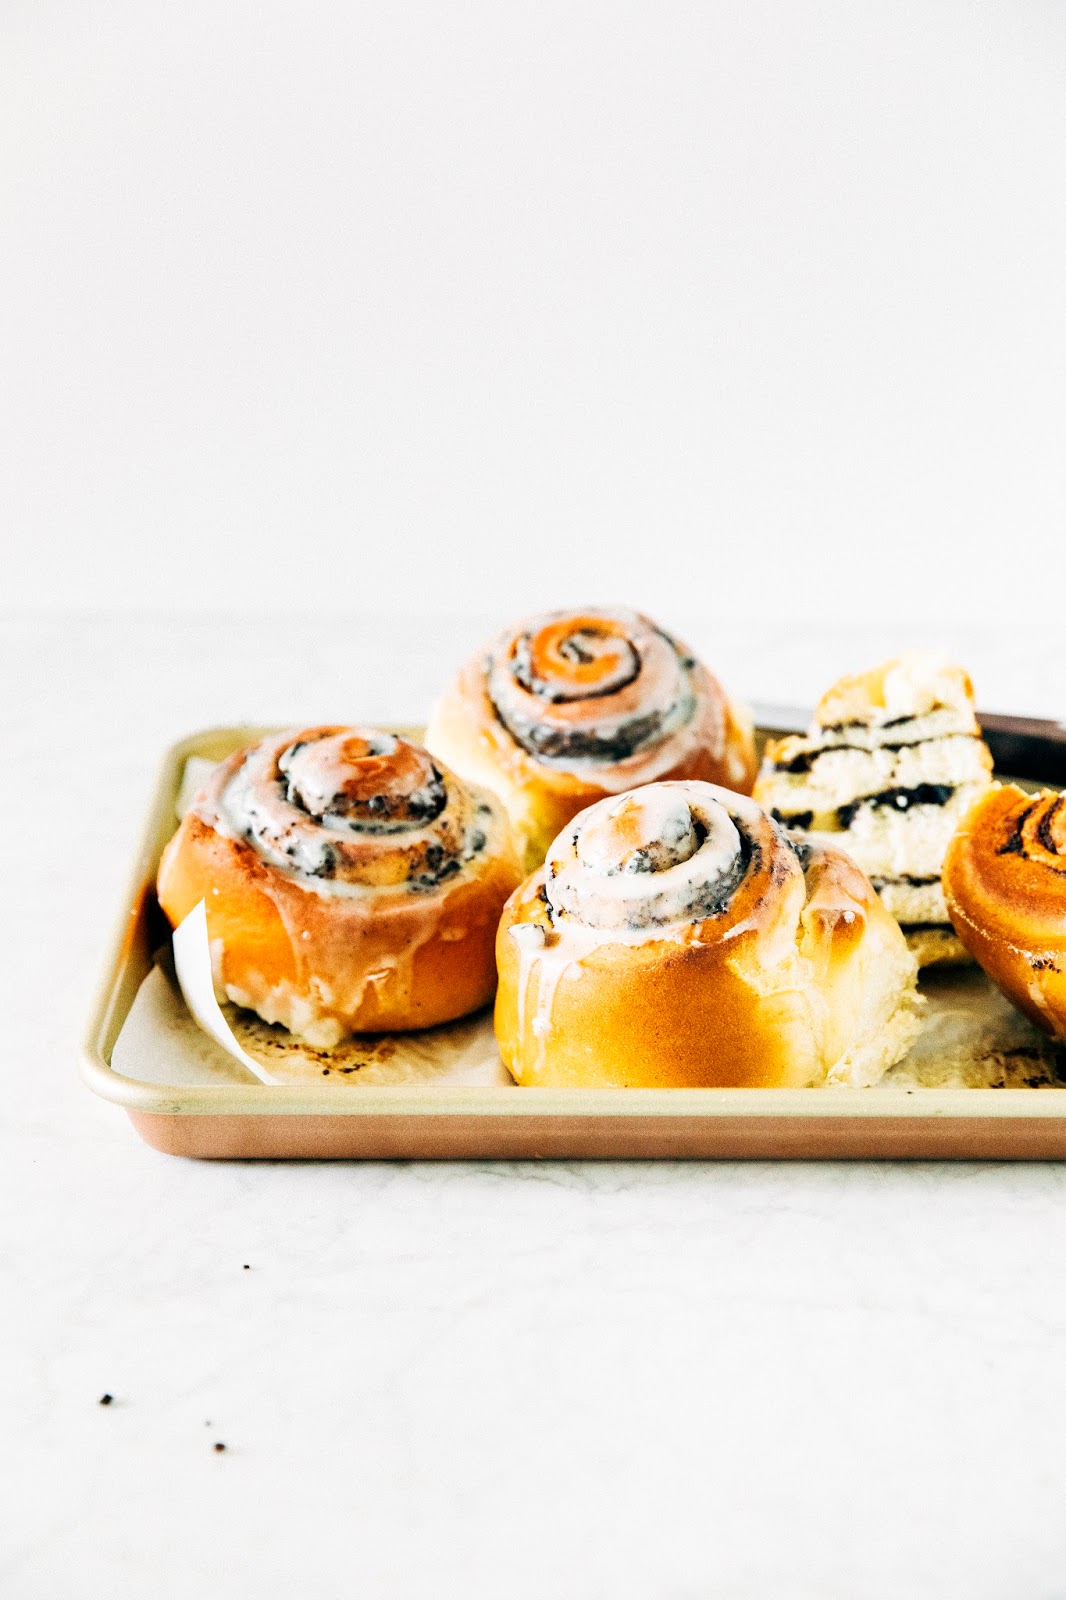
That being said, it strikes me as weird that cookies and cream isn’t more timeless: it’s just crushed classic Oreos (which are still holding strong, by the way, despite all their new crazy flavors) with vanilla cream. Since I am the (self-declared, ehem) cinnamon bun queen, I decided to create a cookies and cream bun. These buns are huge, each the size of your hand, and are filled with vanilla bean crème fraîche and crushed Oreo cookies to create the classic cookies n cream flavor from your childhood. In the oven, the cookie crumbs soften, creating a soft, fluffy textured bun but with a healthy dose of Oreo flavored MSG. They are so, so good that I ate one and promptly gave the rest away to my friend Kyle in order to avoid eating them all (who, I believe, immediately inhaled two upon receiving them). Enjoy!
-
- For this particular recipe, it’s important that you pay attention to the temperature of the ingredients as listed in the instructions. The buns are leavened with yeast, which needs to be activated at certain temperatures to work — but don’t go overboard, because if you use a temperature that’s too hot, you might accidentally kill the yeast. Different types of yeast are activated at different temperatures; I like to use instant yeast, which is activated between 120 to 130 (F). You’ll be stirring in an egg and oil to buttermilk that’s been warmed up to that temperature; if you use a cold egg, there’s a chance you might lower the temperature too much and it won’t activate the yeast properly.
- For the filling, I used Vermont Creamery Madagascar Vanilla Bean Crème Fraîche, which is lightly sweetened and studded with real vanilla beans. If you haven’t tried it yet, you should, because this isn’t even sponsored and I’m genuinely just obsessed with it. If you can’t find it in your store, regular crème fraîche will do just fine — just up the amount of granulated sugar in the filling from 1 tablespoon to 2 tablespoons, and use the beans from 1 fresh vanilla bean pod to stir into the filling.

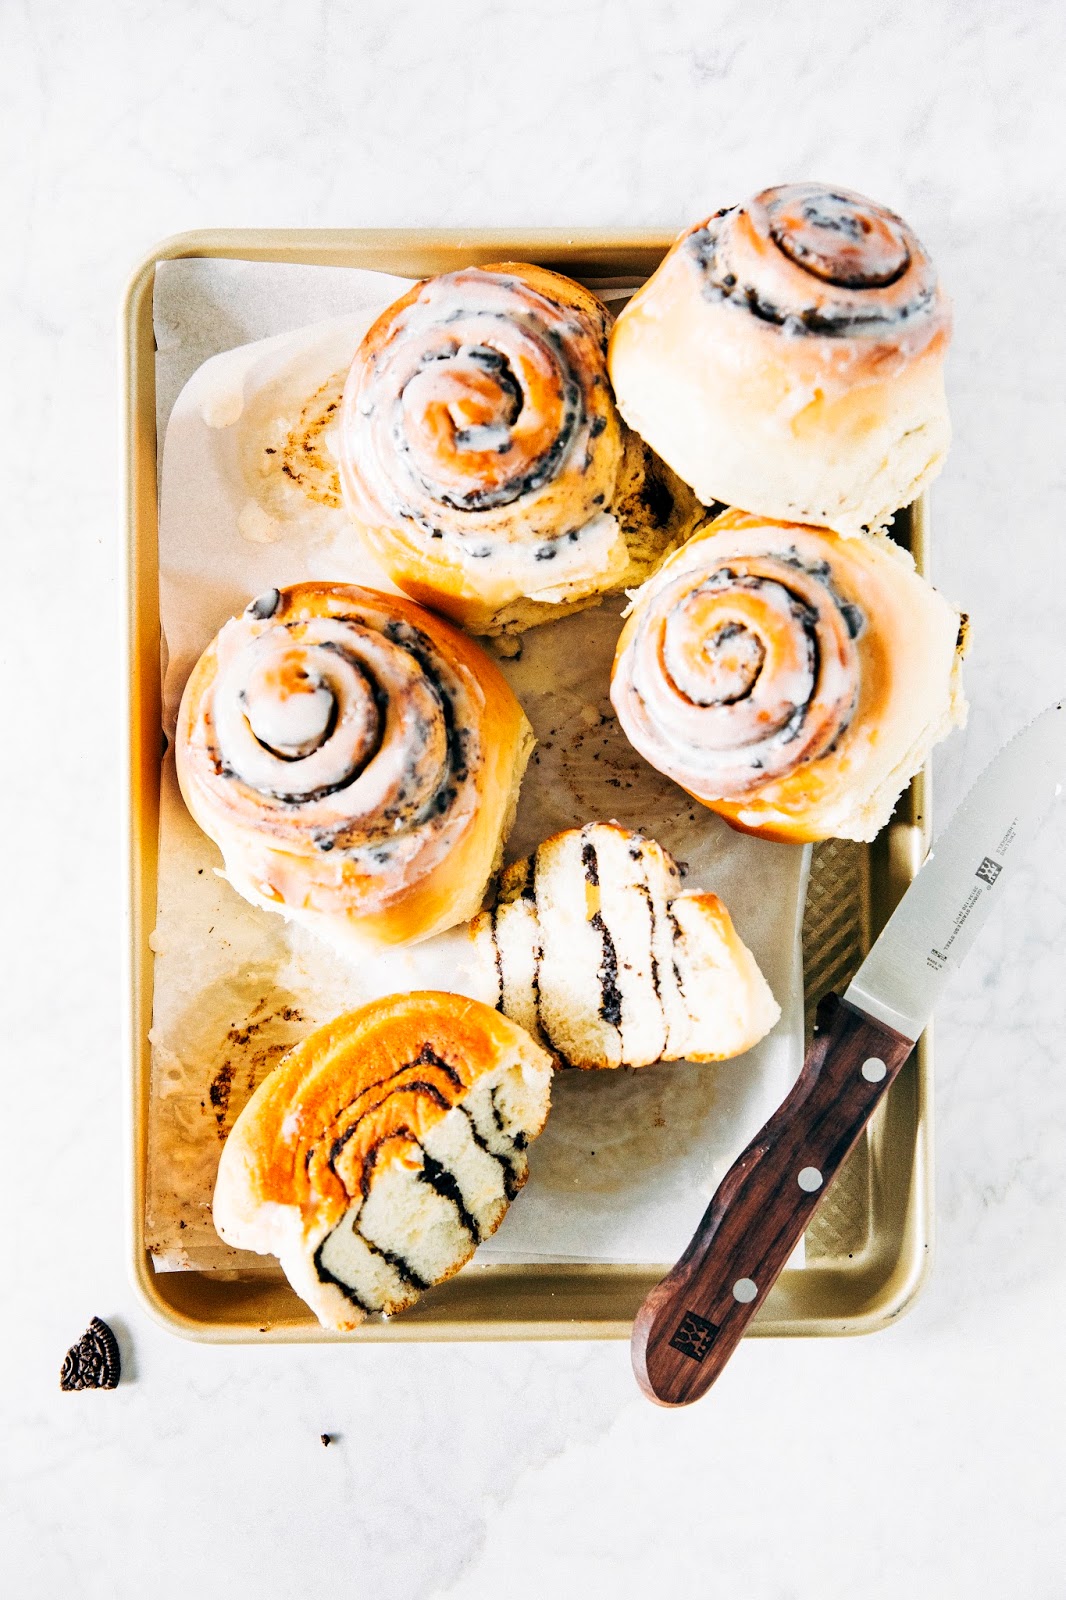
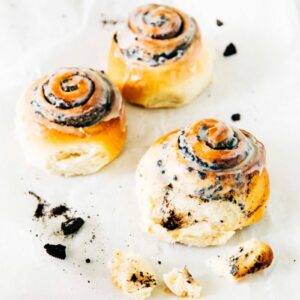
Get the Recipe: Cookies and Cream Morning Buns
Ingredients
For the Buttermilk Dough
- 3 1/2 cups (15.75 ounces) all-purpose flour
- 3 tablespoons granulated sugar
- 1 1/2 teaspoons instant yeast
- 1/2 teaspoon baking soda
- 1 teaspoon kosher salt
- 1 cup (8 fluid ounces) buttermilk, warmed to between 120 to 130 (F)
- 1 large egg, at room temperature
- 1/4 cup (2 fluid ounces) canola oil
For the Cookies and Cream Filling
- 1/4 cup (2 ounces) Vermont Creamery Madagascar Vanilla Bean Crème Fraîche (see baker's notes for substitutions)
- 1 tablespoon granulated sugar
- 1 teaspoon pure vanilla extract
- 1/2 cup "heaping" (2 ounces) crushed Oreo cookies (filling and all)
For the Cream Glaze
- 3 tablespoons (1.5 ounces) crème fraîche
- 1 tablespoon whole milk
- ½ teaspoon pure vanilla extract
- ¾ cup (3 ounces) confectioners’ sugar
Instructions
- In the bowl of a freestanding electric mixer fitted with a dough hook, combine 3 1/2 cups flour, 3 tablespoons sugar, 1 1/2 teaspoon instant yeast, 1/2 teaspoon baking soda, and 1 teaspoon salt. Whisk to combine. Use a tall cup or large measuring cup to make a well in the center of the ingredients, and set aside.
- In a large liquid measuring cup, combine 1 cup buttermilk, 1 large egg, and 1/4 cup canola oil and whisk to combine. Pour the mixture into the well at the center of the dry ingredients, and use a rubber spatula to stir until combined. As the dough starts to form, nestle the bowl into the electric mixer and turn on the mixer to knead on medium-low speed for at least 10 minutes, or until the dough is smooth and elastic. If you find that the dough is sticking to the sides of the bowl, use a rubber spatula to scrape down the sides of the bowl occasionally.
- Turn out the dough onto a counter. Use a rubber spatula to scrape down the dough hook and the sides of the bottom and the bowl if needed, using your hands to manually knead the dough into a mass. Spray the bowl with cooking spray and transfer the dough back into the bowl. Cover with plastic wrap and transfer to the refrigerator to rise until doubled in size for at least 8 hours, preferably overnight.
- Once the dough is doubled in size, it's time to make the filling. In a small bowl, combine 1/4 cup crème fraîche, 1 tablespoon granulated sugar, and 1 teaspoon pure vanilla extract. Whisk until throughly incorporated, and set aside.
- Return to the dough. Use a rolling pin to roll the dough into a large rectangle about 12 x 20-inches. 20 inches will seem like a stretch, but the longer your rectangle, the more attractive the rolls will be! Try to make those 20 inches work. Use a bench scraper to press against the edges of the dough to straighten them out. Use an offset spatula to spread the crème fraîche filling evenly and completely across the dough, going right up to the edges. Sprinkle 1/2 cup crushed Oreo cookies evenly and completely across the crème fraîche filling, going right up to the edges.
- Starting from one of the 12-inch sides, roll the dough into an even log. Use a serrated knife to cut the roll into 6 rolls, each about 2-inches wide. Transfer the rolls into a quarter sheet pan lined with parchment paper, placing each roll cut side up and leaving at least 4-inches between each roll — you want to leave plenty of space for the rolls to grow and expand outwards. Cover with plastic wrap and let rise in a warm, draft-free place until the rolls have doubled in size and the edges have rounded, around 1 to 1 ½ hours.
- About 30 minutes into the rolls’ second rising time, prep the oven and make the glaze. Center a rack in the oven and preheat to 350 (F). In the bowl of a freestanding electric mixer fitted with a paddle attachment, combine 3 tablespoons crème fraîche, 1 tablespoon milk, and 1/2 teaspoon pure vanilla extract. Beat on low speed until combined. Add 3/4 cup confectioners’ sugar all at once and continue to beat on low speed until smooth and fluffy. Set aside.
- Once the rolls have doubled, it’s finally time to bake them! Transfer to the preheated oven and bake for 30 to 35 minutes, or until the edges of the bun are golden in color and the centers have risen slightly. A skewer inserted in the center of a bun should come out clean. Transfer to a wire rack and immediately use an offset spatula to cover the top of each bun with a generous amount of the glaze — the residual heat from the buns will help melt and spread the glaze throughout the bun’s crevices. Serve warm.