A close-up picture of Claire Saffitz's brownies on a wire rack.

About Claire Saffitz’s Brownies

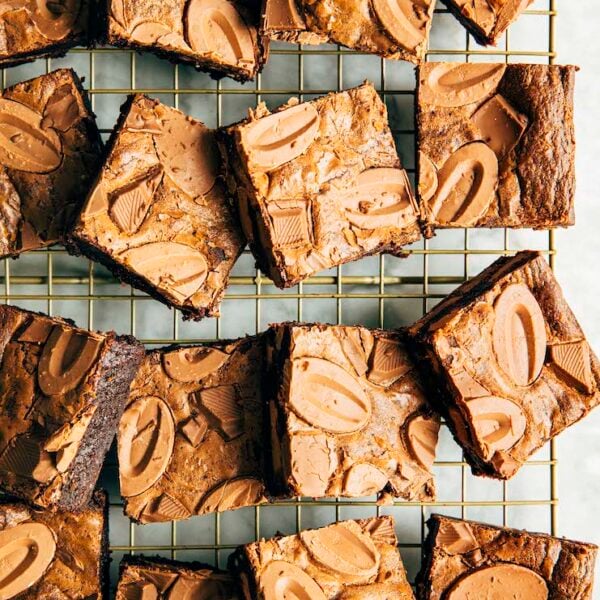
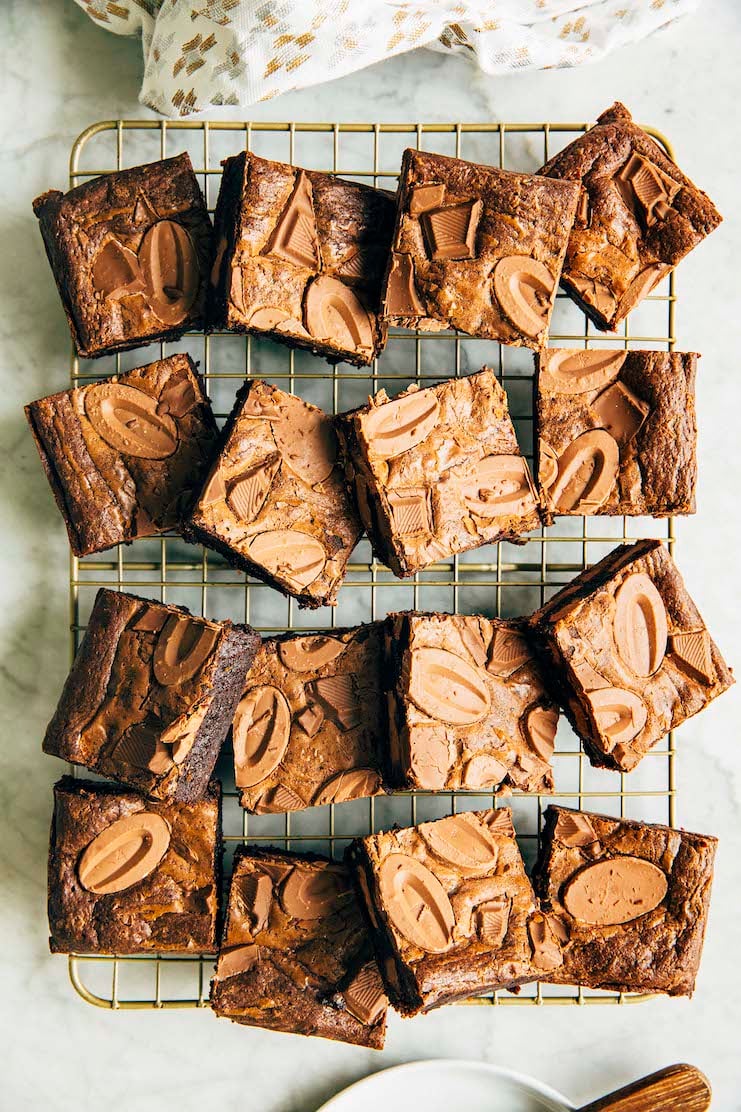
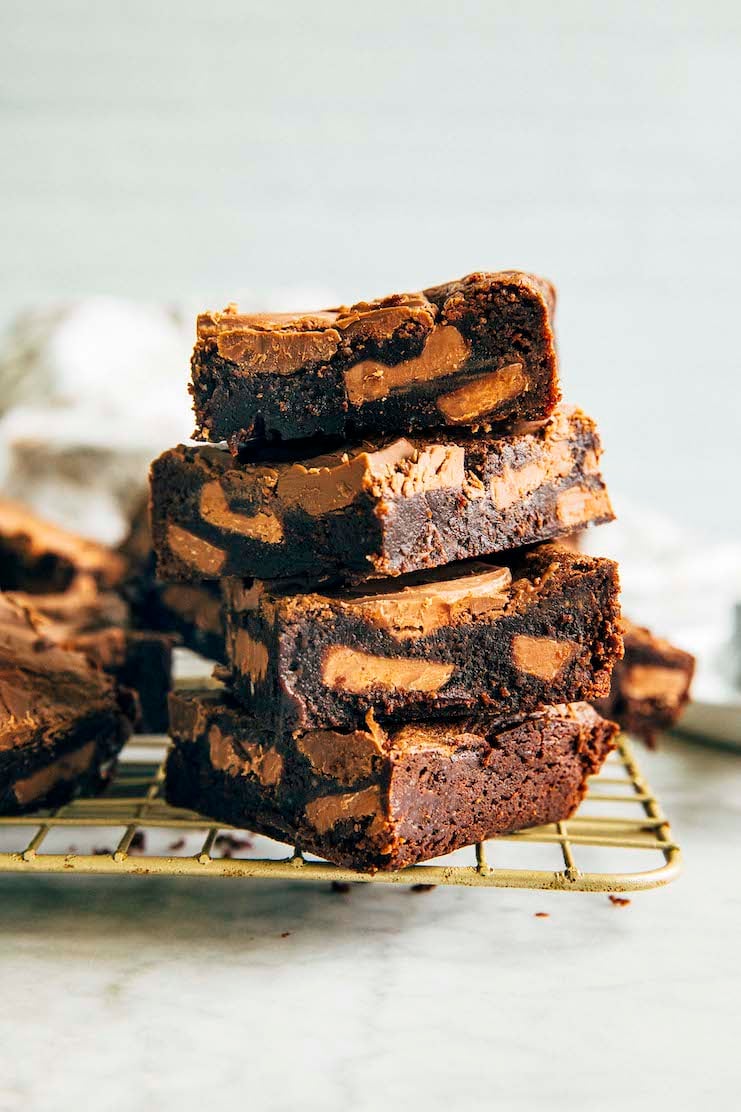
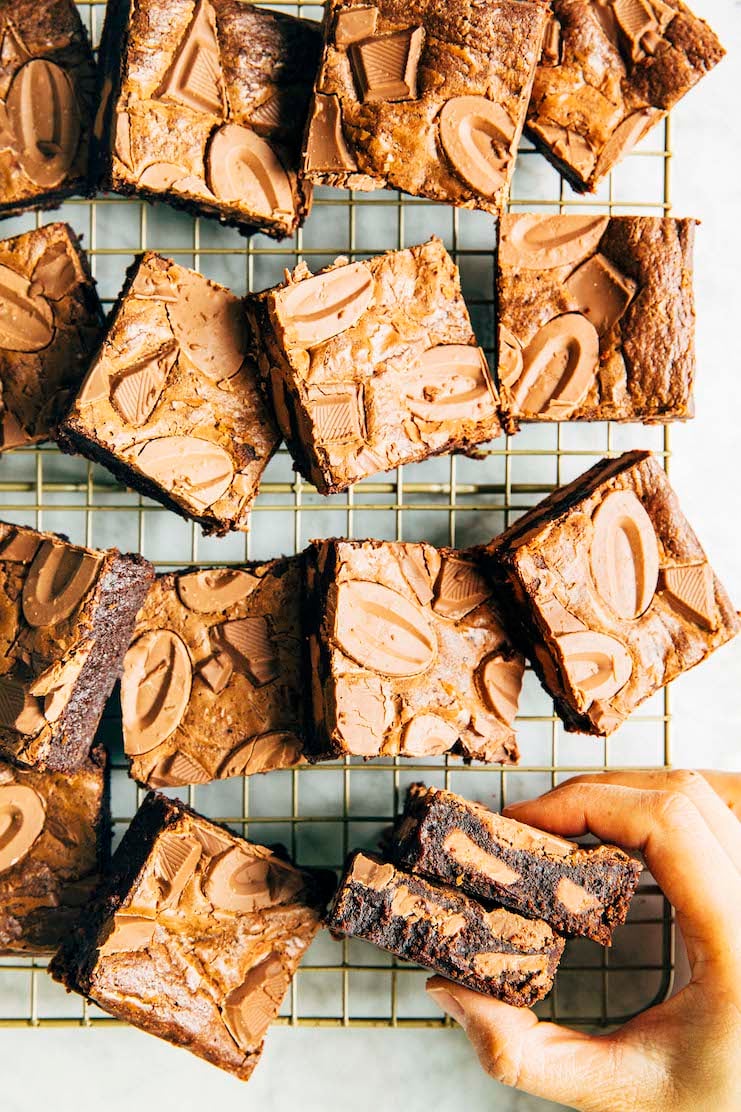
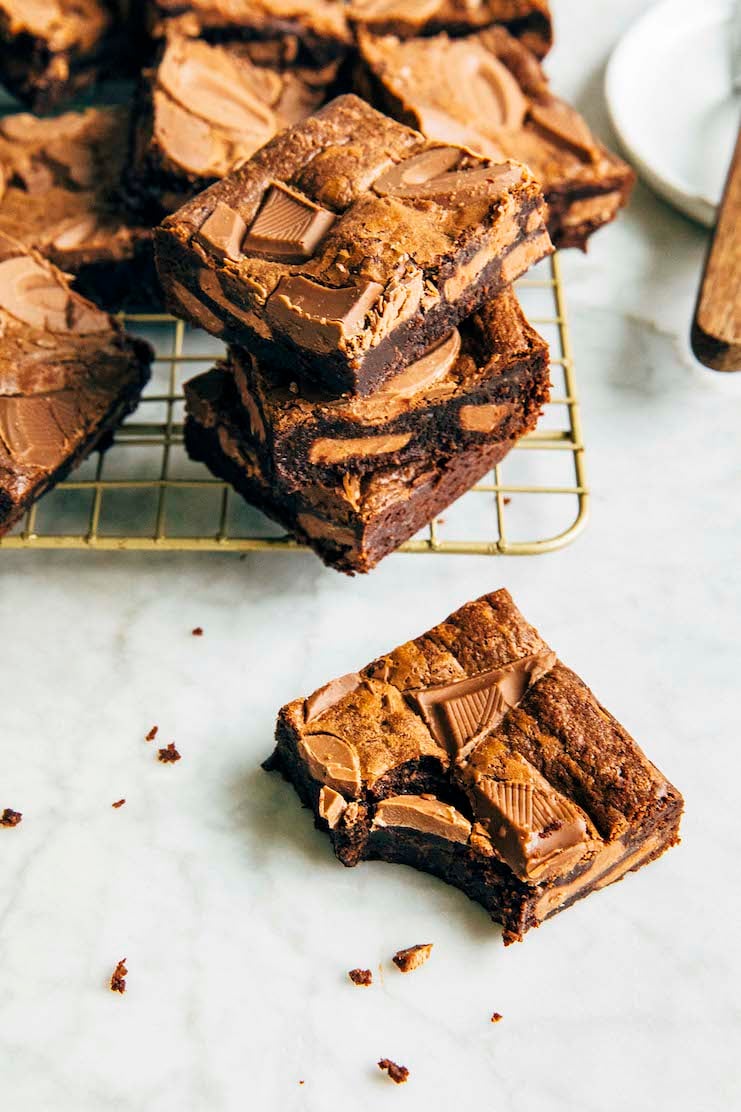
These are the Malted “Forever” Brownies from Claire Saffitz’s cookbook, Dessert Person! The brownies are super dense, fudgy, and chewy, with a distinctive flavor reminiscent of malted milk balls. This is thanks to ingredients like malted milk powder and chocolate. The recipe also uses a handful of unique techniques—like blooming the cocoa powder! and chilling the brownies!—to make them extra flavorful and chewy.

Wait, who is Claire Saffitz?

Claire Saffitz is a famed pastry chef and Bon Appetit magazine alum known for her desserts. For many years, she was the star and host of “Gourmet Makes”, a YouTube series with Bon Appetit. In “Gourmet Makes”, Claire would attempt to make popular snacks and candy like Doritos and Starburst from scratch.

Claire’s first book, Dessert Person, came out in 2020 and was a New York Times bestseller. The book contains a wide range of dessert recipes ranging from simple and straightforward (like these brownies!), to challenging and complicated. Because I’m a long time admirer of hers (fun fact: she even wrote a blurb for my cookbook, Weeknight Baking, which was definitely a highlight in my baking career), I decided to showcase her brownies on Hummingbird High as part of my Brownie Bake-Off month.

A picture of Claire Saffitz brownies on a wire rack.

Why You Should Make The Recipe

Here are all the reasons to make Claire Saffitz’s brownies:

Claire Saffitz’s brownies use unique ingredients like malted milk powder, making it distinct from other brownie recipes.

One of the things that attracted me to Claire Saffitz’s brownie recipe was her use of malted milk powder. The malted milk powder in the brownies definitely gives them a unique flavor, distinguishing them from the other fudge brownie recipes I baked this month. Additionally she also instructs you to use milk chocolate chips in the brownie recipe. The milk chocolate chips and malted milk powder combine together to give the brownies a unique taste similar to malted milk balls.

Claire Saffitz’s brownie recipe uses interesting techniques to lead to extra flavorful and chewy brownies.

I wanted to make Claire Saffitz’s brownie recipe is because she uses a handful of techniques that are unique to her recipe. I’ve already talked about how her use of malted milk powder and milk chocolate is a bit of a surprise—most brownie recipes skip these ingredients, and/or use dark chocolate instead.

But beyond these ingredients, there were a couple of surprising techniques in her brownie recipe. First, she instructs you to “bloom” the cocoa powder in the recipe. How? You simply mix the cocoa powder with boiling hot water. Doing so allows the cocoa powder’s flavor to strengthen, as well as encourage any lumps in the cocoa powder to dissolve.

Next, she instructs you to mix the batter for longer than what’s normal in most brownie recipes. In her YouTube video for the recipe, she explains that the longer mixing time encourages gluten to develop, leading to a chewier brownie.

Finally, after cooling the brownies, Claire instructs you to refrigerate them for an hour before serving. In her book, she explains that this extra step leads to even more chew.

So yes—if you’re looking for a quick-and-easy brownie recipe, Claire’s recipe is NOT it. It’s definitely fussier than standard brownie recipes. That being said, these steps do pay off and result in extra flavorful and chewy brownies as she promised.

Claire Saffitz’s brownies store well.

Because these brownies are so fudgy, chewy, and dense, they store well. I found that they were still fresh, moist, and flavorful even 3 days after making. In fact, I liked them best the day after they were baked. I found that the brownies developed in flavor overnight. The malted milk powder flavor became even more pronounced! Pretty cool.

A close up picture of Claire Saffitz brownies stacked on top of each other, showing off their texture.

Ingredients and Substitutions

Now that I’ve convinced you to make Claire Saffitz’s brownies, here’s everything you need for the recipe:

Shopping List for Claire Saffitz Brownies

Be sure to scroll down to the recipe card for the exact ingredient quantities—hit the “Jump to The Recipe” button on the page for a quick shortcut!

  • all-purpose flour
  • malted milk powder
  • kosher salt
  • Dutch-processed cocoa powder
  • dark chocolate (between 60% to 70% cacao), from whole fèves or a high-quality chocolate bar
  • unsalted butter
  • canola oil
  • granulated sugar
  • dark brown sugar
  • large eggs
  • pure vanilla extract
  • milk chocolate (between 30% to 40% cacao), from whole fèves or a high-quality chocolate bar

And let’s talk about some of the recipe’s key ingredients and any potential substitutions:

Malted Milk Powder

You need 2 Tablespoon malted milk powder to make Claire Saffitz’s brownie recipe.

What is malted milk powder?

Malted milk powder is often added to dairy-based desserts to enhance their natural, nutty flavors. It is usually made from a combination of a sprouted and dried grain (usually barley), wheat flour, and powdered milk. You can learn more about the ingredient in this Bon Appetit blurb.

Where To Buy Malted Milk Powder

Typically, you can find malted milk powder in the baking aisles of most major grocery stores. They are usually stored next to the shelf-stable milks, as well as near ingredients like buttermilk and non-malted milk powder. In the United States, the most popular malted milk powder brand is Carnation. In Asia, the most popular malted milk powder brand is Ovaltine.

For my brownies, however, I used this malted milk powder from King Arthur Baking. I don’t think it’s any better than Carnation—it’s just what I happened to have on hand!

I don’t want to buy malted milk powder. Do I really need to use it in this brownie recipe?

No, Claire actually writes that the malted milk powder in her brownie recipe is optional. However, I think that’s a weird thing to say—this recipe is called “Malted ‘Forever’ Brownies” in her book. With a title like that, it seems like she considers them to be a main ingredient? It’s also what makes this brownie recipe unique when compared with the other brownie recipes I’m baking this month.

Can I substitute the malted milk powder with any other ingredient?

Yes! Claire writes that if you can’t find malted milk powder at the store, you can substitute 6 ounces (170 grams) coarsely chopped malted milk balls for the milk chocolate in the recipe. In the United States, the most commonly available malted milk ball candy is Whoppers. You can find Whoppers in the candy aisle of most major grocery stores.

Kosher Salt

You need 1 teaspoon kosher salt to make Claire Saffitz’s brownie recipe.

Why You Should Use Kosher Salt When Baking

I like to use kosher salt (as opposed to table salt) when baking. Its larger crystals make it difficult to confuse with granulated sugar. However, not all kosher salts are created equal. Some kosher salts have smaller granules than others, which will result in saltier tasting baked goods.

For consistency, I recommend sticking to one brand, and one brand only: Diamond Crystal kosher saltIt’s the only brand of salt I use when I develop recipes for Hummingbird High. Why? Diamond Crystal kosher salt is one of the few 100% pure salts in the grocery store. Other brands have additives that can add unexpected flavors to your desserts.

I can’t find Diamond Crystal kosher salt. Is Morton’s Coarse kosher salt okay?

Yes, with reservations. Morton’s Coarse kosher salt granules are much smaller, denser, and crunchier than Diamond Crystal. According to this Food52 article, the two are different shapes and sizes because of how they’re made. Morton’s is made by flattening salt granules into large thin flakes by pressing them through high-pressure rollers, whereas Diamond Crystal is formed by a patented method in which “upside-down pyramids [are] stacked one over the next to form a crystal.” You can even see a visualization of the different sizes in this Cook’s Illustrated article.

Okay, but what does that mean, exactly? 1 teaspoon of Morton’s will taste saltier than 1 teaspoon of Diamond Crystal. Wild, right? So if you follow my recipes exactly as they are written but use Morton’s instead of Diamond Crystal, the results will come out saltier. In fact, sometimes they will come out TOO salty. So if you’re using Morton’s instead of Diamond Crystal, reduce the salt in the recipe by half.

Want to learn more about Diamond Crystal versus Morton’s Coarse kosher salt? Definitely check out the Food52 and Cook’s Illustrated articles I linked to above, as well as this Taste article.

I can’t find Diamond Crystal OR Morton’s Coarse kosher salt. Can I just use table salt?

Yes, with reservations. If you use table salt, you’ll need to reduce the recipe’s salt quantity by half.

If you read my little essay about Diamond Crystal and Morton’s, you learned that Diamond Crystal kosher salt granules are larger than Morton’s kosher salt granules. The same principle applies to table salt versus kosher salt. Table salt granules are much smaller than kosher salt granules. As a result, 1 teaspoon of table salt tastes much saltier than 1 teaspoon of kosher salt… simply because it can hold more granules! Wild, right?

So if you follow my recipes exactly as they are written but use table salt instead of kosher salt, the results will come out saltier. If you’re using table salt instead of kosher salt, I recommend reducing the salt in the recipe by half. 

Dutch-Processed Cocoa Powder

You need ¼ cup Dutch-processed cocoa powder to make Claire Saffitz’s brownie recipe.

Natural Unsweetened Cocoa Powder versus Dutch-Processed Cocoa Powder

Cocoa powder, when used in baking recipes, often comes in two varieties: natural unsweetened, and Dutch-processed.

Natural unsweetened cocoa powder is more typical and is cocoa powder in its purest form. It is slightly reddish brown in color and results in deeply flavored chocolate goods. Because it is slightly acidic, it is often paired with baking soda in baking recipes to help create a chemical reaction that will cause the baked good to rise in the oven.

Dutch-processed cocoa powder is natural unsweetened cocoa powder that’s been treated with alkaline to neutralize its acidity, giving it a darker color and milder flavor. It is the cocoa powder that is used for making midnight-black baked goods like Oreos.

I only have natural unsweetened cocoa powder. Can I use that instead?

Yes! You can substitute natural unsweetened cocoa powder for the Dutch-processed cocoa powder in this recipe, no problem. Just a head’s up—your brownies will look and taste just ever-so-slightly different than mine. They will have a more reddish-brown color instead of a blackish-brown one. They’ll also taste a little bit sharper from the acidity of the cocoa powder.

Dark Chocolate

You need 5 ounces (142 grams) dark chocolate to make Claire Saffitz’s brownie recipe.

Bittersweet versus Semisweet versus Dark Chocolate

Whenever I share a recipe that uses dark chocolate, many of you ask if you can use bittersweet or semisweet chocolate. Many manufacturers make chocolate bars that are specifically for baking; these are often labeled “bittersweet”, “semisweet”, or “unsweetened”. You’ll notice that “bittersweet” and “semisweet” typically don’t include cocoa percentages. That’s because there’s no official benchmark for each designation. Specifically: it’s up to the manufacturers to determine how much cocoa to use, and cacao percentages for each type will vary greatly between brands.

That’s why in my cookbook, I advise folks to ignore these bars and instead stick with the ones that list their cocoa percentages. That’s truly the only way to know what you’re getting! In a pinch, however, you can use either bittersweet or semisweet chocolate for these brownies without too much consequence.

Do I really need to chop chocolate for this brownie recipe? Can I just melt chocolate chips instead?

Honestly, yes, you can get away with melting chocolate chips in this recipe. However, I don’t recommend it.

Why?

Most grocery store brands—even the ones that offer products specifically made for baking—contain all sorts of additives like paraffin wax and palm oil. These ingredients compromise the flavor and texture of your results. I’ve stopped using chocolate chips in 90 percent of my recipes, and my baked goods have tasted so much better as a result. 

That being said, there are some brands that sell high-quality chocolate chips perfect for this recipe. Chocolate chips made by GuittardNestle Artisan Collection, and Valrhona use minimal stabilizers and preservatives. Those are the only chocolate chips I recommend for this recipe.

Wait, you’ve scared me off chocolate chips. But I *HATE* chopping up chocolate bars. Is there a halfway point between chocolate bars and chips?

Absolutely! If you want the convenience of chocolate chips but the quality of chocolate bars, I recommend buying chocolate discs or fèves instead.

Discs and fèves are used by fancy chocolatiers to make their own bars and bon bons. They typically don’t use the same preservatives and stabilizers as chocolate chips.

Wait, what are chocolate fèves?

Chocolate fèves are a fancy pastry school term for a flat, bean-shaped disc of chocolate. The most prominent maker of chocolate fèves is one of my favorite chocolate makers, Valrhona Chocolate. For these brownies, I used Valrhona’s Caraibe 66% chococlate fèves You can buy them online and/or at select Whole Foods Market locations.

I don’t have chocolate. Can I substitute the chocolate in the recipe with cocoa powder?

Many of you also asked if you could substitute the chocolate in the recipe with cocoa powder. Unfortunately, the answer is noThat would change the recipe completely.

you only have cocoa powder on hand, I highly suggest checking out the Better-Than-Box-Mix Cocoa Brownie recipe in my cookbook. Although it’s currently not on my blog, my friend Jeanine recently published the recipe on her site, Love and Lemons.

Canola Oil

You need ¼ cup canola oil to make Claire Saffitz’s brownie recipe.

Can I use another oil instead?

Yes! You can use whatever oil you have on hand instead. Vegetable oil, grapeseed oil, and peanut oil work best to replace the canola oil because they are also neutral in flavor. However, you can also use flavored oils like coconut or olive in this recipe. Just note that your brownies might have a subtle coconut or olive oil flavor to them, too.

Personally, I think it’s best to stick with a neutral oil. While coconut oil will work with the malt powder, malt and olive oil might be weird together.

Dark Brown Sugar

You need ½ cup tightly packed dark brown sugar to make Claire Saffitz’s brownie recipe.

Light versus Dark Brown Sugar

Brown sugar is granulated white sugar with a touch of molasses to give it its signature color and flavor. Because brown sugar contains molasses, it adds more moisture baked goods than granulated sugar otherwise would.

Brown sugar is available in two varieties: light or dark. Similar to Claire, I like dark brown sugar better. Because it contains more molasses, I find it to be more flavorful, especially when contrasted with all the chocolate in these brownies. However, if light brown sugar is all you have, you can use it in this recipe without altering its flavor too much.

I don’t have any brown sugar. Can I use all granulated white sugar instead to make these brownies?

Technically yes, but I don’t recommend it. The brown sugar is what gives the brownies their unique, fudgy texture, as well as subtle caramel and butterscotch flavors without being overly sweet. If you use all white sugar, the texture will be a little different and they’ll taste a LOT sweeter. And trust me—these brownies are plenty sweet already!

Can I use coconut sugar instead of brown sugar?

Yes, with reservations. Coconut sugar is more similar to granulated sugar when it comes to moisture levels. If you use coconut sugar in this recipe, your brownies will have a slightly drier, less fudgy texture than mine. I recommend checking for doneness a few minutes earlier than what’s stated in the recipe below.

Milk Chocolate

You need a total of 10 ounces (284 grams) milk chocolate to make Claire Saffitz’s brownie recipe.

What milk chocolate did you use to make Claire Saffitz’s brownies?

I used a combination of Valrhona Andoa milk chocolate fèves (which has 39% cacao) and Trader Joe’s Belgian Milk Chocolate bars! But in a pinch, I also like Ghirardelli’s Milk Chocolate Baking Bar, which is readily available at most major grocery stores.

A close up picture of a hand reaching for Claire Saffitz brownies, showing off their chocolate studded texture.

How To Make The Recipe

Here are the basic steps to make Claire Saffitz’s brownies from scratch:

  1. Prep the ingredients for the brownies. (Prep Time: 5 to 10 minutes)
    If you’re using chocolate bars to make these brownies, you need to chop up the chocolate. Doing so usually takes around 5 minutes.

    To save yourself time, buy thin chocolate bars that are easier to slice. You can also use a food processor to chop the chocolate. But my personal recommendation is to use chocolate discs or fèves for the recipe! You won’t need to chop them before melting.

  2. Start making the brownie batter by mixing the cocoa powder with hot water, then add the chocolate, butter and oil and melt over medium heat. (Work Time: 10 minutes)
    Place the cocoa powder in a large bowl, pour in the hot water, and whisk to combine. The hot water will strengthen the cocoa powder’s flavors, as well as dissolve any stubborn lumps. Then, add the chopped dark chocolate and butter. Place the bowl on top of a sauce pan with an inch or two of simmering water, and cook everything over medium heat until smooth.

  3. Cool the chocolate mixture, then whisk in the eggs, sugars, vanilla, dry ingredients, and milk chocolate. (Work Time: 15 minutes)
    Let me warn you now—this step is one of the more time consuming parts of the recipe! You need to cool the chocolate mixture to lukewarm before whisking in the rest of the ingredients. To make the mixture cool faster, I either place the bowl on a wire rack (this allows air to circulate around the bowl better, cooling the mixture faster) OR scrape the chocolate mixture into a new bowl (doing so releases a lot of heat in the process). In general, it takes about 10 minutes to cool the mixture to lukewarm.

    Once the mixture is lukewarm, whisk in the rest of the ingredients. Make sure to whisk the batter for at least 1 minute after adding the dry ingredients—doing so leads to extra chewy brownies!

  4. Assemble the brownies. (Work Time: <5 minutes)
    Pour the brownie batter into an 8-inch square pan lined with parchment paper. Smooth the top with a rubber spatula if necessary, then sprinkle with the remaining chopped milk chocolate.

  5. Bake the brownies. (Bake Time: 25 minutes)
    Claire’s brownie recipe bakes for between 25 and 30 minutes. When baking brownies, it’s always better to pull them out of the oven early. Leaving them in too long means that they’ll turn out tough! Check out the recipe and FAQ below for more tips.

  6. Cool the brownies. (Cool Time: 2 hours)
    After you pull the brownies out of the oven, Claire instructs you to cool them on a wire rack for 1 hour. After that, she then instructs you to move the brownies to the refrigerator and chill them there for 1 hour longer. According to her, doing so leads to extra chewy brownies!

    While I included this step in my version of the recipe below, I didn’t find it 100% necessary. The brownies were plenty chewy without the additional chill time. But if you want to stay true to the recipe, follow Claire’s instructions for the authentic experience!
A photo of a Claire Saffitz brownie with a bite taken out of it.

Recipe Troubleshooting and FAQ

FAQ: All About The Baking Equipment You Need To Make The Recipe

I don’t have an 8-inch square pan. However, I *DO* have a 9-inch square pan. Can I use that instead?

Yes, with reservations. In a pinch, you can use a 9-inch square pan to make these brownies instead. However, doing so will result in slightly thinner brownies since a 9-inch square pan has slightly more surface area than an 8-inch square pan, causing the batter to spread more. This might also cause the brownies to bake slightly faster. If you’re using a 9-inch square pan, I highly suggest checking for doneness 5 minutes before the recipe’s original Bake Time.

Is it better to use a glass or metal pan when baking brownies?

Alright, here we go—when you google the answer to this question, the first few search results will tell you that it is better to use a glass pan when baking brownies. THEY ARE 100% INCORRECT. It is my *FIRM* opinion that it is always, ALWAYS better to use a metal pan when baking brownies.

Why? Glass pans are slow to heat up; however, when hot, they retain heat for much longer. This quality often results in uneven baking. By the time the interior of whatever you’re baking is done, the exterior of it is often overcooked, dry, and overly dark.

What does that mean for this Claire Saffitz brownie recipe? If you’re baking the brownies in a glass pan, they’ll continue to bake LONG after being pulled out of the oven because the pan continues to retain so much heat. That usually means dense, dry, and overcooked brownies that are not fudgy at all.

Metal, on the other hand, conducts heat. Because metal heats up faster than glass, it leads to brownies with a better rise (but without being cake) with crispier edges. And because metal pans lose heat quickly after being pulled out of the oven, your brownies will too. That means the brownies will cool faster, and they won’t be overdone. Instead, they will instead be perfectly fudgy and set. So please use a metal pan for this recipe!

Finally, if you want to be a perfectionist, choose a light colored metal pan over a dark metal pan. Dark pans absorb more heat, which, like glass, can cause the exterior of the brownies to bake too quickly. I always use pans from Williams-Sonoma’s Goldtouch Pro Nonstick line for my baking.

FAQ: Customizing The Recipe

Can I double the recipe and bake it in a 9 x 13-inch pan instead?

Yes! You can easily double the recipe and bake it in a 9 x 13-inch pan instead. Bake Time will likely be closer to the 30-minute range (as opposed to 25 minutes—still, start checking for doneness then!).

FAQ: Troubleshooting Common Mistakes and Cooking Errors

Help! My brownie batter came out lumpy, even after I added the eggs. What did I do wrong?

This recipe instructs you to melt cook the cocoa powder, chocolate, butter, and oil together, then cool to lukewarm before stirring in the rest of the ingredients. If the chocolate-butter mixture is too hot, it can potentially scramble the eggs, causing a lumpy batter and bad brownies!

If you want to be extra safe and prevent that from happening the next time you make these brownies, pour the melted chocolate and butter into a separate bowl than the bowl it was melted in. Doing so will help the mixture cool faster!

The ideal temperature of the chocolate-butter mixture will be similar to that of a warm bath. Dip your finger in it. It should feel warm, but comfortable (like a hot bath). It should not burn or scald you!

Help! My brownies came out tough. What did I do wrong?

It’s likely that you either a) overmixed the batter or b) baked the brownies for too long and/or used the wrong type of pan to make them.

When mixing the dry ingredients into the rest of the batter, simply mix until the ingredients disappear into the batter, then 1 minute more after that! If you mix beyond that, your brownies will come out dense and tough. I will legit cry for you.

If you’re convinced you didn’t overmix the batter, it’s likely that you overbaked them. First, make sure to use a metal pan when baking brownies. I’ve already explained why it’s important to do so in the FAQ above. But the TL/DR is that gass pans tend to overbake brownies!

Finally, when testing for doneness, stick a skewer in the dead center of the brownies. Pull it out—it should still have a few crumbs attached. If it’s wet with batter, the brownies still need more time. If the skewer is completely dry, uh-oh! You’ve overbaked the brownies.

FAQ: How To Store The Brownies

How To Store Claire Saffitz’s Brownies

The brownies can be stored in an airtight container or zip-top bag at room temperature for up to 3 days.

Can you freeze this brownie recipe?

Yes! You can freeze the baked brownies.

To freeze the brownies, individually wrap any leftover bars in two layers of plastic wrap, then a layer of aluminum foil. The aluminum foil will prevent the bars from absorbing any other flavors or odors in the freezer. Freeze for up to 3 months.

When ready to serve, transfer to the refrigerator to thaw overnight. You can eat the brownies straight from the fridge, or rewarmed in the microwave.

Best Brownie Recipe Tips

Best Prep Tip

  • When prepping the baking pan, use more cooking spray than you think you need to coat the parchment paper. The brownies are VERY fudgy and tend to get stuck on the paper if you don’t use enough spray.

Best Ingredient Tips

  • The brownie batter recipe states that you need 5 ounces (142 grams) of chopped dark chocolate to make the brownie batter. If you don’t have a digital kitchen scale, that’s equivalent to ⅔ cup plus 2 Tablespoons of chopped chocolate. Each piece of chocolate should be roughly the same size and shape of a regular-sized chocolate chip.

    You’ll also need 10 ounces (284 grams) of milk chocolate to mix-in and top the brownies. That’s equivalent to 1 ⅔ cup of chopped milk chocolate.

  • I mention this in my review of the recipe below, but I added more milk chocolate to Claire’s original recipe. Specifically, I added a chopped milk chocolate topping. If you want a less sweet brownie, feel free to skip the milk chocolate topping!

Best Technique Tip

  • The recipe instructs you to cook chocolate, butter, and oil together until melted. Once done, this mixture will look a little grainy (almost like split ganache). Don’t panic! Just continue following the recipe and whisk in the sugars, eggs, and remaining ingredients. Once you start whisking in the eggs, the batter will smoothen out and start to combine.

Best Baking Tip

  • It’s better to pull the brownies out of the oven early than leave them in too long—if you over bake the brownies, they’ll be tough. They might appear underbaked, but I promise that when they’ve cooled, they will be perfect.

More Brownie Recipes

Get the Recipe: Claire Saffitz Brownie Recipe

(5 stars) 9 reviews
Leave a Review

Ingredients

For the Brownie Batter

  • ¾ cup (3.5 ounces or 99 grams) all-purpose flour
  • 2 Tablespoons malted milk powder
  • 1 teaspoon kosher salt
  • ¼ cup (0.75 ounces or 21 grams) Dutch-processed cocoa powder, sifted if necessary
  • ¼ cup (2 ounces or 57 grams) freshly boiled and still very hot water
  • 5 ounces (142 grams) dark chocolate (between 60% to 70% cacao), from whole fèves or a high-quality chocolate bar chopped into ½- and 1-inch pieces
  • 6 Tablespoons (¾ stick or 3 ounces or 85 grams) unsalted butter, chopped into 1- to 2-inch pieces
  • ¼ cup (2 ounces or 57 grams) canola oil
  • ½ cup tightly packed (3.75 ounces or 106 grams) dark brown sugar
  • ½ cup (3.5 ounces or 99 grams) granulated sugar
  • 1 large egg
  • 2 large egg yolks
  • 1 ½ teaspoons pure vanilla extract
  • 6 ounces (170 grams) milk chocolate, chopped into 1- to 2-inch pieces

For the Milk Chocolate Topping

  • 4 ounces (113 grams) milk chocolate, chopped into 1- to 2-inch pieces

Instructions
 

  • Prep the oven and baking pan. Position a rack in the center of the oven and preheat the oven to 350°F. Lightly spray an 8-inch square pan with cooking spray and line with parchment paper, leaving a 2-inch overhang on each of the pan's sides. Spray the parchment paper, too.
  • Mix the dry ingredients. In a medium bowl, whisk together the flour, milk powder, and salt.
  • Bloom the cocoa powder. In a large heatproof bowl, whisk together the cocoa powder and hot water until smooth.
  • Melt the dark chocolate, butter, and oil. Add the dark chocolate, butter, and oil to the bowl with the cocoa powder and water. Place the bowl over a medium, heavy-bottomed saucepan filled with a few inches of simmering water (be sure the bottom of the bowl does not touch the water).
    Cook over medium heat, using a heatproof rubber spatula to stir the mixture and scrape the sides of the bowl occasionally, until the chocolate and butter have melted and combined, about 5 minutes. 
    Remove the bowl from heat, seat on a wire rack, and cool to lukewarm.
  • Add the sugars, eggs, and vanilla. Once lukewarm, whisk the sugars into the chocolate mixture. Add the egg, egg yolks, and vanilla and whisk until combined.
  • Add the dry ingredients and milk chocolate. Sprinkle the dry ingredients over the batter all at once and use a rubber spatula to mix until combined. Once combined, continue mixing for 1 minute more. Add the milk chocolate and mix until incorporated throughout the batter.
  • Assemble the brownies. Pour the batter into the prepared pan and use an offset spatula to smooth the top. Sprinkle the chopped milk chocolate for the topping on top of the batter.
  • Bake the brownies. Bake for 25 to 30 minutes, or until a skewer inserted into the center of the brownies comes out with a few crumbs attached.
  • Cool the brownies. Cool completely on a wire rack, about 1 hour, then refrigerate until the bottom of the pan feels cold, about 1 hour more.
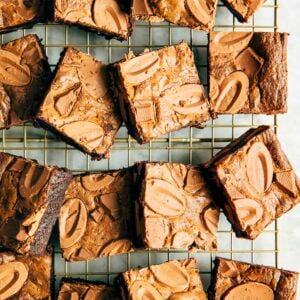
  • Serve and store. Run a butter knife or offset spatula along the edges of the pan and use the overhanging foil as handles to lift the brownies out of the pan and onto a cutting board.
    Slice into 2-inch squares, garnish with flaky salt, and serve.
    The brownies can be stored in an airtight container or zip-top bag at room temperature for up to 3 days.

Notes

  • Recipe adapted from Claire Saffitz’s Dessert Person. Scroll down to see my notes on how I specifically adapted her recipe!
  • When prepping the baking pan, use more cooking spray than you think you need to coat the parchment paper. The brownies are VERY fudgy and tend to get stuck on the paper if you don’t use enough spray.
  • The brownie batter recipe states that you need 5 ounces (142 grams) of chopped dark chocolate to make the brownie batter. If you don’t have a digital kitchen scale, that’s equivalent to ⅔ cup plus 2 Tablespoons of chopped chocolate. Each piece of chocolate should be roughly the same size and shape of a regular-sized chocolate chip. You’ll also need 10 ounces (284 grams) of milk chocolate to mix-in and top the brownies. That’s equivalent to 1 ⅔ cup of chopped milk chocolate.
  • I mention this in my review of the recipe below, but I added more milk chocolate to Claire’s original recipe. Specifically, I added a chopped milk chocolate topping. If you want a less sweet brownie, feel free to skip the milk chocolate topping!
  • The recipe instructs you to cook chocolate, butter, and oil together until melted. Once done, this mixture will look a little grainy (almost like split ganache). Don’t panic! Just continue following the recipe and whisk in the sugars, eggs, and remaining ingredients. Once you start whisking in the eggs, the batter will smoothen out and start to combine.
  • It’s better to pull the brownies out of the oven early than leave them in too long—if you over bake the brownies, they’ll be tough. They might appear underbaked, but I promise that when they’ve cooled, they will be perfect.
Did you make this recipe?Please leave a star rating and review in the form below. I appreciate your feedback, and it helps others, too!

What I Really Think Of Claire Saffitz’s Brownie Recipe

I’m going to be honest with you guys—this is not my favorite brownie recipe. It’s good, but not great. I like milk chocolate, but when combined with the other chocolate elements in Claire’s recipe, it was almost too much. Because of the milk chocolate, I found her brownies to be overly sweet. I realized I much preferred brownies made with dark chocolate.

Another thing I didn’t like about her recipe? It was super fussy and more time consuming than it should have been. Although I liked her technique of blooming the cocoa powder, I didn’t think that her technique of chilling the brownies was worthwhile. The brownies were plenty chewy already (especially since she instructed you to mix them for longer than what’s normal).

Finally, of all the brownies I baked this month, Claire’s recipe made the least appetizing-looking brownies on many levels. First, the batter was unappealing. At several points of the recipe, I was worried it had split like ganache. Although she does warn you that the batter won’t come together until after the eggs are added, no other recipes had this issue.

The finished product itself had a lot to be desired. Other brownie recipes I baked had shiny chocolate tops that flaked like paper when sliced. Claire’s brownies, on the other hand, had a dull and matte sheen. They were the only brownies that didn’t flake when sliced. I think it has to do with the malted milk powder in the recipe—I noticed bakers who had made the recipe but omitted the milk powder had that shiny top. But I was reluctant to leave it out of my version since Claire hyped up the ingredient so much!

Changes I Made To Claire Saffitz’s Brownies

I made this recipe three times before publishing this version of it on Hummingbird High. The first time, I’d followed the directions exactly as they were written in her cookbook. The next two times, I made some subtle technique changes that I thought would lead to a more successful result. Here’s a summary of everything I changed below:

  • Added water to the Ingredients List. The ingredients list in her book doesn’t list boiling water as an ingredient in the recipe. This is a pet peeve of mine—I personally think it’s important to have water listed in the ingredients, especially if it’s meant to be used at a specific temperature.

    In her YouTube video for the recipe, Claire also mentions that the amount of water listed in her book recipe is incorrect/a typo. Specifically, the volume measure is correct while its weight measure is incorrect. I made sure to include the correct volume and weight measure in the recipe you see above.

  • Instructed you to line the baking pan with parchment paper as opposed to aluminum foil. In the original recipe, Claire instructs you to line the baking pan with aluminum foil instead of parchment paper. When I did this the first time I made the recipe, it was a mess. Despite greasing the foil generously, the brownies stuck to it like crazy! I legit had to peel off the aluminum foil from the bottom of a sliced brownie. It was pretty unappetizing. For my next two rounds of baking the recipe, I switched to parchment paper and found that I no longer had any issues.

  • Added more milk chocolate to the original recipe to distract from its lackluster top. The food stylist in me was so heartbroken by the matte, dull top of Claire’s brownies. So I tried to make them “prettier” by adding lots of chopped chocolate on top. I think it worked? They definitely look more appetizing IMO. That being said, adding more chocolate to Claire’s recipe leads to a sweeter brownie. So if you’re someone who wants their brownies to be less sweet, proceed with caution!

Did you make this recipe?

Please leave a comment and rating for the recipe using the form below!

Your ratings make it easier to find the recipe online, and I’m always looking for ways to improve Hummingbird High.

Michelle holding Weeknight Baking cookbook covering her face.

buy the book
Weeknight Baking:
Recipes to Fit your Schedule

Over the past several years of running Hummingbird High, I kept a crucial aspect of my life hidden from my readers: I had a full-time, extremely demanding job in the tech world. In my debut cookbook, Weeknight Baking, I finally reveal the secrets to baking delicious desserts on a tight schedule.