Pumpkin Pie Spice Pull Apart Knots are a sweet twist on the beloved appetizer, pull apart cheesy garlic knots. Instead of being brushed with garlic butter and cheese, these knots are brushed with a generous amount of cinnamon and Land O Lakes® Pumpkin Pie Spice Butter Spread from my sponsor, Land O’Lakes—jump to the recipe! As always, all thoughts and opinions are my own, and thank you for supporting the sponsors that keep Hummingbird High up and running!

Pull Apart Knots
Recently, Erlend and I were at an Italian restaurant that served unlimited cheesy garlic knots as part of their appetizer. We ate basket after basket, relishing how soft and fluffy the knots were as we pulled them apart. If you’re not a crust person (like me—for a long time, I sliced the crusts off the bread in all my sandwiches), pull apart knots are for you—they are 90% fluffy bread, with just a small top and bottom crust.
Later, after we’d stuffed ourselves silly, Erlend asked me why I never made pull apart knots at home. To be honest, savory bread isn’t really in my repertoire. Aside from cinnamon buns and the occasional yeasted waffle, I’m all about making sweet baked goods like cakes and cookies. But that got me thinking: why are pull apart knots mostly savory? Their pillowy texture makes them the perfect vehicle for sweet toppings, too. And after searching a bunch on the internet, I confirmed that most of the pull apart knot recipes I could find were for savory garlic knots! I decided it was time to make a dessert version.

Pull Apart Knots versus Pull Apart Bread
Before I share today’s recipe, I need to point out the difference between pull apart knots and pull apart bread. I’ve made a sweet pull apart bread before—actually, around this time last year, I made a pumpkin pie spice pull apart loaf!
While pull apart bread is made by cutting the dough into squares (that then get folded up and arranged in a loaf pan to form a shingled loaf), pull apart knots are made by forming the dough into different lengths of “rope” and tying them into knots. The knots are then placed in a pan, where they rise together and bake into a (usually round) loaf. But instead of a traditional loaf, the knots almost form individual mini buns that are easy to pull apart.
Although the concept is pretty similar and results in a loaf that can be easily pulled apart, the two methods do yield different textures. Pull apart bread yields pieces that are flatter and more similar to untoasted sliced bread. Pull apart knots are definitely more bun-like than sliced bread-like, if that makes sense.

How to Make Pull Apart Knots
Since we have that very important distinction out of the way, I can jump off my soapbox and we can make these pull apart knots! First, don’t be intimidated. I don’t know about you, but when I hear “knots”, those very fancy Scandinavian breads that are braided in elaborate wreaths immediately come to mind. But if you’ve made cinnamon rolls before, you can make knots no problem—the method for doing so is almost the same. Almost, lol.
First you make the dough and let it rise. I used the cinnamon bun dough from my new cookbook, Weeknight Baking. I usually let the dough rise overnight in the fridge, too. Mostly so I’m not stuck in the kitchen for four hours at a time, but also because I find that doing so gives the dough the wonderful, yeasty (but still subtle!) dough flavor of good breads. After letting the dough rise overnight, punch the dough down and roll it out like you would when making cinnamon rolls. Here’s where the recipe starts to differ: instead of rolling up the slab of dough and slicing it into rolls like you would for cinnamon rolls, use a sharp knife to slice the dough lengthwise into “rope”. You then tie each rope into a knot, folding the excess length into itself to make a mini wreath.

When researching recipes, most of the garlic butter knot recipes encouraged you to have a pot of melted butter on hand and “dip” each knot into the butter for flavor. I tried that method, but found it too messy—I ended up with butter everywhere! What worked instead was using a pastry brush to generously brush each knot with melted butter.
And like I said before, because I was aiming for a sweet version, I used Land O Lakes® Pumpkin Pie Spice Butter Spread. Every year, I wait for this product to come to season since it’s only around during the fall. I love using it not only in baked goods like these knots, but as a special treat on breakfast toasts, too. It tastes what you imagine fall would taste like! After brushing the knots with it, I sprinkled each with a generous amount of cinnamon sugar, too. The cinnamon sugar really brought out the pumpkin pie spice flavors!

Best Pumpkin Pie Spice Pull Apart Knots Recipe Tips
-
- This recipe splits up the work over two days—on the first day, you make the dough and let it rise overnight in the fridge. On the second day, you roll out the dough and form it into the knots, let it rise once more, and then bake. But don’t worry, you can also make the knots all in one day—simply skip the proofing process in the fridge and let the dough rise in a dark place until doubled in size, 1 to 2 hours. After that, follow the instructions for forming the dough into knots and let it rise a second time before baking.
- For this recipe, it’s important that the egg is warmed to room temperature. You’ll be mixing the egg with buttermilk warmed to the perfect temperature to activate instant yeast. A cold egg might lower that temperature significantly and prevent the yeast from activating.
Get the Recipe: Pumpkin Pie Spice Pull Apart Knots
Ingredients
For the Dough
- 3 ½ cups 15.75 ounces all-purpose flour, plus more for dusting
- 3 tablespoons granulated sugar
- 1 ½ teaspoons instant yeast
- ½ teaspoon baking soda
- 1 teaspoon kosher salt
- 1 cup 8 ounces buttermilk, warmed to between 120° and 130°F
- 1 large egg, at room temperature
- ¼ cup 2 ounces canola oil
Assembly
- 6 tablespoons Land O Lakes® Pumpkin Pie Spice Butter Spread
- ⅔ cup 4.65 ounces granulated sugar
- 1 teaspoon ground cinnamon
Instructions
Day 1: Make the Dough
- In the bowl of a stand mixer fitted with a dough hook, combine the flour, sugar, yeast, baking soda, and salt. Knead on low to combine, about 30 seconds. Make a well in the center of the dry ingredients.
- In a large liquid measuring cup, whisk together the buttermilk, egg, and oil. Pour the mixture into the well in the dry ingredients and knead on medium-low for 10 minutes, or until smooth and elastic, using a rubber spatula to scrape down the bottom and sides of the bowl as necessary.
- Tip the dough out onto a lightly floured counter. Dust your hands with flour and knead the dough once or twice into a rough ball. Scrape down the bottom and sides of the bowl to remove any excess dough. Spray the bowl with cooking spray and place the dough back in the bowl. Cover with plastic wrap. Refrigerate overnight.
Day 2: Shape and Bake the Knots
- Uncover the dough and discard the plastic wrap. Tip it onto a lightly floured counter. Spray a 10-inch cast iron skillet with cooking spray.
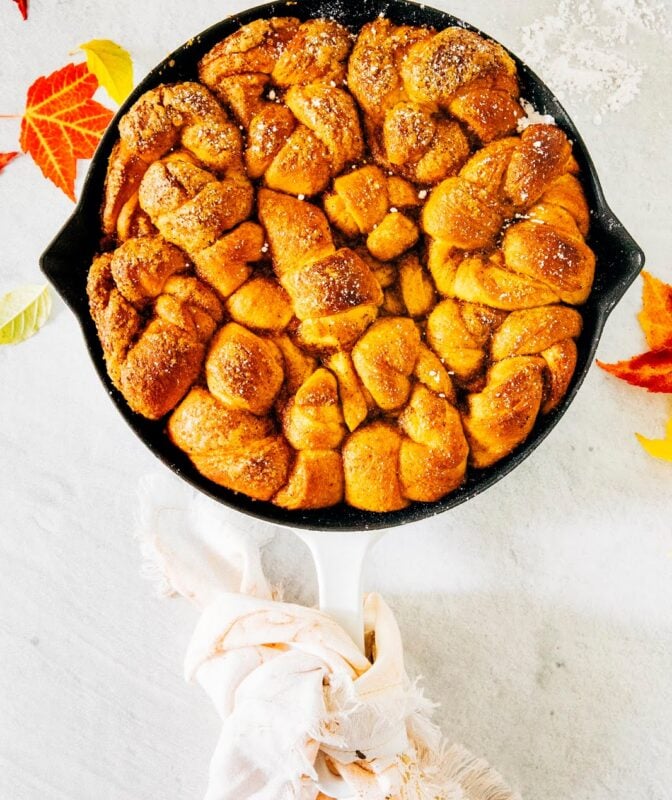
- Use a rolling pin to roll the dough into a large rectangle about 12 inches wide and 14 inches long. Press a bench scraper against the sides of the dough to create straight edges. Use a sharp knife to cut 10 lengths of rope, each around 1 ¼ inches wide. Tie each rope into a knot, tucking the loose ends into the center. Place 7 of the knots in a circle along the edges of the skillet, and the remaining 3 knots in the center of the circle.
- Melt the Land O Lakes® Pumpkin Pie Spice Butter Spread in a small bowl. In another small bowl, whisk together the sugar and cinnamon. Use a pastry brush to cover each knot with a generous amount of Land O Lakes® Pumpkin Pie Spice Butter Spread; immediately sprinkle each knot with 1 tablespoon of the sugar mixture.
- Cover with plastic wrap and let sit in a warm spot for 1 to 2 hours, or until doubled in size.
- About 30 minutes into the second rise, position a rack in the center of the oven and preheat the oven to 350°F.
- Bake the buns for 30 to 35 minutes, or until golden brown and a skewer inserted into the center of a knot comes out clean. Serve warm or at room temperature. The knots can be stored at room temperature in an airtight container for up to 1 day. After that, refrigerate for up to 2 days more.