About The Momofuku Milk Bar Chocolate Chip Cake
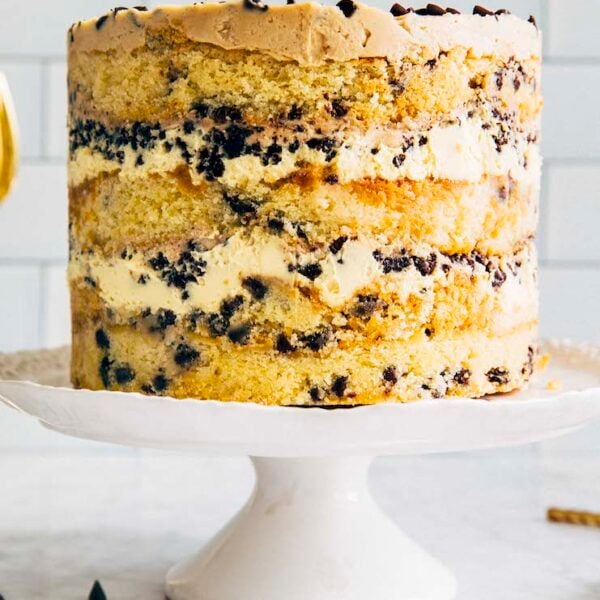
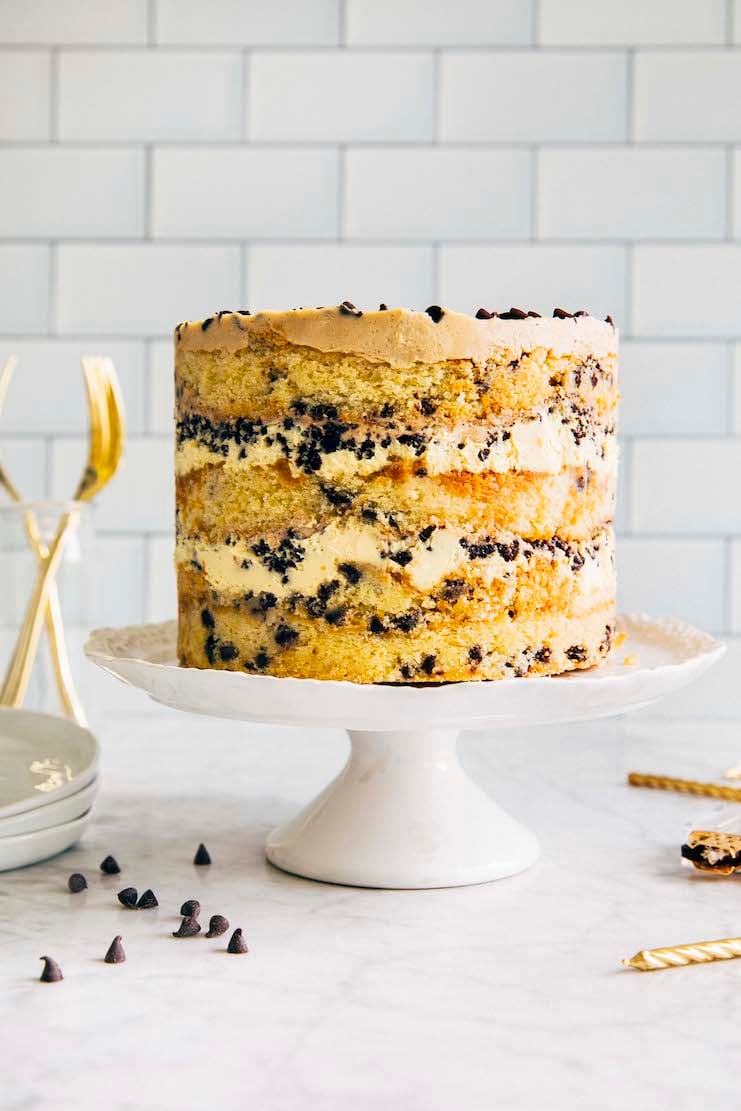
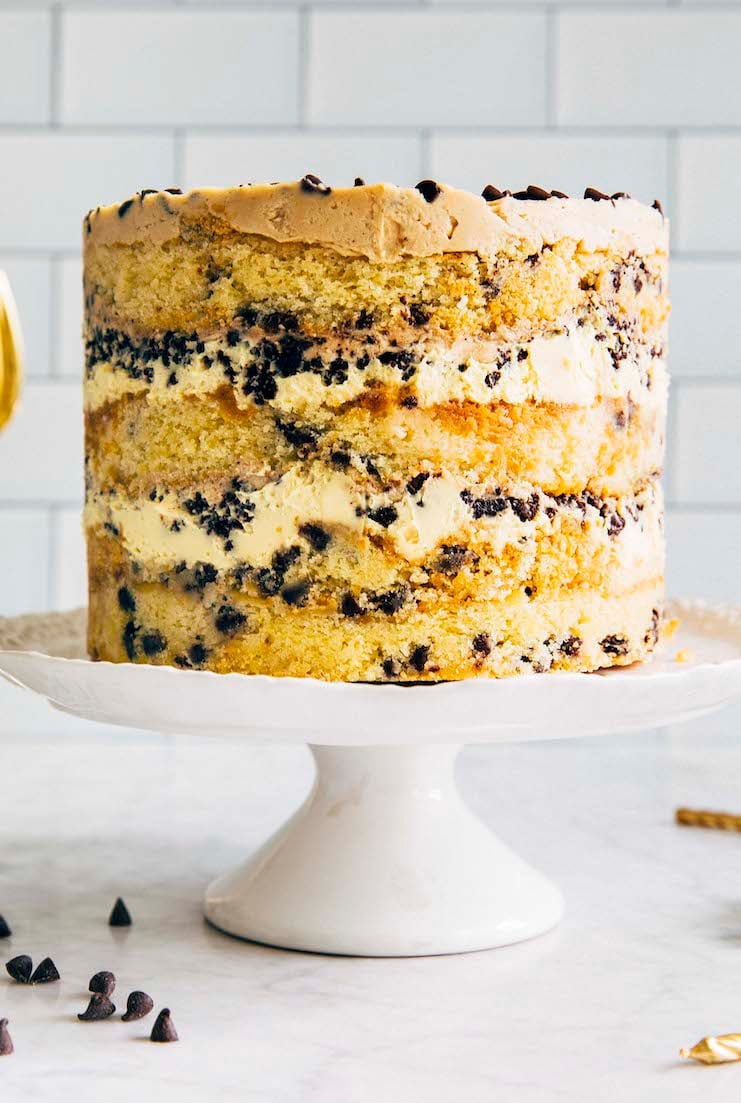
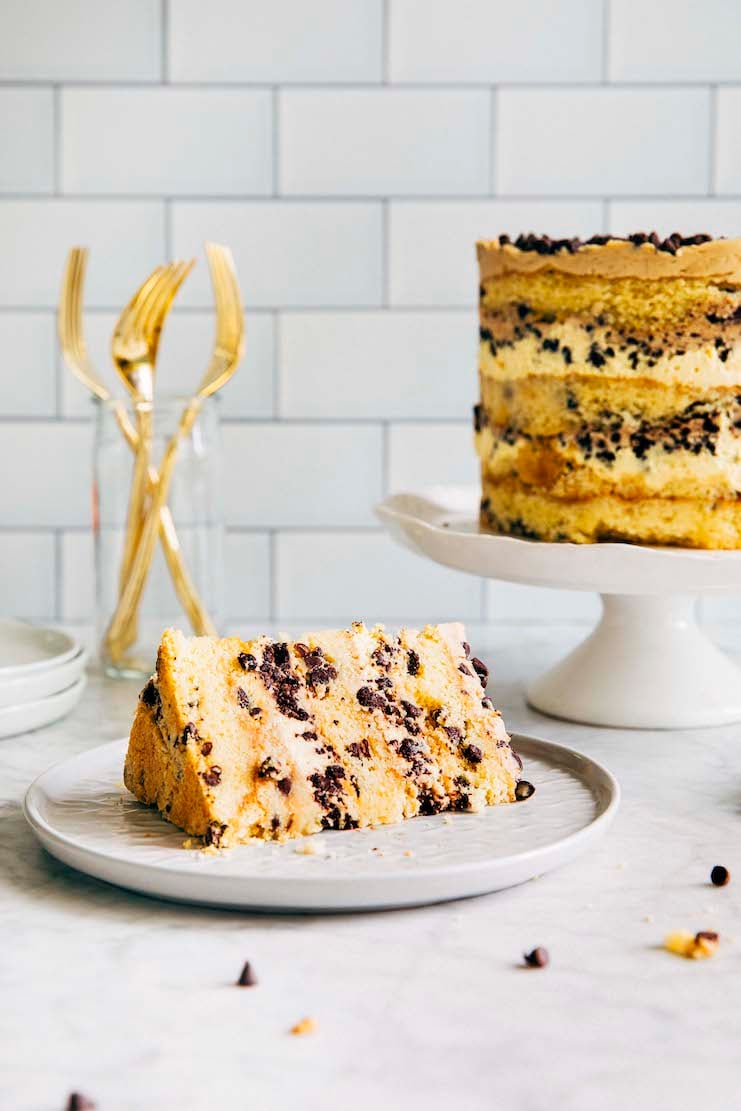
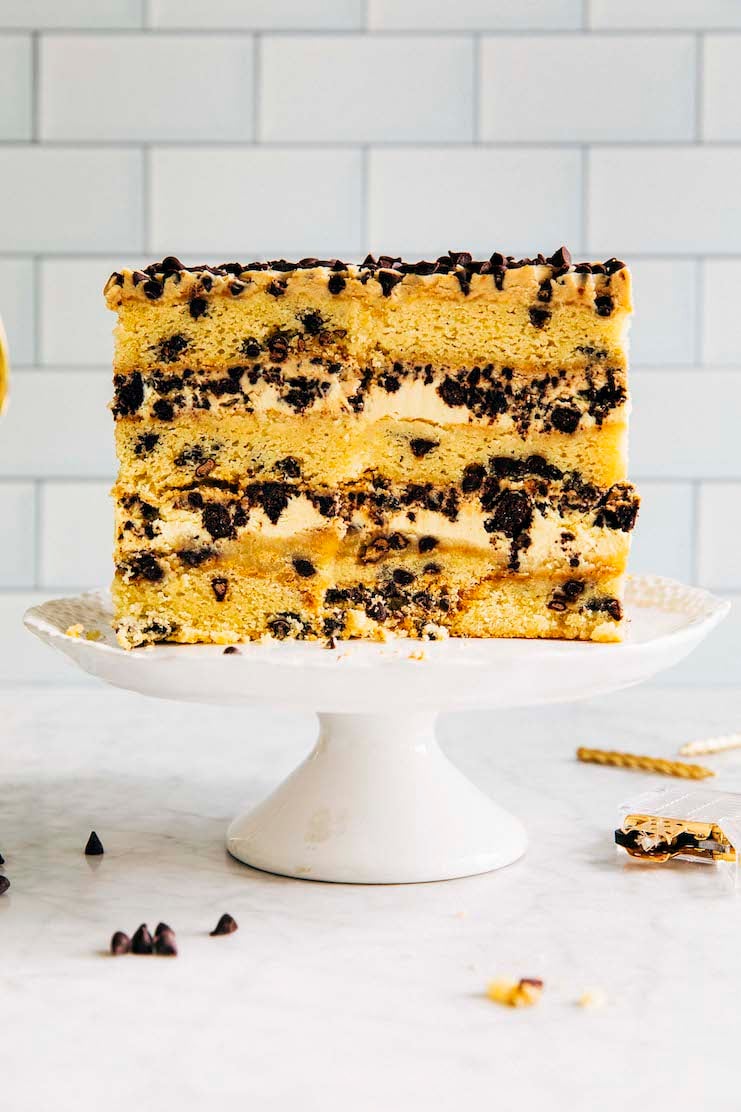
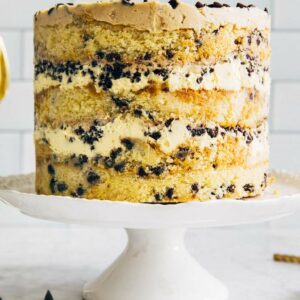
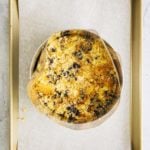
This Momofuku Milk Bar chocolate chip cake is made with layers of chocolate chip yellow cake, passion fruit curd, buttery coffee frosting, and chocolate crumbs!
Although I write that the recipe makes a 6-inch, 3-layer cake, it actually has MANY more layers. Why? The recipe instructs you to layer the first layer of the cake with passion fruit juice, then passion fruit puree, chocolate crumbs, and coffee frosting before starting with another layer of cake. All in all, it equates to about 15 different layers of cake, curd, and crumbs!
The recipe comes from Christina Tosi, the famed pastry chef behind Momofuku Milk Bar bakery and her first cookbook, Momofuku Milk Bar.
What is Momofuku Milk Bar?
Momofuku Milk Bar first exploded into the bakery scene in the mid-2010s as a companion bakery to famed restaurant Momofuku in New York City. It quickly became popular thanks to unique desserts like cereal milk-flavored soft serve and multi-layered naked cakes like this chocolate chip cake.
These days, the bakery simply goes by the name “Milk Bar” and has several locations in other cities beyond New York. You can even buy some of their baked goods at Target and Whole Foods! I also don’t think Christina Tosi works in the kitchens anymore—instead, she appears on TV as a judge on several cooking shows like MasterChef.
So what does passion fruit, coffee, and chocolate actually taste like?
I first made this chocolate cake for my 26th birthday! At the time, I really thought that the combination of chocolate, coffee, and passion fruit was incredibly unique. But it turns out that it’s a common flavor combination in professional pastry kitchens. To wit—in my city of Portland, several donut shops sell a passion fruit cocoa nib donut!
But if you’ve never had the combination before, rest assured that it’s very similar to more common combinations like chocolate strawberry, chocolate raspberry, chocolate orange, and more. The idea behind it is to marry the deep, rich flavors of chocolate with something fruity, tart, and tangy.
And why is the cake naked?
According to Christina Tosi in Momofuku Milk Bar, her and her team worked hard to pack the layer cakes at the bakery with different flavors, textures, and more. They wanted their hard work (and all the layers!) to be visible instead of hidden underneath frosting! I love it.
Prior to their cakes, naked-style cakes weren’t really much of a thing. I believe Milk Bar pioneered the naked cake trend!
Why You Should Make The Recipe
This Milk Bar chocolate chip cake is a homemade version of a famous bakery dessert.
I personally love tasting famous bakery desserts and taking on the challenge of recreating them at home. Luckily, many of my favorite bakeries sell cookbooks that enable me to do so! Like Milk Bar—this recipe comes from their self-titled cookbook. I love knowing that I can bake a cake (that typically sells for $50!) in my own kitchen.
And indeed—this Milk Bar chocolate chip cake goes above and beyond a traditional layer cake recipe. From its unique combination of flavors to all the different textures in the cake, it really does taste like a pro made it! Amazing.
This Milk Bar chocolate chip cake can easily be customized to fit within your schedule.
Real talk—I rarely make a layer cake all in one day. Typically, I make several (or all) of its components like the different cakes, fillings, and frostings beforehand before assembling the entire thing. Why? Leaving it all to do in one day easily sucks up the entire day. And I don’t have time for that! It’s much better to plan ahead, make certain things in advance, and save them for assembling later. You’ll find that when you do, a baking project that usually would have taken all day now only takes 30 minutes or less over the course of several days.
Because the Milk Bar chocolate chip cake consists of SIX different components total—cake, passion fruit puree, passion fruit curd, chocolate crumbs, coffee frosting, and mini chocolate chips—the only way to make it at home is to divide up the work over several days. Doing so results in a baking project that takes only 1 hour or less per day, resulting in an epic cake at the end! It makes it really easy to fit into a busy person’s schedule.
And by the way—if this sort of “recipe time management” is your thing, I highly suggest you check out my OWN cookbook, Weeknight Baking. I break down complicated, time-intensive recipes for layer cakes and pies this way so you can more easily fit it into your schedule!
Ingredients And Substitutions
Now that I’ve convinced you to make this Milk Bar chocolate chip cake, let’s talk about some key ingredients and their potential substitutions:
Common Ingredient Sources and Substitutions
- Passion Fruit Puree. Although you can “make” your own passion fruit puree by scooping out the insides of a passion fruit, you can also buy passion fruit puree online, in Hispanic grocery stores, or in fancy gourmet shops. The fancy pastry school kid by Monin is usually pretty expensive. I recommend going to a Hispanic grocery store and finding a pouch of Goya passion fruit pulp—these typically only cost between $2 and $3!
- Cake Flour. My favorite cake flour is Swans Down Cake Flour. But if you don’t want to go to the store, check out my recipe for Homemade Cake Flour!
- Mini Chocolate Chips. In a pinch, you can use regular-sized chocolate chips. However, Christina Tosi specifically recommends using mini chocolate chips in all her recipes. She claims that doing so ensures more chocolate per bite! Check out my favorite chocolate chips in this post The Best Chocolate For Chocolate Chip Cookies.
- Instant Coffee Powder. In a pinch, you can use ground coffee or instant espresso powder. The coffee powder is mostly there for flavor. Feel free to just use whatever coffee you have on hand, whether its beans that have been ground up, pre-ground coffee, or even the stuff inside a K-cup or coffee pod.
Can I use passion fruit juice instead of passion fruit puree?
No, please don’t! Passion fruit juice typically has added preservatives and sugars in it. If you use it in this recipe, your cake will likely turn out too sweet! Even if you find a juice that doesn’t have any preservatives or sugars, the puree is typically watered down. The passion fruit curd recipe does NOT set properly if you use passion fruit juice!
How To Make Momofuku Milk Bar Chocolate Chip Cake
Real Talk—to make this cake, you need to make four different recipes: one for the chocolate crumbs, another for the passion fruit puree, another for the chocolate chip cake base, and finally, the coffee frosting. If you make all the components all at once, it’s going to take ALL day. Plus, you need to freeze the cake overnight after assembling it, then thaw it before serving. It’s definitely A PROJECT.
Luckily, many of the components can be made ahead of time. If you’re planning on serving the Milk Bar chocolate chip cake for a special occasion on a weekend day like Saturday, I suggest following the schedule below.
Here’s a timeline on how to make Milk Bar chocolate chip cake:
Day 1 (Tuesday): Make The Chocolate Crumbs
However, note that the chocolate crumbs can be refrigerated for up to 1 month, and frozen for much longer.
To make the chocolate crumbs, you’ll need to do the following:
- Prep the ingredients for the chocolate crumbs. (Prep Time: 5 minutes)
- Make the chocolate crumbs. (Work Time: 5 minutes)
- Bake the chocolate crumbs. (Bake Time: 20 minutes)
- Store the chocolate crumbs for assembling the layer cake.
Day 2 (Wednesday): Make The Passion Fruit Curd
However, note that the passion fruit curd can be refrigerated for up to 1 week! Unfortunately, it cannot be frozen as it tends to separate when thawed, ruining the curd’s texture.
To make the passion fruit curd, you’ll need to do the following:
- Prep the ingredients for the passion fruit curd. (Prep Time: 5 minutes)
- Make the passion fruit curd. (Work Time: 10 minutes)
- Store the passion fruit curd for assembling the layer cake.
Day 3 (Thursday): Make the Chocolate Chip Buttermilk Sheet Cake
Christina Tosi in Momofuku Milk Bar states that you can refrigerate the cake overnight; however, I dislike refrigerating cakes because I find that it dries them out. Instead, I recommend leaving it out at room temperature (tightly wrapped in two layers of plastic wrap) OR freezing it overnight. Freezing locks in the moisture of the cake. In a pinch, you can freeze the cake for up to 3 months!
To make the chocolate chip buttermilk sheet cake, you’ll need to do the following:
- Prep the ingredients for the chocolate chip buttermilk cake. (Prep Time: 5 minutes)
- Make the chocolate chip buttermilk sheet cake. (Work Time: 10 minutes)
- Bake the chocolate chip buttermilk sheet cake. (Bake Time: 30 minutes)
- Store the chocolate chip buttermilk sheet cake for assembling the layer cake.
Day 4 (Friday): Make the Coffee Buttercream Frosting, Assemble The Layer Cake, Then Freeze Overnight
Unfortunately, the coffee buttercream is a little on the finicky side (more on that in the Troubleshooting section below). It needs to be used immediately in order for the cake to work. After making the frosting, follow the instructions to assemble the cake and freeze overnight. Between you and me, making the coffee frosting and assembling the different components of the cake are the most time-consuming parts of the recipe. Plan accordingly!
To make the coffee frosting, you’ll need to do the following:
- Prep the ingredients for the coffee frosting. (Prep Time: 5 minutes)
- Make the coffee frosting. (Work Time: 20 minutes)
Then, to assemble the cake, you’ll need to do the following:
- Prep the tools you need to make the layer cake. (Prep Time: 5 minutes)
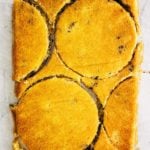
- Use the cake ring to stamp out two 6-inch circles from the sheet cake, then reserve the remains for the first layer of the cake. (Work Time: 5 minutes)
- Make the first layer of the Milk Bar chocolate chip cake. (Work Time: 10 minutes)
- Make the second layer of the Milk Bar chocolate chip cake. (Work Time: 10 minutes)
- Make the final, top layer of the Milk Bar chocolate chip cake. (Work Time: 5 minutes)
- Freeze the assembled cake.
Day 5 (Saturday): Thaw the Cake, Then Serve and Enjoy!
After freezing the cake, you’ll need to pop the assembled cake out of its cake ring, then thaw for at least 3 hours in the refrigerator. I found it was still a little too chilled after 3 hours—I thawed it for an additional hour at room temperature before serving.

Recipe Troubleshooting and FAQ
What baking tools do I need to make Milk Bar chocolate chip cake?
To make this recipe, you need a handful of regular baking equipment and specialty baking equipment (which I’ve marked with an asterisk below):
- parchment paper
- stand mixer with a paddle attachment
- a bench scraper
- air tight containers for storing the chocolate crumbs and passion fruit puree
- a blender OR immersion blender
- a 9 x 13-inch quarter sheet pan*
- a 6-inch cake ring with 2- or 3-inch tall sides*
- acetate paper OR acetate cake collars*
- plastic wrap for storing the chocolate chip sheet cake
And let’s talk about the specialty equipment below:
What is a quarter sheet pan? Can I use a 9 x 13-inch cake pan instead?
You need a quarter sheet pan to bake the Milk Bar chocolate chip cake.
A quarter sheet pan has the same dimensions as a 9 x 13-inch rectangular cake pan. However, cake pans typically have 2- to 3-inch tall sides. In contrast, a quarter sheet pan typically only has short, 1-inch sides.
And yes! In a pinch, you can use a 9 x 13-inch cake pan instead and achieve the same results.
What is a cake ring? And do I really need one to make the Milk Bar chocolate chip cake?
A cake ring is often used in professional pastry kitchens to create mousse cakes and other fancy desserts. It looks like a cake pan, but with taller sides and no bottom. I used this cake ring to make my Milk Bar chocolate chip cake. I like it because it has especially tall sides, and this recipe makes an especially tall cake! But there are plenty that you can choose from that are cheaper.
Unfortunately, you NEED a cake ring to make the Milk Bar chocolate chip cake recipe. The closest substitution I could think of is to use the sides of a 6-inch springform pan (just make sure it has 2- to 3-inch tall sides, like this Fat Daddio’s or Wilton pan). However, because I’ve never tried it myself, I can’t guarantee the results!
Why can’t I use three 6-inch round cake pans to make the Milk Bar chocolate chip cake?
In the book, Christina Tosi instructs you to bake the chocolate chip cake batter into a sheet cake, use a cake ring to stamp out two 6-inch circles, then use the scraps for the base layer. More traditional recipes would instruct you to divide the batter into three 6-inch cake pans to make the three different layers.
Truthfully, I really have no idea why Christina Tosi instructs you to do it that way in her book. My hunch is that, in a professional bakery, this process makes more space in the kitchen (cake pans are bulkier to store than sheet pans) and they’re able to repurpose the scraps for other baked goods (like their cake truffles).
But I guess if you want to make your life a little bit easier, go ahead and divide the chocolate chip cake batter into three 6-inch cake pans and bake it that way. Just make sure to do it evenly because this cake is unforgiving—since it’s naked, you’ll be able to see any uneven layers in the final cake. I would even weigh the batter with a scale before dividing it. How? I place a bowl on my digital kitchen scale, tare it, then pour the batter into the bowl. I divide the resulting number by three (say, the cake batter weighs 300 grams total), then pour the resulting number into three 6-inch cake pans (in my example, 100 grams per pan), using the scale to weigh everything out once more.
Note that, even if you go this route, you’ll STILL need the 6-inch cake ring to build and assemble the cake. Sorry!
What is acetate paper?
Acetate paper is clear paper made out of plastic. In baking, it functions like parchment paper. Professional pastry chefs line the inside of cake pans and molds with the acetate paper to form the cake, then peel it off before serving. It is stiffer and less adhesive than parchment paper, making it a great tool for making cakes with melty and liquidy fillings like creams, curds, ice creams, and mousse.
The Best Acetate Paper for the Milk Bar Chocolate Chip Cake Recipe
When the Momofuku Milk Bar cookbook first came out in 2011, acetate paper wasn’t widely available outside of pastry kitchens. Instead, you had to order it online from Amazon, where the acetate was sold in sheets similar to printer paper (since acetate is also used for projector slides). These days, Amazon has a much wider selection of acetate sheets for baking. You can get acetate cake collars easily, which are already cut and shaped into the right dimensions for baking.
In the book, Christina Tosi writes that you need two rectangular sheets of acetate paper to make the cake, each 20 inches long and 3 inches tall. You can cut a sheet of acetate paper to that size, or buy a roll of a 3-inch or a 4-inch inch tall acetate cake collar paper and cut a 20-inch length of it. The height of the cake collar doesn’t matter too much—you can even buy a 6-inch or an 8-inch tall roll, which will work well with the recipe since the resulting cake is around 6 inches tall.
However, there are pros and cons. Using a taller roll of acetate paper will eliminate the need to use the two cake collars as instructed in the recipe below. However, it will also make it much harder to build the base and second layer. The taller sides of the acetate paper will get in the way as you try and spread the passion fruit curd and coffee frosting on the different layers!
Help! My passion fruit curd came out pretty thick and solid after chilling it. Is this normal?
Truthfully, I was a little surprised by the texture of this recipe’s passion fruit curd. It was less creamy, and instead far more solid than the curds I’ve made in the past. And when I spread it while assembling the cake, it was a little like spreading jelly!
But don’t worry. If the texture of your curd sounds similar to mine, rest assured that you’ve done nothing wrong. It works in the cake, I promise!
Help! My coffee frosting looks REALLY weird. It’s still pretty solid and will just NOT come together. I’ve been mixing for at least 10 minutes now. What did I do wrong?
Before updating this post, I spent a lot of time reading other bloggers’ takes on the recipe on the internet. And it seems like we all came to the same conclusion, independently: Christina Tosi’s coffee buttercream for this cake is a hot mess.
Why? The recipe has a really odd amount of sugar, fat, and liquid. Specifically—there’s too much fat, and not enough sugar and liquid to beat the frosting into the more traditional American buttercream frosting that you’re likely used to.
And even in the book, she writes that it takes a long time for the coffee milk to integrate with the butter because you’re just trying to mix in fat with more fat and nothing else. It took me nearly 15 to 20 minutes of beating the ingredients in my stand mixer before it came together. And even then, it was not the creamy, fluffy frosting that she promised. Instead, it reminded me of the slightly-greasy-but-not-too-sweet coffee buttercream frostings you get in Asian desserts.
Personally, I probably would have gone back to the drawing board with this coffee buttercream recipe and developed one that was less finnicky. But if you want the true Milk Bar experience, follow the recipe as instructed. It works—it just takes a long time to do so.
Best Recipe Tips
Tips For Making the Passion Fruit Curd
- To use powdered gelatin, you’ll need to activate its properties by “blooming” it in water. To do so, simply sprinkle the gelatin over the surface of a few tablespoons of water. Just make sure to sprinkle the gelatin evenly over the water! Pouring it into a pile on top of the water will NOT bloom it properly since the granules in the center will remain hard. Allow the granules to soften entirely in the cold water for 3 to 5 minutes—the gelatin has bloomed when it has become soft. If it still has hard bits, it needs to bloom longer. If it’s so soft it is falling apart, it’s over-bloomed! Throw out the gelatin and start over.
- In a pinch, you can use an immersion blender instead of a traditional blender. However, if you go this route, you’ll need to add the butter slowly instead of all at once. In order to do so, cut the butter into 1-inch cubes. Add the cubes slowly, 1 to 2 pieces at a time, only adding the next portion when the previous portion is fully blended into the mixture.
Best Tips for Making the Chocolate Chip Sheet Cake
- In the cookbook, Christina Tosi warns that there is a ton of liquid and fat in the chocolate chip cake base. She encourages you to make sure that the batter is homogenous at each step (meaning no streaks, discolorations, or any other signs of separation and unincorporation). In fact, the book specifically states that you need to mix the batter on medium-high for AT LEAST 4 to 6 minutes, or until the mixture is “practically white, twice the size of the original fluffy butter-and-sugar mixture, and completely homogenous.” Don’t rush the process!
For Making the Coffee Frosting
- I mentioned this earlier, but making the coffee frosting is the most time-consuming part of the cake. It takes about 15 to 20 minutes for the coffee frosting to come together! Add the coffee milk slowly, 1 to 2 Tablespoons at a time, to the butter and confectioners’ sugar. Wait until the liquid is fully integrated before adding more. The mixture will look very clumpy—but keep mixing! It will eventually come together. To make the process go by faster, scrape down the bottom and sides of the bowl frequently and make sure all your ingredients are at room temperature.
Tips For Assembling the Milk Bar Chocolate Chip Cake
- In the original recipe, Christina Tosi instructs you to assemble the cake with two acetate cake collars, each roughly around 20 inches long and 3 inches tall. These days, you can easily buy acetate cake collar rolls that are taller and measure either 6 or 8 inches in height. Truthfully, these rolls suit the recipe much better since the resulting cake is around 6 inches tall. So if you opt for a taller cake collar roll, you’ll only need to use one cake collar for the whole cake! But there are some disadvantages to doing so—checkout the Troubleshooting and FAQ section of the blog post for more info!
- The original recipe is also pretty vague about dividing up the passion fruit puree, passion fruit curd, chocolate crumbs, and coffee frosting between the layers. The book only gives you rough estimates (e.g. “Use half of the passion fruit puree for the bottom layer”) as opposed to giving you exact volume or weight measures for each layers. So the first time I made this cake, it was wildly uneven! I ended up using way more coffee frosting for the first layer, and ran out by the time I needed to frost the rest of the cake. Similarly, I had way too much passion fruit curd and chocolate crumbs in my bottom layer versus the middle layer.
So when adapting this recipe for Hummingbird High, I made sure to give you EXACT weight measures of the different components needed for each layer. Doing so ensures an even, perfect cake with just the right textures and quantities for each layer! I mean, truthfully, you can probably just eyeball it too. But why not just strive for perfection? - After freezing the cake, the recipe instructs you to pop it out of its cake ring before thawing in the refrigerator. Doing so actually more difficult than I anticipated! The acetate cake collar was frozen around the cake ring. I ended up taking an offset spatula and running it between the acetate and the cake ring. I then pressed my fingers around the outside of the cake, rotating it to methodically apply gentle pressure all around.
Get the Recipe: Momofuku Milk Bar Chocolate Chip Layer Cake Recipe
Ingredients
For the Chocolate Crumbs
- ⅓ cup (1.85 ounces or 53 grams) all-purpose flour
- ⅓ cup (1.15 ounces or 33 grams) Dutch-processed cocoa powder, sifted if necessary
- ¼ cup (1.75 ounces or 50 grams) granulated sugar
- 1 teaspoon cornstarch
- ½ teaspoon kosher salt
- 3 Tablespoons (1.5 ounces or 43 grams) unsalted butter, melted and cooled slightly
For the Passion Fruit Curd
- ½ cup (3.5 ounces or 100 grams) passion fruit puree, strained of seeds
- ⅓ cup (2.30 ounces or 65 grams) granulated sugar
- 2 large eggs
- 2 Tablespoons cold water
- ½ teaspoon unflavored powdered gelatin
- ¾ cup (1 ½ sticks or 6 ounces or 170 grams) cold unsalted butter
- ½ teaspoon kosher salt
For the Chocolate Chip Cake
- 1 ½ cups (6.5 ounces or 185 grams) cake flour
- 1 teaspoon baking powder
- 1 teaspoon kosher salt
- ½ cup (1 stick or 4 ounces or 113 grams) unsalted butter, at room temperature
- 1 ¼ cups (8.80 ounces or 250 grams) granulated sugar
- ¼ cup tightly packed (2.15 ounces or 60 grams) light brown sugar
- 3 large eggs, at room temperature
- ½ cup (3.85 ounces or 110 grams) buttermilk, at room temperature
- ½ cup (2.65 ounces or 75 grams) grapeseed oil
- 1 Tablespoon pure vanilla extract
- ¾ cup (5.30 ounces or 150 grams) mini chocolate chips
For the Coffee Frosting
- ½ cup (1 stick or 4 ounces or 113 grams) unsalted butter, at room temperature
- ¼ cup (1.40 ounces or 40 grams) confectioner's sugar, sifted if necessary
- ¼ cup (1.95 ounces or 55 grams) whole milk, at room temperature
- ¾ teaspoon instant coffee powder
- ¼ teaspoon kosher salt
Assembly
- 1 recipe Chocolate Chip Cake (from above)
- ⅓ cup (2.15 ounces or 60 grams) passion fruit puree, strained of seeds
- 1 recipe Passion Fruit Curd (from above)
- ½ recipe Chocolate Crumb (from above)
- 1 recipe Coffee Frosting (from above)
- ¼ cup (1.40 ounces or 40 grams) mini chocolate chips
Equipment
- parchment paper
- air tight containers
- a stand mixer with a paddle attachment
- a bench scraper
- a blender OR immersion blender
- a medium, heavy-bottomed saucepan
- a 9 x 13-inch quarter sheet pan
- a 6-inch cake ring with 2-inch OR 3-inch tall sides
- acetate paper, cut into one 20-inch long x 6-inch tall rectangular strip OR cut into two 20-inch long x 3-inch tall rectangular strips
- a pastry brush
Instructions
Chocolate Crumb Recipe
- Prep the oven and pan. Position a rack in the center of the oven and preheat to 300°F. Line a half sheet pan with parchment paper.
- Mix the dry ingredients, then add the butter. In the bowl of a stand mixer fitted with the paddle attachment, combine the flour, cocoa powder, sugar, cornstarch, and salt. Mix on low speed until combined, 30 seconds. With the mixer on low, slowly pour in the butter. Beat on low for 1 to 2 minutes, or until the dough starts to come together in small clusters and crumbs.
- Bake the crumbs. Use a rubber spatula to spread the clusters on a parchment-lined sheet pan. Bake for 20 minutes, using a bench scraper to break them up every 4 to 5 minutes. After 20 minutes, the crumbs should still be slightly most to the touch at that point. They will harden and dry as they cool.
- Store for assembling the layer cake. Cool the crumbs in the pan on a wire rack completely before storing or using in the recipe. The crumbs will keep, in an airtight container at room temperature, for up to 1 week. The crumbs will also keep, in an airtight container in the refrigerator, for up to 1 month.
Passion Fruit Curd Recipe
- Blend the passion fruit, sugar, and eggs. Combine the passion fruit puree and sugar in the blender's pitcher. Blend on high until the sugar dissolves, 1 minute. Add the eggs and blend on low until combined, another minute. Use a rubber spatula to scrape the mixture into a medium, heavy-bottomed saucepan.
- Bloom the gelatin. Pour the water into a small bowl or mug. Sprinkle the powdered gelatin evenly over the surface of the water. Let sit for 3 to 5 minutes, or until the gelatin is soft but still keeps its shape and does not fall apart (see Baker's Tips).
- Cook the passion fruit mixture, then blend with the gelatin, butter, and salt. Bring the the passion fruit mixture to a boil over medium-low heat, whisking continuously. Once it boils, remove it from the heat and use a rubber spatula to scrape the mixture back into the blender's pitcher.Add the bloomed gelatin, butter, and salt and immediately blend until the mixture is thick, shiny, and super smooth, 1 to 2 minutes.
- Store for assembling the layer cake. To store, pour the passion fruit curd into an airtight container. Press a sheet of plastic wrap directly against the surface of the curd to prevent a skin from forming. Cover with a lid and refrigerate for up to 1 week; do NOT freeze.
Chocolate Chip Cake Recipe
- Prep the oven and cake pan. Position a rack in the center of the oven and preheat the oven to 350°F. Generously spray a quarter sheet pan with cooking spray and line the bottom with parchment paper. Spray the parchment, too.
- Mix the dry ingredients. In a medium bowl, whisk together the flour, baking powder, and salt.
- Beat the butter and sugars. In the bowl of a stand mixer fitted with the paddle attachment, combine the butter and sugars. Beat on medium until light, fluffy, and doubled in volume, 3 to 4 minutes, using a rubber spatula to scrape down the bottom and sides of the bowl as necessary.
- Add the eggs, oil, buttermilk, vanilla, and dry ingredients. Reduce the mixer to low and add the eggs one at a time, adding the next egg only after the previous one has been fully incorporated, scraping down the bottom and sides of the bowl after each addition. With the mixer on low, slowly pour in the oil, followed by the buttermilk and vanilla, and beat until the mixture is smooth, 3 to 4 minutes. Gradually add the dry ingredients and beat until just combined. Scrape down the bottom and sides of the bowl once more, and beat on low for an additional 30 seconds.
- Assemble the cake for baking. Pour the batter into the prepared pan and use an offset spatula to smooth its top if necessary. Sprinkle the chocolate chips evenly over the batter.
- Bake the cake. Bake for 30 to 35 minutes. When done, the top of the cake should bounce back when gently pressed and a skewer inserted into the center of the cake should come out with a few crumbs attached. Cool completely in the pan on a wire rack before storing or using for assembly.
- Store for assembling the layer cake. Turn the cake out onto a sheet of plastic wrap. Use the plastic wrap to tightly wrap the entire cake (you may need an additional sheet or two of plastic wrap to cover it completely). The cake will keep, at room temperature, for up to 1 day. The cake will also keep in the freezer, wrapped in an additional layer of aluminum foil, for up to 3 months.
Coffee Frosting Recipe
- Beat the butter and sugar. In the bowl of a stand mixer fitted with the paddle attachment, beat the butter on medium-low until smooth and creamy, about 1 minute. Reduce the mixer to low and add the confectioners' sugar until combined. Scrape down the bottom and sides of the bowl with a rubber spatula, then beat on medium-high until light and fluffy, 2 to 3 minutes.
- Meanwhile, make the coffee milk. While the butter and sugar is creaming, make the coffee milk. Whisk together the milk, coffee powder, and salt in a small bowl.
- Slowly add the coffee milk to the butter and sugar. Once the butter is light and fluffy, scrape down the bottom and sides of the bowl once more. With the mixer on medium-high speed, slowly add the coffee milk, one tablespoon at a time—do NOT add more coffee milk until the previous addition is fully mixed into the frosting! It will take a long time for the two ingredients to combine. Be patient! At first, the butter will clump and separate when the coffee milk is poured in. Keep beating until light, fluffy, and shiny, about 5 minutes. Use immediately for assembling the layer cake.
Assembly
 First, prep the chocolate chip sheet cake for cutting. Place a piece of parchment paper large enough to hold the chocolate chip cake on your counter. Invert the cake onto it; peel and discard the parchment from the bottom of the cake.
- Cut the sheet cake into the different layers. Use the cake ring to stamp out 2 full circles and 2 half circles from the cake.
- The full circles will be your top two cake layers, while the half circles and remaining cake scraps will come together to make the bottom layer of the cake.
- Prep the cake ring and acetate cake collar. Clean the cake ring and place it in the center of a sheet pan lined with clean parchment paper. Line the inside of the cake ring with the acetate paper (if using two strips of acetate paper, just use one strip).
- Make the bottom layer of the Milk Bar chocolate chip cake. Nestle the two half circles in the cake ring, pressing their round sides against the cake ring. There will be a gap in the middle of the circles—this is totally okay, I promise!
- Fill the gap between the two half circles with the remaining cake scraps. Use the back of your hand to press the scraps together to fit into the space. Head's up that you're going to have more scraps than can fit in the gap—that's totally normal, I promise! Simply take the excess scraps and press them down evenly on top of the rest of the cake layer, using the back of your hand to create a flat and even layer. At this point, the acetate collar will start to wrinkle from the pressure of the cake. Don't worry about it too much! It will even back out when you add the middle and top layer.
- Brush the bottom layer with half of the passion fruit puree for assembly. Use a pastry brush to brush half of the passion fruit puree for assembly over the layer. If using a digital scale to weigh out the passion fruit puree, you'll need approximately 1 ounce (30 grams) of passion fruit puree for this layer.
- Spread the half of the passion fruit curd over the bottom layer. Use the back of a spoon or a small rubber spatula to spread half of the passion fruit curd in an even layer over the cake. If using a digital scale to weigh out the passion fruit puree, you'll need approximately 6.25 ounces (177 grams) of passion fruit curd for this layer. Don't worry too much about making the top of the passion fruit curd smooth—you'll cover it with other ingredients in the next step. The more important thing is to try and spread it as evenly as you can across the top of the cake, and ensure that too much of it doesn't get up on the sides of the acetate collar.
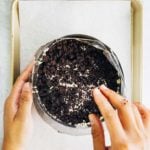
- Sprinkle half of the chocolate crumbs over the passion fruit curd on the bottom layer. Sprinkle half of the chocolate crumbs over the passion fruit curd. If using a digital scale to weigh out the chocolate crumbs, you'll need approximately 3 ounces (85 grams) of chocolate crumbs for this layer. Use the back of your hand to gently press the crumbs in place.If you want to go the extra mile, sprinkle slightly more crumbs along the outer edges of the cake. Christina Tosi recommends doing so in a YouTube tutorial of hers—doing so creates more contrast between layers in the final, assembled cake!
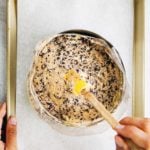
- Spread a third of the coffee frosting over the chocolate crumbs on the bottom layer. Use the back of a spoon or a small rubber spatula to spread ⅓ of the coffee frosting as evenly as possible over the chocolate crumbs. If using a digital scale to weigh out the coffee frosting, you'll need approximately 1.15 ounces (33 grams) of coffee frosting for this layer.This is the most difficult process of assembling the layer cake! The coffee frosting will pull some of the crumbs up, and refuse to spread over their rough texture. But similar to the previous step of spreading the passion fruit curd, don't worry about making the frosting smooth. The more important thing is to try and spread it as evenly as you can across the top of the cake, and ensure that too much of it doesn't get up on the sides of the acetate collar.
- Make the middle layer of the Milk Bar chocolate chip cake. If you're using two acetate cake collars, gently tuck the second strip of acetate between the cake ring and the top ¼ inch of the first strip of acetate. Doing so creates a ring of acetate that is 5 to 6 inches tall, combined—this will be high enough to support the height of the finished cake. Set a cake round on top of the frosting. If one of your cake rounds is jankier than the other, use it in the middle and save the pretty one for the top!
- Repeat the process for brushing the middle layer with the remaining half of the passion fruit puree, the remaining half of the passion fruit curd, the remaining half of the chocolate crumbs, and a ⅓ (1.15 ounces or 33 grams) of the coffee frosting.
- Make the top layer of the Milk Bar chocolate chip cake. Once you've finished assembling the passion fruit puree, passion fruit curd, chocolate crumb, and coffee layers of the coffee frosting, set the final cake round on top of the frosting.
- Frost the top layer of the Milk Bar chocolate chip cake with the remaining coffee frosting. Use the back of a spoon or a small rubber spatula to spread the remaining coffee frosting as evenly as possible over the top layer. Again, don't worry about making the frosting smooth! You'll cover it with mini chocolate chips in the next step.
- Garnish the frosted Milk Bar chocolate chip cake with the mini chocolate chips for assembly. Garnish the frosting with the remaining mini chocolate chips for assembly.
- Freeze the cake. Transfer the sheet pan with the cake to the freezer. Freeze, uncovered and fully assembled, for a minimum of 12 hours to set the cake and all its fillings. The cake will keep in the freezer for up to 2 weeks.
- Thaw the cake, then serve. At least 3 hours before you are ready to serve the cake, pull the sheet pan out of the freezer and use your fingers and thumbs to gently pop the cake out of the cake ring. Transfer the cake to a serving plate or cake stand. Gently peel off the acetate. Defrost in the fridge for a minimum of 3 hours (or 1 hour at room temperature) before serving.
- Store the cake. The assembled cake will keep, uncovered in the refrigerator, for up to 1 day. After that, tightly wrap in plastic wrap and refrigerate for an additional 3 days. Leftover slices can be stored in an airtight container in the fridge.


Notes
- Adapted from Momofuku Milk Bar
- To use powdered gelatin, you’ll need to activate its properties by “blooming” it in water. To do so, simply sprinkle the gelatin over the surface of a few tablespoons of water. Just make sure to sprinkle the gelatin evenly over the water! Pouring it into a pile on top of the water will NOT bloom it properly since the granules in the center will remain hard. Allow the granules to soften entirely in the cold water for 3 to 5 minutes—the gelatin has bloomed when it has become soft. If it still has hard bits, it needs to bloom longer. If it’s so soft it is falling apart, it’s over-bloomed! Throw out the gelatin and start over.
- In a pinch, you can use an immersion blender instead of a traditional blender. However, if you go this route, you’ll need to add the butter slowly instead of all at once. In order to do so, cut the butter into 1-inch cubes. Add the cubes slowly, 1 to 2 pieces at a time, only adding the next portion when the previous portion is fully blended into the mixture.
- In the cookbook, Christina Tosi warns that there is a ton of liquid and fat in the chocolate chip cake base. She encourages you to make sure that the batter is homogenous at each step (meaning no streaks, discolorations, or any other signs of separation and unincorporation). In fact, the book specifically states that you need to mix the batter on medium-high for AT LEAST 4 to 6 minutes, or until the mixture is “practically white, twice the size of the original fluffy butter-and-sugar mixture, and completely homogenous.” Don’t rush the process!
- I mentioned this earlier, but making the coffee frosting is the most time-consuming part of the cake. It takes about 15 to 20 minutes for the coffee frosting to come together! Add the coffee milk slowly, 1 to 2 Tablespoons at a time, to the butter and confectioners’ sugar. Wait until the liquid is fully integrated before adding more. The mixture will look very clumpy—but keep mixing! It will eventually come together. To make the process go by faster, scrape down the bottom and sides of the bowl frequently and make sure all your ingredients are at room temperature.
- In the original recipe, Christina Tosi instructs you to assemble the cake with two acetate cake collars, each roughly around 20 inches long and 3 inches tall. These days, you can easily buy acetate cake collar rolls that are taller and measure either 6 or 8 inches in height. Truthfully, these rolls suit the recipe much better since the resulting cake is around 6 inches tall. So if you opt for a taller cake collar roll, you’ll only need to use one cake collar for the whole cake! But there are some disadvantages to doing so—checkout the Troubleshooting and FAQ section of the blog post for more info!
- The original recipe is also pretty vague about dividing up the passion fruit puree, passion fruit curd, chocolate crumbs, and coffee frosting between the layers. The book only gives you rough estimates (e.g. “Use half of the passion fruit puree for the bottom layer”) as opposed to giving you exact volume or weight measures for each layers. So the first time I made this cake, it was wildly uneven! I ended up using way more coffee frosting for the first layer, and ran out by the time I needed to frost the rest of the cake. Similarly, I had way too much passion fruit curd and chocolate crumbs in my bottom layer versus the middle layer. So when adapting this recipe for Hummingbird High, I made sure to give you EXACT weight measures of the different components needed for each layer. Doing so ensures an even, perfect cake with just the right textures and quantities for each layer! I mean, truthfully, you can probably just eyeball it too. But why not just strive for perfection?
- After freezing the cake, the recipe instructs you to pop it out of its cake ring before thawing in the refrigerator. Doing so actually more difficult than I anticipated! The acetate cake collar was frozen around the cake ring. I ended up taking an offset spatula and running it between the acetate and the cake ring. I then pressed my fingers around the outside of the cake, rotating it to methodically apply gentle pressure all around.
Did you make this recipe?
Please leave a comment and rating for the recipe using the form below!
Your ratings make it easier to find the recipe online, and I’m always looking for ways to improve Hummingbird High.
get new recipes via email:

buy the book
Weeknight Baking:
Recipes to Fit your Schedule
Over the past several years of running Hummingbird High, I kept a crucial aspect of my life hidden from my readers: I had a full-time, extremely demanding job in the tech world. In my debut cookbook, Weeknight Baking, I finally reveal the secrets to baking delicious desserts on a tight schedule.
This is such a gorgeous cake! I love complicated recipes that are truly worth the time and energy in the end.
Absolutely gorgeous! And what a way to celebrate your 26th! Love the green cake stand too 🙂
Happy happy (slightly belated) birthday! I have a similar attitude towards my own birthdays but I'm pretty sure that this cake would make it all seem so much better. It looks and sounds incredible!
That is the most beautiful cake I've ever seen. EVER. Oh my. Happy Birthday!!!
That cake is gorgeous! Happy Birthday!!! (mine is today so we are super close!)
happy birthday! I love these cakes layered with crumbs and custard.
Happy birthday Michelle!
Happy belated birthday, your cake looks fantastic. Thanks for the in depth details for the recipe, I was considering getting this book but it doesn't sound like it explains what you need to do. Is it a book worth having?
Hi there,
It's an okay book — definitely could use a little more process pictures/pictures of the final product. They also use a lot of ingredients that are hard to find. But if you're committed, you can definitely make goods that are identical to the ones found in the NYC bakeries.
Thanks Michelle, I may give it a go if I see on special offer.
Wowwwww. I'm in awe. That's a fabulous birthday present to yourself! Haha I made the momofuku funfetti cake for my bday last year and it was such a hit with all my friends. Would you say you prefer that one or this one?? I might follow in your footsteps…
Happy belated birthday ! I just discovered your blog and I love it!
wonderful pictures and i love the recipes you pick , you have a new fan in me :)take care ~
Curious why you can't refrigerate the icing, but freezing the whole cake is OK?
Hi there,
If you refrigerate the icing immediately after making it, the coffee and butter will separate and you'll have to spend the same amount of time mixing the two back together. For some reason, the coffee and butter don't separate when it's on the cake — I think it's because it's distributed evenly via thin layer, which keeps it together (as opposed to when it's in the bowl as a blob).
Omg Michelle I finally made this cake (for my bf's bday, coming up) and the coffee frosting is WEIRD. It's just like, butter, whipped. Plus coffee. Did it taste good to you? My friend and I both thought it tasted pretty much like pure butter. Although we used almond milk because I didn't have whole milk…do you think that might have screwed it up?? I haven't cut into it yet, but I'm nervous…
Okay, DON'T PANIC! I won't be the first to admit the coffee frosting is weird — because you're right, it tastes completely like pure butter with just a splash of coffee added. It's not the kind of frosting I'd like to eat with a spoon, and I say that about almost every frosting.
That being said, when the frosting is combined with the cake, chocolate crumbs, passionfruit curd, and mini chocolate chips, the coffee frosting is absolutely lovely. You just have to see it as part of the whole package, as opposed to its own piece. It complements the rest of the cake really, really well. But on its own? Yeah, defs nothing to write home about.
Don't panic! It'll be okay. Let me know what you think after you have a slice.
Okay phew! You were right. It worked! And the cake was DELICIOUS. Although…I do think it was a good binder for all the other cake components, but I feel like the frosting could have added more to the cake. Maybe a coffee buttercream would be too much, but I want to experiment with something more than just butter and coffee!
Thanks for the reassurance! 🙂
hiya michelle! found a photo of your cake on pinterest and it led me here – hooray! you did an awesome job on this one! i have the momofuku milk book too and while i have sat and read it a few times and probably drooled, i havent' attempted any of the crazy cakes yet! feeling more inspired to go for it now… ^__^ looking forward to exploring more of your blog.
PS happy belated birthday! i just had my birthday too, and i usually sit and wait around for someone else to make me a cake… but this year i made my own and it was SO SATISFYING and fun, even! maybe next year i'll go for one of the momofuku ones! ^__^
annnnnd i just saw that your birthday was in june. haha! happy 5 months after your birthday! 😛
Michelle this looks absolutely incredible! Would you simply be able to double it to make a 12" round cake? I think of making it for a birthday dinner and would need to feed quite a few people? Thank you, Rochelle
Hmm… you'd need a bigger pan, probably? Also, bigger cake rings (unless you're planning on making a SUPER TALL CAKE). I'm not sure, I've never tried doubling it, sorry I'm not more useful!
Thanks for posting this with the day to day detail. Helped me pull everything together…with so many steps I wasn't getting my head around the process.
On a side note, I did mine in a 7×7 springform pan…I couldn't find a 6" pan that would arrive in time for my cook. It worked great. Plus, it was easy to slice consistent pieces from the square. Baked the cake in a 15" sheet. Pressed out 2 7×7 squares and then the long side that was left over…split it and it combine to be the bottom layer. This was easier than piecing together the leftovers from a round cut. The only thing I would change from using a different size pan is to double the coffee frosting. There just wasn't enough to cover completely. There was plenty of puree, curd, and coffee crumbs.
Thanks again.
Hi!
You are amazing! I want to make one of the Momofuko cakes for my brother and his wife's 5 year anniversary; he is a big Momo fan….
Any tips on which is easier? Tastier? Generally prefereable?
Toss up between Funfetti and Choco Chip…
Help!?
Thx 🙂
Getting ready to make this. Thanks for all the info. Just want to say…. LOVE the green cake plate.
any way to make the cake a little less dense? ive made this recipe twice and both times the cake part is so dense by the time you serve it…it seems like its underdone, even though the cake was baked to completion
I honestly think that’s just the style of Momofuku Milk Bar cakes. Each cake has SO many components that it needs to be fairly dense to hold it together. I suggest trying another recipe: https://www.hummingbirdhigh.com/category/cakes
This looks UHHHHHHHHHmazing! But where did you find the passionfruit pulp I have been looking EVEYWHERE?!?
If you’re willing to shell out, Amazon has some passionfruit puree for sale… at a premium. https://amzn.to/2Rsj5Mx But if you have any Latin American or Asian grocery stores near you, I highly suggest checking their freezer aisles! Latin American markets will have cheap packets of passionfruit puree (from Goya, I think) that sell for about $2-$3, whereas Asian supermarkets typically have frozen passionfruit fruits that you can juice for $5.
Great! Any brand on Amazon you’d recommend??? I keep finding the pulp and then when I read about what’s in it the reviewers say there’s lots of sugar and its too sweet. Thanks again – I’ll def check out Goya too
This is the brand that most professional pastry chefs (including Christina Tosi herself) uses: https://amzn.to/2Rt9tB9 It’s kinda on the spendy side though!
Hi!
Your cake looks amazing!!!
What is the height of your 6″ cake round? I am not sure whether to buy one that is 2.5″ or 3″ heigh to make this cake.
Hi!
I used this cake ring: https://amzn.to/39JWEvD
Given her reputation, and a number of reviews, I was concerned this would be too sweet. It’s not too sweet at all! I weighed the ingredients and made for a group of Europeans that don’t usually care for typical American desserts. It was a huge hit. Everyone wanted more.
Hi,
This looks amazing, BUT, no one in our family likes coffee. Do you think I could substitute chocolate frosting?
Probably, but I personally wouldn’t do it. I worry it would make the cake too sweet—the coffee helps tamper down a lot of its sweetness!
Regarding your Momofuko Milk Bar Chocolate Chip Cake – Would you please share the recipe (amount for each ingredient) to convert from three 6 in pans to three 8 in pans. I\’ve been baking cakes every weekend since mid February 2020…and have been able to bake a different cake each of those weekends. This cake is different, seems like it might be a bit of a challenge to bake (which I like) and sounds like it will be delicious. I look forward to hearing back from you with the conversion amounts for three 8 in layers. Thanks in advance!! Cyndi
Hi Cyndi,
My friend Erin made this amazing calculator that converts recipes into different pan sizes that you should get you what you need for this recipe! Definitely check it out: https://cloudykitchen.com/calculators-and-converters/
What a nice surprise finding this recipe and your blog. Decided to give this a try and have yet to eat it. Will give it a rating after I do. But the next time I make it, I will try spreading the given amount of coffee buttercream on a cut layer of the cake, and then carefully lay it down on top of the crumbs. Makes way more sense to me than trying to spread it evenly over crumbs.
Baking it now for my husband’s 50th birthday. He doesn’t have a very sweet tooth, but 10 years ago he tried this cake from Milk Bar, and it’s the only one he ever mentioned. I tried ordering it for his big occasion, but it looks like they don’t make this particular combo of chocolate, passionfruit and coffee any longer so its up to me and your recipe to save the day. Thank you for detailed explanations, I appreciate it a lot.
Hello there,
Is there a reason you say not to freeze the passion curd, yet it is ok to freeze the cake? Does the dues defrost ok in this instance?
Thanks!
Being frozen in the cake helps prevent the curd from separating/splitting when defrosted!
10 or so years later and this recipe is still going strong! I wonder if you are like me who tends to keep making new things and only repeats very VERY favourite ones!
Only JUST put the assembled cake in the freezer and loved every component (spent a lazy week making it which was kinda great) , even the coffee frosting, someone said it tasted like butter but I really liked it – and as you said not by the spoonful – but its now on my list of fillings for cakes or a little puddle in a cupcake for sure. I used espresso powder and I liked that bit of extra pow.
Had a nibble along the way of everything but the cake and I love these flavour combinations – passionfruit and coffee is one I will definitely be combining again. I just finished and espresso honey beehive cake so coffee is getting a workout!
Anyway hi from Sunny Australia and I will be a hit at dinner with the friends tomorrow night.
Thanks again for the recipe
Dave
Hi! this looks absolutely delicious, but unfortunately I’m allergic to passionfruit. Is there another fruit you could recommend, or am I out of luck? Thank you!
Passion fruit works best, but I actually think you could get away with using orange juice. It has the same sweetness/tanginess, and there’s been a trend of people adding an espresso shot to orange juice in the last year and enjoying that flavor combo!