
About This Gluten Free Pandan Vietnamese Honeycomb Cake Recipe
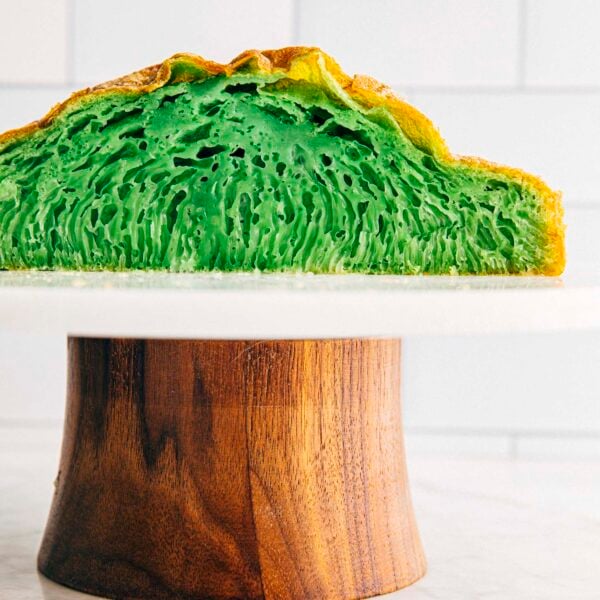
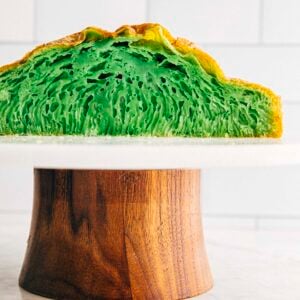
This pandan Vietnamese honeycomb cake, also known as bahn bo nuong or bánh bò nướng, is a bouncy, chewy, airy sponge cake! Its English name of “honeycomb cake” references the cake’s unique texture and crumb made of big, chewy air pockets and bubbles. It has an appearance similar to honeycomb when sliced.
The light and airy honeycomb cake is flavored with both coconut cream and pandan. If you love chewy textures and desserts that are “not too sweet“, this recipe is for you! The best part? Thanks to ingredients like tapioca starch, rice flour, and coconut cream, the cake is naturally both gluten free AND dairy free.
For more Southeast Asian simple cake recipes (that are also gluten free!), check out this Bouncy Chewy Gluten Free Ube Mochi Cake and this Traditional Filipino Cassava Cake recipe!
@hummingbirdhigh this one is for the texture girlies
♬ ladyfingers – chop


Ingredients and Substitutions
Now that I’ve convinced you to make this Vietnamese honeycomb cake, here’s everything you need for the recipe:

And let’s talk about some key ingredients, where to find them, and any common substitutions:
- Canola Oil: While testing the recipe, I found that you can replace the canola oil in the recipe with any other neutral flavored oil (e.g. grapeseed oil, safflower oil, vegetable oil).
- Tapioca Starch: Tapioca starch is naturally gluten free and can be found in most Asian grocery stores. I used Erawan tapioca starch, but I also like Bob’s Red Mill tapioca flour (which is typically available in major grocery stores and health food stores). Note that tapioca starch is also the same thing as tapioca flour.
- Rice Flour: Don’t confuse rice flour with glutinous rice flour or sweet rice flour. You need straight-up rice flour for this recipe! It can be found in most Asian grocery stores (close to where you would find tapioca starch, too). I used Erawan rice flour, but I also like Bob’s Red Mill white rice flour.
- Coconut Cream: Coconut cream is different from coconut milk—you need CREAM for this recipe! It is typically available in Asian grocery stores or the Asian food aisle of most major grocery stores (I believe Whole Foods has it). I like Arroy-D coconut cream the best; you can get boxes that come in the 1 cup (8.5 ounces or 241 grams) needed for the recipe. In a pinch, you can also use regular cream but you’ll miss the coconut flavor that’s traditional to bahn bo nuong.
- Kosher Salt: In my cookbook, I argue that kosher salt is the best salt for baking recipes. But you can replace the kosher salt in the recipe with table salt. Just use half the amount listed in the recipe when you do!
- Pandan Extract: Most Asian grocery stores carry pandan extract in their baking aisles. Try and find a pandan extract that is vibrant green in color and thicker in consistency. I like Butterfly brand pandan extract.
- Cream of Tartar: Cream of tartar is an acidic by-product of fermenting grapes into wine. Bakers primarily use it to stabilize meringues and whipped creams, and to make traditional cookie recipes like snickerdoodles. Unfortunately, you need it for this recipe! But use the leftovers to make Incredibly Soft and Moist Snickerdoodle Bread, My Best Snickerdoodle Recipe, and Soft and Fluffy Snickerdoodle Cake.

Butterfly Pandan Extract


How To Make The Recipe
Check out the gallery below for pictures of what the cake batter looks like at different points in the process. I’ve also included pictures of tricky/odd steps in the recipe like cutting the egg yolks and cooling the cake upside down!


Recipe Troubleshooting and FAQ
Help! My Vietnamese honeycomb cake failed. The cake top came out flat and/or sank. What did I do wrong?
Oh no! There are several reasons why the cake could have come out flat and/or sank. Check out my tips below:
- Don’t forget to preheat your cake pan with the oven. The hotter the pan, the taller the cake dome.
- Make sure your eggs are room temperature. Using room temperature ingredients ensures a tall cake dome that holds it shape!
- Make sure to stir gently throughout the cake making process. Incorporating too much air into the batter can cause the cake to sink later.
- Cool the cake upside down. This step is key—if you cool the cake right side up, it will likely sink. Turn it upside down IMMEDIATELY after pulling it out of the oven. It will start to sink if you wait too long! And make sure to cool the cake upside down for at least 1 hour before removing from the pan, too. If you remove the cake from the pan too early, it will also increase the chance of the cake sinking.
Best Recipe Tips
- So you’re nervous about cooling the cake upside down. I get it! A couple of tips—first, when greasing the pan, make sure to only grease its bottom. Second, although this isn’t necessary, it might be worth it to invest in a NON-nonstick pan. Using a NON-nonstick pan will make it more likely that your cake won’t come sliding out the pan during its cooling process. I like this one by Fat Daddio.
- The recipe instructs you to bake the cake with a convection fan. No convection fan? No problem. The recipe works fine without it, though your final Vietnamese honeycomb cake dome likely won’t be as tall or brown as mine. You may also need to increase the Bake Time by 5 minutes.

Fat Daddio 8 x 2 Inch Round Cake Pans
Get the Recipe: Gluten Free Pandan Vietnamese Honeycomb Cake
Ingredients
For The Pan
- ½ teaspoon canola oil
For The Batter
- 1 ⅓ cups (5.35 ounces or 152 grams) tapioca starch
- 1 Tablespoon (0.35 ounces or 10 grams) rice flour
- 1 cup (8.5 ounces or 241 grams) coconut cream
- ¾ cup (5.25 ounces or 149 grams) granulated sugar
- ½ teaspoon pandan extract
- ½ teaspoon kosher salt
- 1 Tablespoon (0.5 ounces or 14 grams) canola oil
- 5 large eggs, at room temperature
- 2 teaspoons cream of tartar
- 1 teaspoon baking soda
Equipment
- (8-inch) round cake pan (preferably NOT nonstick—see baker's notes!)
- microwave
- kitchen shears
- fine-mesh sieve
Instructions
- Prep the baking pan and oven. Pour the ½ teaspoon canola oil into the center of the cake pan. Pick up the pan and swirl it from side to side to spread the oil in the bottom of the pan (be sure not to get any on the sides of the pan!). Position the cake pan on a rack in the center of the oven and preheat the oven to 350°F using the convect setting (if possible).
- Mix the dry ingredients. In a small bowl, whisk together the tapioca starch and the rice flour.
- Mix the coconut cream, sugar, pandan extract, and salt, warm in the microwave and add the canola oil. In a large bowl, use a rubber spatula to mix together the coconut cream, sugar, pandan extract, and salt until just combined. Heat in the microwave for 1 minute, then add the canola oil. Mix until just combined.
- Prep the eggs, then add to the coconut cream mixture. Crack open the eggs into a small bowl. Use a pair of kitchen shears to cut the egg yolks into small pieces and stir them very lightly.Add the cut eggs into the coconut cream mixture, and mix lightly until just combined.
- Add the dry ingredients in two parts, then add the cream of tartar and baking soda. Add half of the dry ingredients into the coconut mixture and gently mix with the rubber spatula, making sure to scrape the bottom and sides of the bowl. After 1 minute, add the rest of the dry ingredients and continue mixing for about 1 minute more.Add the cream of tartar and baking soda to the mixture. Working quickly, mix until just combined, about 30 seconds.
- Assemble the cake batter for baking. Remove the cake pan from the oven (but keep the oven on!) and place on a wire rack. Hold a fine mesh sieve over the pan and pour the batter into the center of the pan. Use a rubber spatula to press the batter through the sieve as necessary, but discard any remaining big lumps.Using oven mitts or a tea towel, lift the filled pan 1 to 1.5 inches from the rack and gently drop it to burst any air bubbles in the batter. Repeat 2 to 3 times.
- Bake the cake. Bake for 40 minutes, or until the cake top is light brown with a domed top.
- Cool the cake. Working quickly (but be careful—the pan will be hot!), use oven mitts to hold the cake pan by its edges. Invert it upside down and position the cake so that the pan's edges are resting on two tall glasses/coffee mugs and the center of the cake is suspended upside down to cool (see picture above for reference).Cool upside down for at least 1 hour.
- Serve and store. Serve warm, or at room temperature. To serve the cake, invert it right side up once more. Run an offset spatula along the edges of the pan and use the spatula to gently lift the cake out of the pan, being careful not to crush its top.Use a serrated knife to slice into 8 pieces and serve. The cake slices can be stored in an airtight container or under a cake dome for up to 3 days.
Notes

buy the book
Weeknight Baking:
Recipes to Fit your Schedule
Over the past several years of running Hummingbird High, I kept a crucial aspect of my life hidden from my readers: I had a full-time, extremely demanding job in the tech world. In my debut cookbook, Weeknight Baking, I finally reveal the secrets to baking delicious desserts on a tight schedule.
This is like my favorite kind of cake!
*drives to closest Asian Market for pandan extract and rice flour* 😆
This is a great recipe! I’ve baked pandan cakes for a long time. I thought I’d try the convection oven baking method and a game changer. Btw – I’m Vietnamese and 5* for this recipe.
Thank you!
I am so exited to make it and I just love baking southeast asian food.
Easy, Beautiful, and delicious.
Tried the recipe. Too much egg, not enough sugar. It came out looking great but smelling and tasting too eggy, with not nearly enough sweetness as a traditional banh bo nuong. Going to try this again with 3 eggs instead of 5 and 1 and 1/4 cups of sugar.
I agree, that’s too much eggs for 162g of flour. For my recipes I use 6 eggs for 300g of flour and it’s beautiful and flavorful with no eggy smell. I had tried it with 7 eggs and it definitely has an eggy smell.
Hi! I’m collecting the ingredients and so excited to try this recipe. Would this batter work in a Bundt pan?
Hi! This looks fantastic, however I want to know is there any way we can get rid of the rice flour and can we sub a maple syrup or honey for the sweetener? (Strict paleo diet) thank you in advance! So stoked to find your website!!!
Hi! Unfortunately, I don’t have any advice on how to make this without the rice flour or sugar. Both are key ingredients to the cake! I think you will have more luck reducing the sugar in the recipe than substituting it with a liquid sweetener though. The batter is pretty liquidy already, so adding more liquid to it will be hard without adding more of another ingredient (like the rice flour) to help absorb it.
Thank you Michelle! I appreciate you taking the time to respond.
I will keep this info in mind and still might make it for someone with less restrictions. Thanks again!