About My Best Easy Chocolate Chip Cookie Recipe
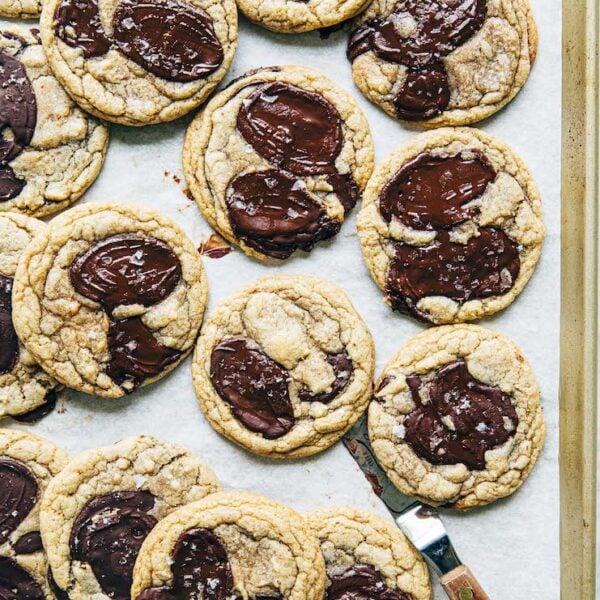
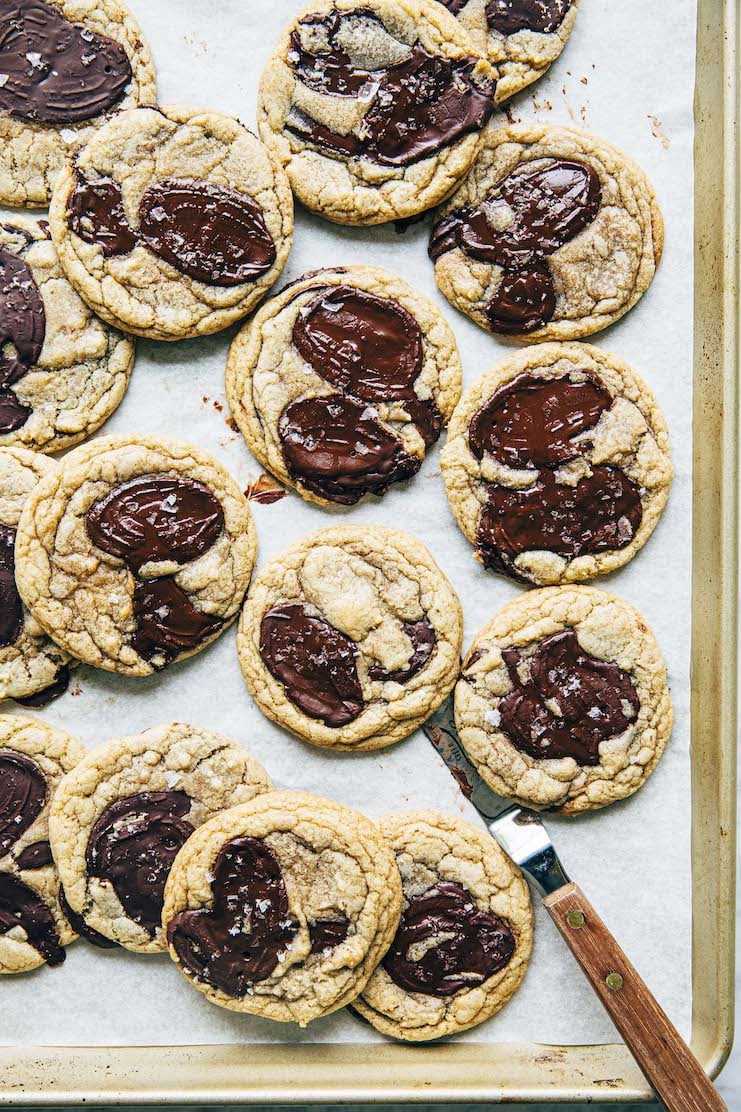
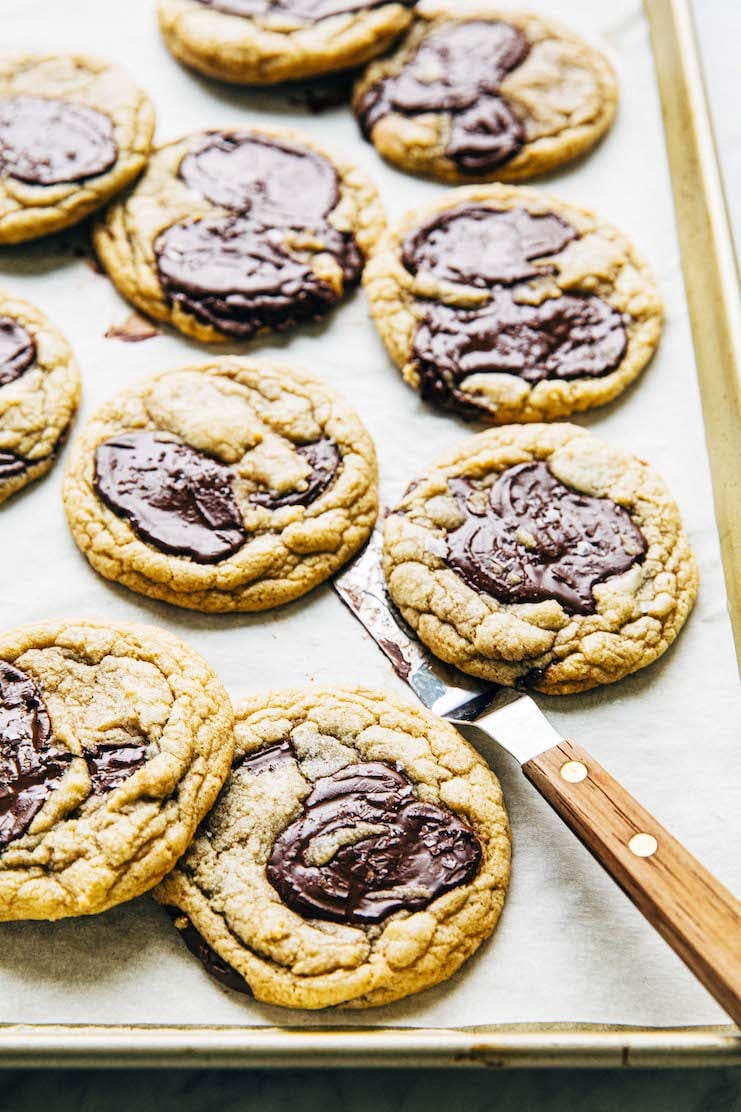
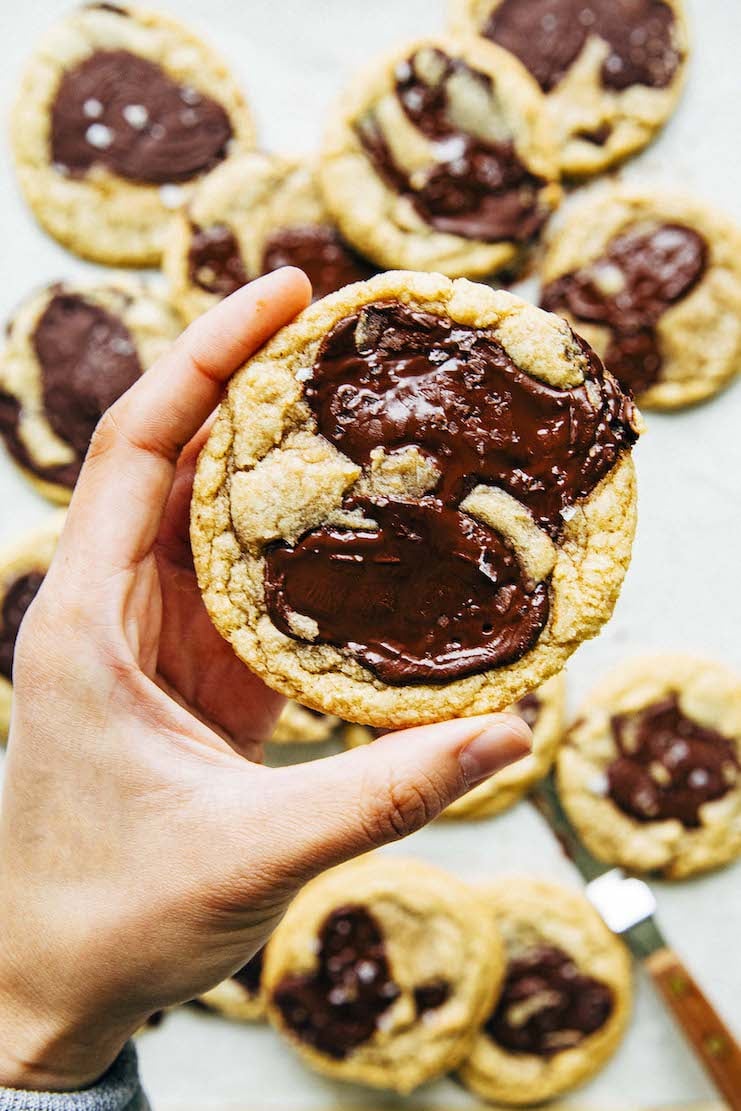
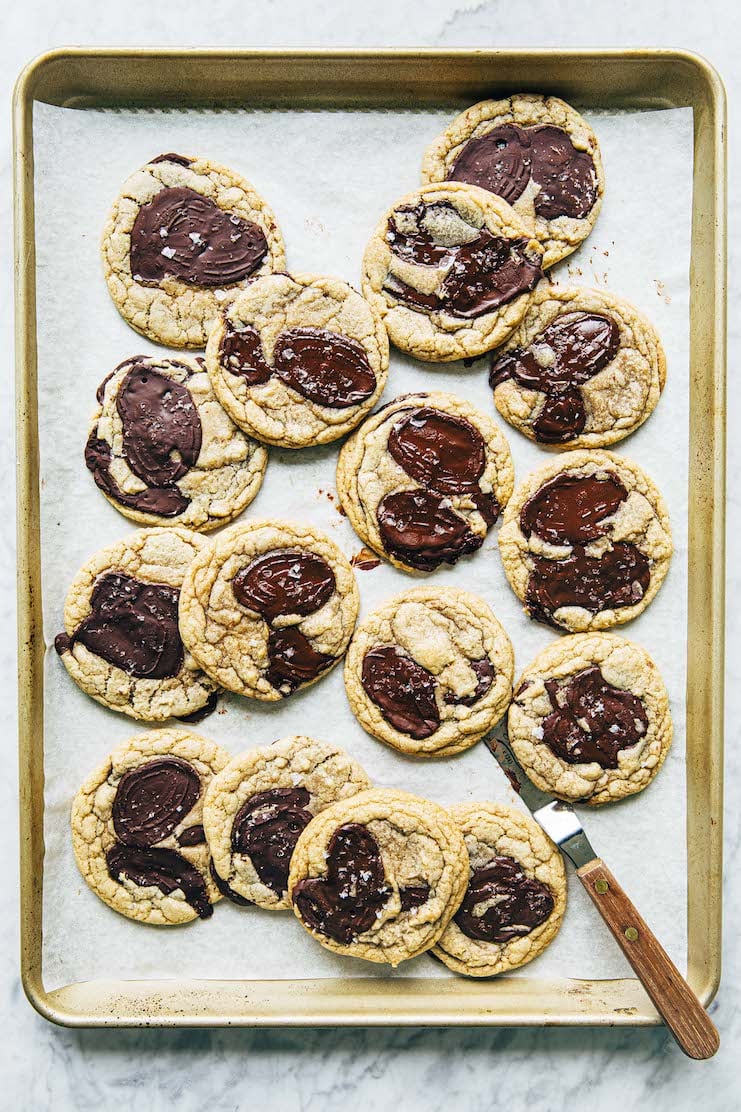
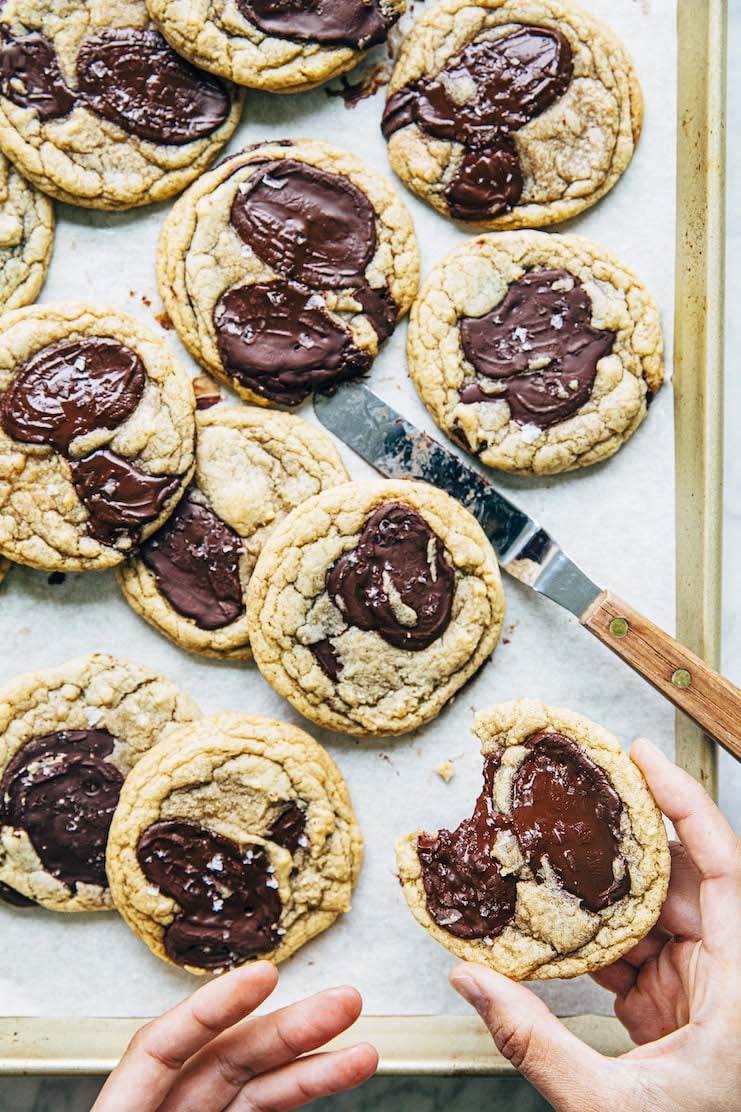
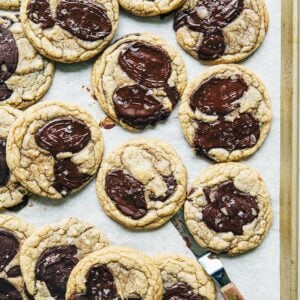
My Best Easy Chocolate Chip Cookie Recipe makes my perfect chocolate chip cookies: chewy, fudgy, and doughy in the center, crispy on the edges, filled with pools of melted chocolate and topped with flaky salt. The best part? The dough comes together SUPER quickly in just 5 minutes. Why? You don’t need a stand mixer to make the cookie dough, AND there’s no need to chill it either!
For more chocolate chip cookie recipes on Hummingbird High, check out my Chocolate Chip Cookie Recipe Archive! I also love these Elevated Toll House Chocolate Chip Cookies and these Vegan Tahini Chocolate Chip Cookies.
The Best Chocolate For Chocolate Chip Cookies
Check out my post on The Best Chocolate For Chocolate Chip Cookies, which discusses why you should use dark chocolate with cacao percentages, chopped chocolate from baking bars and/or fèves, and more when making chocolate chip cookies!
How To Make The Recipe
Here are the basic steps to make easy chocolate chip cookies from scratch:
@hummingbirdhigh just romanticizing #chocolatechipcookies over here #baking #chocolatechipcookierecipe #bakingtiktok ♬ original sound – Noel Schmidt
- Prep the ingredients (Prep Time: 5 to 10 minutes)
The prep process for these cookies is easy! All you need to do is measure out the ingredients beforehand. That’s it!
If you’re using whole fèves like I recommended, there’s no need to chop them up beforehand. As a result, your prep time will only be about 5 minutes. However, if you’re chopping up chocolate for the recipe, your prep time will be 10 minutes. - Then, make the cookie dough. (Work Time: 5 minutes)
The dough comes together really quickly. First, mix the dry ingredients in a small bowl. Then, mix the melted butter, sugars, egg, and vanilla in a medium bowl. Mix in the dry ingredients to this mixture, then the chocolate. That’s it! - Next, assemble the cookies. (Work Time: 5 minutes)
The fastest and easiest way to make picture-perfect cookies is to invest in a cookie dough scoop. These handy tools scoop the dough into dough balls that bake into perfect cookie circles every time. In general, I use a 3-Tablespoon or 4-Tablespoon sized cookie dough scoops to make my cookie recipes. Doing so makes perfect 3- to 3.5-inch wide cookies. - Finally, bake the cookies. (Bake Time: 10 minutes)
The cookies need 10 minutes in the oven. When done, the edges should be set. However, the centers will still look a little soft. That’s normal! In fact, that’s the secret to a perfect cookie with a chewy center.
Recipe Troubleshooting and FAQ
Help! My cookies came out too puffy. They didn’t sink after baking and don’t look flat like yours. What did I do wrong?
Check out my troubleshooting guide on How To Fix Puffy Cookies (And Other Cookie Baking Fails)!
Help! I made these chocolate chip cookies but they don’t look like your cookies. My chocolate stayed mostly in tact. They didn’t melt and pool throughout the cookie like yours did. What did I do wrong?
First things first: did you use chocolate chips? If you did, they’re the likely culprit.
I mentioned earlier that chocolate chips are made with stabilizers like more cocoa solids and paraffin wax to ensure that they keep their shape when baked. They won’t melt and pool into puddles like chopped chocolate bars. That’s why I always recommend using chopped chocolate if you’re looking for a picture-perfect, Instagram-ready cookie!
However, if you did use chopped chocolate, it’s likely that you chopped your chocolate up too finely. You want to keep the pieces fairly big—think: ½ inch to 1 inch pieces. Bigger pieces will get more melty and molten!
Finally, if you’re using feves, note that some fèves melt better than others—milk and white chocolate doesn’t melt as well as dark chocolate, and Valrhona dark chocolate fèves melt better than Guittard wafers. If you want your cookies to look EXACTLY like mine, check out my post on The Best Chocolate For Chocolate Chip Cookies. You can find even more of my chocolate tips, tricks, and recommendations there!
Best Recipe Tips
Technique Tips
- To save myself some clean up, I melt the butter in the bowl I’m planning to make the cookie dough in. Specifically: I use a small bowl to mix the dry ingredients. Then, I use the microwave to melt the butter in a medium bowl big enough to mix the dough in, add the sugars, egg, and extract, then the dry ingredients and chocolate. As a result, I only need two bowls for this recipe!
- When prepping ingredients, I also melt the butter first. That way, it has time to cool while I prep the rest of the ingredients. Doing so ensures your butter isn’t too hot and won’t scramble the egg when you add it to the dough!
- Be mindful when melting the butter for these cookies! You don’t want the butter to sizzle, crackle, or pop. I like to chop it up into 1-inch cubes then melt it in a small sauce pot over medium-low heat. Be sure to stir the butter constantly as it melts to help prevent it from overheating.
Troubleshooting Tip
- If your dough seems too soft to scoop, don’t panic! It’s likely that the butter was still too hot when you combined it with the rest of the ingredients. Simply pop the bowl of cookie dough in the refrigerator for 10 to 15 minutes to firm the dough up.
Styling Tip
- Want your cookies to look *EXACTLY* like mine, with a signature puddle of melted chocolate skimmed across each surface? Easy! Simply reserve a fève or a ½- to 1-inch piece of chopped chocolate for each cookie. Place on top of each cookie dough ball before baking. The chocolate will melt into the puddles you see on top of each cookie!
Baking Tip
- I like to bake the cookies one pan at a time. I find that doing so makes the best cookies, ensuring that none of them have overly burnt bottoms or raw centers. However, to save time, you can bake two sheet pans at a time. Position a rack in the upper-third position of the oven, and a second one in the lower-third position of the oven. Bake a pan on each rack, swapping their positions half way through the Bake Time.
Get the Recipe: My Best Easy Chocolate Chip Cookie Recipe (No Stand Mixer Or Chilling Required!)
Ingredients
- 1 ⅔ cups (7.5 ounces or 213 grams) all-purpose flour
- ½ teaspoon baking powder
- ½ teaspoon baking soda
- 1 teaspoon kosher salt
- ½ cup (1 stick or 4 ounces or 113 grams) unsalted butter, melted and cooled slightly
- ¾ cup tightly packed (5.65 ounces or 160 grams) light OR dark brown sugar
- ¼ cup (1.75 ounces or 50 grams) granulated sugar
- 1 large egg
- 2 teaspoons pure vanilla extract
- 1 ⅓ cups (8 ounces or 227 grams) dark chocolate (between 60% and 70% cacao), from whole fèves or a high-quality chocolate bar roughly chopped into 1- to 1 ½-inch pieces
- flaky salt, for garnish
Equipment
- a (3-Tablespoon) cookie dough scoop
Instructions
For My Best Easy Chocolate Chip Cookies
- Prep the oven and baking pan. Position a rack in the center of the oven and preheat the oven to 350°F. Line two half sheet pans with parchment paper.
- Mix the dry ingredients. In a small bowl, whisk together the flour, baking soda, baking powder, and kosher salt.
- Mix the butter, sugars, egg, and extract. In a medium bowl, use a rubber spatula to mix together the butter and sugars until moistened, about 1 minute. Add the egg and vanilla extract and mix until combined.
- Add the dry ingredients and chocolate. Gradually mix in the dry ingredients until just combined. Add the chocolate all at once and mix until the chocolate is evenly distributed throughout, about 1 minute.
- Assemble the cookies. Use a 3-Tablespoon cookie dough scoop to portion the cookie dough into balls, placing them at least 3 inches apart on the prepared sheet pans.
- Bake the cookies. Bake one pan at a time for 10 minutes, or until the edges have set but the centers are still gooey. Cool the cookies on the pan on a wire rack for 20 minutes, or until the edges and bottoms of the cookies have set and feel firm to the touch. Repeat with the remaining cookie dough.
- Serve and store. Serve warm or at room temperature. The cookies can be stored in an airtight container or zip-top bag at room temperature for up to 3 days.
Notes
- Freeze the UNBAKED chocolate chip cookie dough.
Follow the recipe instructions to make the cookie dough and scoop them out into cookie dough balls. Place the cookie dough balls in a small sheet pan. Cover the pan with plastic wrap and freeze for at least 1 hour, or until the cookie dough balls are frozen solid. Transfer the cookie dough balls to a zip-top bag and freeze for up to 1 year. To bake the frozen cookie dough balls, line sheet pans with parchment paper and position the cookie dough balls at least 3 inches apart on the sheet pans. Then, follow the recipe instructions to preheat the oven. Bake for 12 minutes, or until the edges have set but the centers are still gooey. - Freeze the BAKED chocolate chip cookies.
Individually wrap any leftover chocolate chip cookies in two layers of plastic wrap, then a layer of aluminum foil. The aluminum foil will prevent the cookies from absorbing any other flavors or odors in the freezer. When ready to serve, transfer to the refrigerator to chill overnight. Rewarm in the microwave or in the oven at 350°F for 5 minutes before serving.
Did you make this recipe?
Please leave a comment and rating for the recipe using the form below!
Your ratings make it easier to find the recipe online, and I’m always looking for ways to improve Hummingbird High.
get new recipes via email:

buy the book
Weeknight Baking:
Recipes to Fit your Schedule
Over the past several years of running Hummingbird High, I kept a crucial aspect of my life hidden from my readers: I had a full-time, extremely demanding job in the tech world. In my debut cookbook, Weeknight Baking, I finally reveal the secrets to baking delicious desserts on a tight schedule.
These are my family’s favorite CC cookies, and we’ve tried a ton of recipes over the past couple of years. I love them, too, and not just because they’re incredibly easy to make. There’s something about the salt-sweet-buttery ratio that hits every mark. I used Guittard discs for half the recipe, and used morsels (for a couple of persnickety nephews) for the other half and both turned out great and crazy delicious. Definitely recommended, and definitely making again!
I had a craving to bake something easy last night and whipped out my copy of Weeknight Baking to find this chocolate chip cookie recipe. It was so quick to make and I already had all the ingredients on hand. After trying the cookie dough I knew these would be amazing, but just wait until they come out of the oven. OMG they are unmatched to any chocolate chip cookie I’ve ever had. So soft but chewy and the perfect amount of salty & sweet. I will never use any other chocolate chip cookie recipe again.
Super easy and delicious cookies! My family loved these! These are on the softer/chewy side – I like my cookies a littler crisper so I’ll just try increasing the bake time next time.
So delicious!
Hello,
Love your site. This is a general question about chocolate chip cookie recipes and I wasn’t sure where to place it, but hopefully this section is okay.
Say you’re working with a chocolate chip cookie recipe that calls for 20 ounces of chocolate, and wanted to add extracts and nuts — should you decrease the amount of chocolate? What is the right amount of extract and nuts? Is there a general rule of thumb?
Sorry if this has been addressed elsewhere on your site, I just haven’t been able to pinpoint an answer. Thank you!
Hmmm, there’s no hard and fast rule, but I usually start by replacing half the chocolate with half its weight in nuts. So if a recipe calls for 20 oz chocolate, I would probably do 10 oz chocolate and 10 oz nuts.
Makes sense. How about extract? Say you want to incorporate rum extract — in your opinion, how much would you use for 10 ounces of chocolate and 10 ounces of nuts? Thanks.
Hmm, it depends on the extract tbh. Like peppermint extract is so strong and overpowering, I always recommend starting with 1/4 teaspoon or even 1/8. But others you can be more generous and start by adding 1/2 teaspoon. You can also replace the vanilla in the recipe with rum extract.
My favourite CC cookie recipe! Easy and WORTH it to use my valrhona stash for this. I’ve gotten bored of the brown butter CC recipes (they still have a place!) and realized I just want something simple and delicious like this that emphasizes butteryness and chocolate!
This wasn’t my best recipe
They look and taste wonderful, and these came together so easy. Perfect for this sweet-treat-wanting, rainy desert night.