
About This Easy Canned Cherry Pie Recipe
Let’s talk about this easy canned cherry pie recipe! I love making cherry fruit desserts. But you know what I don’t love? Pitting cherries to use in the recipes. Doing so is a messy process that takes FOREVER. So what if I told you there was a better way?
Enter this easy canned cherry pie recipe. I swear that this recipe is one of the easiest cherry pie recipes you’ll ever try on my blog. Why?
The all-butter pie dough is made in a stand mixer and makes a flaky, crisp pie shell with almost no mess. The sweet and tart cherry pie filling is made with canned cherries, eliminating the need for you to individually pit fresh cherries.
You cut down on SO much prep time (which, as you all know from my cookbook, I’m all about).
But don’t worry! Despite this ease and convenience, you still end up with the classic and comforting cherry pie you know and love. For me, that’s a cherry pie filled with a slightly gloopy, sweet AND tart cherry filling, all encased in a buttery, crispy pie shell. Yes and yes.
First, Let’s Talk Pie Dough
The recipe uses an unusual yet efficient way to make pie dough from scratch.
Most pie dough recipes instruct you to make pie dough in a handful of ways: by hand (either with tools like a pastry cutter, or without them), or in a food processor. I have never, ever recommended making pie dough by hand. It’s too messy and time-consuming! And while using a food processor is faster, it’s far too easy to overwork the butter and end up with a flat, dense, crust.
So in my recipe below, I instruct you to make the pie dough with a STAND MIXER. The pie dough recipe is from my cookbook, Weeknight Baking.
After chilling the ingredients for five minutes or so, you throw everything into the stand mixer and mix it on low speed like you would a cookie dough. It takes less than 5 minutes to come together and eliminates TONS of mess and work. Furthermore, unlike a food processor, a stand mixer allows you more control and visibility as the dough comes together—no flat, dense crusts here folks!
What You Need For This Cherry Pie
Ingredient Sources, Recommendations, and Substitutions
- Pie Dough. Although this recipe instructs you to make pie dough from scratch, you can also use store bought frozen pie dough. Store-bought pie dough usually comes in two varieties: the kind that’s already pre-molded onto a disposable pie pan, and the kind that the baker needs to roll out and fit onto his or her own pie pan. I recommend using the latter so that you can cover your canned cherry filling with pie crust, too.
- Canned Cherries. In general, most canned cherries come pitted and whole. Some are preserved in syrup, while others are preserved in water. Either works for this recipe.
Canned cherries are also available in different varieties. You can get dark, sweet cherries, or red, tart cherries (also known as pie cherries). Either works in this recipe, but I especially recommend using 1 can of each since I love the mix of sweet and tart together - Brown Sugar. Either light or dark brown sugar works in the recipe.
- Kosher Salt. Learn why kosher salt is the best salt for baking recipes in this blog post. But in a pinch, you can replace the kosher salt in the recipe with half its amount in table salt.
Wait, why do I need 2 OR 3 cans of cherries?
Good question! You may need more cherries depending on the kind of pie pan you use for baking pies. In general, I like to bake my pies in thin, shallow metal pans (like this one!). I find that doing so makes the pie crust more crispy and lowers the risk for a soggy-bottomed pie. Shallow metal pie pans usually have a depth between 1 ¼- and 1 ½-inches.
However, many people bake their pies in deep-dish pie pans. In contrast, these deep-dish pie pans typically have a depth between 2- and 2 ½-inches. As a result, this greater depth enables the pie to hold more filling. If you have one of these kinds of pie pans, I recommend using 3 cans of cherries as opposed to 2.
How To Make The Recipe Fit Your Schedule
Have you ever thought to yourself: “Wow! Making pie is a PROJECT.” I’m not going to argue with you—it is a project! For a long time, I avoided making pies because they took ALL day.
But what if I told you there was another way?
I mentioned this earlier, but in general, it’s rare that I make and bake all the different components for pie in a single day. I usually break it up over a series of days instead. That way, I’m only in the kitchen for an hour or so over those days. It gives me more control over my time and schedule. With this canned cherry pie recipe, I broke it down over 3 days:
Day 1: Make the Pie Dough and the Canned Cherry Pie Filling (Total Time: 25 minutes)
First I make the pie dough, dividing it into two discs per the recipe. I wrap the discs tightly in plastic wrap and refrigerate overnight. Then I make the canned cherry pie filling. After making the cherry pie filling, I let it cool completely then scrape it into an airtight container. I also refrigerate the filling overnight.
Day 2: Assemble the Canned Cherry Pie (Total Time: 30 minutes)
After assembling the pie, I cover the entire thing in a loose sheet of plastic wrap. I then freeze it overnight. Instead of waiting the 4 hours or so to bake the pie, I can spend the rest of my day worry-free!
Day 3: Bake the Canned Cherry Pie (Total Time: 60 minutes)
The best part? This last day of “work” is pretty low effort on your part. Why? You’ve already done all the hard work! At this point, all you need to do is preheat the oven and bake the frozen pie. There’s no need to thaw it beforehand.
FYI — if this sort of “recipe time management” is your jam, I highly encourage you to check out my cookbook. I break down elaborate recipes for layer cakes and other pies in this way, too!
Recipe Troubleshooting and FAQ
Help! I don’t have a stand mixer. Can I still make this canned cherry pie recipe?
Yes, absolutely! If you don’t have a stand mixer, you can make the pie dough in a food processor. Combine the flour, sugar, salt, and butter in the bowl of a food processor and pulse until it has the texture of coarse meal. Add 6 Tablespoons of the water-vinegar-ice mixture, pulsing once or twice after each addition. Now pick up a pinch of the mixture and squeeze it. If it stays together, you’re good to go! Dump it into a large bowl and press the mixture together to form a small mound of dough. Follow the rest of the recipe as directed.
And don’t forget! If the food processor method sounds like too much work for you, you can use store-bought frozen pie dough. Check out the Ingredients section above for more info!
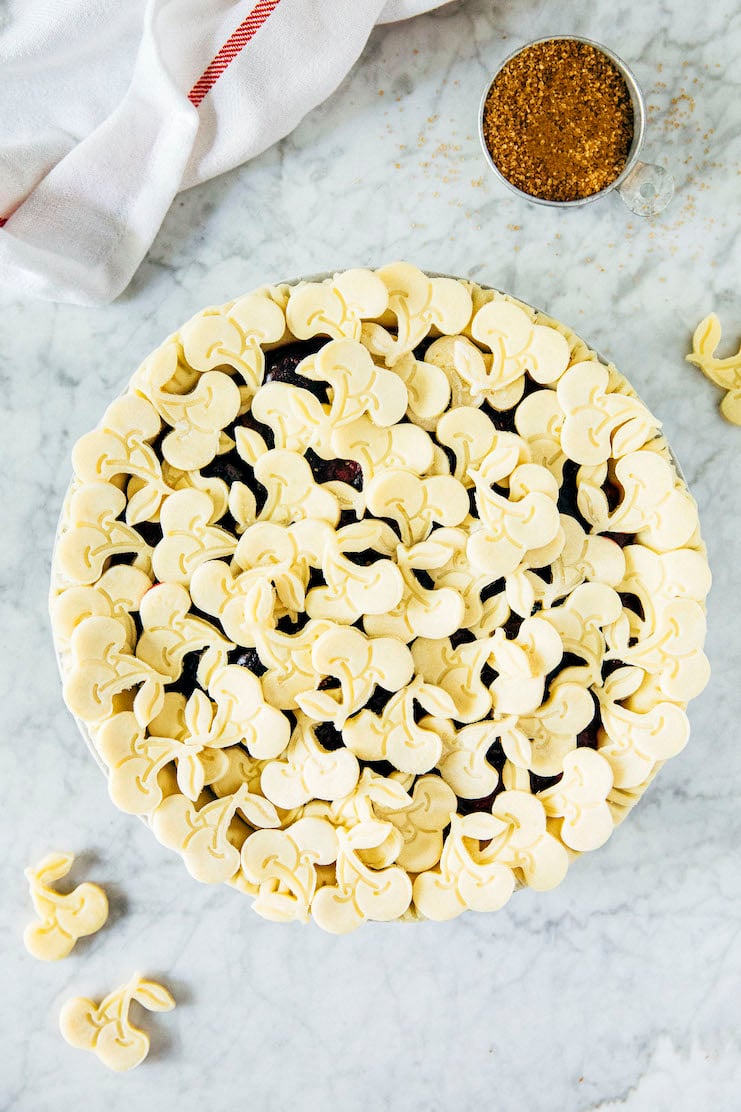
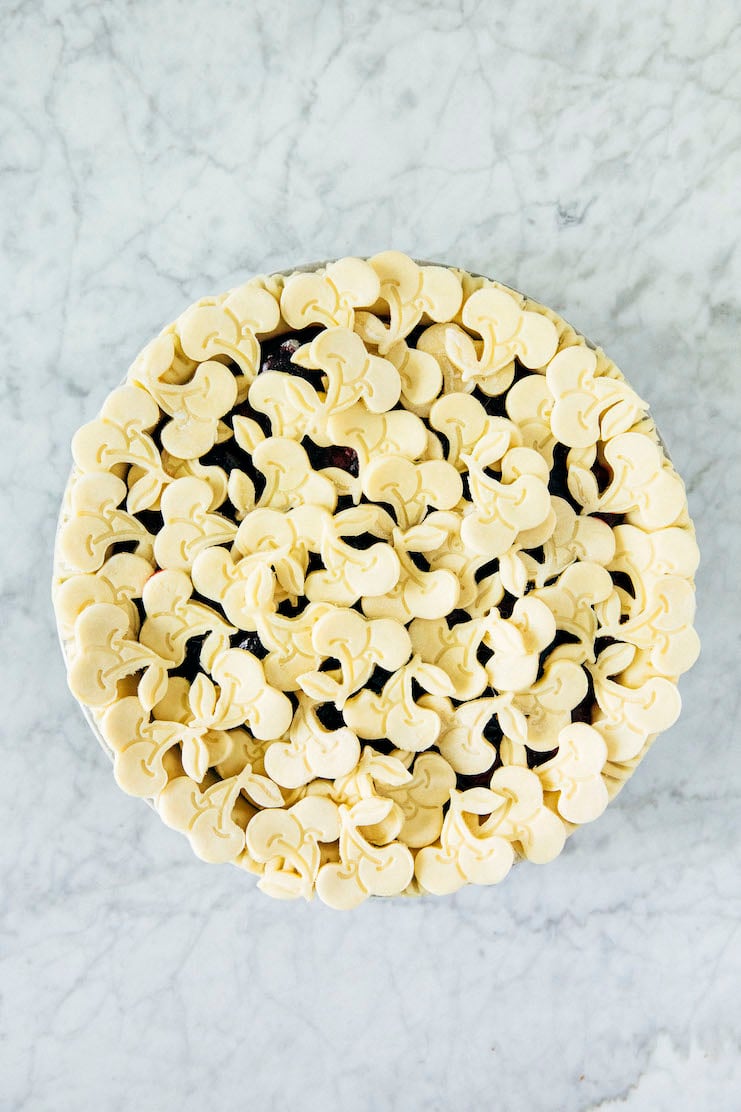
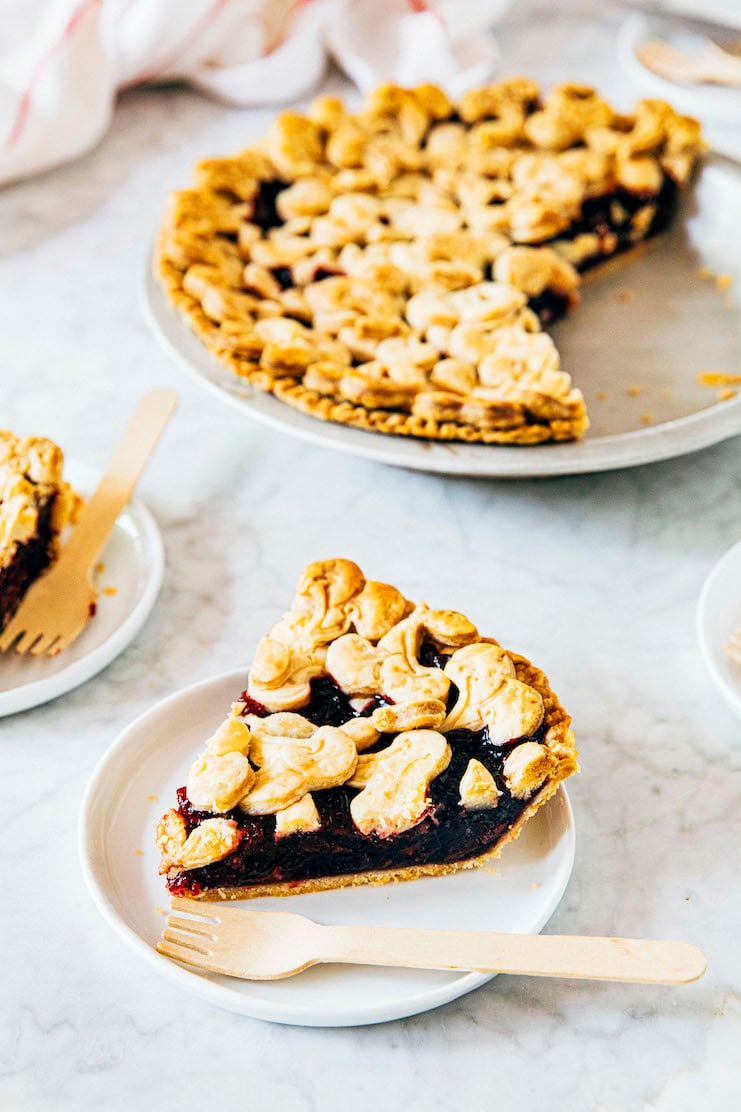
Help! I don’t have a cherry-shaped cookie cutter. What can I use instead to make this canned cherry pie recipe?
You don’t need a cherry-shaped cookie cutter to make this canned cherry pie recipe. You can use other cookie cutter shapes to make pie dough cutouts. Some examples: I used leaf-shaped cookie cutters in this black bottom oatmeal pie, round cookie cutters for this blueberry cream cheese pie, and star-shaped cookie cutters for this tayberry pie. Don’t be afraid to get creative with what you have!
In my opinion, using cookie cutters is one of the fastest and easiest ways to make a fancy pie crust without too much effort on your part. However, if you have another method you prefer—say, a simple lid (like this one!), or a traditional lattice—feel free to shape the dough that way instead! Just make sure to leave “vents” to allow steam to escape from the pie filling as it bakes.
Best Recipe Tips
Equipment Tip
- For this canned cherry pie recipe, I recommend using a shallow, metal pie pan similar to this one. In general, I recommend metal over glass or ceramic pie plates. Why? First, metal pans make crispier pie crusts. Second, metal pie pans are safer. Most pie recipes instruct you to chill or even freeze the assembled pie before baking. Glass bakeware is sensitive to sudden changes in temperature. If you place a frozen glass pie plate in the hot oven, it might potentially shatter!
If you only have a glass or ceramic pie plate, no worries! I’ve incorporated several tips throughout this post that helps you adjust for your equipment. Similarly, if you only have a deep-dish pie pan or plate, you may need to increase the amount of cherries in the canned cherry pie filling. That’s why there’s an optional, additional can of cherries in the Ingredients list. You won’t need to use this additional can with a shallow pie pan.
Ingredient Tips
- In the ingredients list below, I’ve made sure to note the temperature of specific ingredients needed for the recipe. Pay attention to these temperature cues. In general, when making pie, you want your ingredients to be as cold as possible. Cold ingredients make the resulting dough easier to work with!
- Most pie recipes instruct the baker to brush the pie with an egg wash before baking. This egg wash makes the pie extra crispy and golden-colored. However, I skip doing so in the recipe below. Why? I find that egg washes can hide and distort the shapes on my pie crust lid.
But if an egg wash is your jam, go for it! To make an egg wash, whisk together 1 large egg white and 1 teaspoon water. Right before baking the assembled pie, use a pastry brush to coat the top of the pie with a thin layer of egg wash. If desired, sprinkle with coarse sugar, too. Bake as directed in the recipe.
Best Recipe Technique
- If you find that your pie dough is sticking—either to the counter after rolling it out, or to the cookie cutter when stamping out shapes for the lid—don’t panic! Simply use more flour underneath the pie dough when rolling it and on the cookie cutter. If the additional flour doesn’t help, that likely means the pie dough has gotten too warm. Simply refrigerate the rolled out dough for 10 to minutes before trying again.
Get the Recipe: Easy Canned Cherry Pie Recipe
Ingredients
For the Stand Mixer All-Butter Pie Dough:
- 1 cup (8 ounces or 227 grams) very cold unsalted butter
- 6 Tablespoons (3 ounces or 85 grams) very cold water
- 1 Tablespoon apple cider vinegar
- 1 cup ice
- 2 ½ cups (11.25 ounces or 319 grams) all-purpose flour
- 1 ½ teaspoons granulated sugar
- ½ teaspoon kosher salt
For the Canned Cherry Pie Filling:
- 1 (15-ounce or 425 grams) can pitted dark sweet cherries
- 1 (14.5-ounce or 411 grams) can pitted red tart cherries
- ¼ cup tightly packed (1.85 ounces or 52 grams) brown sugar
- ¼ cup (1.75 ounces or 50 grams) granulated sugar
- ¼ cup (1 ounce or 28 grams) cornstarch
- Zest of 1 small lemon (about 1 Tablespoon)
- 1 Tablespoon strained freshly squeezed lemon juice
- pinch of kosher salt
- 1 (15-ounce or 425 grams) can pitted dark sweet cherries OR 1 (14.5-ounce or 411 grams) can pitted red tart cherries, drained (optional—see Ingredients section for more info)
Instructions
Easy Canned Cherry Pie Recipe
- First, make the pie dough. Cut the butter into 1-inch cubes and place them in a small bowl. Freeze while you prep the rest of the ingredients.
- In a large liquid measuring cup, whisk together the water and vinegar. Add the ice and whisk. Refrigerate while you prep the rest of the ingredients.
- In the bowl of a stand mixer fitted with the paddle attachment, combine the flour, sugar, and salt. Beat on low until just combined, about 15 seconds. Add the butter all at once and beat on low until the mixture has the texture of coarse meal, with pea-sized pieces of butter throughout, about 3 minutes.
- Remove the ice water mixture from the refrigerator. With the mixer on low, add 6 tablespoons of liquid from the ice water mixture in quick succession. Beat on low for 2 to 3 minutes, or until the dough clumps around the paddle and/or the sides of the bowl. If the dough seems too dry, add more liquid from the ice water mixture 1 teaspoon at a time.
- Tip the dough out onto a lightly floured counter with the spatula. Quickly knead the dough into a rough ball. If making a double-crust pie, divide the dough in half with a bench scraper and shape each half into a rough ball (each should weigh about 11 ounces). Wrap each portion tightly in plastic wrap and flatten into a small disc. Refrigerate for at least 1 hour, preferably overnight.
- Then, make the canned cherry pie filling. Place a fine-mesh sieve over a medium, heavy-bottomed saucepan. Pour the canned cherries on top of the sieve so that their juices drain into the saucepan. Set aside the cherries (you’ll need them for later, so don’t throw them out!), and cook the juices, over medium-high heat, until reduced to ¼ cup.
- Lower the cooking temperature to medium and add the cherries, sugars, cornstarch, lemon zest, lemon juice, and salt. Cook, stirring frequently with a wooden spoon, for another 2 to 3 minutes, or until the cherries have released their juices and the mixture is thick and glossy. Use a rubber spatula to scrape into a medium glass bowl and cool completely before using in the pie.
- Now, make the pie's bottom crust. Remove one of the dough discs from the refrigerator and place on a lightly floured surface. Use a rolling pin to roll it into a 10- to 11-inch circle. If the dough is too hard to roll out, give it a few whacks with your rolling pin, rotating the disc after every whack to ensure that it flattens evenly.
- Fit the bottom crust onto your pie pan. Transfer the dough circle onto your pie pan to make the bottom crust. Use kitchen shears to trim off any excess pie dough overhanging from the pan, making sure that the edge of the bottom crust aligns with the edge of the pan. Dust a fork with flour and press its tines into the dough all around the edges of the pan to seal the crust onto the pan.
- Fill the bottom crust with the canned cherry pie filling. Use a rubber spatula to scrape the canned cherry pie filling into the bottom crust, spreading the filling evenly across the pan. Refrigerate the filled bottom crust while you make the pie's top crust.
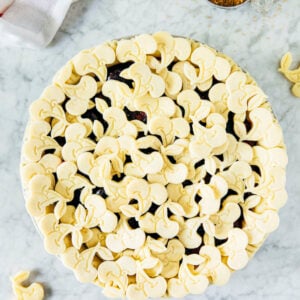
- Make the pie's top crust. Remove the second dough disc from the refrigerator and follow the instructions above to roll it into a 10- to 11-inch circle. Use a floured cherry-shaped cookie cutter to stamp out shapes in the dough. Arrange on top of the canned cherry pie filling. Cover loosely with plastic wrap and freeze for 4 hours, preferably overnight.
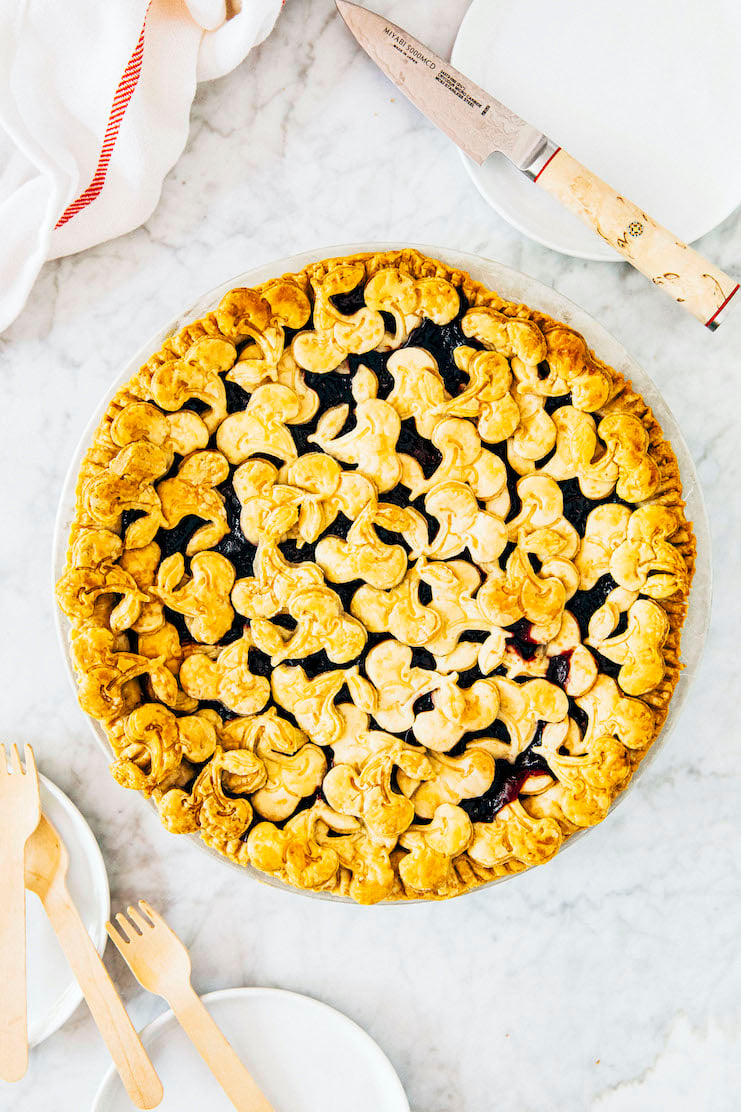
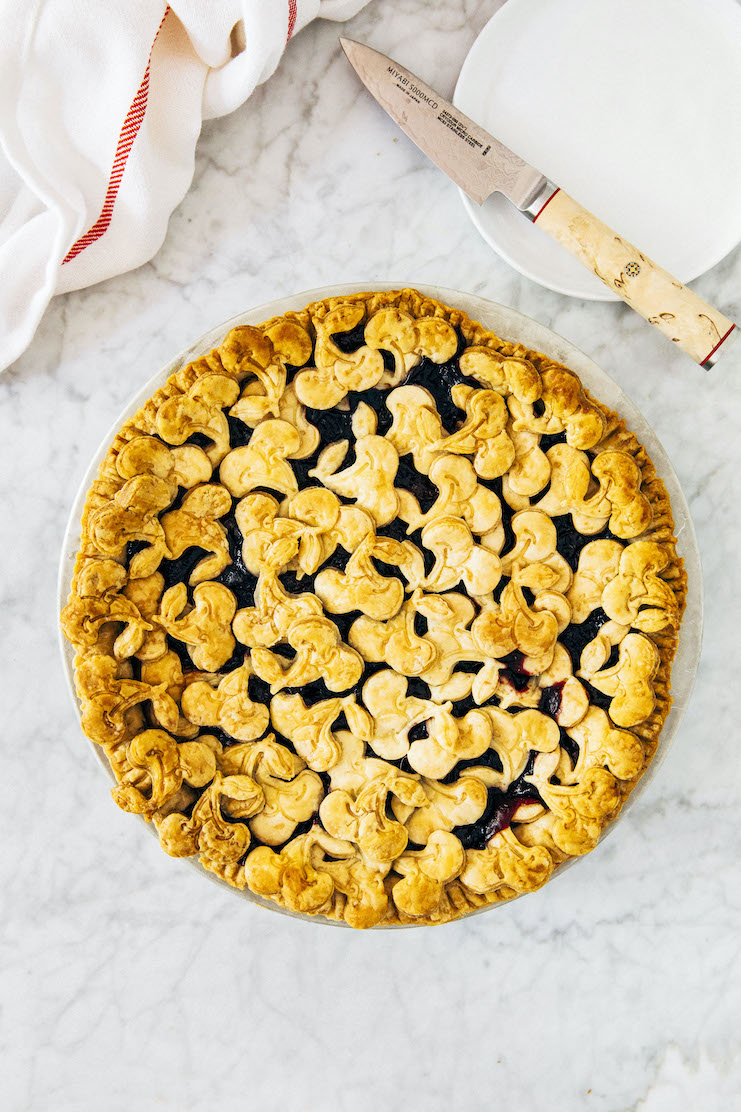
- Bake the pie. Position a rack in the lower third of the oven and preheat to 375°F. Line a sheet pan with parchment paper. Remove the frozen pie from the freezer, discard the plastic wrap, and place the pie in the center of the prepared sheet pan. Bake for 60 to 65 minutes, or until the crust is golden brown and the fruit juices are bubbling slowly in the center of the pie. Check the pie 45 minutes into the Bake Time— if the crust is browning too quickly, loosely cover the top of the pie with a sheet of foil.
- Serve and store. Cool on a wire rack for at least 1 hour before slicing. Serve warm or at room temperature. The pie can be stored at room temperature, under a cake dome or a large bowl turned upside down, for up to 1 day. After that, cover loosely with plastic wrap and refrigerate for up to 2 days.
Notes
Can you freeze the UNBAKED canned cherry pie?
Yes! You can absolutely freeze the unbaked canned cherry pie. In fact, you can do so in multiple ways:- Freeze the unbaked, UNASSEMBLED pie components like the pie dough and canned cherry pie filling. To freeze the pie dough, tightly wrap each disc in 2 layers of plastic wrap and 1 layer of aluminum foil (the foil prevents the dough from absorbing flavors or odors in the freezer). Freeze for up to 3 months. When ready to use, transfer to the refrigerator to thaw overnight. To freeze the cherry pie filling, cool it to room temperature and then scrape it into an airtight container with a lid. Freeze for up to 3 months. When ready to use, transfer to the refrigerator to thaw overnight.
- Freeze the entire unbaked, ASSEMBLED canned cherry pie. After assembling the pie, freeze for 1 to 2 hours, or until frozen solid. Wrap tightly in two layers of plastic wrap and 1 layer of aluminum foil. Freeze for up to 3 months. When ready to use, follow the recipe instructions below to bake the pie. If you’re using a metal pie pan, there’s no need to thaw it beforehand! However, if you’re using a glass pie plate, transfer to the refrigerator to thaw overnight. Preheat the oven per the recipe’s instructions. As you do, set the cold pie on your kitchen counter for a minimum of 15 to 20 minutes to thaw slightly. Like I said before—glass bakeware is sensitive to sudden changes in temperature. If you skip this step, there’s a chance your glass pie plate will explode if you put it directly in the oven!
Did you make this recipe?
Please leave a comment and rating for the recipe using the form below!
Your ratings make it easier to find the recipe online, and I’m always looking for ways to improve Hummingbird High.
get new recipes via email:

buy the book
Weeknight Baking:
Recipes to Fit your Schedule
Over the past several years of running Hummingbird High, I kept a crucial aspect of my life hidden from my readers: I had a full-time, extremely demanding job in the tech world. In my debut cookbook, Weeknight Baking, I finally reveal the secrets to baking delicious desserts on a tight schedule.
I really want to make such a dish, but … I don’t know how to cook
Anyway, thanks for sharing this post!
I really like it!
A little suggestion, you should put the ingredients list above the instructions. I struggled to find them multiple times and in fact tried again looking for them just to make sure I wasn’t being crazy. It almost seems impossible, and almost abandoned this recipe in search of a new one. Also since you have two different recipes on here and just so much going on in this site it really convolutes everything. That said, this was my first time making cherry pie and this recipe was fantastic I did use my own pie crust recipe but the filling was phenomenal. Thank you much.
Hi Ryan,
I am genuinely confused by this comment. The ingredients list for the recipe is directly above the instructions, which is the way I format every single recipe on my site.
You may have missed the recipe card at the bottom of the blog post: https://www.hummingbirdhigh.com/2020/08/easy-canned-cherry-pie-recipe.html#easy-canned-cherry-pie-recipe
The recipe card has a summary of all the ingredients, instructions, and steps throughout the blog post, with the ingredients list directly above the step-by-step instructions.
Alternatively, you can use the “jump to the recipe” button up top of this blog post to jump to the recipe card where the ingredients list is directly on top of the instructions list, or use the “print the recipe” function to print it. Printing the recipe will also give the ingredients list on top of the instructions list.
I’m with Ryan. You should put the ingredients and amounts on this page. It doesn`t make sense to have them separate. Thanks for the tip about the lemon. I bought a can of dark cherries in heavy syrup, so I’m gonna try it out.
Again, I stand by my confusion. The ingredients list for the recipe is directly above the instructions, which is the way I format every single recipe on my site.
You may have missed the recipe card at the bottom of the blog post: https://www.hummingbirdhigh.com/2020/08/easy-canned-cherry-pie-recipe.html#easy-canned-cherry-pie-recipe
The recipe card has a summary of all the ingredients, instructions, and steps throughout the blog post, with the ingredients list directly above the step-by-step instructions.
Forgot to give you a rating. This rating is for flavor, it’s definitely that good it, but 1 star for navigating this page.
I agree. Cooking/baking websites drive me crazy with the information I need on the bottom of the page. I had to keep navigating back and forth between the description and the actual recipe. I really wish the ingredients and steps were on the very top of the page. Also, I may have missed it but do you HAVE to freeze the pie? I want to put it straight into the oven.
You can put the pie straight in the oven without freezing it, but it’s likely that it won’t hold its shape and the cut outs will melt some.
Re: your comment about cooking/baking websites putting the recipe on the bottom of the page. Content creators work hard to create this content for free to readers like you. Instead of asking money from you for the work, we get paid by displaying ads on our site. As you scroll through our content to get to the “relevant” information at the bottom of the page, we are able to earn a revenue for it. While that sounds glamorous, that payout amounts to pennies per user for literal hours of work. To wit, this canned cherry pie post probably took me a full week to bake multiple times, write up all the info, and photograph it. You can learn more about how bloggers earn this type of income in this post: https://www.bowlofdelicious.com/why-are-food-blog-posts-so-long/
Sooooo tasty! I used my own pie crust recipe but the filling was amazing, will definitely be using again!
In step number 7 in the actual recipe card, I think you forgot to list add sugars. I found that instruction in the steps in the blog but not in the actual recipe card. Wanted to let you know! Filling came together well, looking forward to assembling everything tomorrow for Christmas.
Oops, sorry about that! Updated it accordingly.
Really confused by the ingredient list – why are the two types of canned cherries listed twice ?
Per the blog post:
“You can get dark, sweet cherries, or red, tart cherries (also known as pie cherries). Either works in this recipe, but I especially recommend using 1 can of each since I love the mix of sweet and tart together.”
All in all, this recipe requires 2 (15-ounce) cans of canned cherries of any variety. You can mix and match like I did in the recipe, or use 2 cans of the same kind.
I made this pie for a 4th of July party this weekend and it was DELICIOUS! I used star cutouts and two cans of tart cherries. The crust was stand out. You’ve made pie dough easy and so yummy to make; I’m not going to be afraid if it any more! Thank you for a wonderful recipe.
After draining the three cans of cherries (1 sweet and 2 tart) I have 1.25 cups of juice. It’s taking much longer than 10 minutes to reduce this to 1/4 cup. Should I have used only the juice from one of the cans of cherries?
That’s more juice than what was in my canned cherries! You may have used a different brand than me. If it’s taking too long, just pour out the rest and keep 1/4 cup for the recipe.
Actually it was the same brand, Oregon. I went ahead and let it boil down then continued to follow your recipe. I used my own crust recipe and prebaked the bottom crust because I wanted to ensure it didn’t get soggy. When assembling the pie I “glued” the lattice strips to the mostly cooked edge with egg wash then chilled the pie as directed. It looks terrific. Hopefully it tastes just as good. I’m going to make a smaller version tomorrow since I have to bring this one to my daughters and I’ll try it without prebaking the crust.
Hey Michelle, I have your cookbook & I love your blog! I’m having trouble finding CANNED cherries in both varieties, and I would like to try both varieties when I bake it. I can however find FROZEN versions of these cherries. What would you recommend I do to adapt for frozen? Thank you for your help!
FWIW I find your site really easy to navigate and use. -Jenn
Frozen cherries will work! They aren’t as liquidy as canned cherries, so there’s no need to drain the cherries and reduce their juice like I instruct you to do in Step 6. Instead, I recommend just jumping ahead to Step 7 of the recipe where I instruct you to cook the cherries in a pan. Your Cook Time will be different because you’re using frozen cherries, so just cook them until the cherries have released their juices and the mixture is thick and glossy.
Thank you so much Michelle! I can’t wait to surprise my husband with this–cherry pie is his favorite. -Jenn
Hi Michelle,
Thank you for yoir detailed post and tips that are really putting my mind at ease as this will be my first attempt to baking. I have a question, can i freeze the pie after its baked? I am hoping to prepare as much as i can ahead of ny scheduled dinner. Thank you!
Yes! You can freeze the pie after baking. Use a metal pan (a glass one has the potential to shatter when baked from frozen), and wrap the baked thing in two layers of plastic wrap. When ready to reheat, bake at 350… I’m not sure of the exact time, but maybe anywhere between 25 to 40 minutes depending on how frozen the pie got?
Thank you so much!
This sounds really good and I’m going to try it. My confusion comes in at the ingredients list. There are 3 cans of cherries listed but later in comments you say to use 2. The lady with too much liquid says she used 3 cans. So 2 or 3 cans of cherries? Thankyou
Hi! It depends on the pie pan you like to use—shallow vs deep dish. There’s a section about it in the post: “You may need more cherries depending on the kind of pie pan you use for baking pies. In general, I like to bake my pies in thin, shallow metal pans (like this one!). I find that doing so makes the pie crust more crispy and lowers the risk for a soggy-bottomed pie. Shallow metal pie pans usually have a depth between 1 ¼- and 1 ½-inches.
However, many people bake their pies in deep-dish pie pans. In contrast, these deep-dish pie pans typically have a depth between 2- and 2 ½-inches. As a result, this greater depth enables the pie to hold more filling. If you have one of these kinds of pie pans, I recommend using 3 cans of cherries as opposed to 2.”