
This post was sponsored by Land O’Lakes, my favorite butter company! As always, all thoughts and opinions are my own, and I’m incredibly excited to be working with Land O’Lakes all year long because of their high-quality butter and dairy products. Thank you for supporting Hummingbird High and my awesome sponsors!
If you’re a long-time reader of Hummingbird High, you’ll know that my relationship with pie has always been a little bit rocky. I first attempted to make pie from scratch (for this blog, actually) in 2012, only to discover that I was missing half the key tools I needed and that making pie dough on a 90-degree+ day in an unairconditioned kitchen was maaybeeee not the best idea. It took me a full year to muster up the courage to try again, and even then, the resulting pie was shall we say, erm, rustic.
Fast forward to now, almost six years later, where I find myself teaching a pie class with one of Instagram’s most famous and talented pie makers at Portland’s biggest food festival, Feast. How did THAT happen? I suspect it has something to do with #humhipieamonth, where I spent a year making a pie from scratch each month to really hone in my skills. And this year, I’ve already made over 50 pies as I researched, developed, and photographed pies for #weeknightbakingbook — and when you find yourself making the same pie dough recipe over and over again in a row (there was seriously one day in which I assembled 12 pies in a row and wanted to cry by the end of it), you can’t NOT pick up some tips and tricks along the way to make the whole thing go faster and easier. Which is all very well and good for you guys, because the funny thing is, I noticed that as my pies and all the other pies on Instagram got more and more elaborate, I was getting more requests and questions about classic pie lattices. And it makes sense, if you think about it — you gotta learn to walk before you can run!
So here I am today with a tutorial on how to do a basic classic lattice. Start with two discs of your favorite pie dough and your favorite pie filling (I’ve also included some recipes for both after this post). Roll out one of the pie dough discs and fit it onto a 9-inch pie plate. Fill the rolled out crust with pie filling, and place it in the refrigerator to chill while you roll out the second disc for the lattice.
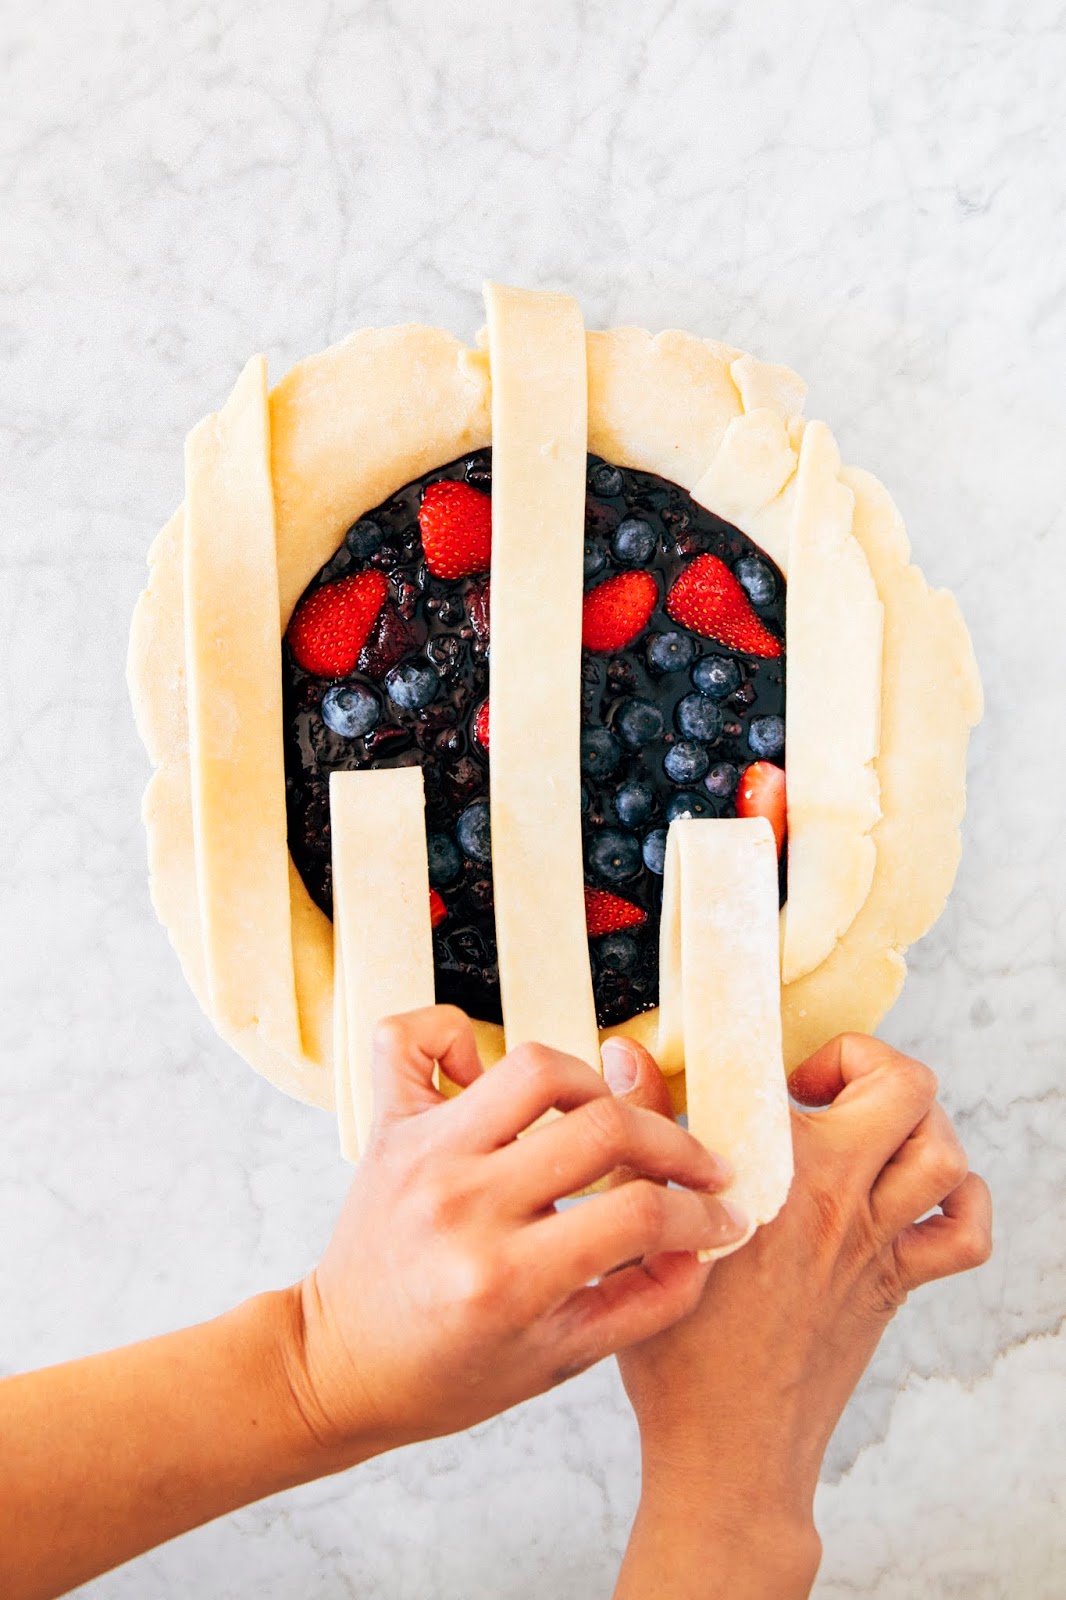
Roll out the second disc into a circle that is at least 3 inches wider than your pie plate — that means that if you’re using a 9-inch pie plate, you’ll need to roll out a circle that is 12 inches. I know that this seems excessive, but I promise that it will give you the extra leeway you might need for the best lattice ever. After rolling it out into this large circle, you’ll need both a pastry wheel and a ruler. Use both to cut the circle into 10 even strips, each about an inch wide.
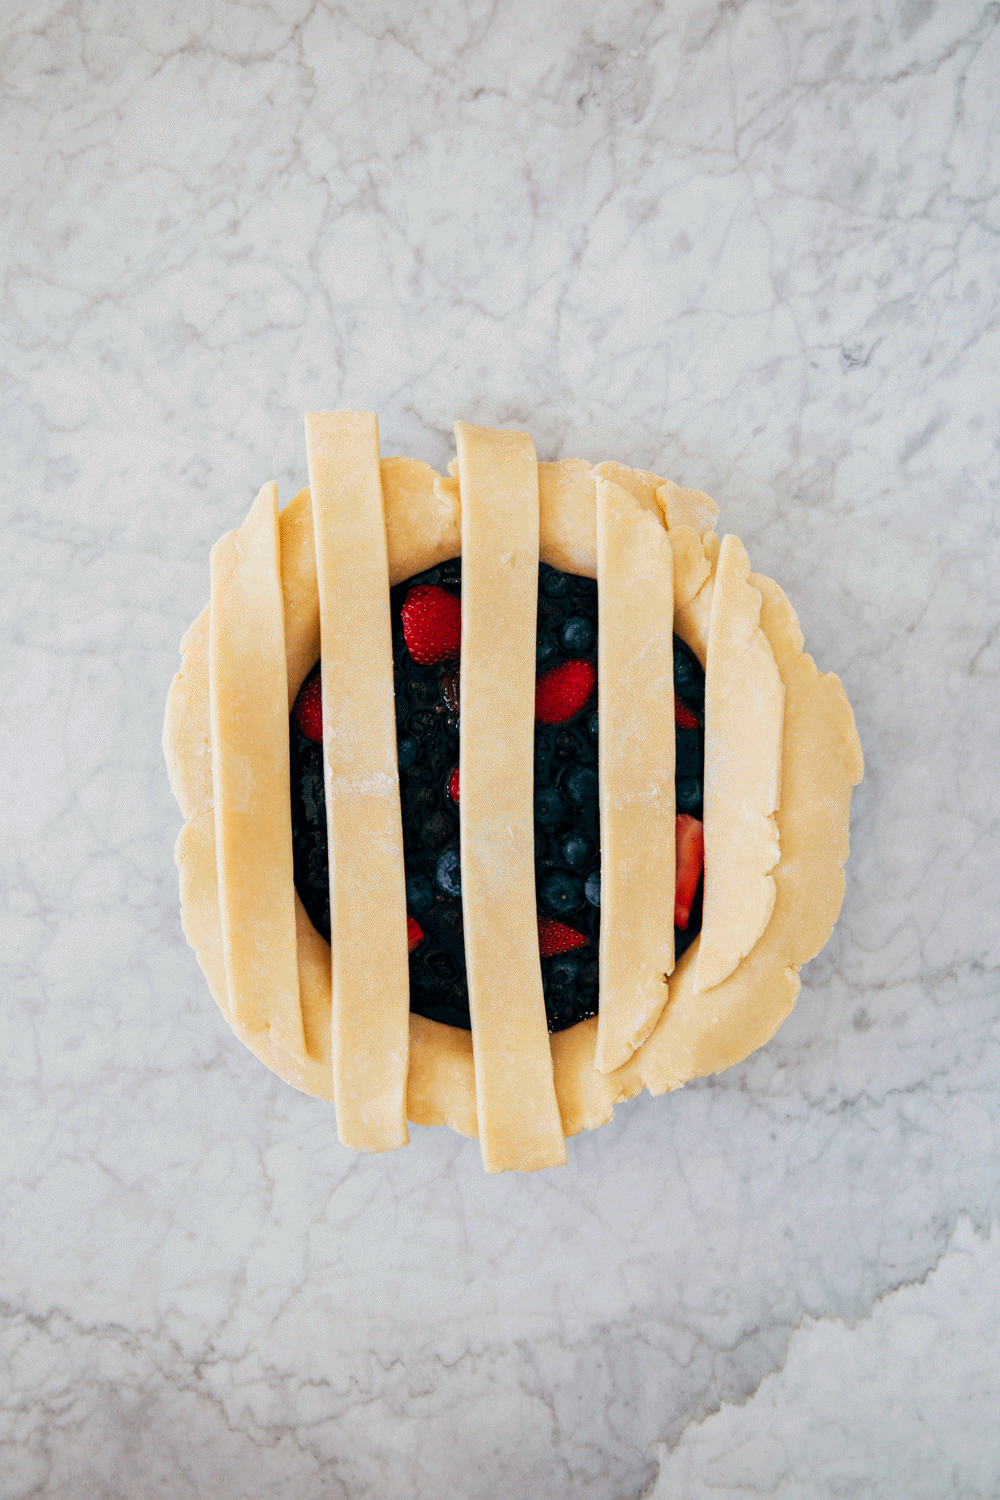
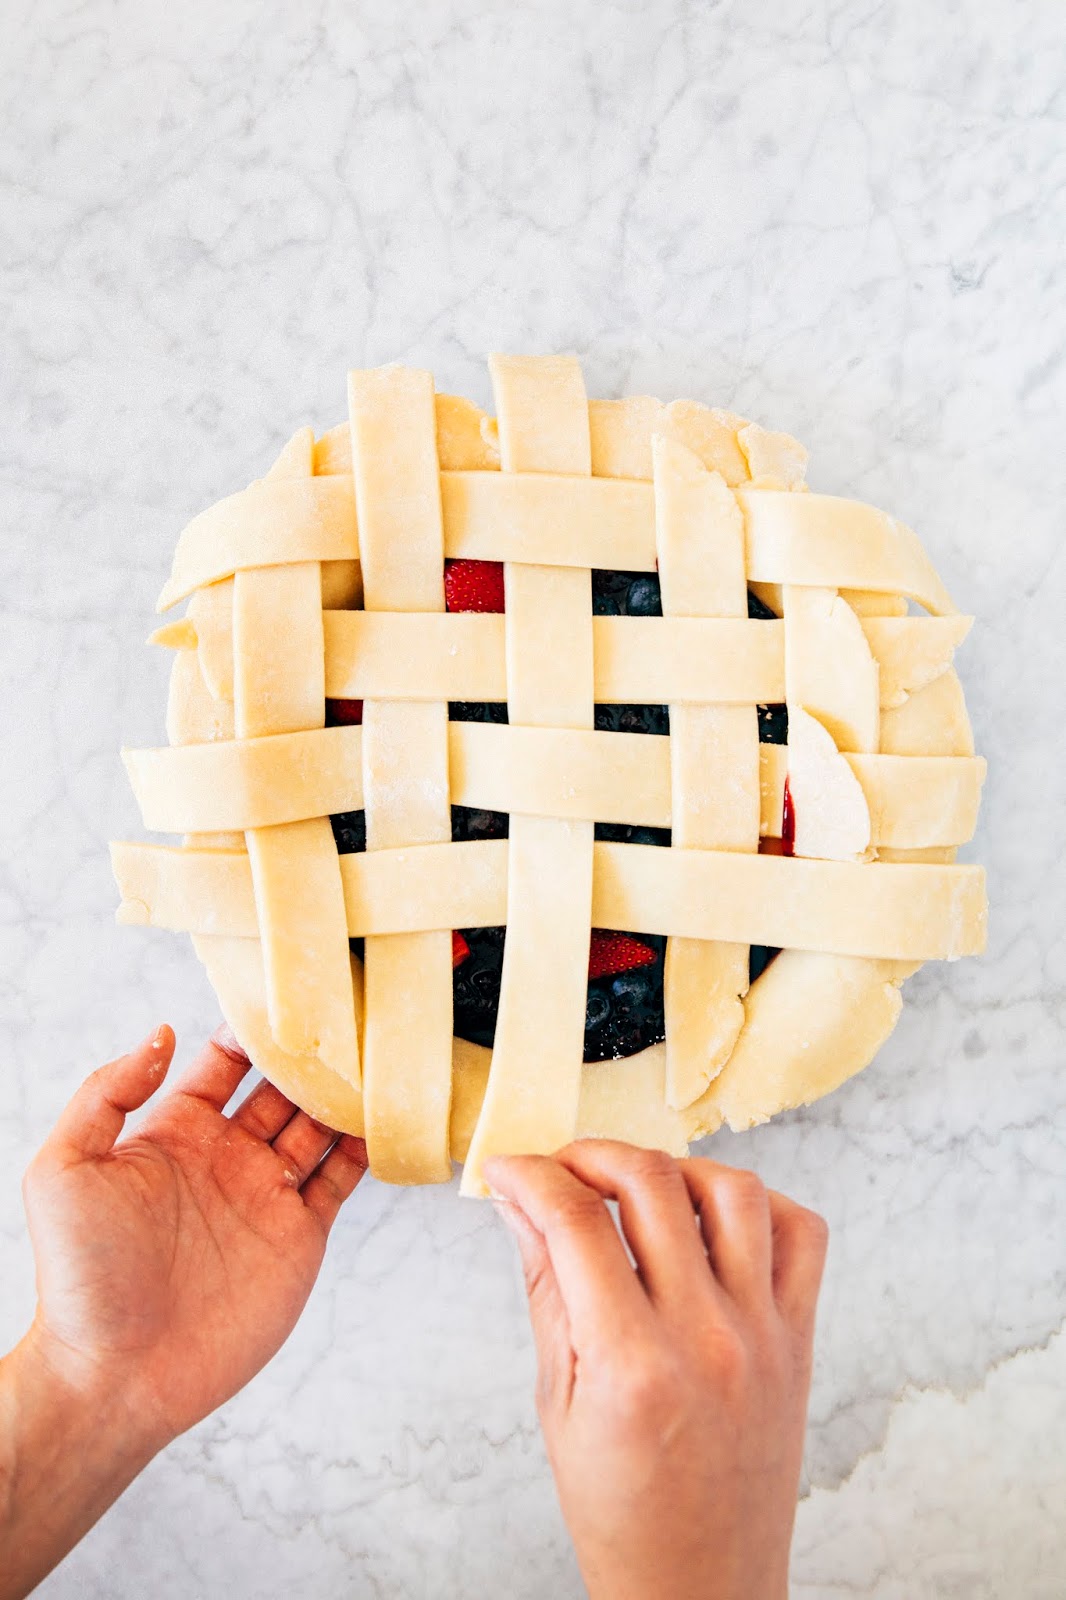
At this point, you have everything you need to weave the lattice. Start by arranging 5 of the strips vertically on the pie, leaving about 1/2-inch or so between each strip. Make sure to use the longer strips for the center of the pie and the shorter ones for the sides of the pie:

Fold the 2nd and 4th lattice strip halfway back across the pie towards yourself. Take one of the leftover pie strips NOT currently on the pie and lay it horizontally in the center of the pie, close to where you folded up the 2nd and 4th vertical lattice strips. Unfold the 2nd and 4th vertical lattice strips over the horizontal strip, so that the horizontal strip is running underneath the 2nd and 4th vertical strips when they’re folded down:

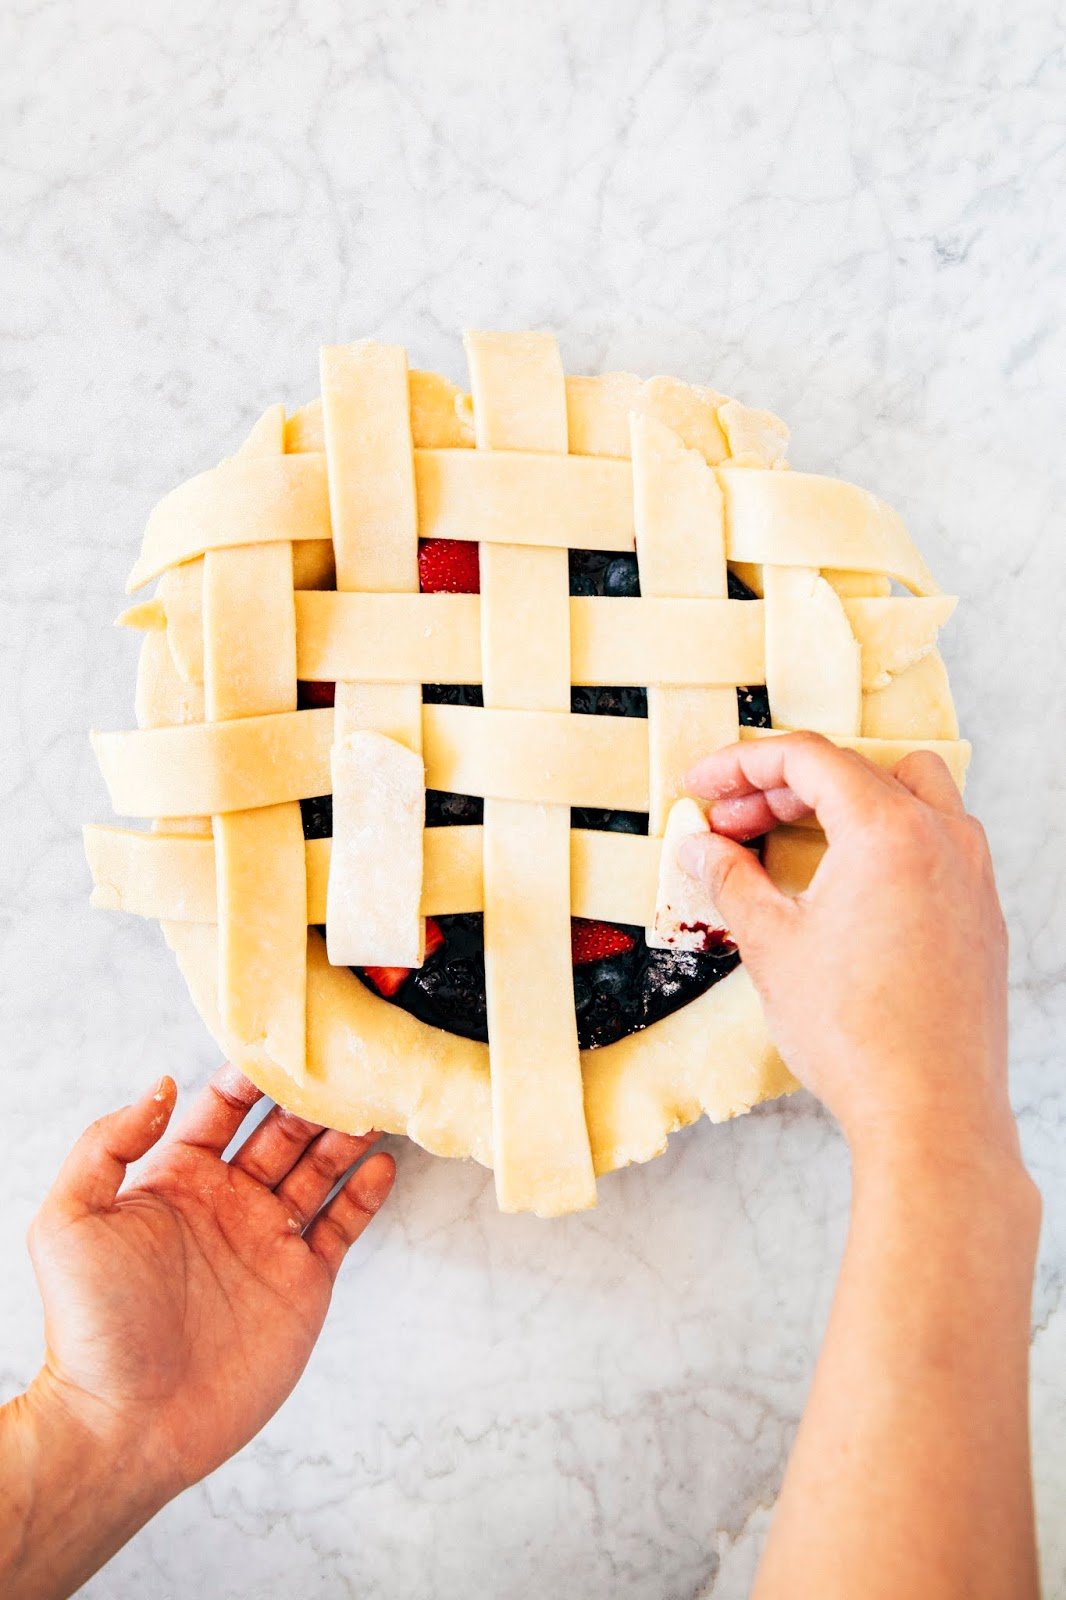
Next, you’ll need to fold the 1st, 3rd, and 5th vertical lattice strips halfway back across the pie, similar to what you just did with the 2nd and 4th strips, but this time over the one horizontal lattice strip that’s currently in the center of the pie. Lay another pie strip horizontally across the pie, close to where you folded up the 1st, 3rd, and 5th vertical strips. Unfold those vertical strips over this second horizontal strip, so that the horizontal strip is running underneath the 1st, 3rd, and 5th vertical strips:
Once you’ve folded the 1st, 3rd, and 5th lattices back down to their original positions, you’ll need to start again but this time fold the 2nd and 4th vertical lattice strips back over the horizontal lattice strip you just laid across the pie. Lay another lattice strip horizontally close to where you folded over the 2nd and 4th vertical lattice strips, and fold the 2nd and 4th lattice strips over the horizontal strip you just laid across the pie:

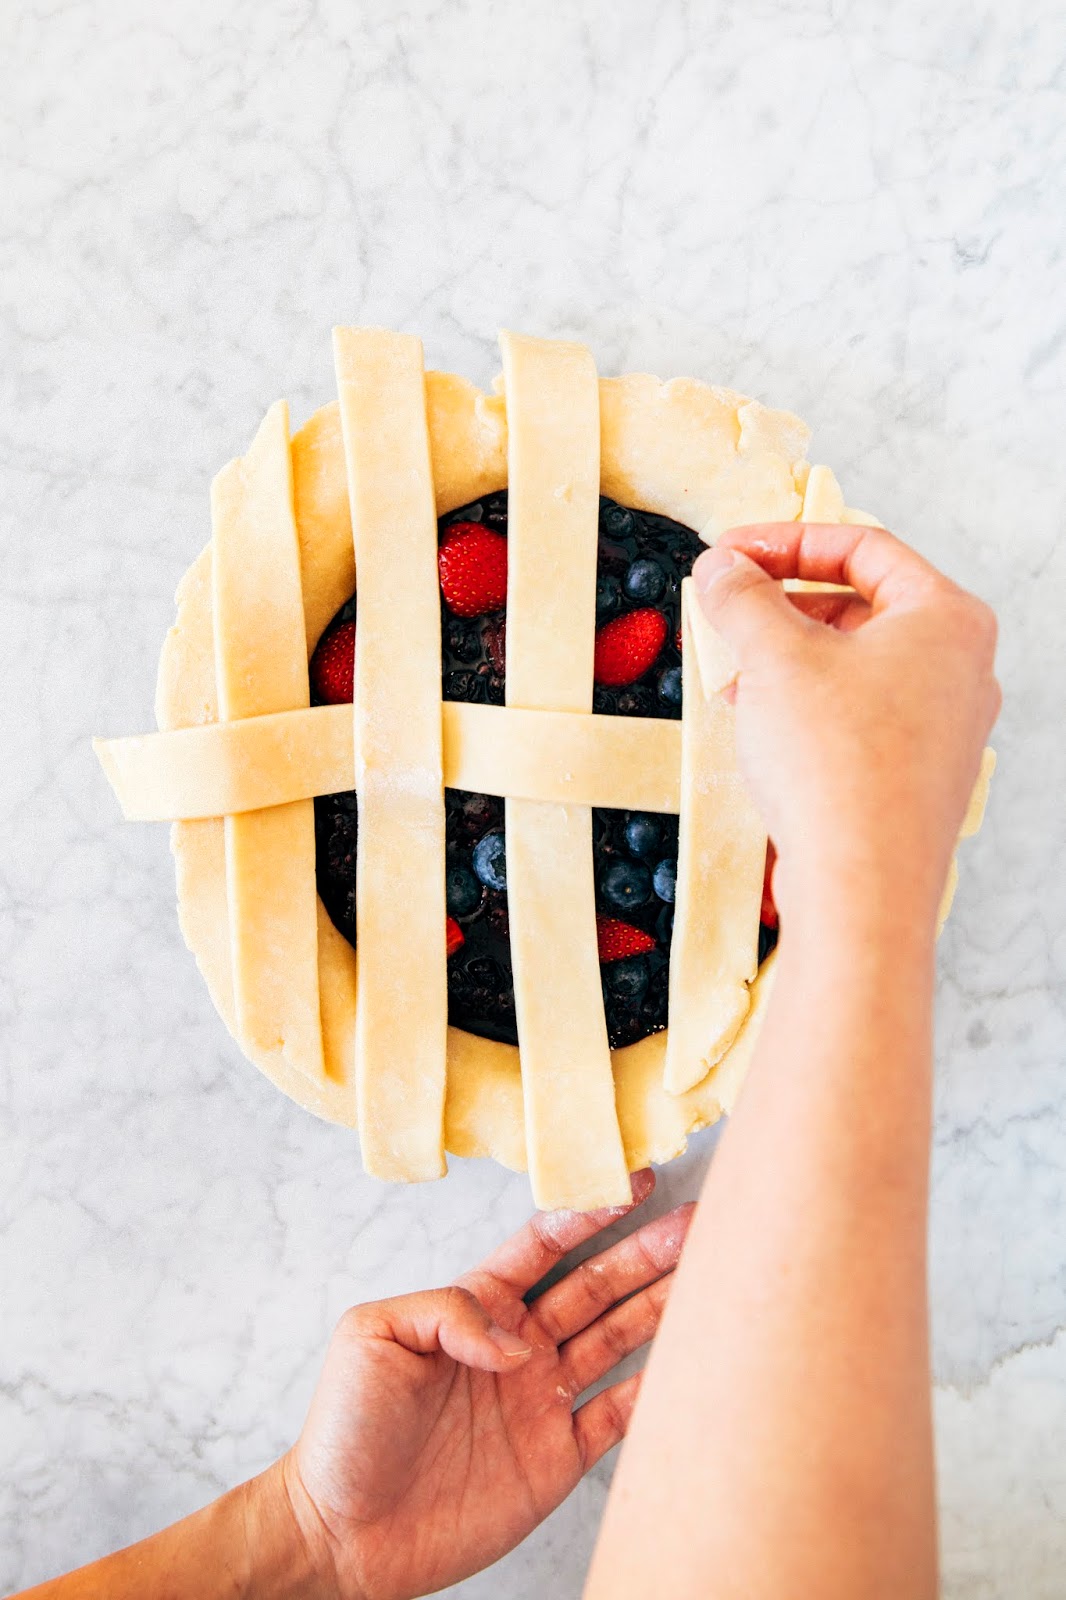
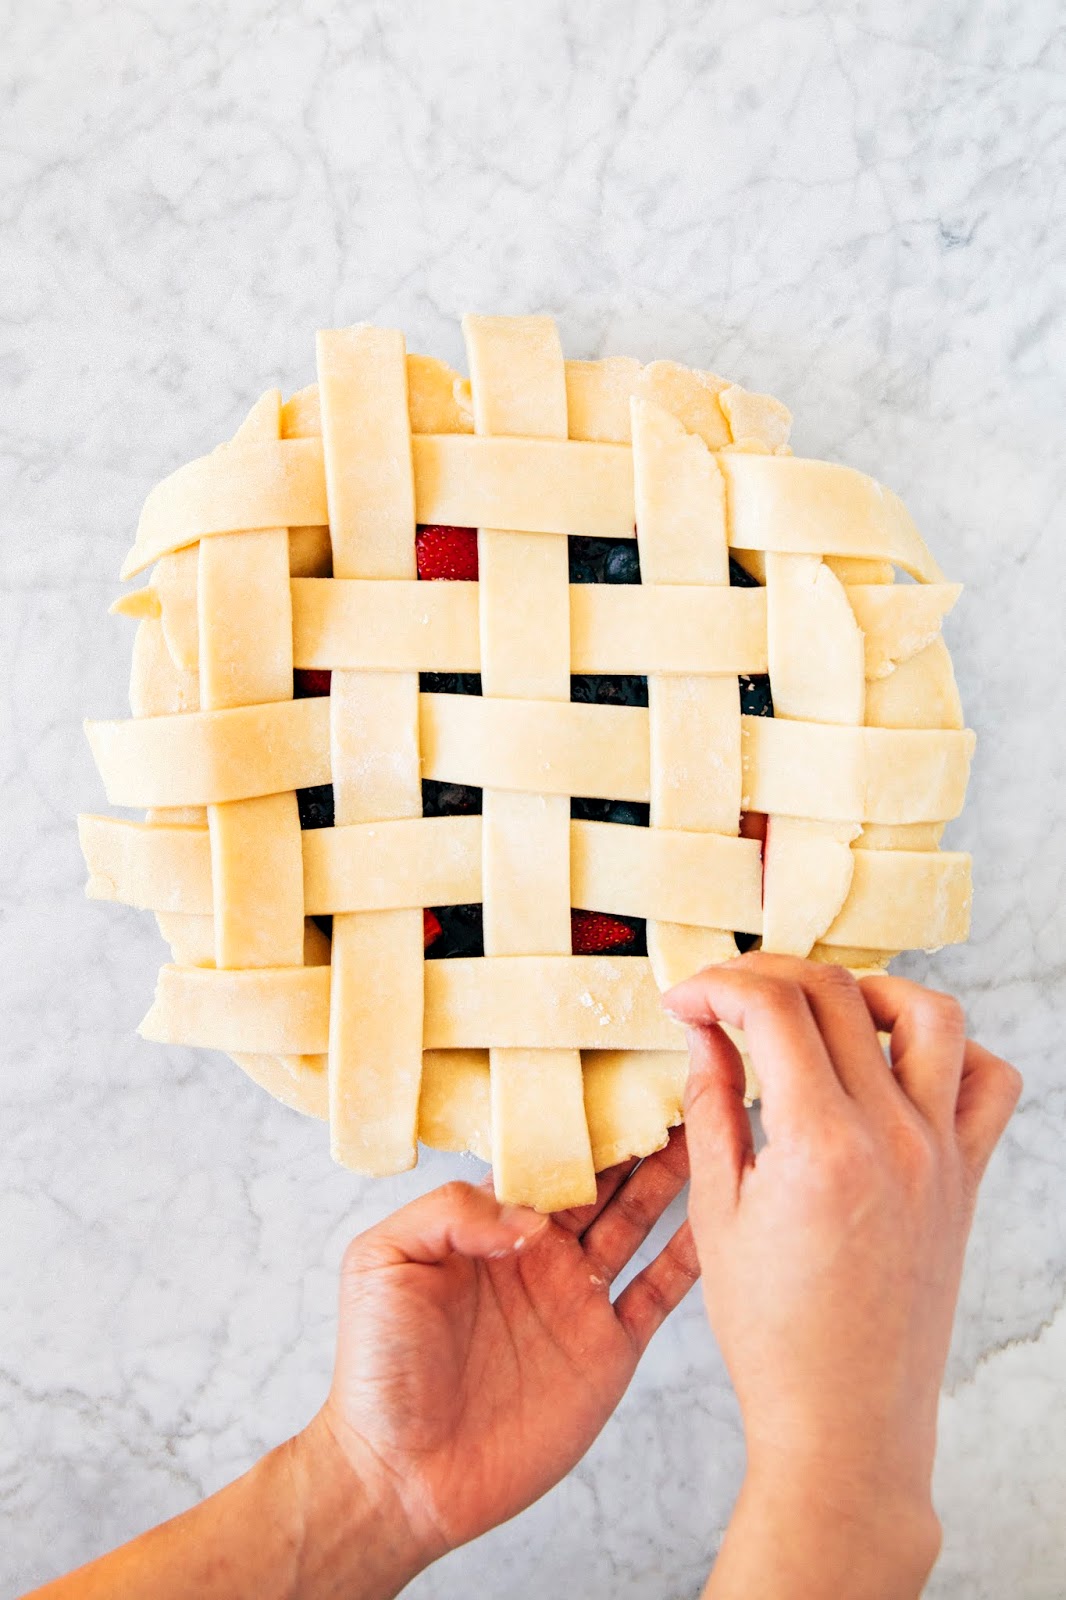
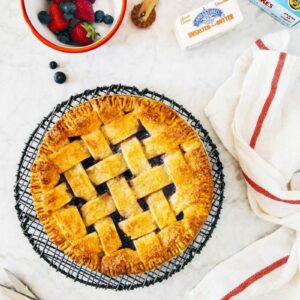
Congratulations! At this point, the top half of your pie has been successfully woven:

At this point, all that needs to be done is the bottom half of the pie. You’re basically going to do what we just did, but this time, folding the vertical strips upwards as opposed to downwards. Fold the 1st, 3rd, and 5th vertical strips up over the horizontal strip that is running across the center of the pie and lay another strip horizontally a half inch or so underneath it. Fold the 1st, 3rd, and 5th strips down over this horizontal strip:

Yay! You’ve got one strip left to go. Fold the 2nd and 4th vertical strip upwards over the last horizontal strip you just laid across the pie. Lay the final lattice strip horizontally across the pie, then fold the 2nd and 4th vertical strips down over it.
Now step back — voila! You’ve woven a lattice pie.
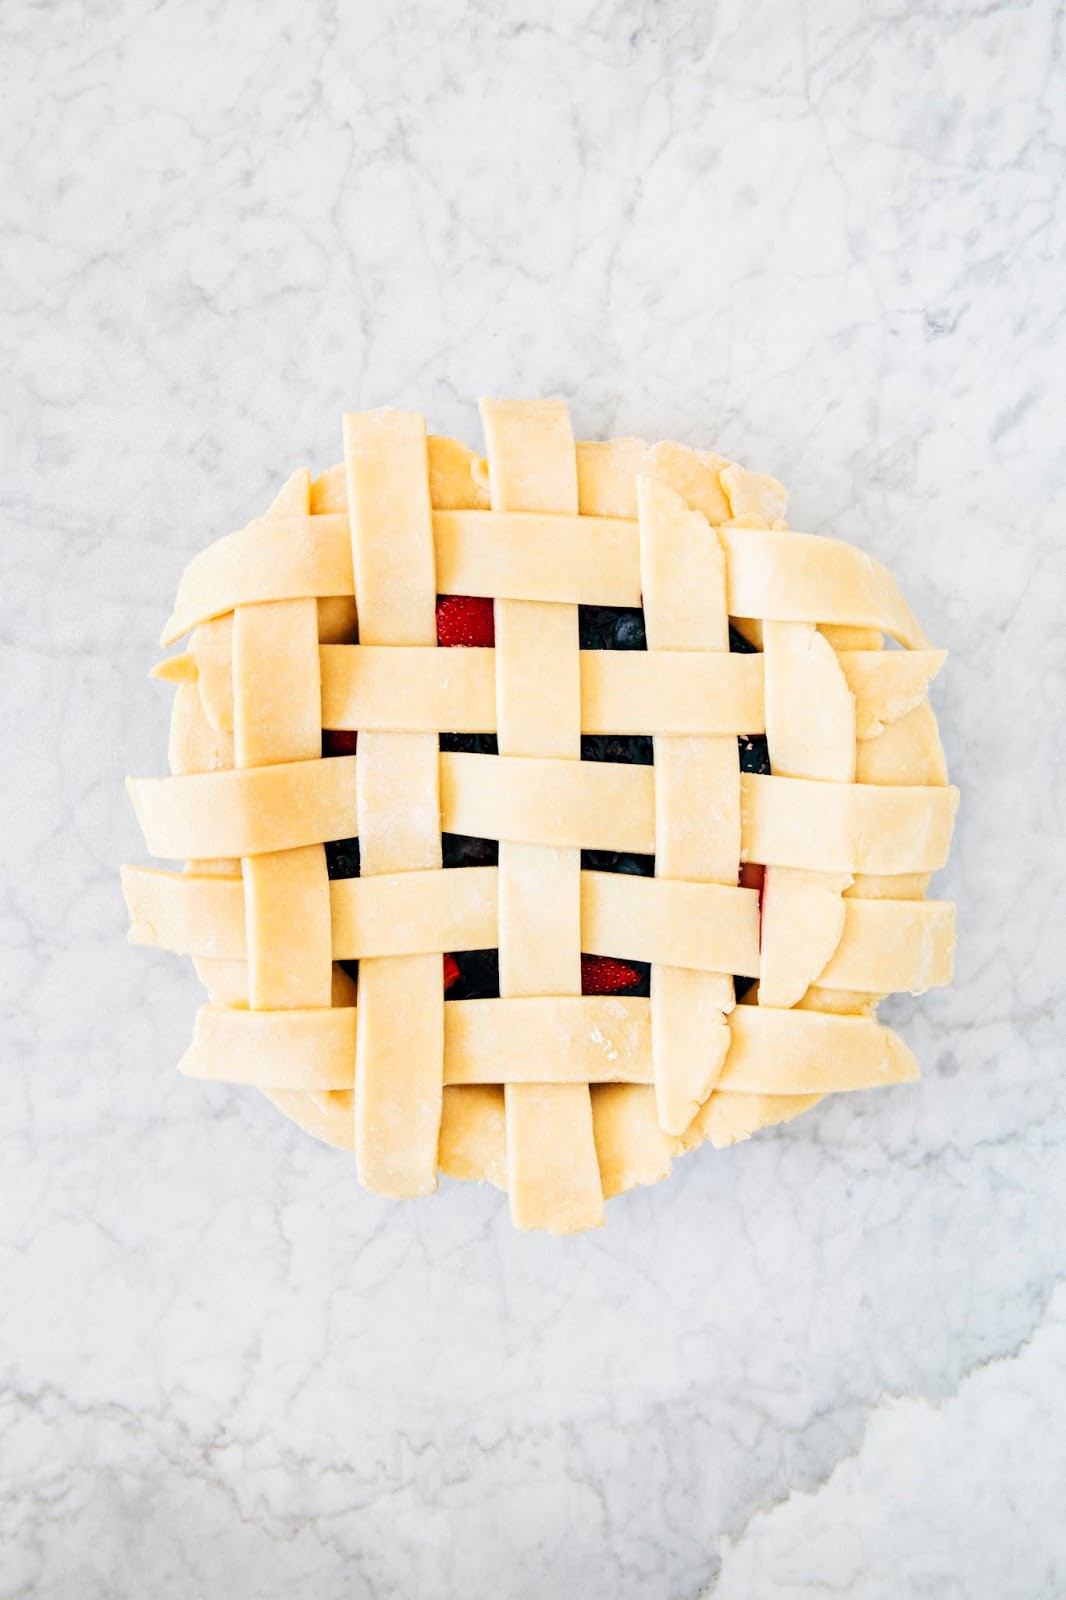
At this point, you can trim any excess strips and pie dough hanging over the edge of the plate and use a fork to press down on the crust around the edges of the pie to make a border. Alternatively, you can also roll the excess pie dough up onto the plate and shape it into a more traditional crimp. However, I prefer to use the fork method because it’s faster, easier, and I don’t want to distract from the lattice that I just worked so hard to weave.
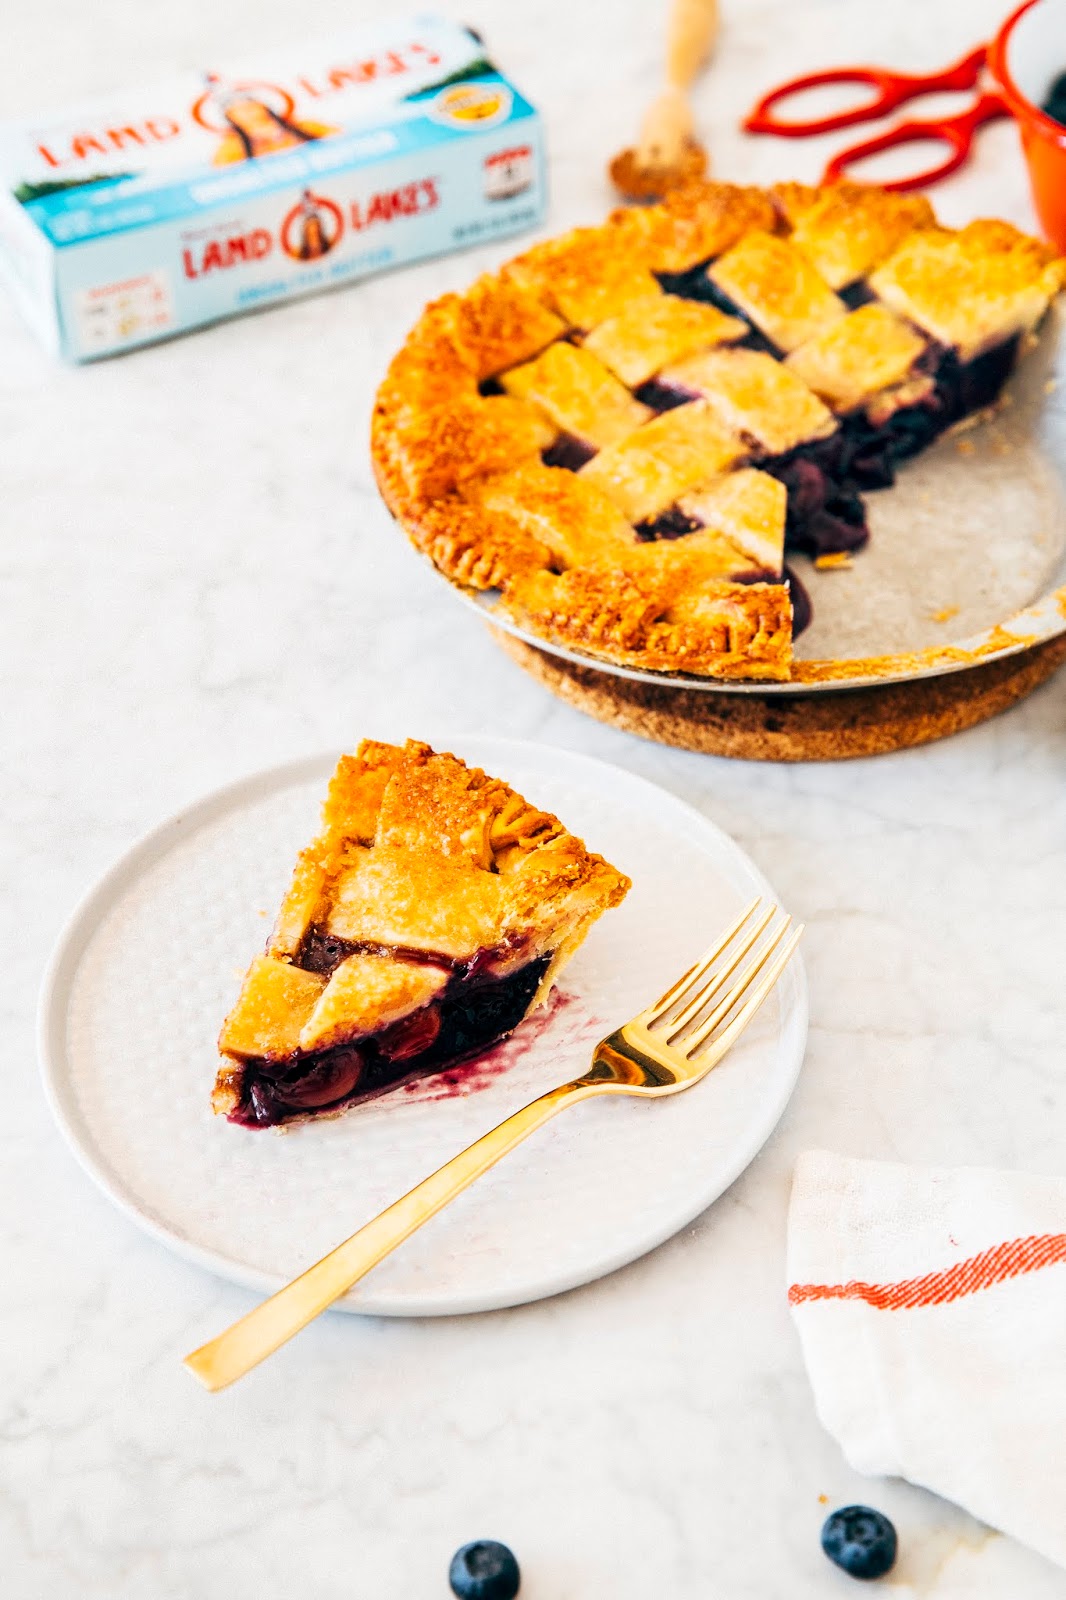
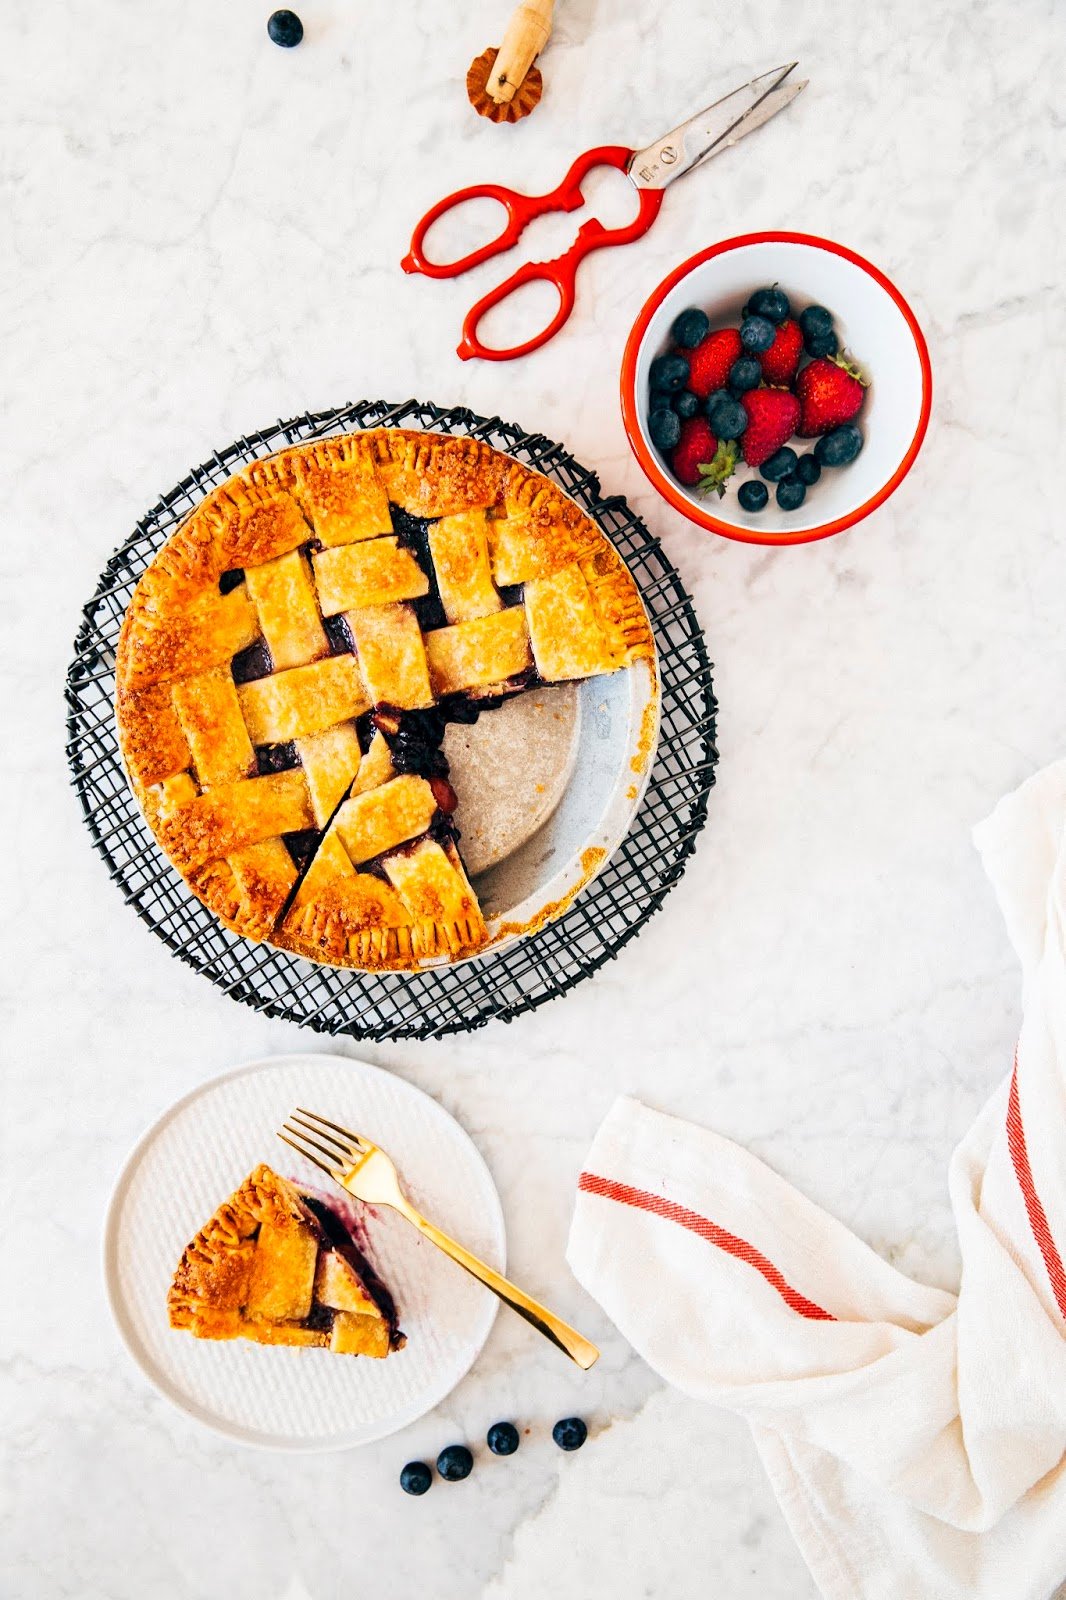
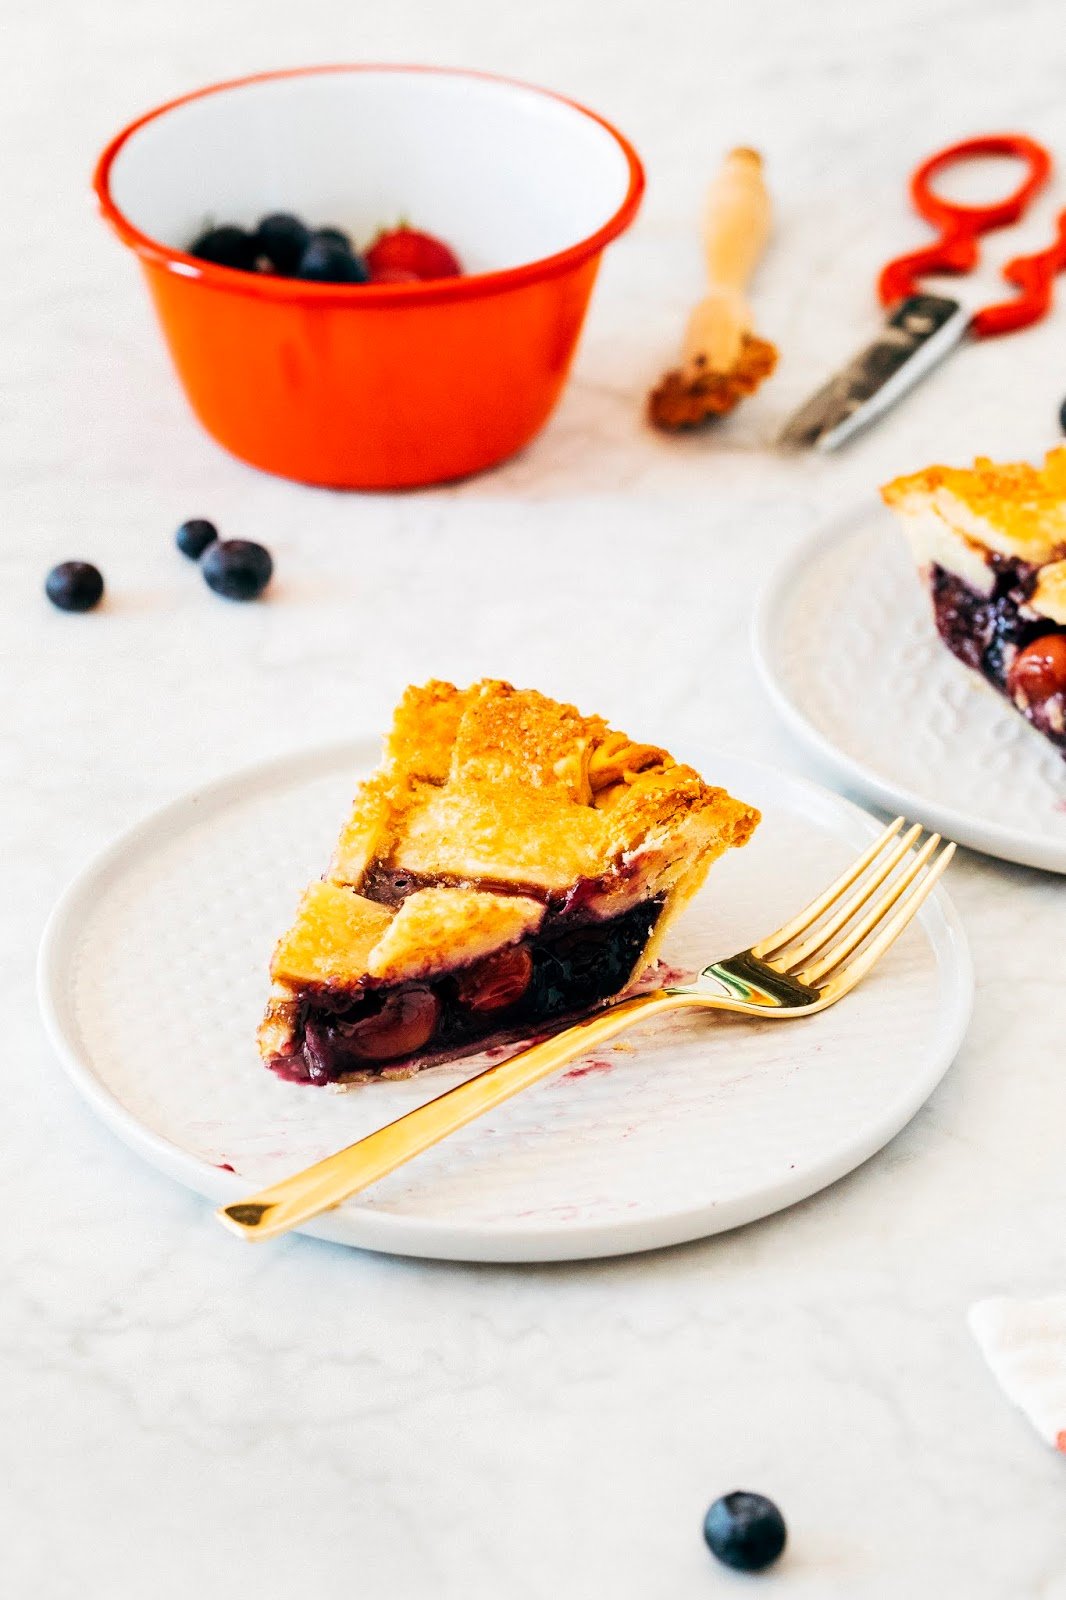
Now before you go off and weave your lattice, I’d like to share some final tips: when making pie dough, be sure to keep all your ingredients, especially your butter, as cold as possible to create a dough that’s easy to work with and yields an incredibly flaky-yet-tender final crust. Pie dough is also one of those desserts where, because it uses so few ingredients, it’s important to use the very best quality of ingredients you can get in order to achieve the best flavor. For most of my baking, I rely on Land O Lakes® Unsalted Butter, which has a clean and classic butter flavor that really makes my pies and other desserts stand out. Enjoy, and be sure to check out the video below to see this pie come together:
Get the Recipe: My Favorite Basic Pie Dough + Any Kind of Fruit Filling
Ingredients
For the Basic Pie Dough
(makes enough for a double-crusted 9-inch pie)
- 2 1/2 cups (11.25 ounces) all-purpose flour
- 1 tablespoon granulated sugar
- 1 teaspoon kosher salt
- 1 cup 8 ounces very cold Land O Lakes® Unsalted Butter
- 6 tablespoons (3 ounces) very cold water
- 2 teaspoons apple cider vinegar
- 1/2 cup ice
For the Fruit Filling
(makes enough for a 9-inch pie)
- 6 cups (24 ounces) fresh pie fruit of your choice, prepped and chopped into 1- to 2-inch chunks if using rhubarb, stone fruit, apples, and/or pears
- 3/4 cup (5.25 ounces) granulated sugar
- 2 tablespoons (1 ounce) Land O Lakes® Unsalted Butter
- 1/4 cup 1 ounce cornstarch
- a pinch of kosher salt
Assembly
(makes enough for a 9-inch pie)
- 1 large egg white
- 1 teaspoon water
- 3 tablespoons demarara (or other coarse) sugar
Instructions
For the Basic Pie Dough
- In a large bowl, combine 2 1/2 cups all-purpose flour, 1 tablespoon granulated sugar, and 1 teaspoon kosher salt. Whisk to combine.
- Slice 1 cup Land O Lakes® Unsalted Butter into 1-inch cubes and add to the dry ingredients. Use a dough blender to rub the butter into the dry ingredients until the mixture resembles a coarse cornmeal, with no butter chunks larger than the size of your thumbnail.
- In a liquid measuring cup, combine 6 tablespoons water, 2 teaspoons apple cider vinegar, and 1/2 cup ice, whisking to combine until the mixture is cold. Drizzle 6 tablespoons of the mixture over the dry ingredients and use a rubber spatula to mix the liquid into the dry ingredients. To test if the mixture is going to come together, eyeball and pick up a tablespoon’s worth of the mixture and squeeze it in your hands — if it sticks together, your dough has enough liquid. If it still feels super dry and crumbles easily, you’ll need to add another tablespoon of the water mixture to the dry ingredients.
- Use your hands to knead the mixture into a rough ball. Divide the ball into two even halves, and mold each into a flat disc. Cover in plastic wrap and refrigerate for at least an hour, preferably overnight, before following the instructions above to roll out the pie and weave a lattice.
For the Fruit Filling
- While the dough is chilling, make the pie's fruit filling. Combine 3 cups of the fruit and 3/4 cup granulated sugar in a medium saucepan and cook over medium-high heat for around 10 minutes, or until the fruit has softened and released juices. Transfer to a medium bowl and use a heatproof rubber spatula to immediately stir in 2 tablespoons of Land O Lakes® Unsalted Butter until the butter completely melts in the mixture. Add the remaining fruit, 1/4 cup of cornstarch, and a pinch of kosher salt, tossing into the fruit mixture until the cornstarch dissolves and the fresh fruit is coated in the cooked fruit mixture. Let cool to room temperature — the filling can be transferred to an airtight container and refrigerated for up to 3 days before using in a pie.
Assembly and Baking Instructions
- Once you’ve filled your pie and topped it off with a pie lattice, transfer to the freezer to chill for at least 2 hours, preferably overnight.
- Once the pie has frozen solid, it’s time to bake it. Position a rack in the oven to its lowest height and preheat to 375 (F). Whisk 1 large egg white and 1 teaspoon water in a small bowl and set aside.
- Line a sheet pan with parchment paper and place the frozen pie in the center of the sheet pan. Working quickly, use a pastry brush to brush the lattice and edges of the pie with the egg white mixture and sprinkle with demarara sugar — the egg white mixture should act as glue to keep the sugar on. Transfer the sheet pan with the pie to the preheated oven’s lowest rack and bake for 60 minutes, or until the top of the pie has turned into a golden brown and the pie filling is bubbling slowly through the lattice.
- Transfer to a wire rack to cool completely before serving and slicing. Enjoy!