

This time last summer, I had left my full-time job at Yelp and was gearing up to move back to Portland and focus on writing my cookbook, Weeknight Baking. Given that I had spent many years balancing my day job with this blog, I thought that finally just focusing on one thing would allow me to pursue everything I’d always wanted to do with Hummingbird High but never had time to do so: mostly, more interiors posts, party posts, travel posts, step-by-step tutorials, elaborate pastries, GIFS, videos and more!
Needless to say, none of that happened, lol. Although many of my friends and peers who’d written cookbooks warned me about how much work it all was, I’d secretly ignored their warnings because I was just too friggin’ cocky. Despite their horror stories, I figured that after balancing a full-time corporate job and this blog for so long, it would be a breeze. Ha! Nope. Long story short, the book replaced Yelp as my full-time job and Hummingbird High was once again pushed to the sidelines as I raced to develop, test, and photograph recipes for Weeknight Baking.
There is light at the end of the tunnel though! I’ve finally met the first of my major deadlines, turning in my manuscript at the start of last month and all the photos this past Monday. I have about a month off before I get the first round of edits, during which I’m planning to relax, go on the Whole 30 in attempt to lose all the scary book-related weight I’ve gained in the last year, and finally stop neglecting my blog and start working on all of the ideas and plans I’ve had for it since yesteryear. Get excited!
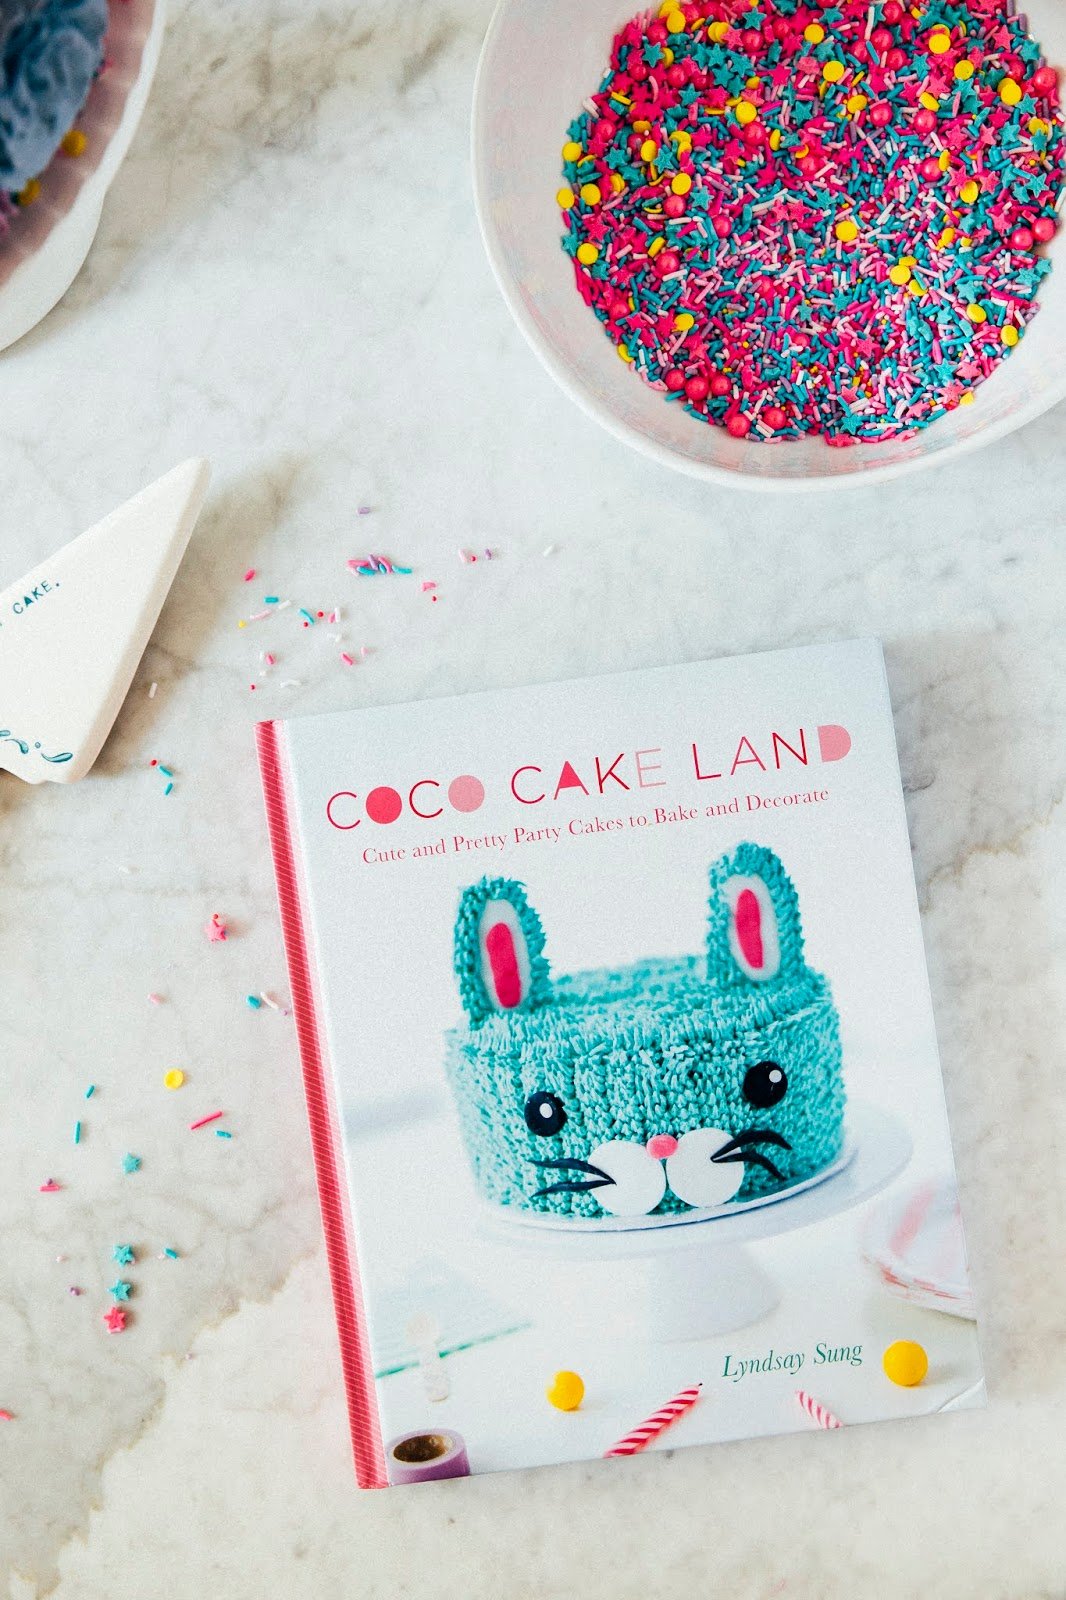
First up: a decorating tutorial with the help of my talented friend, Lyndsay Sung of Coco Cake Land! Her new cookbook just came out and is dedicated to all things cake decorating and is just SO. MUCH. FUN. Lyndsay is known for her badass feminist cakes, her super kawaii animal cakes, and her general boss cake decorating skills. She is one of my favorite bakers, and is such an inspiration both inside and outside of the kitchen. Real talk — she wrote part of the book while she was fighting (and winning!) against breast cancer. I told you she was fierce.
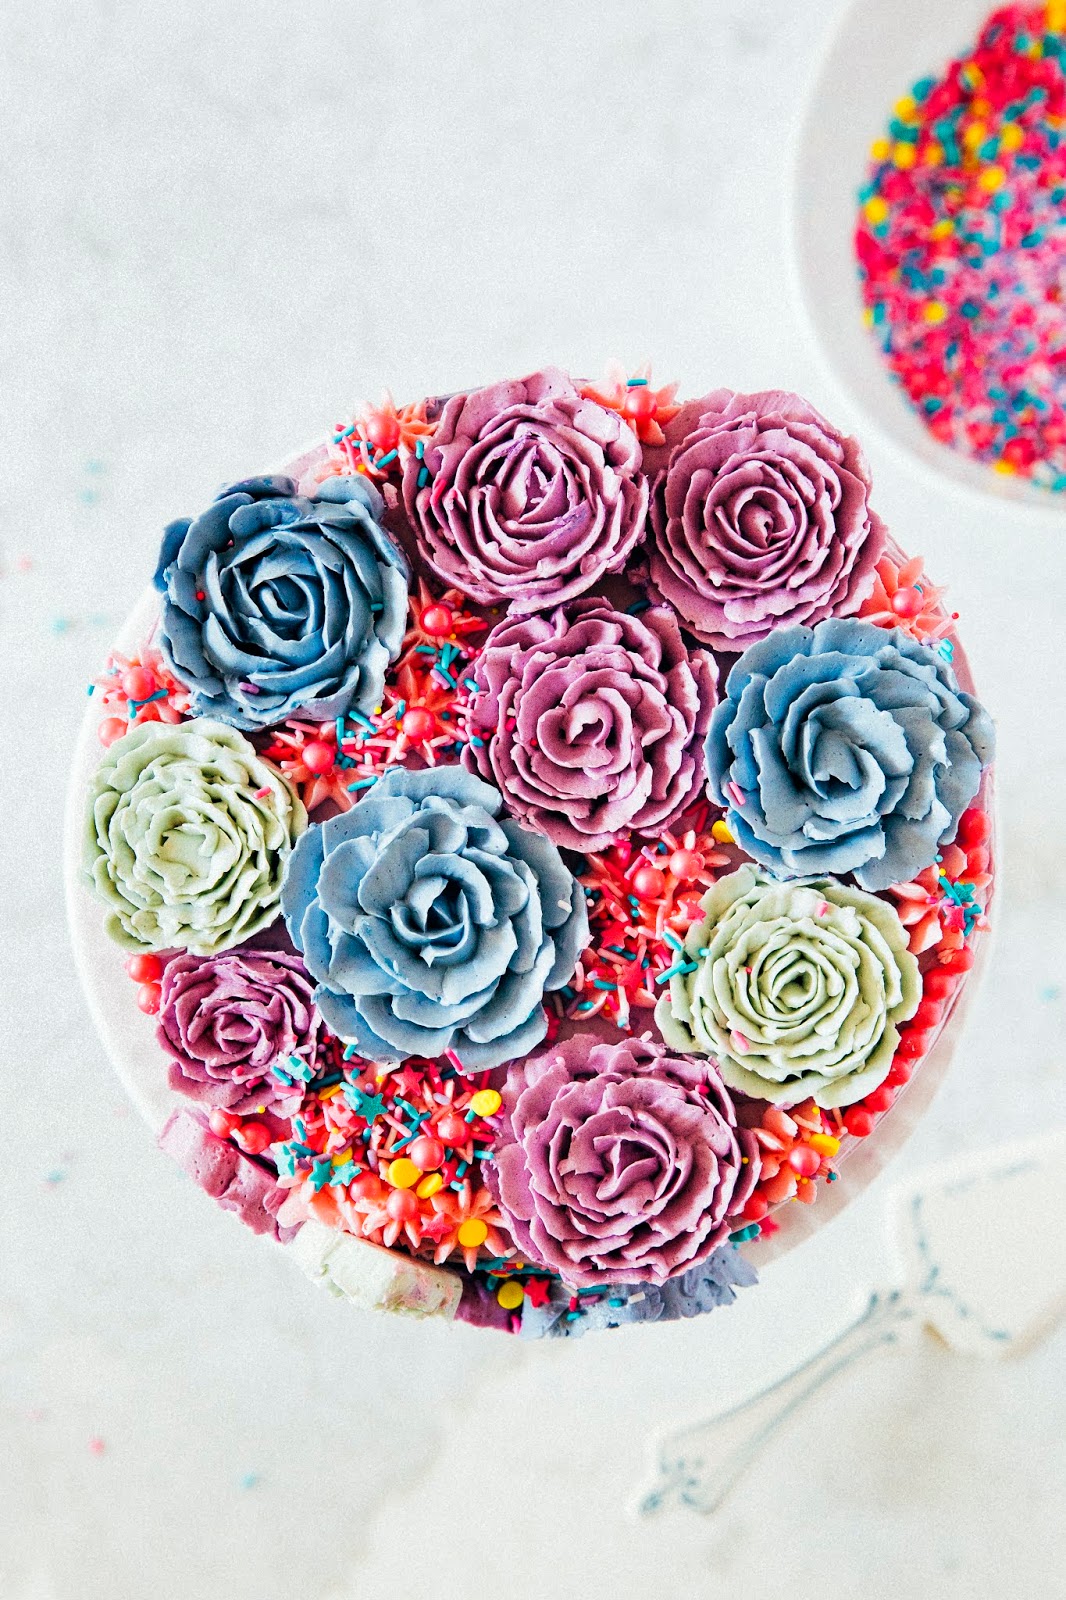
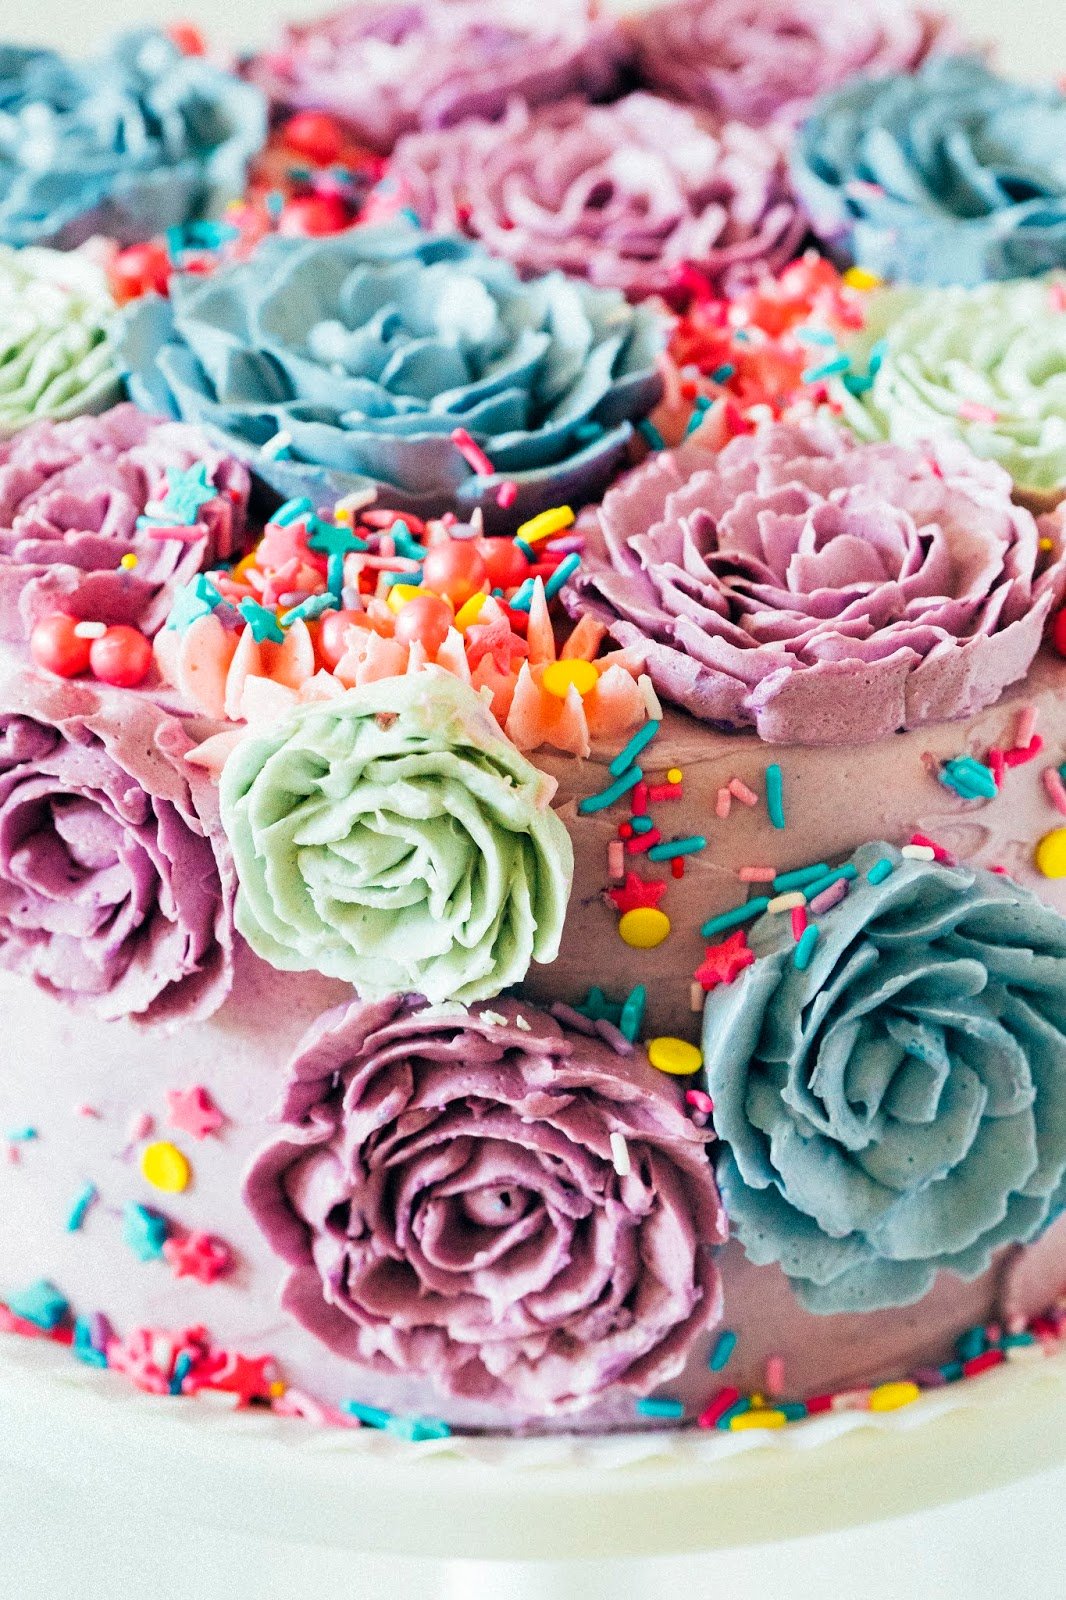
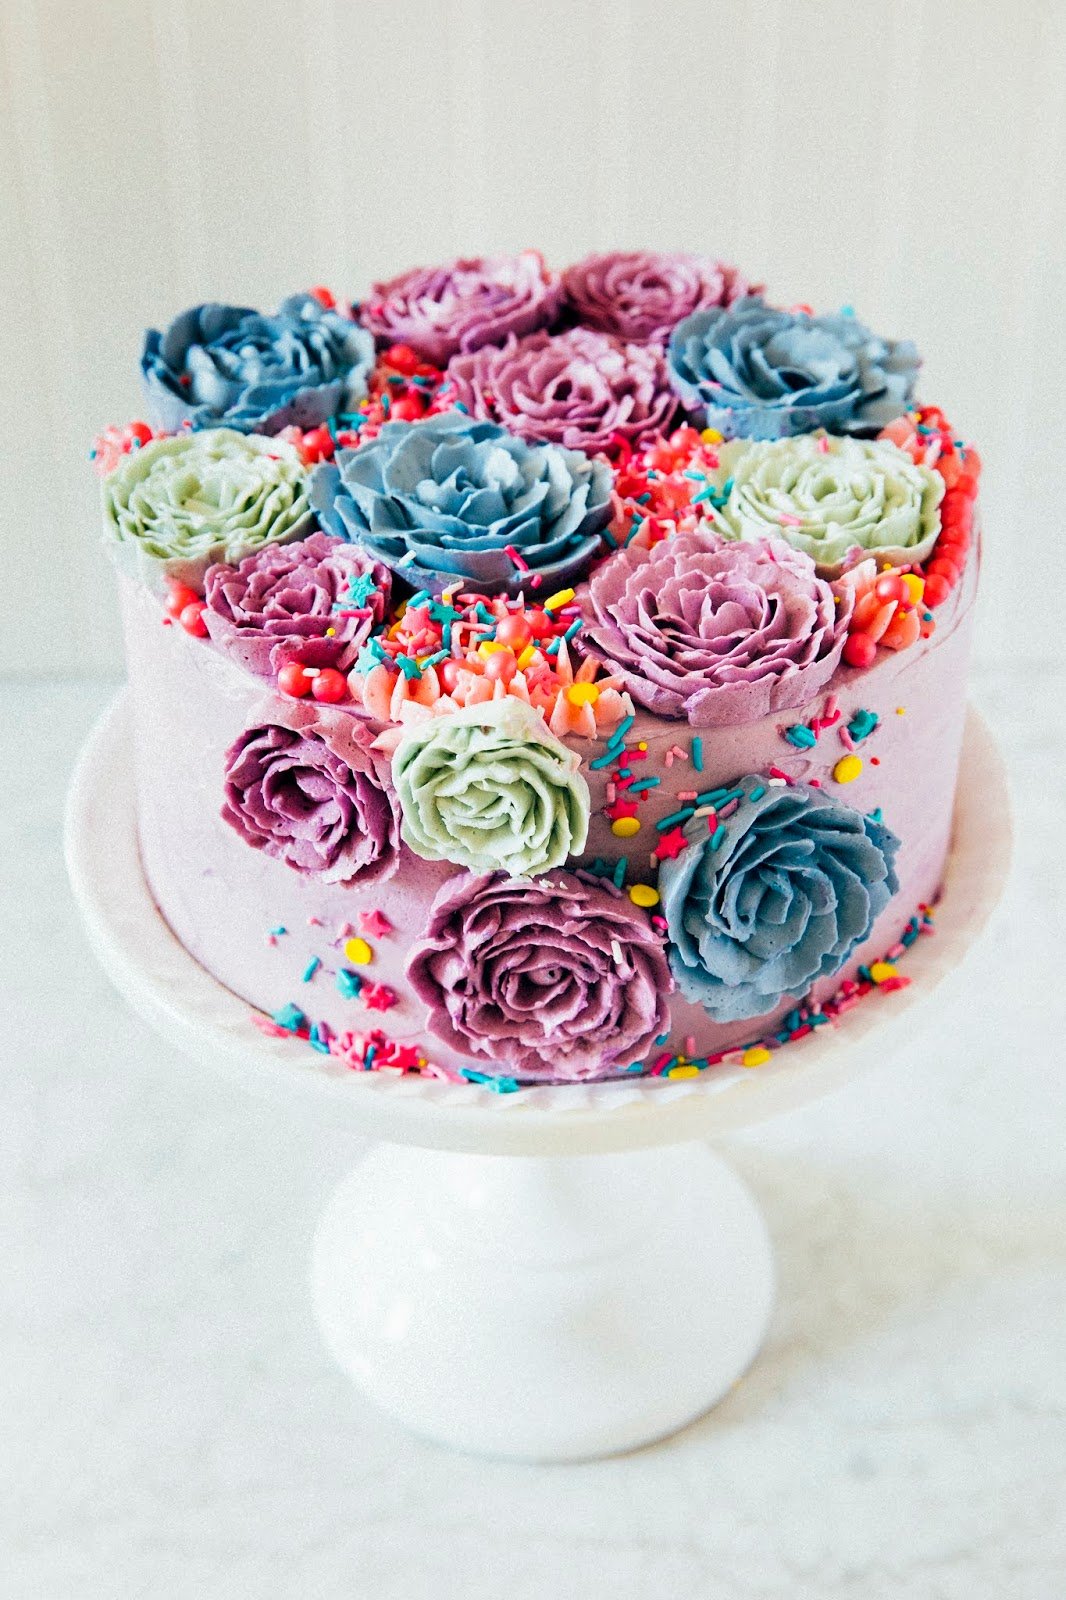
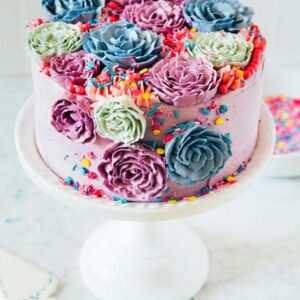
One of the cakes in Lyndsay’s book is the Buttercream Flower Power cake, which is a layer cake topped with beautiful and 100% edible buttercream roses in bright neon colors (I tried to channel them for this cake, but I think my colors came out more muted than Lyndsay’s — oh well). Buttercream flowers kinda blew up on the internet last year, and of course, I’m late to the party. I’m not going to lie — I avoided piping them for a really long time because I was super intimidated to do so, but they’re actually pretty easy! It helps to have a good video tutorial or two to guide you (as much as I love photos, sometimes a video really does do the job better) so I’ve included a pretty bare bones instructional video on how I pipe my roses:

What do you guys think of the video? Is it too bare? Should I add music and flashing lights? I know that those Buzzfeed Tasty-style videos are super popular, but for more instructional videos, I decided to keep it minimalist so you can actually see what I’m doing without any distractions. Tell me your thoughts!
Also, be sure to check out the rest of the post below for some formal instructions on how to pipe the flowers as well a quick guide on literally everything you need to get started on piping flowers of your own. And don’t miss my post on Instagram, where I’m giving away a copy of Lyndsay’s cookbook and a jar of some of her custom made Sweetapolita sprinkles. Super fun, right??? I’m so excited, you guys. I feel like this is a fresh start to Hummingbird High, and I am so excited to kick it off with Lyndsay and her new book. Yay!!!

TOOLKIT
What Tools You Need for Swiss Meringue Buttercream
- a heatproof rubber spatula
- a candy thermometer, preferably digital (I use this one)
- a freestanding electric mixer with a whisk and paddle attachment (I use a KitchenAid mixer)
What Tools You Need for Cake Decorating
- 4 pastry piping bags
- 4 pastry bag couplers
- a petal piping tip (I recommend Wilton #102 for small flowers, and Wilton #125 for large ones)
- an open star piping tip (I recommend Wilton #1M)
- a flower nail
- one 12 x 16-inch sheet of parchment paper, cut into 2- or 3-inch squares
- a half sheet pan
- flower lifter scissors

Get the Recipe: Swiss Meringue Buttercream 101
Ingredients
Lyndsay’s Swiss Meringue Buttercream Frosting
- 1 cup (8 ounces) large egg whites, from about 7 to 8 large eggs
- 2 1/4 cups (15.75 ounces) granulated sugar
- 2 1/2 cups (20 ounces) unsalted butter, cut into 1-inch cubes and at room temperature
- 2 teaspoons pure vanilla extract
- a pinch of kosher salt
Instructions
- In the bowl of a freestanding electric mixer, combine 1 cup large egg whites and 2 1/4 cups granulated sugar. Mix with a heatproof rubber spatula to combine into a sugary slurry. Fill a medium saucepan with a few inches of water and place it on the stovetop over medium-high heat. Set the mixer bowl on top of the saucepan to create a kind of double boiler, making sure the mixer bowl doesn’t touch the water.
- Heat the egg and sugar mixture until it reaches 160 (F) on the candy thermometer, using the rubber spatula to scrape down the sides of the bowl to prevent any ingredients from burning and stirring the mixture occasionally. This process should take around 10 minutes, so if you find that it’s taking longer, don’t be afraid to crank up the heat!
- Use oven mitts to carefully transfer the mixer bowl onto the stand mixer and fit a whisk attachment in place. Turn the mixer on to its highest setting and beat the mixture for 10 minutes, or until you’ve created a meringue with medium-stiff peaks and the sides of the bowl are only slightly warm or at room temperature.
- Scrape down the whisk, and replace it with the paddle attachment. With the mixer on low speed, add 2 1/4 cups cubed unsalted butter a few cubes at a time, continuing to mix until the butter is incorporated. At this point, it should look like a thick soup, and that’s totally okay. Add 2 teaspoons pure vanilla extract and a pinch of kosher salt, and turn the mixer up to its highest speed. Beat the mixture on high speed for about 2 to 3 minutes, or until a fluffy, silky, magical buttercream frosting has formed.
Notes
… if your Swiss Meringue Buttercream is too soupy:
That likely means that the meringue wasn’t cool enough when you started adding the butter, and/or it’s a super hot day, and/or your butter was way too soft. No worries! Place the whole bowl in the fridge for about 10 minutes to cool it down before beating it again, first on low speed and gradually increasing it to high speed. … if your Swiss Meringue Buttercream looks curdled and/or mottled:
That likely means that the butter you used was way too cold and refuses to emulsify with the meringue. We can fix it, don’t even worry. Eyeball out a 1/4 cup scoop of the curdled/mottled Swiss Meringue buttercream and transfer to a liquid measuring cup. Microwave on low speed for about 15 to 20 seconds, or until the frosting is soupy, liquidy, and warm. Pour back into the rest of the frosting and turn the mixer back on to high speed for about 2 to 3 minutes — the melted frosting should have helped bring the entire batch down to the right temperature for whipping. If you don’t have a microwave, you can try Lyndsay’s suggestion: lightly heat the whole bowl over a low-boing pot of water. Once it’s warmed up a teensy bit, try mixing it again.
Storing Swiss Meringue Buttercream Frosting
Swiss meringue buttercream will keep in an airtight container for up to 1 week in the fridge or up to 1 month in the freezer. Just be sure to store in an airtight container to prevent the frosting from absorbing any weird fridge/freezer flavors. To use chilled buttercream, bring it back to room temperature by letting it sit uncovered at room temperature for about 1 hour or so. Transfer to the bowl of a freestanding electric mixer and gently rewhip before using. If you find that the buttercream looks mottled, use the tricks above to incorporate it fully. To use frozen buttercream, thaw the buttercream in the fridge overnight and follow the steps for thawing chilled buttercream.
Get the Recipe: Buttercream Flowers 101
Ingredients
- one 8-inch cake of your choice, smoothly frosted
- one recipe Lyndsay’s Swiss Meringue Buttercream (included above)
- pink, purple, green and blue food coloring (I used colors from this awesome Americolor set)
- sprinkles
Instructions
How to Pipe Buttercream Roses
- First, prep your ingredients and tools: divide the buttercream into four even batches, dying each batch with a different color. Fit 4 pastry bags with couplers, and fill each pastry bag with its own batch of buttercream. For one of the pastry bags with the petal tip.
- Squeeze a tiny amount of buttercream onto the center of the flower nail. Pat a parchment paper square on top of the buttercream, pressing down and rubbing it across the surface of the nail to “glue” it onto the nail. Arrange the parchment paper so that it is relatively centered on the nail. Brilliant! You’re ready to pipe flowers.
- Start by piping a small blob of buttercream in the center of the parchment paper. It doesn’t have to be a specific shape or even pretty — a small blob will do. Next, hold the piping bag at a 45-degree angle with the wide end of the piping tip at the bottom of the nail; squeeze the piping bag, turning the nail at the same time, so that it pipes a half circle around the blob of buttercream frosting. Pipe another half circle, starting from the halfway point of the initial half circle. Repeat until you’ve got a circle that forms the base of the rose. Repeat this process for the outer petals of the rose — as your flower grows, you’ll notice that you’ll need to pipe longer and longer half circles. Continue making the layers of petals until you’ve reached the desired size for your rose — smaller ones will look more like conventional roses, whereas larger ones will look almost like peonies, succulents, or even cabbage flowers.
- Once satisfied with your flower, carefully remove the parchment paper from the flower nail with the flower attached and place it on the half sheet pan. Repeat the process for however many roses you wish to make, moving the petal tip to different piping bags for different colored flowers. Go crazy and make as many flowers as you want, but be sure to reserve some frosting for finishing the cake and gluing the flowers on to the actual cake itself. Once done, transfer the sheet pan to the freezer to freeze for at least 1 hour, or until the flowers are cold and firm to the touch.
How to Assemble a Buttercream Flower Power Cake
- Once the flowers are frozen and firm to the touch, it’s time to decorate the cake. Remove the sheet pan from the freezer. Use the flower lifter scissors to carefully lift up each flower from its parchment paper square, discarding the paper and transferring the flower to the top of the cake. To transfer them to the sides of the cake, pipe a blob of reserved frosting onto the sides of the cake to use as glue to hold the flower in place.
- Use a pastry bag with an open star piping tip to pipe quick stars in between the flowers, eliminating any “naked” space on the top of the cake. Garnish with sprinkles.
How to Save Buttercream Flowers for Future Cakes
- If you find yourself with leftover flowers, you can save your hard work for future cakes! Leave any leftover flowers on their individual parchment paper squares on the sheet pan and transfer to the freezer to chill overnight. Once the flowers have frozen solid, carefully transfer the flowers on their parchment squares into a Ziploc bag and seal tightly. The flowers will keep in the freezer for several months. When ready to use, you can use them straight from the freezer: simply unpeel each flower from its square and arrange on your cake as desired.
Hello, how firm do the meringue roses freeze?
Firm enough that you can place them on cakes and gently press down without them losing their shape!