About These Small Batch Pecan Sticky Buns
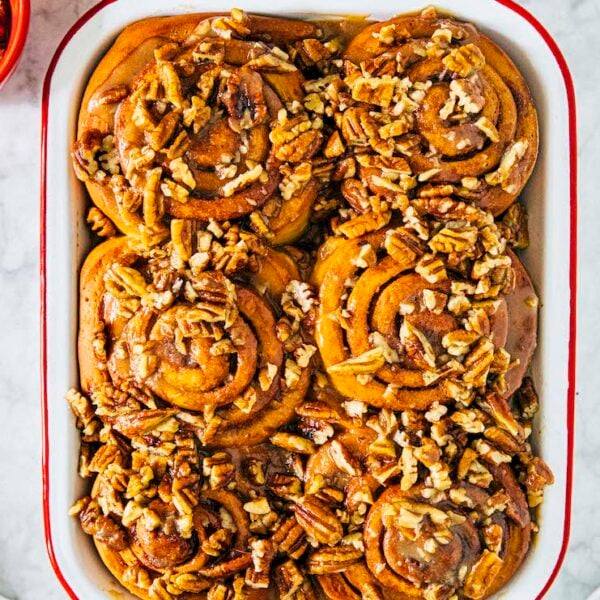
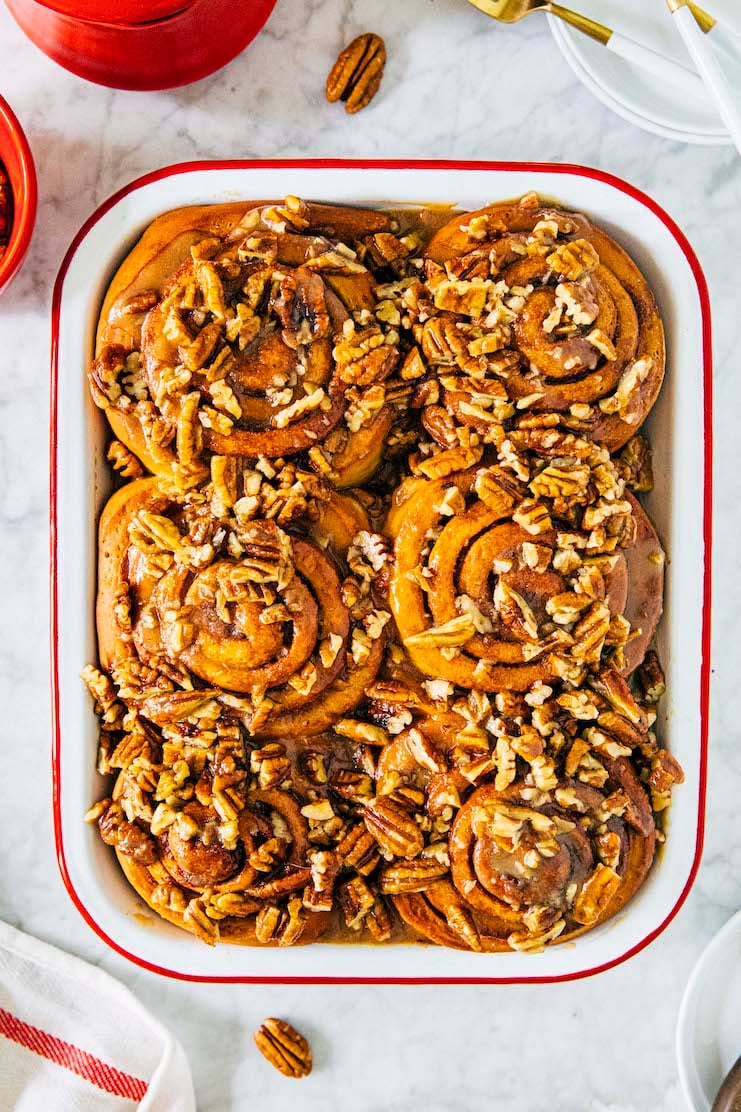
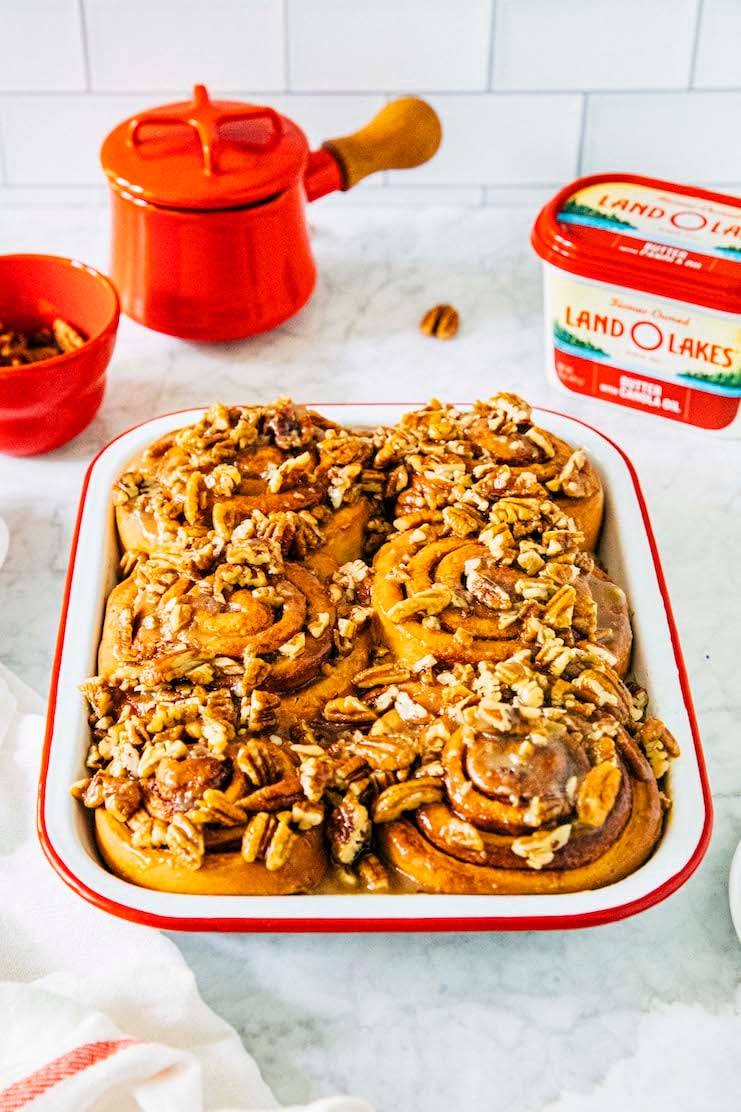
These small batch pecan sticky buns are a modern update to a traditional Pennsylvania Dutch recipe! The buns are similar to traditional cinnamon rolls, but topped with a sticky caramel and pecan-studded topping instead of traditional frosting.
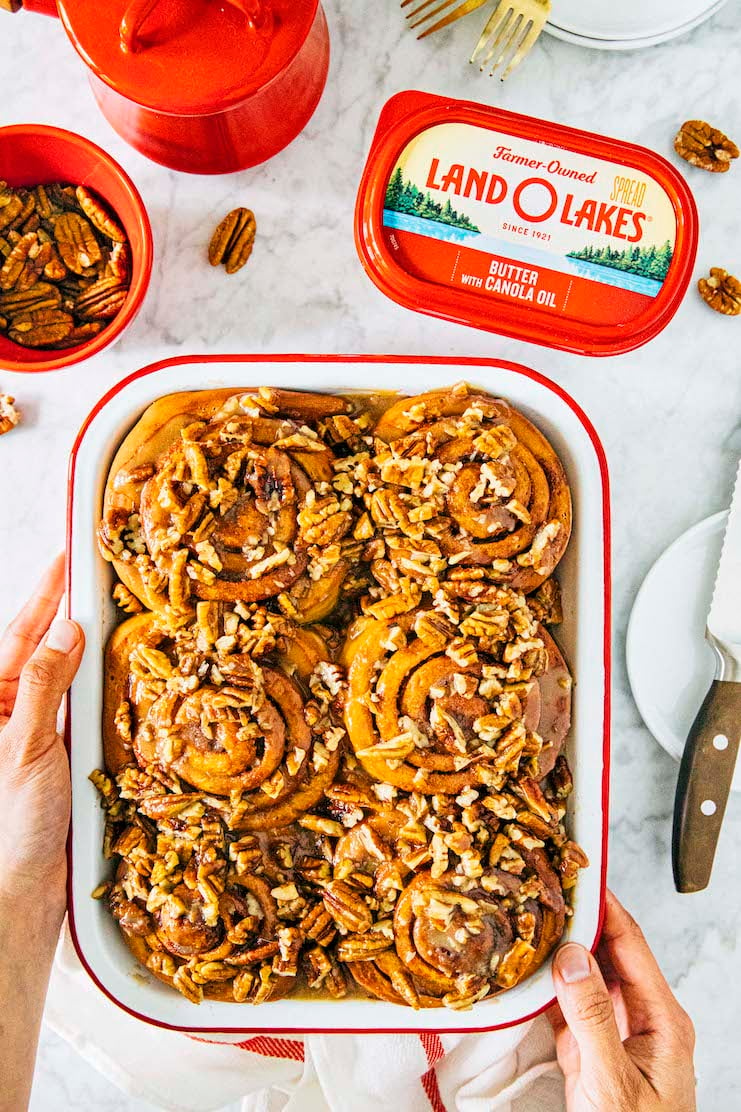
The best part? This small batch recipe makes only 6 pecan sticky buns, the perfect amount for a small household. For flavor and convenience, I made the buns with butter with canola oil from my sponsor, Land O’Lakes. Learn more in the blog post, and thank you for supporting the sponsors that keep Hummingbird High up and running!
For more delicious homemade breakfast pastry recipes, check out Hummingbird High’s Breakfast Recipe archive! Popular recipes include this 5 Minute Cream Cheese Frosting For Cinnamon Rolls and these Mini Banana Chocolate Chip Muffins.
Why You Should Make The Recipe
This pecan sticky bun is a modern take on a classic recipe.
When researching recipes for pecan sticky buns, I noticed that many of them still relied on old-fashioned methods. A traditional pecan sticky bun recipe typically instructs you to make the sticky pecan topping first, pour it into a baking pan, and layer the buns on top. After baking, the entire pan is flipped over so that the sticky pecan topping falls on top of the buns.
I’m not going to lie—I tried this method a few times and it was really, really messy. Sometimes, a bun or two would get stuck in the pan. Other times, the buns would come crashing out way too quickly, splashing hot caramel everywhere. Baking the sticky topping also resulted in a very, very sweet topping. The topping was almost too intense for somebody with a big sweet tooth like myself.
So with all this in mind, I decided to modernize the recipe. How? I made it more convenient and suited for our current tastes. No more baking the sticky topping with the rolls and inverting the pan! Instead, my recipe instructs you to simply pour the topping over—it’s far less messy. Skipping the baking process for the topping also results in a less-intense-but-still-equally-delicious flavor and texture that’s not too sweet or sticky.
Ingredients and Substitutions
Now that I’ve convinced you to make this small batch pecan sticky buns recipe, here’s everything you need:
Shopping List
- all-purpose flour
- granulated sugar
- instant yeast
- baking soda
- kosher salt
- buttermilk
- large eggs
- Land O Lakes® Butter with Canola Oil
- ground cinnamon
- pecans
- brown sugar
- whole milk
- maple syrup
And let’s talk about any substitutions you can make:
Common Ingredient Sources and Substitutions
- All-Purpose Flour. You can use a 1-1 gluten free all purpose flour replacer to make the recipe gluten free. I like Bob’s Red Mill Gluten Free 1 to 1 Baking Flour or King Arthur Flour Gluten Free All Purpose Flour.
- Instant Yeast. You can replace the instant yeast in the recipe with the same amount of active dry yeast—just note that you’ll need to activate it in a different way!
Instant yeast allows you to mix it into the dry ingredients; active dry yeast needs to be activated first on its own with a small amount of liquid from the recipe. They are also activated at different temperatures. - Kosher Salt. Kosher salt is the best salt for baking recipes—learn more in my post! But if you don’t have any, you can use table salt. Just use half the amount listed in the recipe.
- Buttermilk. No buttermilk? No problem. Check out my post on how to make buttermilk with other common fridge and pantry ingredients like milk, yogurt, lemons, vinegar, and more!
- Land O Lakes® Butter with Canola Oil. Land O Lakes® Butter with Canola Oil comes in a tub and is made with only 3 ingredients: sweet cream, canola oil, and salt. The canola oil keeps it spreadable straight from the refrigerator! That being said, note that canola oil is neutral in flavor. As a result, Land O Lakes® Butter with Canola Oil tastes very similar to butter from the sticks you know and love. But with this product around, there’s no need to bring the butter to room temperature for spreading on toast and breakfast pastries like these pecan sticky buns!
How To Make The Recipe
Here are the basic steps to make pecan sticky buns from scratch:
First, make the dough:
- First, prep the ingredients for the dough. (Prep Time: 10 minutes)
For this recipe, it’s important that all its ingredients are at the temperature listed in the recipe. Why? First of all, remember that yeast is a living thing. If you activate the yeast at a temperature that’s too warm, you might accidentally kill the yeast and end up with a dough that doesn’t rise. However, on the flip side, the yeast won’t activate if other ingredients—like the buttermilk, egg, and Land O Lakes® Butter with Canola Oil—are too cold. So, to really set yourself up for success, take the extra 5 minutes to make sure all the ingredients are measured out and are at the right temperatures! - Then, make the dough. (Work Time: 15 minutes)
After you’ve prepped the ingredients, making the dough itself is a breeze. First, whisk together the dry ingredients in a stand mixer. Pour in the wet ingredients and let the stand mixer knead it into a beautiful, elastic dough for 10 minutes. That’s it! - Let the dough rise. (Rise Time: Overnight)
Once the dough is ready, cover the bowl with plastic wrap and stick it in the refrigerator. The fridge’s cooler temperature enables the dough to rise at a slower pace than it otherwise would at room temperature. The next morning, you end up with a perfectly risen dough that’s perfect for shaping and baking!
Then, shape, bake, and glaze the buns:
- First, prep your ingredients for the filling. (Prep Time: <5 minutes)
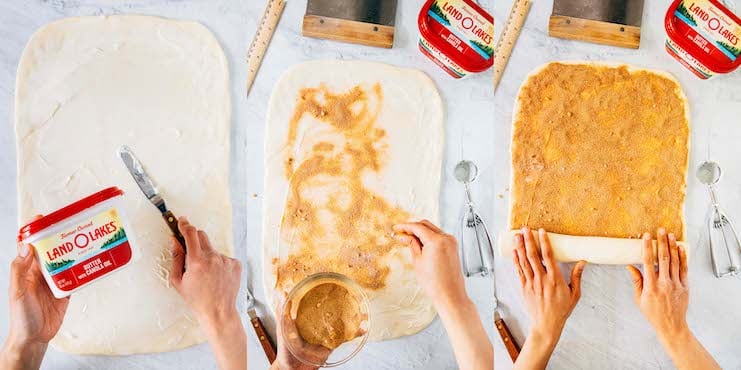
Thankfully, prepping the ingredients for the filling is much easier this time around. Simply set out your tub of Land O Lakes® Butter with Canola Oil, and whisk together sugar and ground cinnamon for the filling. - Then, roll out the dough. (Work Time: 5 minutes)
For beginner bakers, rolling out the dough is the most time-consuming and challenging part of this small batch pecan sticky bun recipe. Use a strong, sturdy rolling pin to roll the dough out into a large rectangle. You may need to flour your countertop and rolling pin every so often to prevent the dough from sticking. A bench scraper also works wonders in helping shape the dough into a rectangle. - Next, top the dough with butter and cinnamon sugar. (Work Time: 5 minutes)
Once the dough is rolled out, cover it completely with Land O Lakes® Butter with Canola Oil and sprinkle it with the cinnamon sugar. Make sure you cover the entire rectangle with butter and cinnamon sugar—doing so ensures a perfectly filled pecan sticky bun. - Then, shape the dough into buns. (Work Time: 5 minutes)
After you’ve covered the dough with butter and cinnamon sugar, roll it into a short, squat log of dough. At this point, it should look like a burrito! Use a sharp, serrated knife to slice the log into 6 even pieces, each about 2 inches wide. - Finally, let the buns rise. (Rise Time: 1 to 2 hours)
Place the pieces, cut side up, on a greased baking pan or sheet pan. Cover with plastic wrap and let rise in a warm, draft-free spot for 1 to 2 hours. After this rise, the buns will look puffy with edges that have rounded significantly.
Next, bake the buns and make the topping:
- Bake the buns. (Bake Time: 30 minutes)
The buns don’t need a lot of time in the oven. Bake the buns for 30 minutes, or until the edges are golden brown. A skewer inserted into the center of a roll should come out clean. - Next, toast the pecans. (Work Time: 5 to 10 minutes)
When the buns are done, keep the oven on to toast the pecans. Spread the pecans out on an aluminum foil-lined sheet pan and bake for 5 to 10 minutes until fragrant and lightly toasted. - Then, make the sticky pecan topping. (Work Time: 5 minutes)
If you can handle it, I suggest multitasking! As you toast the pecans, make the sticky topping. Combine the brown sugar, milk, Land O Lakes® Butter, maple syrup, and salt in a medium, heavy-bottomed sauce pot over medium-high heat. Bring to a boil and boil for 3 minutes, using a heatproof rubber spatula to stir constantly to prevent any burning or charring. Once done, remove from heat and immediately stir in the toasted pecans. - Finally, assemble the buns and serve. (Work Time: <5 minutes)
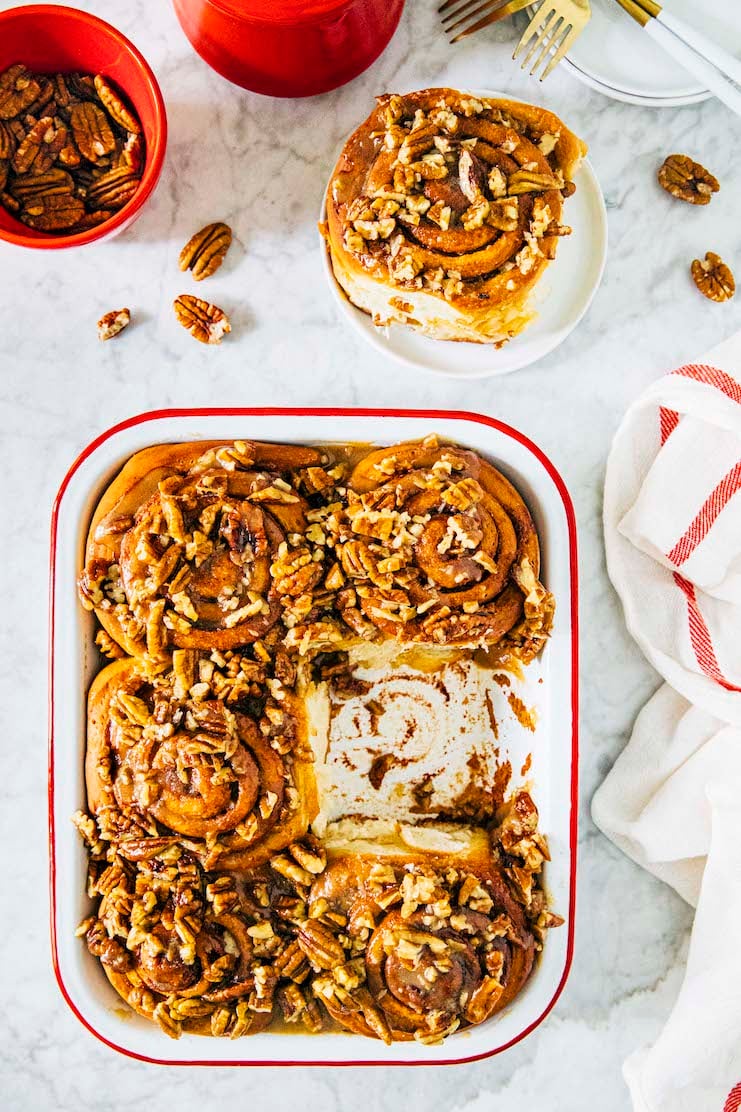
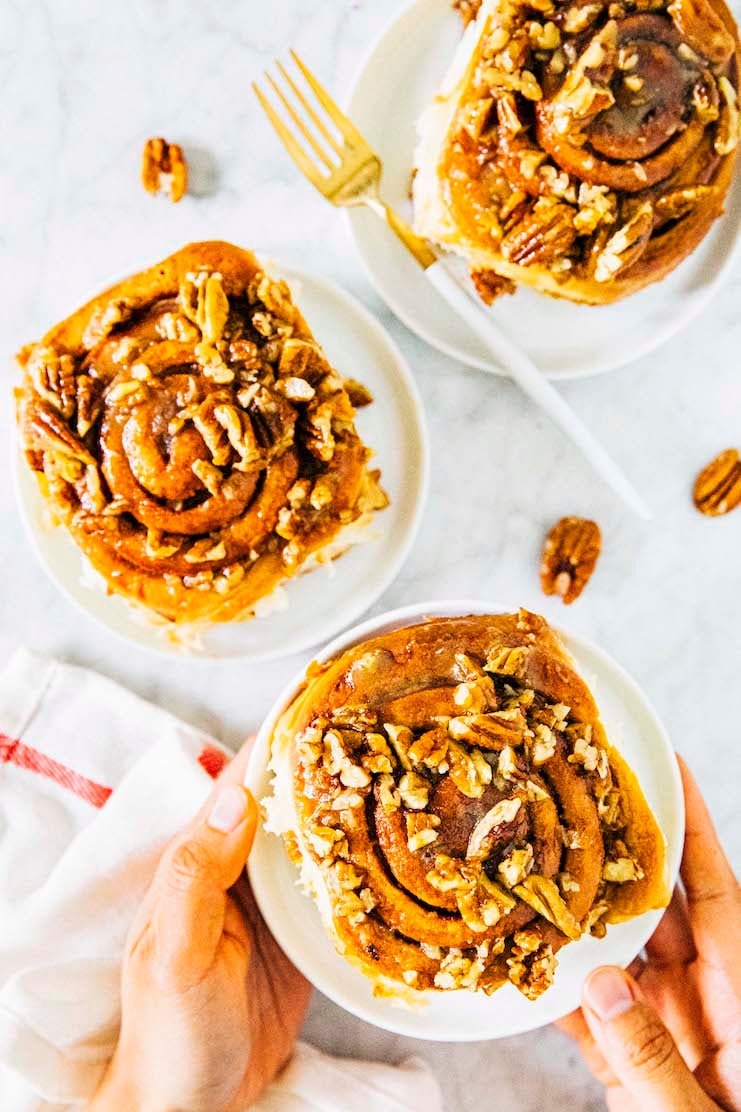
Pour the sticky pecan topping over the buns and serve immediately. At first, the pecan topping will be runny, but will firm up into a sugar glaze as it cools. Enjoy!
How To Make These Small Batch Pecan Sticky Buns All in One Day
Okay, I get it. You don’t have time to wait for the dough to rise overnight. You want the sticky buns right now. I see you and respect you.
After making the dough and covering its bowl in plastic wrap, don’t refrigerate the dough. Instead, place the bowl in a warm, draft-free spot and let the dough rise, undisturbed, until doubled in size. On a 65° to 70° degree day, it should take between 1 to 1 ½ hours. Be sure to check out my baker’s tips below on how to “speed up” the proofing, especially on a cold day! Once the dough has doubled, follow the recipe’s instructions to punch it down and shape it into buns.
Recipe Troubleshooting and FAQ
Help! My sticky buns aren’t as wide and/or swirled as yours. What did I do wrong?
In the recipe, I instruct you to roll out the dough and shape it into a really long rectangle. Its short side is 12 inches wide, while its long side is 20 inches long. The 20 inches seems like it’s way too long, but I promise that it’s the secret to a photogenic, perfectly swirled roll. If you skimped on the length, your pecan sticky buns won’t look as wide and/or swirled as mine.
Help! My sticky buns didn’t rise and/or don’t look as tall and fluffy as yours. What did I do wrong?
Uh oh. First things first: did you pay attention to the temperature of the ingredients listed in the recipe? I mentioned earlier that, for this recipe, it’s super important to prep your ingredients to the temperature listed in the recipe. If the buttermilk is warmed too much, it will kill the yeast—your buns won’t rise and/or be as tall and fluffy as mine. If the buttermilk, eggs, and butter are too cold, it won’t activate the yeast—your buns won’t rise and/or be as tall and fluffy as mine, either.
However, if you’re convinced that you did prep the ingredients accordingly, I believe you. It may be a matter of technique. In the recipe, I instruct you to roll out the dough, fill it with Land O Lakes® Butter with Canola Oil and cinnamon sugar, then roll it up again to form “a dough burrito”. You then slice this “dough burrito” crosswise to form 6 rolls. Each slice ends up being about 2 inches wide. These slices look WAY too big, but again, I promise this is the secret to super tall and fluffy buns. If your slices were smaller than 2 inches, you end up with shorter, squatter buns.
Help! The centers of my sticky buns rose way more than the rest of the bun. It looks like they’ve spiraled up and outwards. What did I do wrong?
In the equipment section above, I mention the importance of using a pan big enough to allow the buns to double in size. If your pan was too small, the buns will end up competing for space with their sides squishing tightly against each other. This can also cause their centers to spiral up and outwards.
Best Recipe Tips
Tips for Making This Recipe Fit Into Your Schedule
- I’ve already talked about how to make these small batch pecan sticky buns in one day. But if you don’t mind planning ahead and want to serve them for breakfast or brunch, I recommend following the recipe’s instructions and making them the night before you plan on serving them! I usually make the dough the night before I’m planning on serving them. The next morning, the dough is perfectly proofed and ready to be rolled and shaped into buns for serving.
Ingredient Tip
- Just another friendly reminder to make sure to pay attention to the ingredients and the temperatures they’re listed at in the recipe. Yeast is a living thing and you can easily kill it by mixing it in a liquid that’s too hot. You want the temperature to be similar to that of a warm bath and no more. Be sure to use an egg that’s at room temperature rather than straight from the fridge. An egg straight from the fridge will be too cold and lower the temperature of the overall mixture, risking dropping it to a point where the yeast won’t activate properly.
Technique Tips
- You may have noticed that some cinnamon roll recipes instruct you to cut the buns with a piece of unflavored dental floss. This technique prevents you from pushing down too hard on the soft dough, potentially leaking out its filling. However, I don’t ask you to do that for this pecan sticky bun recipe. Why? Turns out you don’t really need to do it. With the right technique, you can slice your buns evenly and cleanly. First, use a sharp, serrated knife—you want to use the knife you use when you cut crusty bread or bagels. Second, instead of pressing down on the dough to slice it, saw the serrated knife in a back and forth motion down the dough. This sawing motion helps prevent the dough from squishing and leaking filling!
- Dough rises fastest and best on warm, humid days. Although you can get the same effect on cold, dry days, it can take two to three times as long to proof dough. This is why professional bakeries have dedicated drawers to proof dough. The proofing drawer mimics the environmental conditions of a warm, humid day. And guess what? You can do that at home too, with the oven you already have. First, if your oven has a pilot light, turn it on—doing so increases the temperature inside the oven by about five degrees. Next, bring 2 to 4 cups of water to a boil and pour it into a heatproof glass or ceramic bowl. Place the bowl of water in the oven, then place the dough you’re trying to proof next to it. The warmth from the light and moisture from the steaming, hot water will create a warm, humid environment in the oven to proof the dough faster.
Video Tutorial
Use the video player below to watch my Instagram Story tutorial on how to make this small batch pecan sticky buns recipe! The arrows to the left and right of the frame allow you to skip through the different recipe steps. You can also hit the “pause” or “enlarge” buttons on the upper right hand side of the frame to pause or enlarge the frames accordingly.
Alternatively, head to my Instagram profile to watch these Stories on mobile! The circles underneath my bio indicate saved Instagram Story highlights depicting various recipes. Clicking on one of the circles will play the videos you see above. You may need to scroll right to find this small batch pecan sticky buns recipe.
Get the Recipe: Small Batch Pecan Sticky Buns Recipe
Ingredients
For the Dough:
- 3 ½ cups (15.75 ounces or 447 grams) all-purpose flour, plus more for dusting
- 3 Tablespoons granulated sugar
- 1 ½ teaspoons instant yeast
- ½ teaspoon baking soda
- 1 teaspoon kosher salt
- 1 cup (8 ounces or 227 grams) buttermilk, warmed to between 120° and 130°F
- 1 large egg, at room temperature
- 4 Tablespoons (2 ounces or 57 grams) Land O Lakes® Butter with Canola Oil, melted and cooled to between 120° and 130°F
For the Filling:
- 3 Tablespoons Land O Lakes® Butter with Canola Oil, plus more for pan
- ½ cup (2.35 ounces or 67 grams) granulated sugar
- 2 teaspoons ground cinnamon
For the Pecan Topping:
- 1 cup (4.5 ounces or 128 grams) pecans, chopped into ½- to 1-inch pieces
- ⅓ cup tightly packed (2.5 ounces or 71 grams) dark or light brown sugar
- 6 Tablespoons (3 ounces or 85 grams) whole milk
- 4 Tablespoons (2 ounces or 57 grams) Land O Lakes® Butter
- 3 Tablespoons dark or very dark maple syrup
- pinch of kosher salt
Instructions
Day 1: Make the Dough
- In the bowl of a stand mixer fitted with the dough hook, combine the flour, sugar, yeast, baking soda, and salt. Knead on low to combine, about 30 seconds. Press a tall glass into the center of the dry ingredients to make a well.
- Pour the buttermilk, egg, and Land O Lakes® Butter with Canola Oil into the dry ingredients and mix with a rubber spatula until a rough, shaggy dough forms. Use the mixer to knead on medium-low for 10 minutes, or until smooth and elastic, using a rubber spatula to scrape down the bottom and sides of the bowl as necessary.
- Tip the dough out onto a lightly floured counter. Dust your hands with flour and knead the dough once or twice into a rough ball. Scrape down the bottom and sides of the bowl to remove any excess dough. Spray the bowl with cooking spray and place the dough back in the bowl. Cover with plastic wrap. Refrigerate overnight.
Day 2: Shape, Bake, and Glaze the Buns
- Uncover the dough and discard the plastic wrap. Tip it onto a lightly floured counter. Use Land O Lakes® Butter with Canola Oil to lightly grease a quarter sheet pan.
- Make the filling. In a small bowl, whisk together the sugar and cinnamon.
- Shape the buns. Use a rolling pin to roll the dough into a large rectangle about 12 inches wide and 20 inches long. Press a bench scraper against the sides of the dough to create straight edges. Use an offset spatula to spread Land O Lakes® Butter with Canola Oil evenly across the dough. Sprinkle the sugar-cinnamon mixture evenly on top.
- Starting from one of the short ends, roll the dough into an even log. Use a serrated knife to cut the log crosswise into 6 rolls, each about 2 inches wide. Place the rolls cut-side up and at least 3 inches apart on the prepared pan. Cover with plastic wrap and let sit in a warm spot for 1 to 2 hours, or until doubled in size.
- Prep your oven. About 30 minutes into the second rise, position a rack in the center of the oven and preheat to 350°F.
- Bake the buns. Bake the buns for 30 to 35 minutes, or until the edges are golden brown and a skewer inserted into the center of a roll comes out clean. Keep the oven on, but place the buns on a wire rack to cool slightly as you make the sticky pecan topping.
- Toast the nuts. Line a quarter sheet pan with parchment paper. Spread the pecans in a single layer across the pan. Bake for 5 to 10 minutes, or until fragrant and toasted brown. Use a heatproof rubber spatula to toss the nuts every 2 to 3 minutes to ensure even toasting. Once toasted, scrape the nuts onto a plate to prevent them from cooking further.
- Make the topping. In a medium, heavy-bottomed saucepan, combine the brown sugar, milk, Land O Lakes® Butter, maple syrup, and salt. Bring to a boil over medium-high heat and cook, stirring continuously with a rubber spatula or wooden spoon, for 3 minutes. Remove from the heat, immediately add the pecans and stir until combined.
- Pour over the topping over the buns and use an offset spatula to help spread the nuts.
- Serve and store. Serve warm, or at room temperature. The pecan sticky buns can be stored at room temperature, under a cake dome or a large bowl turned upside down, for up to 1 day. After that, transfer the buns to an airtight container and refrigerate for up to 2 days more.
get new recipes via email:

buy the book
Weeknight Baking:
Recipes to Fit your Schedule
Over the past several years of running Hummingbird High, I kept a crucial aspect of my life hidden from my readers: I had a full-time, extremely demanding job in the tech world. In my debut cookbook, Weeknight Baking, I finally reveal the secrets to baking delicious desserts on a tight schedule.
1). Can these rise at room temp instead of overnight in fridge – if so how long?
2). Nutritional values??
Thanks
Hi Karen,
Yes! You can make these all in one day and rise at room temp instead of overnight. After making the dough, cover the bowl with the dough and let rise in a warm, draft-free spot until doubled, 1 to 2 hours. Then, follow the recipe instructions to punch down the dough and assemble it into rolls. Let rise again covered in a warm, draft-free spot for 1 hour or until puffy and the edges of the rolls are rounded (the rolls will not necessarily double).
As for nutritional values, sorry! I don’t include them on my baking blog because, well, it gets depressing fast lol. These rolls aren’t exactly diet friendly or nutritional in any way…
Can I use traditional butter without the canola oil or is the butter/oil mix a deal breaker here?
Yes! You can use all butter—they’ll come out softer and less chewy though.
I made these same-day using your tips for proofing in the oven and they turned out beautifully! The instruction to roll from the short end created so many layers, which made them feel more like something from a bakery! The only thing I’d do differently next time (and there will absolutely be a next time) is to double the topping.