
When I set out to make this chocolate chestnut yule log as a centerpiece for our holiday dessert table this year, I fell into a rabbit hole researching the origins of yule logs and bûche de Noël cakes. What I believed to be an innocent dessert actually originated in Germanic Paganism! The yule log was special log selected to burn and represent the battle between the epic good and evil, with the fire representing the light and the power to turn evil into ashes. Some cultures even believed that the special log had the power to ward off all sorts of bad stuff, like toothaches and other physical ailments to weather patterns like lightning and hail.
Huh.
Somewhere along the way, the yule log turned from a magical ward against evil into a tasty and delicious cake served around Christmastime. Although they’re mostly a European tradition and not as popular in the United States, I’ve been seeing them more and more around these parts. I’m pretty sure that their rising popularity around these parts can be attributed to The Great British Bake Off airing on Netflix; I mean, my own interest in making one stemmed after watching The Great British Bake Off holiday special on Netflix where contestants from previous seasons fiddled with making a yule log.
And I’ll be honest — my first attempt at making one was a disaster. I’d ignored all the advice on the show about using a Genoise cake sponge base and opted to use the yellow cake recipe in my upcoming cookbook instead. But there’s a reason why you need to use a Genoise sponge; because they’re lighter and airier, they’re much easier to shape and roll into a log than the dense and heavy buttermilk cake in #weeknightbakingbook, which cracked and crumbled upon rolling. Oops.
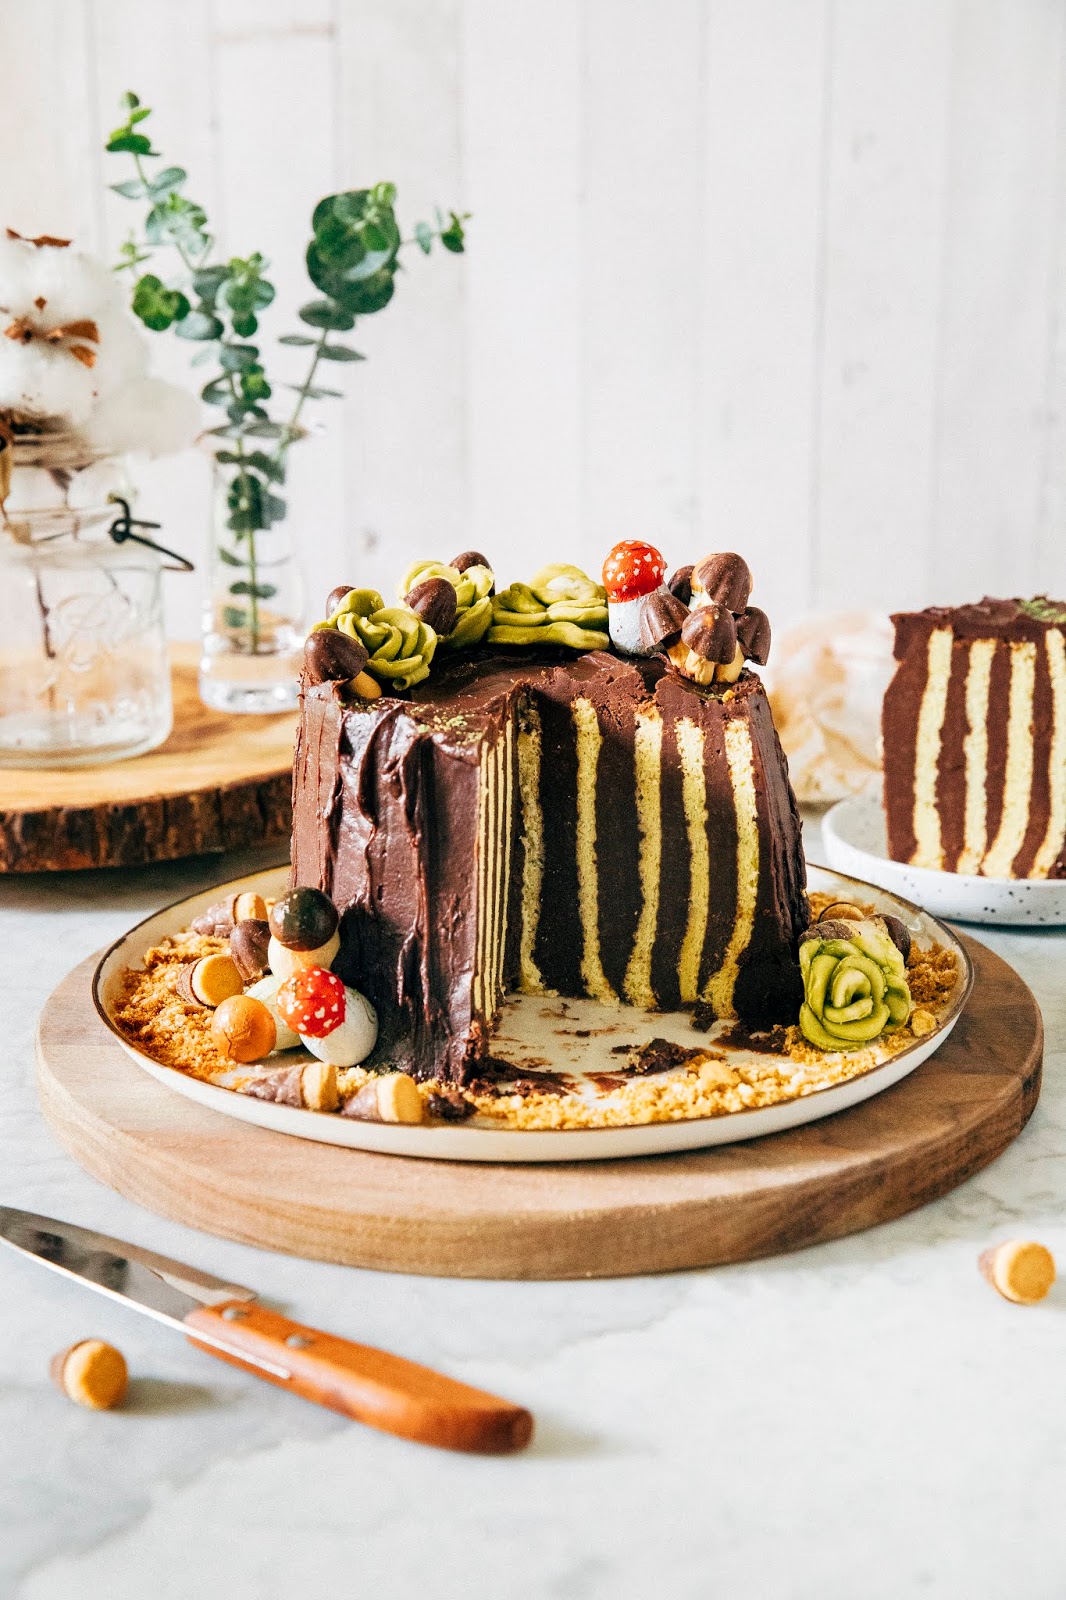
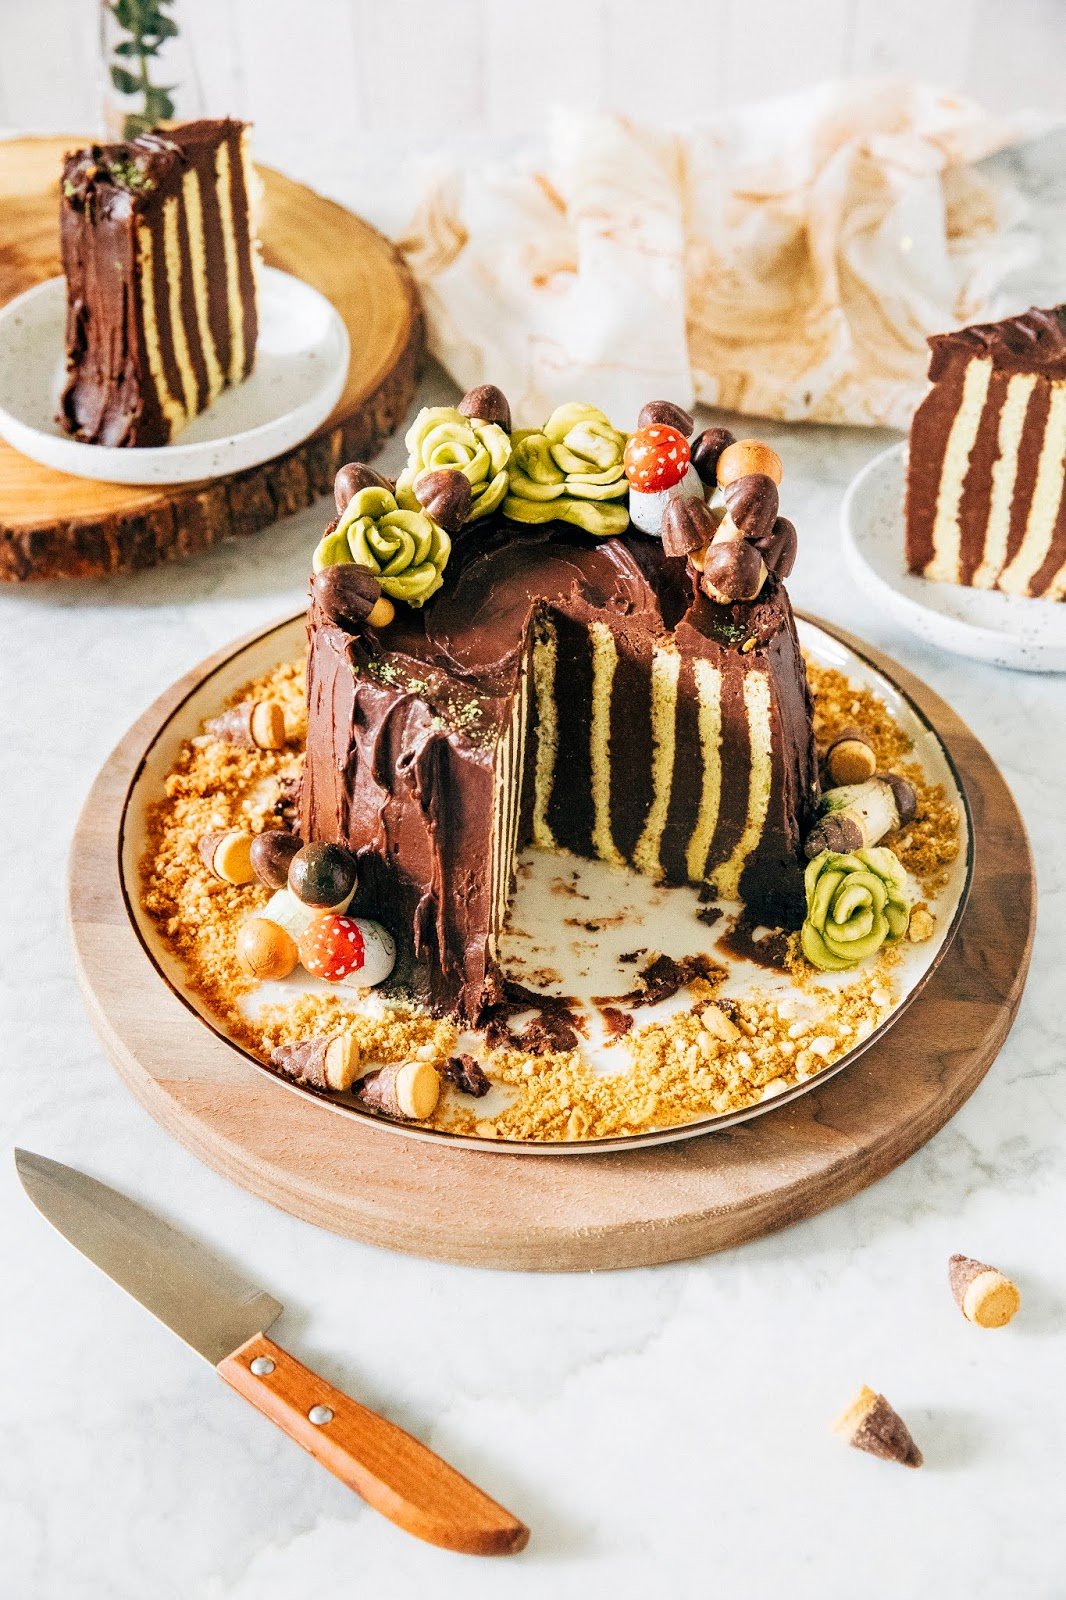
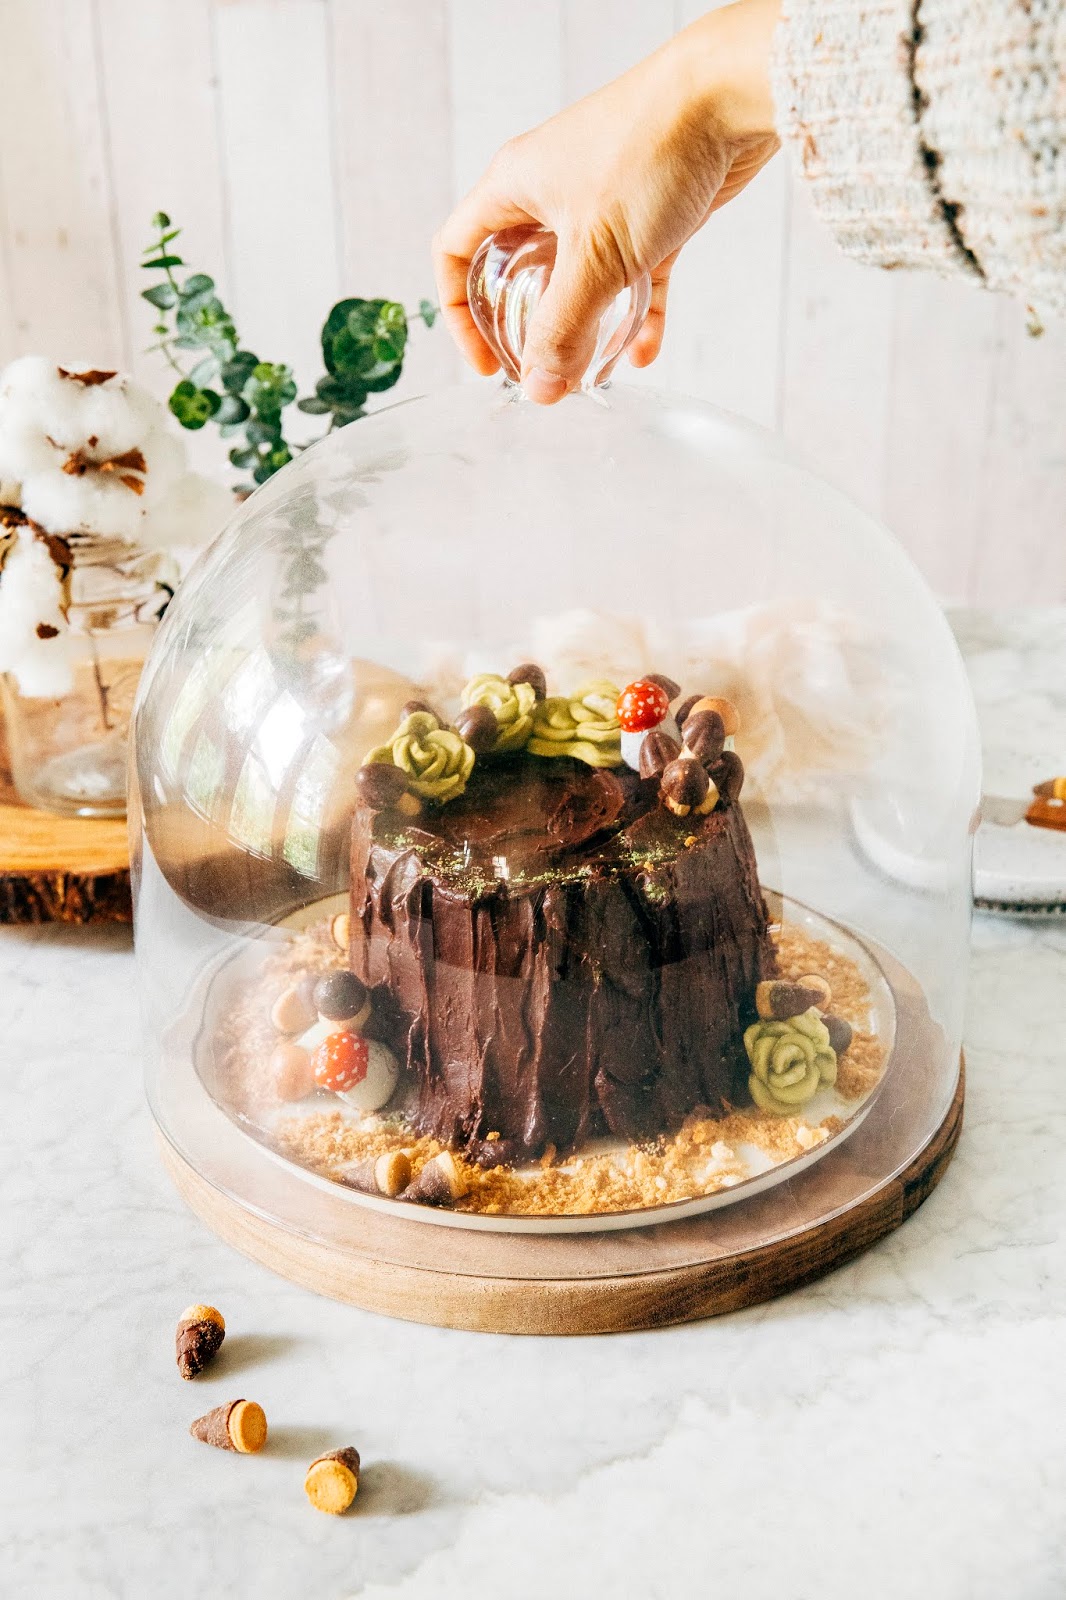
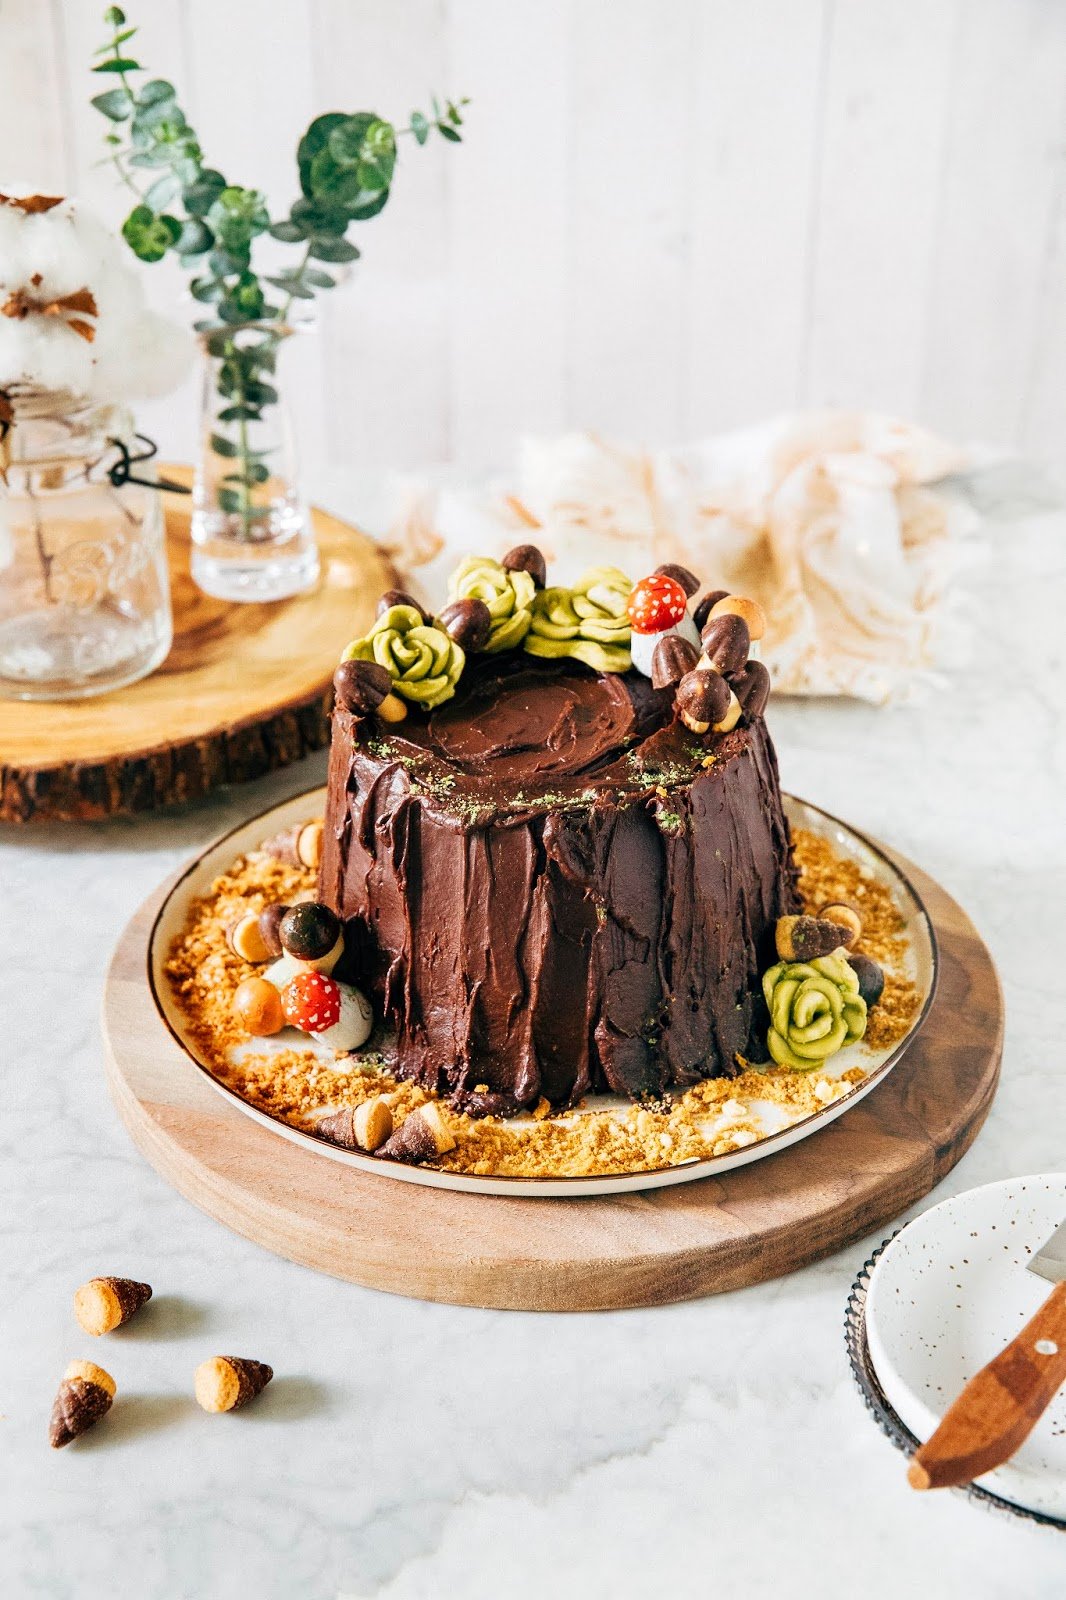
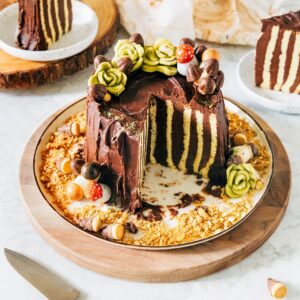
And keeping true to the spirit of The Great British Bake Off, I opted to make it a true showstopper by turning it into a vertical layer cake as opposed to the long, horizontal cakes that tend to be the more traditional form of yule log cakes. I wish I could take credit for the idea, but all of that goes to my friend Izy, who’d posted her unforgettable version last year — the only thing that I really did differently was make all my decorations edible and stick it under a cake cover to mimic a succulent dome. Be sure to check out the baker’s notes below for more information on Genoise sponges and where to source all the edible chocolate acorn and mushroom cookies I used for decoration!
-
- This recipe is made up of a variety of smaller ones from different sources: the cake recipe comes from my friend Erin’s amazing cookbook, The Fearless Baker (it’s a great stocking stuffer for beginner bakers, not only filled with solid recipes but also a ton of awesome information about baking); the chocolate chestnut filling from King Arthur Flour; and the chocolate ganache recipe from one of my favorite vintage Hummingbird High cake recipes. Because it has so many components and can be pretty time consuming, I recommend splitting up the work — both the chocolate chestnut filling and the ganache can be made up to 1 week in advance and stored in an airtight container in the refrigerator; simply heat in a double boiler and rewhip before using. The cakes can be made up to a day before, stored in their rolled shapes in between parchment paper. Simply cover and wrap the entire thing in plastic wrap.
-
- Roulades are an intimidating cake to make; I mentioned earlier that even the accomplished bakers on The Great British Bake Off struggle with unmolding their cakes and making sure they don’t crack. The trick for a good roulade is to use a solid recipe — a solid recipe will make a sponge that is lighter and bakes faster than traditional cake recipes. Successful roulade recipes also traditionally don’t use any fat like butter or oil in them, and are traditionally leavened with just egg whites. As a result, it’s really important to fold your mixture carefully to prevent it from deflating too much before baking. For the best and most consistent results, it’s also worth it to have both a stand mixer and a handheld electric mixer on hand — one for whipping the egg yolks and dry ingredients, the other for whipping the leavening meringue. I know that’s extra, so in a pinch, you can just use a stand mixer and wash and dry the bowl and attachments thoroughly between each batter.
-
- Assembling the vertical roll cake seems like it’s tricky, but is actually easier than assembling a vertical layer cake. If you need visual aids with my instructions, I recommend checking out my friend Tessa’s guide on Brit.co — she has super helpful photos for everything in the process. And unlike a layer cake where it helps to have the exact amount of frosting between each layer, you can be a little bit more lax when topping the cakes with the chestnut filling. The unevenness makes for a more rustic and realistic tree stump!
- I really wanted all the decorations on the cake to be edible, so I used the following ingredients to build the scene: acorn and mushroom cookies from Meiji (you can get them from Amazon, but they’re usually available in the candy section of any major super market near the Hello Panda cookies, lol), crushed Golden Oreos and culinary matcha powder to represent soil and moss, and these chocolate truffle mushrooms I found at the gourmet Italian store near my gym. For the edible succulents, I rolled out a knob of dyed green marzipan and used a combination of these rose cutters and these succulent ones to make the plants — the trick is to keep the marzipan fairly thick (about 1/4-inch thickness) to emulate the plush leaves of a succulent plant. But really, you can also go the minimalist route and just garnish the whole thing in confectioners’ sugar to mimic a dusting of snow. Use your imagination and whatever you have on hand!
Get the Recipe: Chocolate Chestnut Yule Log
Ingredients
For the Vanilla Sponge Cake
- Makes two 9 x 13-inch sheet cakes
- 1/4 cup (1 ounce) cake flour
- 2 tablespoons all-purpose flour
- 1/4 teaspoon kosher salt
- 2 large eggs, at room temperature
- 3 large egg yolks, at room temperature
- 1/2 teaspoon pure vanilla extract
- 3/4 cup (5.25 ounces) granulated sugar, divided into two 6 tablespoon (2.60 ounces) portions
- 3 large egg whites, at room temperature
- 1/4 teaspoon cream of tartar
- confectioner’s sugar
For the Chocolate Chestnut Filling
- Makes enough for one cake
- 8 ounces dark (at least 65% cocoa) chocolate, roughly chopped
- 1 can (15 1/2 ounces) unsweetened chestnut purée
- 1/2 cup (4 ounces) unsalted butter, at room temperature
- 1/2 cup (3.5 ounces) granulated sugar
- 1/2 teaspoon kosher salt
For the Chocolate Ganache Frosting
- Makes enough for one cake
- 10 ounces dark (at least 65% cocoa) chocolate, roughly chopped
- 2/3 cup (2.65 ounces) confectioners' sugar
- 3/4 cup plus 1 tablespoon (6.5 ounces) heavy cream
- 2 large egg yolks
- 3 tablespoons (1.5 ounces) unsalted butter, at room temperature and cut into 1-inch cubes
Assembly
- green food coloring
- marzipan
- acorn cookies
- cookie crumbs
- matcha powder
- mushroom chocolates
- mushroom cookies
Equipment
- Special Equipment: a handheld electric mixer
- flower cookie cutters (see baker’s notes)
Instructions
For the Vanilla Sponge Cake
- Center a rack in the oven and preheat to 400 (F). Prepare two 9 x 13-inch sheet pans by spraying with cooking spray and lining with parchment paper, leaving an overhang on the two longer ends. Spray the parchment paper with cooking spray as well and set aside.
- In a small bowl, combine 1/4 cup cake flour, 2 tablespoons all-purpose flour, and 1/4 teaspoon kosher salt. Whisk to combine and set aside.
- Combine 2 large eggs, 3 large egg yolks, and 1/2 teaspoon pure vanilla extract in a large bowl. Use a handheld electric mixer to beat on medium speed until slightly pale, 1 to 2 minutes. Gradually add 6 tablespoons granulated sugar, then turn the mixer speed up to medium-high and whip until the mixture is pale, thick, and quadrupled in volume, around 5 minutes. Turn the mixer off and sprinkle about half the flour mixture over the egg yolk mixture and mix on low speed just until incorporated; with the mixer still on low speed, add the remaining flour, mixing just until incorporated.
- In the bowl of a freestanding electric mixer fitted with a whisk attachment, combine 3 large egg whites and 1/4 teaspoon cream of tartar. With the mixer on low speed, whisk the egg whites until slightly foamy, 1 to 2 minutes. Turn the mixer speed up to medium high and whip the whites to soft peaks, around 4 to 5 minutes. With the mixer running, gradually add the remaining 6 tablespoons granulated sugar in a slow, steady stream, then continue whipping until the mixture reaches medium peaks, 1 to 2 minutes more.
- Once the egg whites are stiff, scoop about 1/4 of the mixture to the egg yolk batter, using a rubber spatula to fold them into the batter. Add the remaining whites in 2 or 3 more additions, gently folding the egg whites into the batter until incorporated — the egg whites will lighten the batter considerably. Try not to overmix since the egg whites are the only thing leavening the cake, but you do need the batter to be fairly homogenous — simply fold until the egg whites have disappeared into the batter and you have a uniform batter without any white streaks.
- Divide the batter into the two prepared sheet pans, using an offset spatula to spread the batter across the pan evenly and quickly; try not to overwork the batter since too many swipes will deflate it. Transfer to the preheated oven and bake until the edges of the cake are just starting to turn golden and the center springs back when lightly touched, around 10 minutes.
- Once the cakes are done baking, transfer to a wire rack and immediately use a fine mesh sieve sprinkle the tops of each cakes with a generous amount of confectioner's sugar. Place two pieces of parchment paper large enough to roll the cakes in on a work surface and dust each with a generous amount of confectioners' sugar. Working with one cake at a time, use the parchment overhang to lift each cake out of the pan (be careful — the cakes and sheet pans will still be warm) and invert each one onto its own dusted parchment paper. Carefully peel the parchment paper that lined the cakes while baking from the bottom of the cakes and discard. With one of the shorter sides of the cake facing you, use the underlying sheet of parchment to roll it up into a tight cylinder. Repeat with the second sheet cake. Transfer each cake back to the wire rack and let cool to room temperature completely before frosting and assembling.
For the Chocolate Chestnut Filling
- Melt 8 ounces dark chocolate in a double boiler (or, make a homemade version by placing a heatproof bowl over a sauce pan filled with 2 inches of water over medium heat, making sure the bottom of the bowl does not touch the water). Use a rubber spatula to stir until smooth, then remove from heat to cool slightly.
- In the bowl of a freestanding electric mixer fitted with a paddle attachment, combine 1 can unsweetened chestnut purée, 1/2 cup unsalted butter, 1/2 cup granulated sugar, and 1/2 teaspoon kosher salt. Beat on medium speed until well combined and smooth, 2 to 3 minutes. With the mixer on low speed, slowly pour in the melted chocolate and continue beating until combined.
- For the Chocolate Ganache Frosting:
- Combine 10 ounces bittersweet chocolate and 2/3 cup confectioner’s sugar in a medium, heatproof bowl.
- In a small saucepan over medium, bring 3/4 cup plus 1 tablespoon heavy cream to a gentle simmer, whisking occasionally. Pour the hot cream into the medium, heatproof bowl containing the chocolate and confectioner’s sugar mixture (from the 1st step). Stir the mixture with a heatproof, rubber spatula until the sugar is dissolved.
- Once the sugar has dissolved, nestle the medium, heatproof bowl over a medium saucepan of simmer water to make a double boiler — be sure that the water in the saucepan doesn’t touch the bottom of your heatproof bowl. Gently cook, stirring with a rubber spatula, until all the chocolate is melted and the mixture is smooth. Remove the bowl from the heat.
- In a separate, smaller heatproof bowl, whisk together 2 large egg yolks. Pour about 1/2 cup of some of the melted chocolate mixture into the yolks while whisking, to temper them. Pour the tempered mixture back into the larger, heatproof bowl containing the rest of the original mixture and whisk to combine. Add 3 tablespoons unsalted butter and stir until smooth.
- Allow the ganache to cool for about 10 – 15 minutes, before using immediately.
Assembly
- Carefully unwrap the cooled, room temperature sponge cake spirals to ensure that they don't crack or break. Use a sharp serrated knife to cut each cake in half lengthwise — you should end up with four skinny sheet cakes that are around 4 1/2 inches wide and 13-inches long. Use an offset spatula to divide the chocolate chestnut filling between the four cakes, spreading them smoothly and evenly across the top of each cake.
- Roll one cake by starting from the short side and rolling it back into a spiral, this time with chestnut filling between the roll as opposed to parchment paper. Take the roll and match it next to a second strip of cake, short end to short end, and roll the cakes around themselves. Repeat this process for the next two sheet cakes.
- Once all the cakes are rolled, flip the cake roll on its side so that the giant spiral is facing upwards. Use an offset spatula to cover with the chocolate ganache frosting, working quickly as the ganache frosting will harden and stiffen if it cools too quickly. To give the ganache a realistic tree trunk texture, place the back of the tip of your offset spatula at the base of the ganache frosting and swipe the offset spatula up against the cake, leaving a vertical trail. Repeat around the cake. Use the offset spatula to swipe and swoop the ganache frosting in a circular motion on top of the cake.
- Next, make edible succulents: knead and roll 1 to 2 drops of food coloring in a ball of marzipan until the marzipan is an even green color. Use 1 to 2 different sized flower cutters to stamp out flowers and stack them on top of each other to create the succulents. Garnish around the cake, and finish decorating by adding acorn cookies, mushroom cookies and chocolates, and matcha powder for moss. Enjoy!