
Everything You Need To Know About Pre Baking Pie
There are many good reasons why you should pre bake pie crust.
However, I like to pre bake pie crust because doing so keeps the crust crispy and prevents the bottom from getting soggy. Yes, a pre baked pie crust stays crispy even after being filled with a custard filling (like the one in this chocolate chess pie recipe or this rhubarb custard one)!
Cool, right?! It’s such a foolproof method that I now use it for all the custard pie recipes on Hummingbird High!
When To Pre Bake Pie Crust
Here are all the instances for when I recommend the pre baking method:
1. When the crust needs to be baked longer than the filling.
When a recipe instructs you to pre bake a pie crust, that usually means that the pie’s crust and filling have different baking times. One will need to bake for longer in the oven to be done. Typically, the crust takes longer to cook than the filling. This is often the case for pie recipes with custard fillings, like this chocolate chess pie, this pumpkin pie, or this rhubarb custard pie.
Pre baking the crust for those types of pies will give the pie crust a head start by partially baking it. After you add the filling to the partially baked crust and bake the entire thing, both the crust and the filling will be done at the same time.
2. When the filling doesn’t need to be baked or cooked.
Sometimes, the pie crust will need to be completely baked and then filled. This is common for pie recipes like ice cream or pudding pies, where the filling doesn’t need to be baked at all.
@hummingbirdhigh i think paul hollywood would be proud #nosoggybottoms #pie #baking ♬ Happy Pizza – Tom Howe
How To Pre Bake Pie Crust
Here are the basic steps to pre bake a pie crust:
1. Make your favorite pie crust (or, use a store bought one!).
Follow your recipe’s instructions to make the pie dough.
If you’re looking for a good pie crust recipe, definitely check out my recipe for how to make pie crust in a stand mixer.
@hummingbirdhigh the easiest way to make #pie dough, i promise! #bakingtiktok #bakinghacks ♬ Happy Pizza – Tom Howe
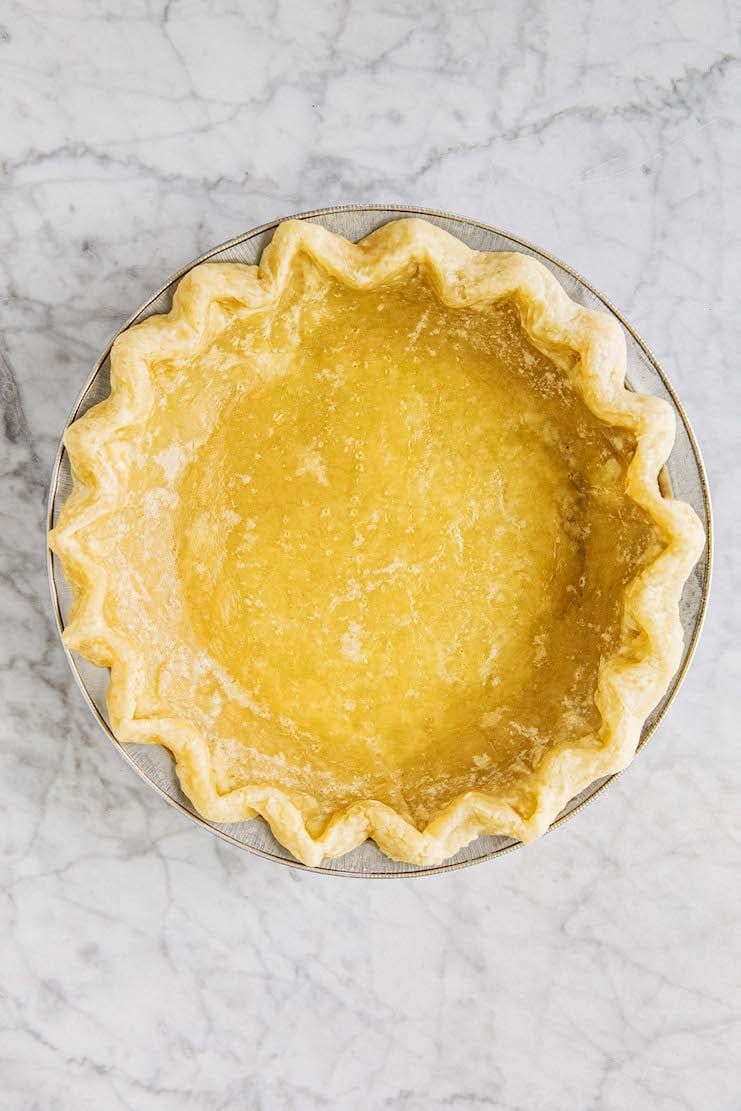
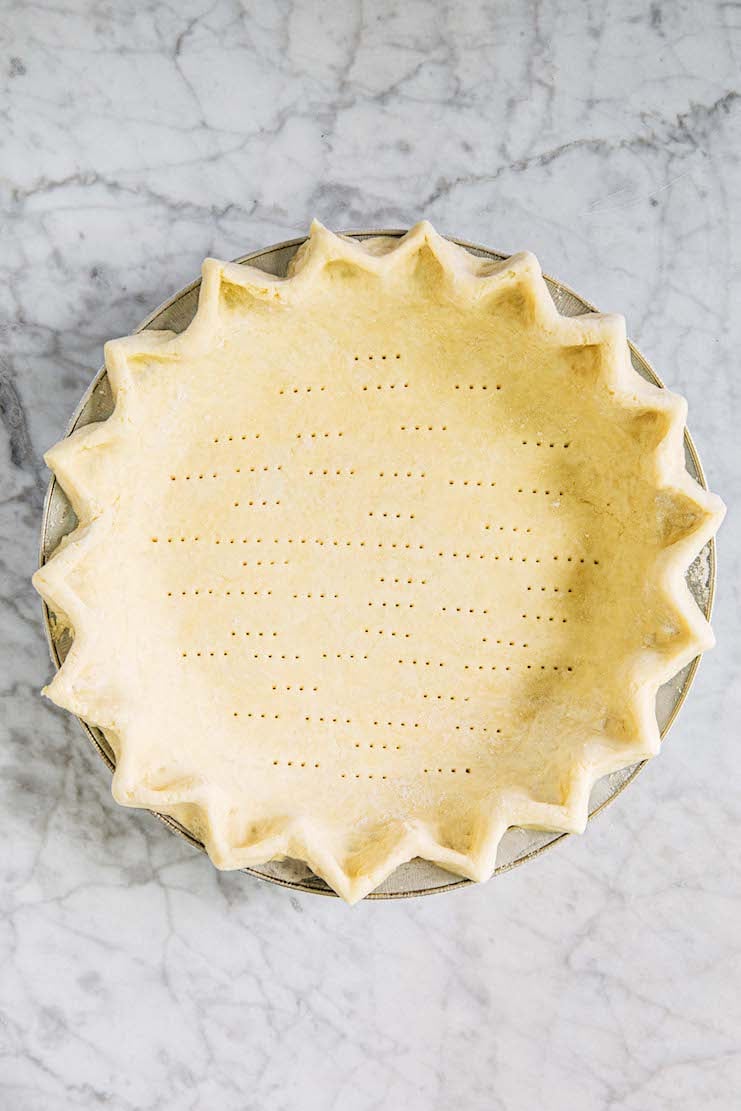
Once you’ve made your pie dough and it’s ready to be assembled, mold it onto the pie plate to form the bottom crust and crimp its edges. Use a fork to prick holes into the bottom and sides of the crust.
2. Freeze the crust before pre baking.
Some recipes will instruct you to bake it right away. But I like to freeze the crust before pre baking. The chilling time allows the gluten in the dough to relax and prevent shrinking when baking.
So I recommend freezing the pie crust for at least 1 hour before pre baking. If you have time, I recommend freezing for even longer—preferably overnight, but for as long as 3 months.
3. Assemble the crust for pre baking.
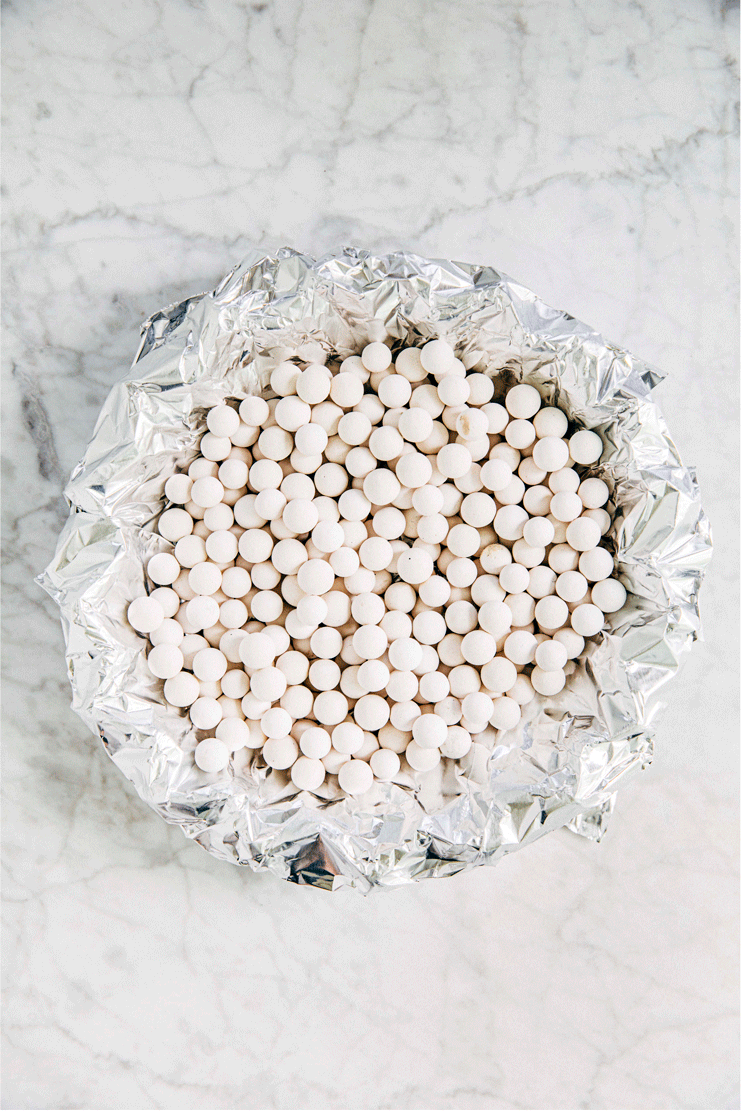
Once the pie crust is frozen solid, cover it with a sheet of aluminum foil. Make sure that the crimp is completely covered. Pour pie weights over the aluminum foil. The pie weights hold the dough in place. Without them, the crust has a tendency to puff up in the center and slump down the sides of the pan.
You can buy different types of pie weights online or any specialty baking store. However, know that not all pie weights are made equal—I personally think that the weight chains aren’t as effective as the ceramic beans.
Alternatively, if you don’t want to buy a specialty tool, you can use other items in your pantry and household. You can use uncooked rice or beans, or even the coins in your spare change jar. Just be sure to fill the covered pie crust as much as you can, all the way to the top. Doing so will also help the pie crust keep its shape in the oven.
4. Pre bake the pie crust.
After you’ve prepped your pie, follow to pre bake the pie in the recipe. If your recipe doesn’t have instructions and you’re wondering how long to pre bake the pie, here’s what I do:
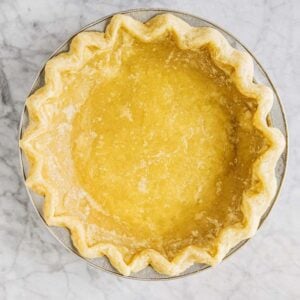
I pre bake the prepped pie crust at 350°F. If the crust is homemade from scratch, I pre bake for 35 minutes. If the crust is store-bought, I pre bake for 30 minutes.
5. Egg wash the pre baked pie crust, then bake again.
After 30 to 35 minutes, remove the pie from the oven (but keep the oven on!). Carefully lift out the aluminum foil and pie weights. Then, brush the bottom and sides of the crust with egg white. If your egg white is too thick, add a dash or two of water to thin it out.
Doing so creates a waterproof seal that prevents the the bottom and sides of the crust from absorbing the filling, keeping it crispy. Bake for an additional 5 minutes to set the egg wash.
@hummingbirdhigh no more soggy bottoms! #baking #bakingtiktok #pie ♬ The Great British Bake Off – Tom Howe
Why did my pie crust shrink?
Here are all the potential reasons why your pie crust shrank during the pre baking process:
- You didn’t freeze the crust before baking.
The gluten in the pie dough typically needs to rest and chill before being baked. Plus, a frozen pie crust is more likely to hold its shape. - You didn’t use enough pie weights.
Be sure to use a LOT of pie weights during the pre baking process—the more you use, the better! - You pre baked the pie at a temperature higher than 350°F.
Pie crusts are more likely to shrink when baked at high temperatures like 400°F+. I prefer to bake my pies at a lower temperature (usually between 350°F to 375°F) for longer.
I don’t have pie weights. What can I use instead?
Alternatively, if you don’t want to add another specialty tool to your crowded kitchen (I get it!), you can DIY pie weights with everyday ingredients and other items. Some people use dried beans and uncooked rice instead of pie weights. They claim that, after doing so, you can still cook the beans and rice to eat like you normally would! However, when I tried this trick, I noticed that both my beans and rice had a funny flavor. Maybe that’s just me, though.
So instead of using beans or rice, I instead recommend you use coins from your spare change jar. The coins won’t melt in the oven, and you can reuse the change after it’s cooled down.
Pie Recipes To Make
Here are some pie recipes you can try with the new method I just taught you:
- Black Bottom Chocolate Pecan Pie
- Blueberry Crumble Pie
- Chocolate Chess Pie
- Libby’s Pumpkin Pie Recipe, Elevated
- My Best Easy Vegan Pumpkin Pie
- Rhubarb Custard Pie
Get the Recipe: Pre Baked Pie Crust Recipe
Ingredients
- enough roll out pie dough for a 9-inch pie pan (either homemade or store-bought), chilled but NOT frozen OR frozen store-bought pie crust in a pie plate
- 1 large egg white
- 1 teaspoon water
- pinch of kosher salt
Equipment
- aluminum foil
- pie weights
- pastry brush
Instructions
- Prep the pie crust if using homemade pie dough OR store-bought roll out style pie dough: Roll out the disc of chilled dough on a lightly floured counter and fit it onto a 9-inch pie pan. Crimp the edge and use a fork to poke holes all over the bottom and sides of the dough. Cover loosely with plastic wrap and freeze overnight.
- Prep the oven and pan. Position a rack in the center of the oven and preheat the oven to 350°F.Line a sheet pan with parchment paper and place the frozen crust, still in its plate, in the center of the pan. Cover the crust with foil, making sure the crimped edges are completely covered and that there are no gaps between the foil and the crust. Fill with pie weights and spread them out so they are more concentrated around the edges of the crust.
- Prebake the crust and make the egg wash. Bake for 30 minutes if using store-bought pie dough, or 35 minutes if using homemade pie dough.While the crust is in the oven, make the egg wash: In a small bowl, whisk together the egg, water, and salt.
- Eggwash the crust. Remove the sheet pan from the oven, keeping the oven on. Carefully lift out the pie weights and foil.Use a pastry brush to coat the bottom and sides of the pie crust (but not the crimped border) with a thin layer of egg wash.Bake, uncovered, for an additional 5 minutes.
- Cool the crust before filling. Set aside on a wire rack to cool slightly while you make the pie filling.
Notes
- You can use either homemade or store-bought pie crust for this recipe. Just note that they have slightly different preparation and Bake Times—read the recipe carefully!
- Typically, grocery stores sell two different types of store-bought pie crust. The first kind is where the dough is rolled up in a sheet, and you need to do the work of fitting it onto the pie plate yourself. The second kind is where the dough is already molded onto a pie plate (usually one made of disposable aluminum), and all you need to do is fill it. Again, you can use either kind for this recipe. However, they’ll have slightly different preparations and Bake Times as instructed in the recipe!
get new recipes via email:

buy the book
Weeknight Baking:
Recipes to Fit your Schedule
Over the past several years of running Hummingbird High, I kept a crucial aspect of my life hidden from my readers: I had a full-time, extremely demanding job in the tech world. In my debut cookbook, Weeknight Baking, I finally reveal the secrets to baking delicious desserts on a tight schedule.
Mine got a little dark oops! I do not have a clue how this happened, I am not an expert in baking tho. Can you explain why this happened? This time used store bought pie dough, next time I want to use homemade pie dough so can you share me the recipe how to make the homemade dough?
Hm, Bake Time will vary depending on the brand of store bought pie dough you used. I always recommend pre baking for 5 to 10 minutes less than the Bake Time in this recipe if using store bought dough. Did you use the kind that you roll out yourself, or the one already fitted into a pie pan?
Nah it was already in a Pie pan.
Will it work if I set an 8” pie plate inside a 9” to avoid slippage of the crust?
Best pre-baked pie crust method I’ve tried! I started with a frozen store bought lard pie crust, switched my egg wash to one whole egg with one tablespoon of milk. I followed your baking instructions to a T, and it was wonderful! Light golden brown and crispy all around, even the edges!
Just a couple clarifying questions.
I made your STAND MIXER pie dough, LOVE the recipe!!! So fast and ez! I put in refrigerator overnite (for 2 nites). Then, when I wanted to bake, I rolled it out, put in pie plate, then FROZE in the freezer for 1 hour. (Is that correct?….not sure if that was needed if the dough was refrigerated overnite.)
2nd, I am using my pie dough for a fresh glazed strawberry pie, and wanted to bake it all the way through (not just par baked, which you would do for a pie that you were going to fill and bake some more). If I need to bake it all the way through, do I still take the crust out after 30-35 mins, brush with egg white to seal, then cook how much longer for it to be finished?
Love your book and your website!!! :D. Thanks for your help!