
About This Small Batch Apple Galette
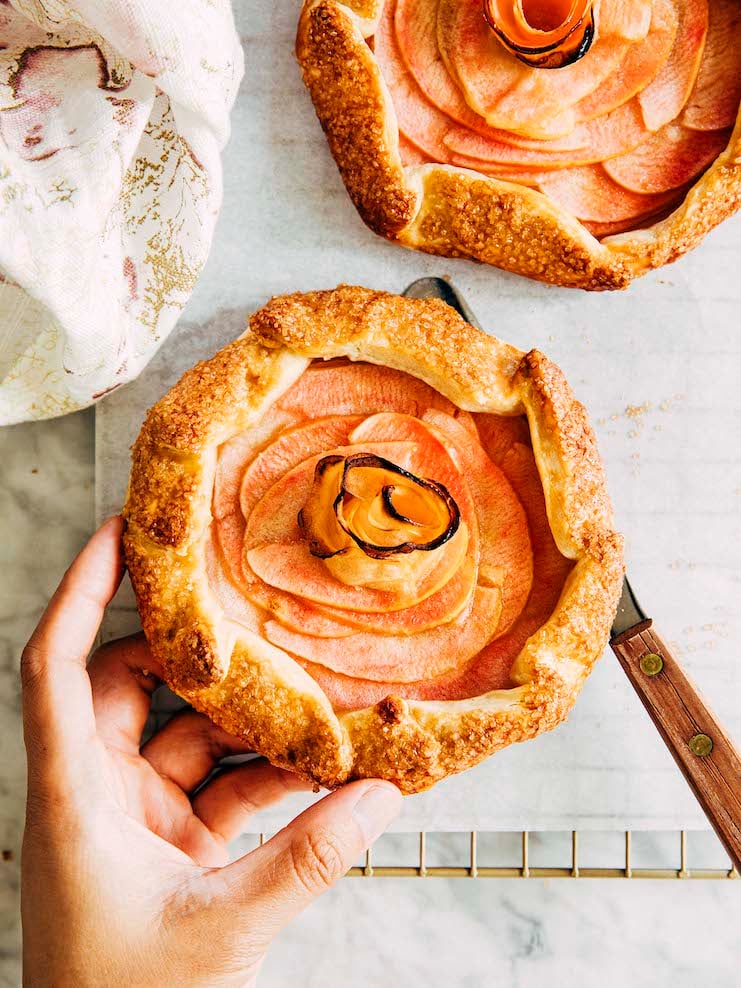
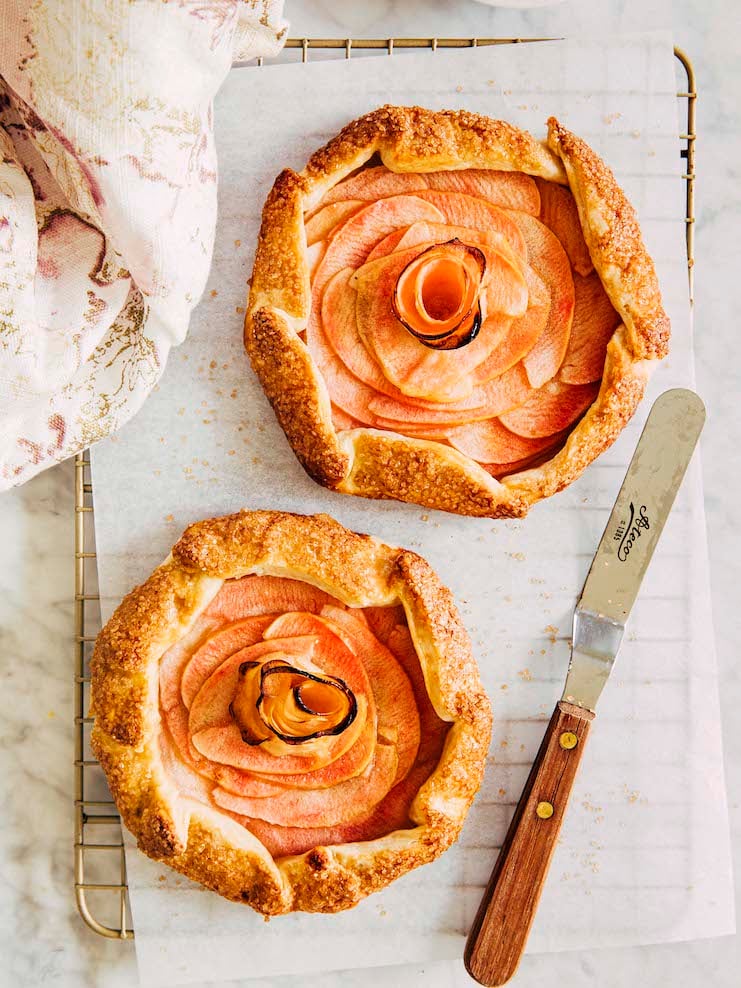
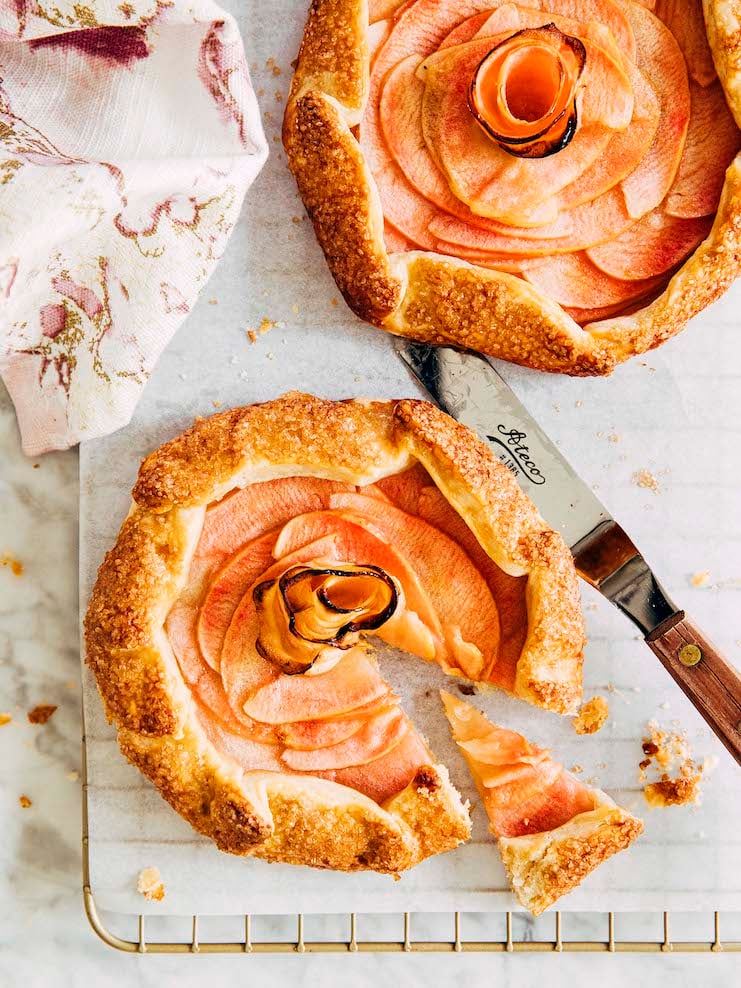
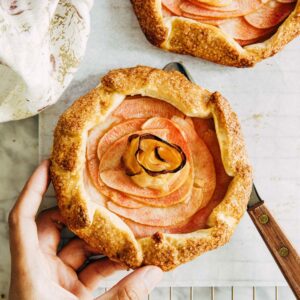
This small batch apple galette recipe makes just one 5-inch galette, just enough for 1 hungry person or 2 more reasonable people to share! The apples in the galette are arranged in a show stopping rose shape (which is surprisingly easy to do, even for a beginner baker!). I instruct you to then brush the apples with honey and butter. Doing so just a touch of sweetness to this rustic and restrained dessert.
For more fruit pie and pastry recipes on Hummingbird High, check out the site’s Dessert Recipes archive! Popular recipes include this 15-Minute Stand Mixer Pie Crust Recipe and this Quick and Easy Blueberry Crumble Pie.
Why You Should Make The Recipe
Here are all the reasons to make this apple galette recipe:
The recipe is small batch.
I frequently get requests to make smaller batch versions of my pie recipes. However, in order to do so, you need specialty equipment like mini pie pans. Because I’m hesitant to encourage folks to buy single-use specialty baking equipment (seriously–who needs more clutter in their kitchen?! I don’t!), I wanted to figure out a small batch pie recipe that didn’t need one.
That’s when I realized that, instead of make a small batch pie, I could make a small batch galette. Why? A galette is basically a pie—they’re made with the same kind of pastry dough, and filled with fruit. The only difference? A galette is “free form” and baked on its own, without a pan to hold it together. On the other hand, a pie is baked in a pie pan. That’s it!
From there, it was a breeze to develop a small batch galette. I took my favorite pie dough and reduced its proportions to be more suitable for a smaller pastry. The recipe uses just ONE apple and makes a 5 inch galette. That’s enough for just 1 hungry person or 2 more reasonable folks!
The galette looks professionally made, but is actually incredibly easy to make at home!
Because the apples are assembled in a beautiful rose pattern, the galette looks like it could be sold in a French patisserie. But don’t be intimidated! This rose pattern is actually incredibly easy for the home baker to achieve. I promise! And to make your life even easier, I’ve included step-by-step video tutorials that you can reference while you make your own version at home.
The recipe is infinitely customizeable.
The best part about this small batch apple galette recipe is that it’s crazy customizable. You can use different stem fruits, like different varieties of apples and pears. I’ve included notes on how to substitute out the apple with the other fruit of your choice.
I’ve also included notes on how to double the recipe if you think that one galette isn’t enough. The recipe can be easily scaled up and down to feed more people. The possibilities are endless!
Ingredients and Substitutions
Now that I’ve convinced you to make this apple galette, here’s everything you need to make the recipe:
Shopping List For Small Batch Apple Galette Recipe
- apple cider vinegar
- unsalted butter
- all-purpose flour
- granulated sugar
- kosher salt
- apples
- lemon
- honey
- large eggs
- Demerara (or other coarse) sugar
And let’s talk about some key ingredients and potential substitutions:
Common Ingredient Substitutions For The Recipe
Here are common substitutions for the ingredients in the recipe:
- Apple Cider Vinegar. In a pinch, you can substitute the vinegar in the recipe with distilled white vinegar.
- Unsalted Butter. You can substitute the unsalted butter with salted butter without any noticeable difference in taste.
- All-Purpose Flour. Substitute the all-purpose flour with your favorite 1-1 Gluten Free All Purpose Flour (I like the ones by Bob’s Red Mill and King Arthur Baking Company) to make the brownies gluten-free!
- Kosher Salt. You can substitute the kosher salt with table salt—if you do, just use half the amount that’s listed in the recipe.
- Demerara (or other coarse sugar). In a pinch, you can just use granulated sugar!
How To Make The Recipe
Here are the basic steps to make the small batch galette from scratch:
- Prep the ingredients. (Prep Time: 10 minutes)
To make the very best pastry dough, make sure ingredients like butter and water are VERY cold! This helps create flaky textures in the pastry dough. In the recipe below, I even instruct you to freeze the butter for a few minutes. Don’t skip this step! - Make the galette dough. (Work Time: 10 minutes)
- Refrigerate the dough for at least 1 hour before shaping. (Chill Time: 1 hour+)
If you want to be efficient, you can make the dough ahead of shaping and assembling the galette. I recommend making it the day before you plan on shaping and assembling everything—however, you can make it up to 3 days in advance! - Once the dough is chilled, roll it out to form the galette circle. (Work Time: 10 minutes)
- Refrigerate the rolled out dough while you prep the apple. (Work Time: 10 minutes)
- Fill and assemble the galette. (Work Time: 15 minutes)
- Refrigerate the galette while you preheat the oven. (Chill Time: ~10 minutes)
- Eggwash the galette. (Work Time: <5 minutes)
- Bake the galette. (Bake Time: 38 minutes)
Best Recipe Tips
Tips About Baking Equipment
- You need a couple of “specialty” equipment for this recipe—see the full list below. If you don’t own everything in that list, check out my equipment substitutions below:
No pastry blender? No problem. You can use two knives to cut the butter into the dry ingredients—check out this YouTube tutorial for a demo!
No rolling pin? No problem. Use a wine bottle or tall water bottle to roll the dough flat! Apparently this is what pro recipe developer Alison Roman does, lol.
No pastry wheel/pizza cutter? No problem. Just use a sharp paring or chef’s knife to slice away the dough. - Bake the galette on the thinnest baking sheet you own. I like to use these one sided cookie sheets, which I find are too thin for cookies (they always burn my cookie bottoms) but are perfect for pastries. Doing so results in the crispiest pie crust!
Changing The Recipe Yield
- Don’t panic if the top of your cake comes out pretty yellow looking! That’s normal. When sliced, the crumb will still be pretty white!
Best Technique Tip
- To make the flower centerpiece of my galette, I used a mandoline slicer to slice my apple as thinly as I possibly could. I then rolled the thin slices up to form the flower shape. You can see a YouTube tutorial of the method here.
If you find that your apples are breaking when you roll them up, it’s simply because your apples are too thick! You’ll need to slice them SUPER thinly to get them flexible enough. Like I said, a mandoline slice will really help with this task!
Get the Recipe: Small Batch Apple Galette Recipe
Ingredients
For The Galette Crust
- 1 ½ Tablespoons (.75 ounces or 21 grams) very cold water
- 1 teaspoon apple cider vinegar
- ¼ cup ice
- 4 Tablespoons (½ stick or 2 ounces or 57 grams) very cold unsalted butter
- ½ cup plus 2 Tablespoons (2.85 ounces or 81 grams) all-purpose flour
- 1 teaspoon granulated sugar
- ¼ teaspoon kosher salt
For The Apple Filling
- 1 medium apple
- 1 Tablespoon freshly squeezed and strained lemon juice
- 1 Tablespoon (.5 ounces or 14 grams) unsalted butter, melted and cooled slightly
- 1 Tablespoon (.75 ounces or 21 grams) honey
- pinch kosher salt
Assembly
- 1 large egg white
- 1 teaspoon water
- Demerara (or other coarse) sugar
Equipment
- Rolling Pin
- pastry wheel OR pizza cutter
- pastry brush
Instructions
- First, make the galette crust. In a small liquid measuring cup, whisk together the water and vinegar. Add the ice and whisk. Refrigerate while you prep the rest of the ingredients.
- Prep the butter. Cut the butter into 1-inch cubes and place them in a small bowl. Freeze while you prep the rest of the ingredients.
- Mix the dry ingredients, then blend in the butter. In a medium bowl, whisk together the flour, sugar, and salt. Add the frozen butter all at once and use a pastry blender to blend and cut the butter into the dry ingredients until the mixture has the texture of coarse meal, with pea-sized pieces of butter throughout.
- Add water and continue blending until the mixture forms a dough. Remove the ice water mixture from the refrigerator. Add 1 teaspoon of water at a time, using the pastry blender to blend the water into the mixture until just combined. When the dough is ready, it will form large clumps that stick around the pastry blender. You will use approximately 4 to 6 teaspoons of the water mixture—it’s totally normal to have water left over, I promise!
- Finish forming the dough and refrigerate for at least 1 hour. Tip the dough out onto a lightly floured counter and quickly knead the dough into a rough ball. Wrap the ball tightly in plastic wrap and flatten to a small disc. Refrigerate for at least 1 hour, preferably overnight.
- Shape the galette crust. Use a rolling pin to roll out the chilled dough to a 6- to 7-inch circle on a lightly floured counter. Use a pastry wheel or pizza cutter to trim the rough edges of the circle. Transfer to a parchment-lined sheet pan and refrigerate while you prep the apple filling.
- Prep the apple. Pour the lemon juice into a shallow bowl. Slice the apple into ⅛- and ¼- thick half-moon shaped slices, placing them in the shallow bowl of lemon juice as you go. Toss occasionally to coat the slices in the lemon juice—doing so will prevent the slices from browning.
- Fill and assemble the galette. Leaving a 1 inch border around the crust, arrange the apples in tight concentric circles, overlapping each slice about halfway over its neighbor, packing the rows very tightly. Gently fold the edges of the dough over the apples, overlapping the dough as necessary. Press gently to seal the edges. Whisk together the melted butter, honey, and salt for the filling and brush over the apples.Refrigerate the assembled tart on the prepared pan while you preheat the oven.
- Preheat the oven. Position a rack in the lower third of the oven and preheat the oven to 375°F.
- Eggwash the galette crust. Once the oven is preheated, make the egg wash. Whisk together the egg white and water for the egg wash in a small bowl. Remove the pan with the galette from the refrigerator and, working quickly, use a pastry brush to brush the edges of the galette with the egg wash. Sprinkle the brushed edges with Demerara sugar.
- Bake the galette. Bake for 38 to 40 minutes, or until the edges of the galette are golden brown and the apples are fork-tender. Cool the galette on the pan on a wire rack for 10 minutes before serving and slicing.
- Serve and store. Serve warm, or at room temperature, with a scoop of your favorite ice cream. The galette is best the day it’s made, but can be stored at room temperature, under a cake dome or a large bowl turned upside down, for up to 1 day. After that, cover loosely with plastic wrap and refrigerate for up to 2 days.
Did you make this recipe?
Please leave a comment and rating for the recipe using the form below!
Your ratings make it easier to find the recipe online, and I’m always looking for ways to improve Hummingbird High.
get new recipes via email:

buy the book
Weeknight Baking:
Recipes to Fit your Schedule
Over the past several years of running Hummingbird High, I kept a crucial aspect of my life hidden from my readers: I had a full-time, extremely demanding job in the tech world. In my debut cookbook, Weeknight Baking, I finally reveal the secrets to baking delicious desserts on a tight schedule.