
About This Cherry Blossom Cake
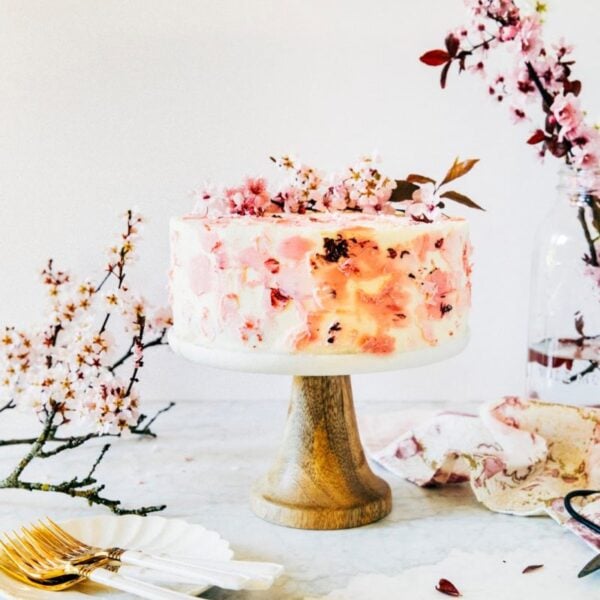
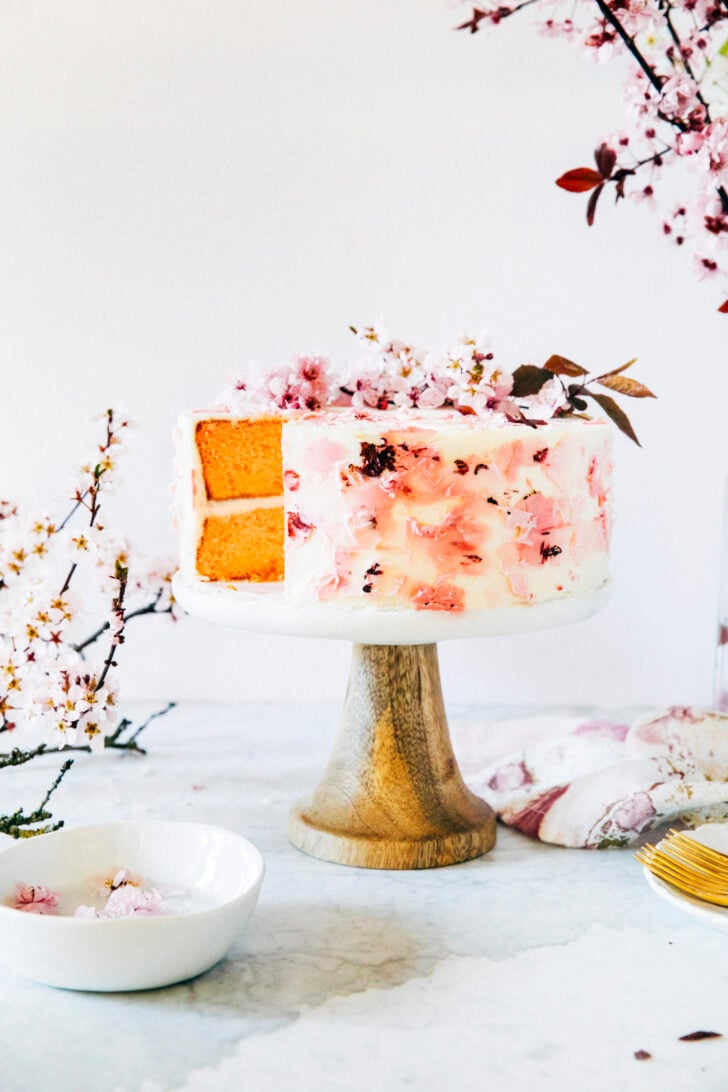
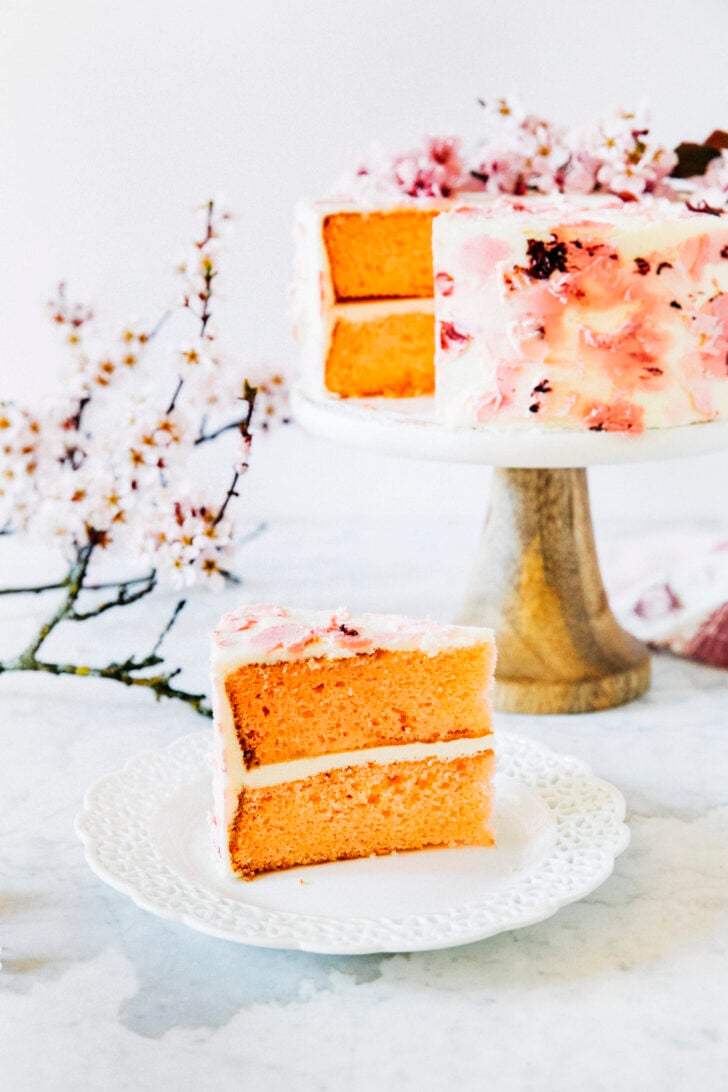
This cherry blossom cake is made with a delicately flavored cherry blossom butter cake. The vibrant pink cake is then decorated with cherry blossom-flavored frosting, complete with edible “petals” made with dabs of pink frosting. It’s the perfect treat to celebrate sakura season!
What is sakura?
If you’re unfamiliar with sakura, here’s a quick primer: sakura is the Japanese word for cherry blossom. And although it’s not common in the United States, it’s frequently used as a culinary flavor in Japan and other Asian countries (especially in desserts).
What does cherry blossom/sakura taste like?
If you’ve ever had a pink-colored mochi, you’ve probably tasted sakura. Most pink mochi are cherry blossom flavored!
But in general, sakura has a very delicate, subtle, perfumey flavor. It’s similar to using lavender (like in these Lavender Earl Grey Cookies) or rose water (like in these Strawberry Rose Snickerdoodles) in baked goods
Too much sakura would taste too soapy and bitter, but a drop or two is just perfect. I replaced vanilla extract for sakura extract in one of my favorite white cake recipes and couldn’t get enough of it.
Looking for more cherry blossom dessert recipes? Check out this cherry blossom (sakura) recipe of mine that went viral on both Instagram and TikTok!

Ingredients and Substitutions
Here’s everything you need to make this sakura cake recipe:
Shopping List For Cherry Blossom Cake
- cake flour
- baking powder
- kosher salt
- heavy cream
- crème fraîche
- sakura extract
- pink food coloring
- granulated sugar
- unsalted butter
- large eggs
- confectioners’ sugar
And let’s talk about some key ingredients and potential substitutions:
Common Substitutions And Sources For Ingredients In This Cherry Blossom Cake Recipe
- Cake Flour. No cake flour? No problem. Check out my post on how to make cake flour with ingredients you likely already have at home!
- Heavy Cream. The heavy cream in this recipe can be replaced with the same amount of whole milk.
- Crème Fraîche. The crème fraîche in this recipe can be replaced with sour cream or unsweetened, unflavored whole yogurt.
- Sakura Extract. You can buy sakura extract online on Amazon.
- Pink Food Coloring. I used pink food coloring from this Americolor Nifty Fifty Food Coloring Set to dye this cake.
How To Make Cherry Blossom Cake
Here are the basic steps to make this cherry blossom layer cake:
First, make the cherry blossom cake.
- Prep the ingredients for the cake. (Prep Time: 5 minutes)
- Make the cake batter. (Work Time: 10 minutes)
- Assemble the cake batter for baking. (Work Time: 5 minutes)
- Bake the cakes. (Bake Time: 30 minutes)
Once the cakes are cool, make the cherry blossom frosting.
- Prep the ingredients for the frosting. (Prep Time: 5 minutes)
- Make the frosting. (Work Time: 5 minutes)
Assemble the cake and frosting to make the cherry blossom cake.
- Level and stack the cake layers. (Work Time: 5 minutes)
- Crumb coat the cake. (Work Time: 10 minutes)
- Smoothly frost the cake sides and top of the cake. (Work Time: 10 to 20 minutes)
- Finish decorating the cake. (Work Time: 5 to 10 minutes)
Recipe Troubleshooting and FAQ
Do I need special tools to make this recipe?
Sort of. If you bake cakes regularly, it’s likely that you already have the main tools you need for this chocolate cake: a round cake board, a rotating cake stand and an offset spatula.
You’ll also need a stand mixer with a paddle attachment and two 8-inch cake pans to make the cake batter and frosting.
Can you freeze cherry blossom cake?
Yes! You can freeze the yellow cake in the following ways:
Freeze the baked, unfrosted cake layers.
Follow the recipe instructions for making and baking the cake layers. Once the layers have cooled, tightly wrap each cake layer in its own individual sheet of plastic wrap. Freeze for up to 3 months. To use in the recipe, there’s no need to thaw the cakes! Simply set the cake layers out on the counter as you make the frosting to let them thaw slightly. Use in the recipe as directed.
Freeze the entire assembled cake with chocolate frosting.
You can freeze the entire assembled cake, too! However, doing so works best if you use a cake board. Follow the recipe instructions for making all the different components of cake and assembling them together on a cake board. Refrigerate the entire assembled cake, uncovered, for a minimum of 4 hours. Doing so sets the frosting and preps it for freezing. After 4 hours, test the cake by gently poking the frosting with your finger. Poke it gently! You don’t want to leave an indent, you just want to swipe it gently to see if any frosting comes off. If no frosting comes off onto your finger, the cake is ready.
Carefully cover the whole thing—cake board and all—in two layers of plastic wrap. Freeze for up to 3 months. To serve, transfer to the refrigerator overnight to thaw, then let stand at room temperature for 1 to 2 hours before serving.
Freeze any leftover slices.
Tightly wrap any leftover slices of cake in plastic wrap and freeze for up to 3 months. Follow the instructions above to thaw and enjoy!
Best Recipe Tips
Tip To Make The Recipe Fit Within Your Schedule
- When making any kind of layer cake recipe, I always make the cake layers a day ahead of assembling the entire cake. Doing so ensures that I’m not stuck in the kitchen all day waiting for the layers to cool in order to frost and assemble the entire thing!
If you want to take this route, I suggest making the cake layers a day ahead of making the frosting and assembling the cake. Let the cakes cool to room temperature, then wrap them in two tight layers of plastic wrap. Freeze overnight. Freezing the cakes will keep them fresh, and make the cakes easier to work with when assembling the cake the next day. And when ready to assemble the next day, thaw the cakes slightly by placing them on the counter at room temperature while you make the frosting.
PS—if you like this kind of make-ahead, splitting-the-work-up-so-you’re-not-stuck-in-the-kitchen-all-day, DEFINITELY check out my cookbook. Recipes for intermediate bakes like layer cakes, pies, and more are written this way to help you bake around your schedule!
Tip For Decorating The Cake
- The frosting is meant to replicate the color and texture of cherry blossom petals. I deliberately didn’t smooth down the dabs of frosting to get a more textured effect on the cake, making them look like real petals.
To get the look, cover the entirety of the cake in an even base layer of frosting. Divide the remaining buttercream into three bowls and add a drop or two of pink and/or red food coloring in each bowl. You want to have different shades here for the full effect.
Take a small spatula (I used this one) or a small offset spatula and dab—literally, just dab don’t even think about it—a small amount about half the size of your pinky nail of frosting on the cake. Flick the spatula away quickly. Don’t worry if the frosting is too smooth or uneven. Repeat across the base layer with the different colors. Step back—voila! You’ve got cherry blossom petals.
Get the Recipe: Beautiful and Vibrant Pink Cherry Blossom Cake
Ingredients
For The Cherry Blossom Cake
- 2 cups (8 ounces or 227 grams) cake flour
- 1 Tablespoon baking powder
- ½ teaspoon kosher salt
- ¾ cup (6 ounces or 270 grams) heavy cream, at room temperature
- ½ cup (4 ounces or 113 grams) crème fraîche, at room temperature
- 1 ½ teaspoons sakura extract
- 1 to 2 drops of pink food coloring
- 1 ¼ cups (8.75 ounces or 248 grams) granulated sugar
- 1 cup (2 sticks or 8 ounces or 227 grams) unsalted butter, at room temperature
- 3 large eggs, at room temperature
For The Cherry Blossom Frosting
- 4 cups (16 ounces or 453 grams) confectioners' sugar, sifted if necessary
- pinch kosher salt
- 2 Tablespoons heavy cream
- 1 ½ teaspoons sakura extract
- 1 cup (8 ounces or 227 grams) unsalted butter, at room temperature
Assembly
- pink food coloring
Equipment
- 8- or 9-inch cake board
- rotating cake stand
- offset spatula
Instructions
For The Cherry Blossom Cake
- Prep your oven and pans. Position a rack in the center of the oven and preheat the oven to 350°F. Generously spray two 8-inch round cake pans with cooking spray and line the bottom of each with a parchment paper circle. Spray the parchment, too.
- Mix the dry ingredients for the cake. In a medium bowl, whisk together the cake flour, baking powder, and salt.
- Mix the wet ingredients for the cake. In a large liquid measuring cup, whisk together the cream, crème fraîche, sakura extract, and food coloring.
- Cream the sugar and butter, then add the eggs. In the bowl of a stand mixer fitted with the paddle attachment, combine the sugar and butter. Beat on medium until light, fluffy, and doubled in volume, 3 to 4 minutes, using a rubber spatula to scrape down the bottom and sides of the bowl as necessary. Reduce the mixer to low and add the eggs one at a time, only adding the next egg when the previous one is incorporated, and beat until the mixture is smooth, about 1 minute.
- Add the dry and wet ingredients. With the mixer on low, gradually add the dry ingredients in three parts, alternating with the wet ingredients, beginning and ending with the dry ingredients. Beat until the last of the dry ingredients are just combined. Scrape down the bottom and sides of the bowl once more and beat for 30 seconds.
- Assemble the cake for baking. Divide the batter evenly between the pans.
- Bake the cakes. Bake for 30 to 35 minutes. When done, the top of the cake should bounce back when gently pressed. A skewer inserted into the center of the cake should come out with a few crumbs attached. Cool completely in the pans on a wire rack before frosting.
For The Cherry Blossom Frosting
- Prep the ingredients for the cherry blossom frosting. Sift together the confectioners' sugar and salt into a medium bowl. In a small liquid measuring cup, whisk together the cream, sakura extract, and food coloring.
- Make the cherry blossom frosting. In the bowl of a stand mixer fitted with the paddle attachment, beat the butter on medium-low until smooth and creamy, about 1 minute. Reduce the mixer to low and gradually add the dry ingredients, beating until combined. Scrape down the bottom and sides of the bowl with a rubber spatula. With the mixer on low, slowly pour in the wet ingredients and beat until just combined. Scrape down the bottom and sides of the bowl once more, then beat on medium-high until the frosting is creamy and smooth, 2 to 3 minutes. Use immediately.
Assembly
- Assemble the cake. If necessary, level the top of the cakes. Place one of the cake layers on a cake board or serving platter in the center of a rotating cake stand. Use a rubber spatula or cookie dough scoop to drop ½ cup of frosting in the middle of this cake layer. Use an offset spatula to spread it evenly all over the top, just like you would spread butter on toast. Place the second cake on top of this frosting, stacking it evenly on top of the first cake.
- Next, crumb coat the cake. Use the offset spatula to cover the surface of the entire layer cake with a thin layer of frosting. Use just enough frosting to cover the entire cake completely. Refrigerate, uncovered, for 10 to 15 minutes to stiffen and "set" the frosting.
- After the crumb coat sets, finish frosting the cake. Use the offset spatula to cover the cake with the remaining frosting. Smooth the sides and top of the cake completely.
- Decorate the cake. Add pink food coloring to any leftover frosting.Use an offset spatula to add small dabs of pink frosting on the top and sides of the cake to make the cherry blossom petals.
- Serve and store. Serve immediately. The assembled cherry blossom cake can be stored at room temperature, under a cake dome or a large bowl turned upside down, for up to 1 day. Press a sheet of plastic wrap against any cut surfaces to prevent the cake from drying out. After that, cover the entire cake loosely with plastic wrap and refrigerate for up to 2 days.
get new recipes via email:

buy the book
Weeknight Baking:
Recipes to Fit your Schedule
Over the past several years of running Hummingbird High, I kept a crucial aspect of my life hidden from my readers: I had a full-time, extremely demanding job in the tech world. In my debut cookbook, Weeknight Baking, I finally reveal the secrets to baking delicious desserts on a tight schedule.