About These Peppermint Bark Oreos
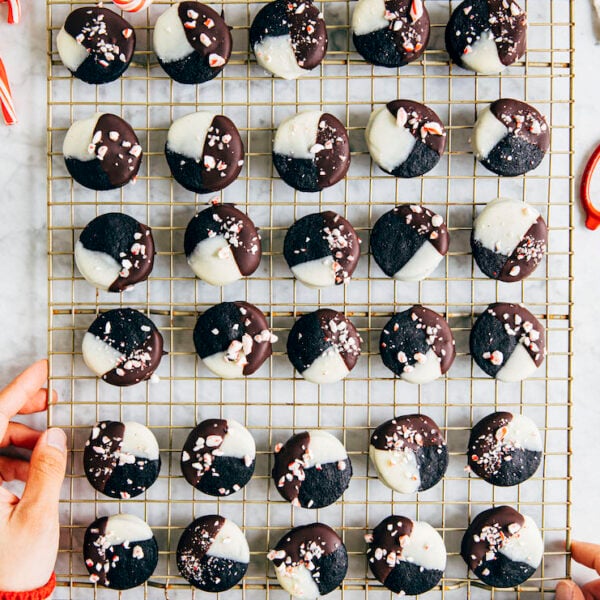
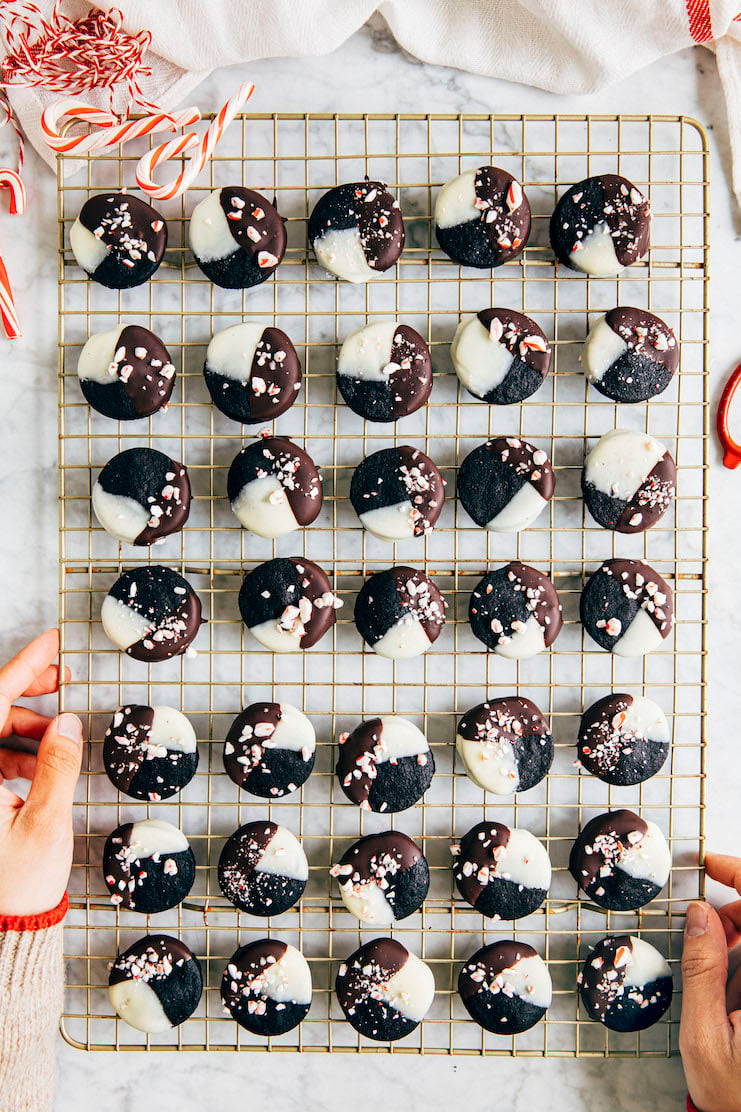
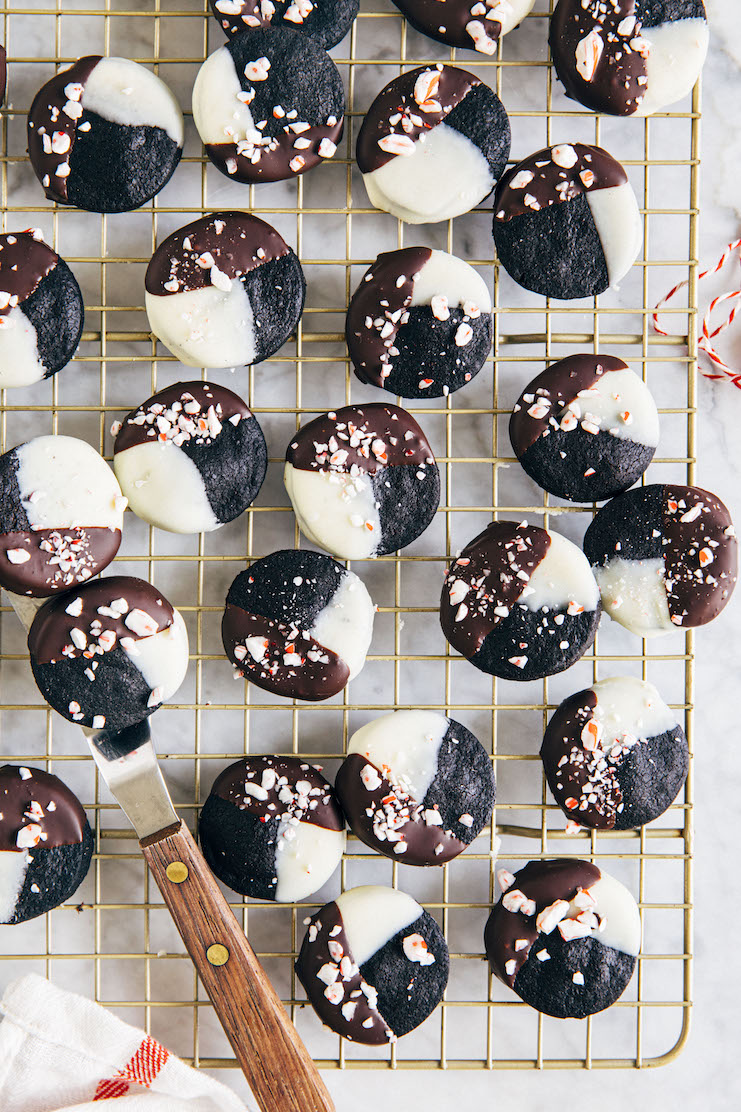
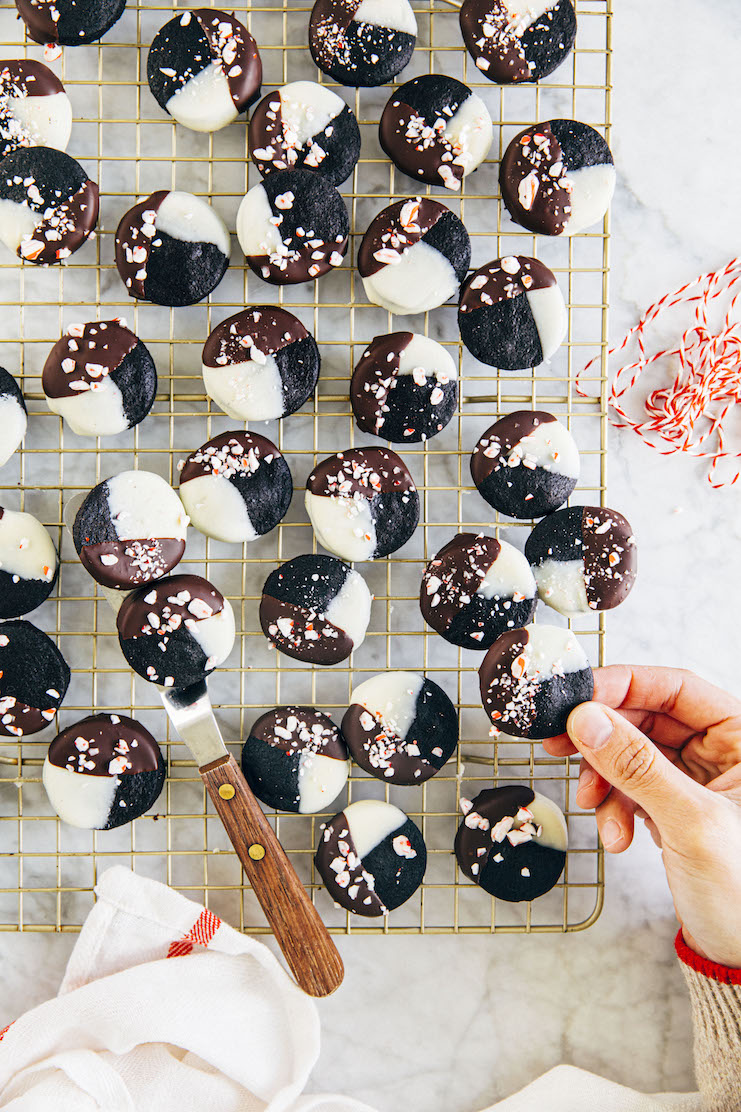
These peppermint bark “Oreos” start with a deep, dark chocolate shortbread cookie base. Each cookie is then topped with “peppermint bark”. How? First, each cookie is dipped in both white white chocolate and dark chocolate, and topped with crushed peppermint candy pieces. It tastes exactly like holiday peppermint bark, but with added Oreo cookie flavor!
For more unique cut out cookie recipes, check out Hummingbird High‘s Cookie Recipe collection! Popular recipes include this Best, Foolproof Cut Out Sugar Cookie Recipe and My Best Shortbread Cookie Recipe.
Why You Should Make The Recipe
These cookies come together easily, thanks to my cut out cookie baking tips.
Although these peppermint bark Oreos look complicated, they are actually a breeze to make! The chocolate shortbread cookie dough comes together in just 10 minutes. The recipe then includes some tips to shape and roll out the dough into Oreo cookies without using any additional flour. Traditional cut out cookie recipes usually require a lot of clean-up. But not this recipe!
Ingredients and Substitutions
Now that I’ve convinced you to make these cookies, here’s everything you need for the recipe:
Shopping List For Peppermint Bark Oreos
- all-purpose flour
- black OR Dutch-processed cocoa powder
- baking soda
- kosher salt
- unsalted butter
- granulated sugar
- white chocolate (check out my recommendations!)
- peppermint extract OR oil
- dark chocolate (between 60% to 70% cacao)
- crushed peppermint candy pieces
And let’s talk about some key ingredients and potential substitutions:
Ingredient Sources and Substitutions
- All-Purpose Flour. Substitute the all-purpose flour with your favorite 1-1 Gluten Free All Purpose Flour (I like the ones by Bob’s Red Mill and King Arthur Baking Company) to make the cake gluten-free!
- Black OR Dutch-Processed Cocoa Powder. Natural unsweetened cocoa powder WON’T give you the classic Oreo chocolate color. So be sure to use Dutch-processed cocoa powder! My favorite brands are Ghirardelli Unsweetened 100% Cocoa Dutch Process, Hershey’s Special Dark Cocoa, and King Arthur Baking Company’s Black Cocoa. Learn more in the deep-dive below.
- Kosher Salt. You can replace the kosher salt in the recipe with half of its amount in table salt.
- Unsalted Butter. You can substitute the unsalted butter with salted butter without any noticeable difference in taste. You can also use vegan butter sticks to make it dairy-free.
- Dark Chocolate. Check out this post to learn about my favorite dark chocolate for baking!
- Crushed Peppermint Candy Pieces. Crushed peppermint candy pieces are typically available in the baking aisles of many grocery stores during the holiday season. However, if you are unable to find some, make your own! Buy some candy canes or peppermint candy and pulse once or twice in a food processor to crush them.
Dutch-Processed Cocoa Powder versus Natural Unsweetened Cocoa Powder
Cocoa powder, when used in baking recipes, comes in two varieties: Dutch-processed and natural unsweetened.
Natural unsweetened cocoa powder is more typical. It is cocoa powder in its purest form. It is slightly reddish brown in color and results in deeply flavored chocolate goods. Because it is slightly acidic, it is often paired with baking soda in baking recipes. This pairing helps create a chemical reaction that will cause the baked good to rise in the oven.
Dutch-processed cocoa powder is natural unsweetened cocoa powder that’s been treated with alkaline to neutralize its acidity. This treatment gives it a darker color and milder flavor. It is the cocoa powder that is used for making midnight-black baked goods like Oreos.
But then what’s black cocoa powder?
Black cocoa powder is Dutch-processed cocoa powder that’s even MORE heavily treated with the alkaline solution. Doing so results in an almost charcoal black cocoa powder with an even deeper intense chocolate flavor. For my pumpkin Neapolitan cookies, I used black cocoa powder. That’s why the chocolate portion of my cookies is so dark!
Where do I find either black or Dutch-processed cocoa powder?
Black cocoa powder is typically available in specialty herb and spice shops. However, I just order mine online. Amazon sells many varieties of black cocoa powder. However, my personal favorite is this black cocoa powder from King Arthur Baking Company.
You can easily find Dutch-processed cocoa powder in the baking aisle of every major grocery store. My favorite Dutch-processed cocoa powders in the grocery store are Ghirardelli Unsweetened Dutch Process Cocoa and Hershey’s Special Dark Cocoa.
How To Make The Recipe
Here are the basic steps to make these peppermint bark Oreos from scratch:
- Prep the ingredients for the Oreo shortbread dough. (Prep Time: 5 minutes)
- Make the Oreo shortbread dough. (Work Time: 5 minutes)
- Roll out the dough. (Work Time: 10 minutes)
- Chill the dough as you preheat the oven. (Chill Time: 10+ minutes)
- Cut out the cookies. (Work Time: 5 minutes)
- Bake the cookies. (Bake Time: 15 minutes)
- Cool the cookies before assembling with the peppermint bark topping.
- Prep the ingredients for the peppermint bark topping. (Prep Time: 10 minutes)
- Make the white chocolate for the peppermint bark topping. (Work Time: 10 minutes)
- Dip the cookies in the white chocolate. (Work Time: 5 minutes)
- Freeze the cookies while you make the dark chocolate topping. (Chill Time: 10+ minutes)
- Make the dark chocolate for the peppermint bark topping. (Work Time: 10 minutes)
- Dip the cookies in the dark chocolate (Work Time: 5 minutes)
- Garnish the cookies with peppermint. (Work Time: 5 minutes)
Best Recipe Tips
- Pay attention to the temperature of the ingredients! This recipe instructs you to use cold unsalted butter, straight from the fridge. Why?
Many traditional recipes instruct you to make the dough, chill it, roll it out, cut out cookies, chill the cutouts, and then bake them. It’s a lot of steps, and over the years, I’ve learned that you can eliminate almost half of them and still get perfect cookies every time.
Many recipes tell you to chill the dough immediately after mixing it together. This is because most instruct you to use butter that’s softened to room temperature. Softened butter will cause the dough to stick to your counter as you roll it out. But using cold butter results in a dough that’s still firm enough to be rolled out into a slab immediately after mixing without sticking. Cool, right?! - The recipe instructs you to use peppermint extract or oil, to taste.
First things first: if you’re using peppermint oil, be sure to use a kind that’s rated food-grade! I don’t want you accidentally ingesting peppermint oil made for aromatherapy.
And now, the scary second part: what does “to taste” actually mean? I personally hate using that descriptor, but it is necessary when it comes to peppermint extract. Mint extract can be a VERY overpowering flavor. And what tastes subtle to some will taste very toothpastey to others. So use your judgement! That means adding a few drops of mint extract to both chocolates at a time, stirring it in, and tasting as you go. If you have a ⅛ teaspoon measure, start there! I ended up using around ¼ teaspoon of peppermint extract for each chocolate.

Get the Recipe: Peppermint Bark Oreos Recipe
Ingredients
For The Oreo Shortbread Dough
- 2 cups (9 ounces or 255 grams) all-purpose flour
- 1 cup (3 ounces or 85 grams) black OR Dutch-processed cocoa powder, sifted if necessary
- ¼ teaspoon baking soda
- 1 teaspoon kosher salt
- 1 cup (2 sticks or 8 ounces or 227 grams) cold unsalted butter
- ¾ cup plus 1 Tablespoon (5.65 ounces or 160 grams) granulated sugar
For The Peppermint Bark and Assembly
- 6 ounces (170 grams) white chocolate, finely chopped
- peppermint extract OR oil, to taste
- 6 ounces (170 grams) dark (between 60% to 70% cacao) chocolate, roughly chopped
- 2 Tablespoons crushed peppermint candy pieces
Instructions
For The Oreo Shortbread Cookies
- Mix the dry ingredients. In a medium bowl, whisk together the flour, cocoa powder, baking soda, and salt.
- Prep the butter. Slice the butter into 1-inch cubes by taking a stick of butter and using a sharp knife to halve it lengthwise. Flip the butter on its side and halve it lengthwise again. At this point, you should have four long columns of butter. Hold the columns together and slice crosswise into rough 1-inch pieces—there’s no need to be precise!
- Cream the butter and sugar. In the bowl of a stand mixer fitted with the paddle attachment, combine the butter and sugar. Beat on low speed for 1 minute to soften the butter, then increase to medium-high and beat until light, fluffy, and doubled in volume, 2 to 3 minutes. Use a rubber spatula to scrape down the bottom and sides of the bowl as necessary.
- Add the dry ingredients. With the mixer on low, gradually add the dry ingredients. Increase to medium-low and beat until the dough clumps around the paddle and/or the sides of the bowl, 2 to 3 minutes.
- Form the dough. Tip the dough out onto the counter and use your hands to shape it into a rough disc. Use a bench scraper to divide the disc in half. Place one half on a piece of parchment paper around the size of a half sheet pan. Place a second sheet of parchment over the dough, creating a parchment “sandwich” with the dough in the middle.
- Roll out the dough. Use a rolling pin to flatten the dough between the parchment sheets, working from left to right. Turn the dough 90 degrees and repeat every so often—doing so will help prevent the dough from cracking as you roll it. If the parchment starts to wrinkle and leave creases in the cookie dough, pull the sheet loose and smooth it before rolling the dough more. Continue rotating and rolling until you have a slab of cookie dough between ⅛ and ¼ inch thick. Don’t worry too much about the size and shape of the slab! It doesn’t really matter since you’ll be cutting out cookies from this slab.
- Chill the dough. Transfer the slab of cookie dough, still in between the parchment, to a half sheet pan. Freeze while you roll out the dough for the second disc.
- Prep the oven. Once both your cookie slabs in the freezer, prep the oven. Position a rack in the center of the oven and preheat the oven to 325°F.
- Prep the pan. Once the oven is preheated, remove the first sheet pan of dough from the freezer. Use the overhanging parchment as handles to carefully lift the slab of dough off the sheet pan and onto the counter. Peel the top layer of parchment from the slab and use it to line the sheet pan once more.
- Cut out the cookies. Use a 1 ½ inch round cookie cutter to cut out circles, placing the cookies at least 1 inch apart on the prepared sheet pan. The dough should still be cool and firm to the touch. If not, freeze the sheet pan of cookies for at least 10 minutes before baking.
- Bake the cookies. Bake one pan at a time (keeping the other pan in the refrigerator) for 15 to 18 minutes, or until small hairline cracks are visible on the surface of the cookies. Cool the cookies on the pan on a wire rack for 20 minutes, or until the edges and bottoms of the cookies are set and feel firm to the touch, then turn out to cool completely. Repeat to bake the remaining cookies.
Assembly
- Melt the white chocolate. Place the white chocolate in the top of a double boiler or in a heatproof bowl set over a medium, heavy-bottomed saucepan filled with a few inches of simmering water (be sure the bottom of the bowl does not touch the water). Cook over low heat to melt the chocolate.
- Flavor the white chocolate. Once the chocolate is melted, remove from heat and set on a wire rack. Add 1 to 2 drops of peppermint extract, mixing to taste.
- Dip the cookies. Working quickly, dip half of each cookie into the melted white chocolate. Place the dipped cookies on a wire rack on top of a parchment lined sheet pan as you go.
- Freeze the cookies. Transfer the dipped cookies, still on the wire rack on top of the sheet pan, to the freezer. Freeze while you melt the dark chocolate.
- Melt the dark chocolate. Place the dark chocolate in the top of a double boiler or in a heatproof bowl set over a medium, heavy-bottomed saucepan filled with a few inches of simmering water (be sure the bottom of the bowl does not touch the water). Cook over medium-low heat to melt the chocolate.
- Flavor the dark chocolate. Once the chocolate is melted, remove from heat and set on a wire rack. Add 1 to 2 drops of peppermint extract, mixing to taste.
- Dip the cookies. Remove the cookies from the freezer. At this point, the white chocolate should be solid enough to handle. Hold a cookie so that your thumb and index finger are pinching at the top of the dip. Working quickly, dip the cookie into the dark chocolate.
- Garnish the cookies. Place the cookie on a wire rack on top of a parchment lined sheet pan. Immediately sprinkle with crushed peppermint candy pieces. Repeat with remaining cookies.
- Serve and store. Cool the cookies completely. The chocolate should be completely solid. The cookies can be stored in an airtight container or zip-top bag at room temperature for up to 7 days.
get new recipes via email:

buy the book
Weeknight Baking:
Recipes to Fit your Schedule
Over the past several years of running Hummingbird High, I kept a crucial aspect of my life hidden from my readers: I had a full-time, extremely demanding job in the tech world. In my debut cookbook, Weeknight Baking, I finally reveal the secrets to baking delicious desserts on a tight schedule.