
About This King Cake Recipe
King cake is steeped in symbolism and celebration, but making one at home is especially rewarding when the recipe honors tradition and improves on it. This king cake recipe leans into the cake’s rich history—from its oval shape and Mardi Gras colors to the playful tradition of hiding the baby—while also tackling the parts that usually intimidate home bakers.
I developed this version to be achievable, deeply flavorful, and visually striking, with clear guidance on shaping an authentic oval king cake at home (something most recipes avoid entirely). The result is a tender, bakery-style cake that feels just as festive and meaningful as one from New Orleans, but fresher, more personal, and made entirely on your own terms. Whether you’re baking for Mardi Gras or just want an excuse to celebrate, this is a king cake that’s truly worth the effort!

Ingredients To Make A King Cake
Now that I’ve convinced you to make king cake, let’s talk about some of the key ingredients:
Brioche Dough
This king cake recipe is made with a brioche dough base.
I mentioned before that, despite its name, king cake is actually more of a bread than an actual cake. But because it’s still technically a “cake”, you need a sweet, enriched dough to make it as cakey as possible. For my recipe, I used a tried and true brioche recipe that I’ve used to make babkas and Christmas wreath breads in the past. The dough has lots of eggs, butter, and sugar to make it as light and fluffy as possible.
Cream Cheese
This king cake recipe contains a cream cheese and brown sugar swirl.
When researching king cake recipes, I found that most were filled with a traditional cinnamon sugar filling, or a more modern cream cheese filling. While I love cinnamon sugar, I worried that using it in my recipe would make my king cake TOO similar to a cinnamon roll. So for my recipe, I decided to do a combination of BOTH fillings: I’ve mixed cream cheese, brown sugar, and cinnamon. Delicious.
Ground Cinnamon
This king cake recipe is mildly flavored with cinnamon.
That being said, I really want to stress how important it is to NOT overpower your cake with cinnamon. You want it to be noticeable, but not so noticeable that the cake is more “cinnamon roll” and less “king cake”. Just a teaspoon of cinnamon should do the trick.
Sanding Sugar and Food Coloring
You need both sanding sugar and food coloring to decorate the king cake.
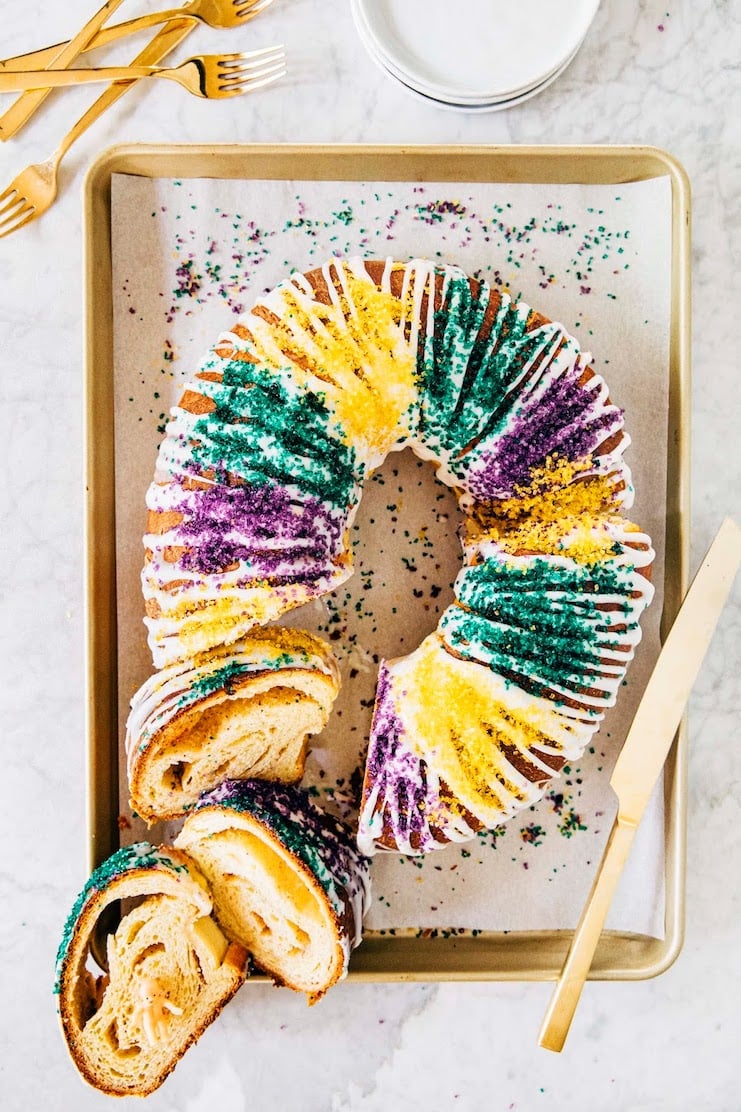
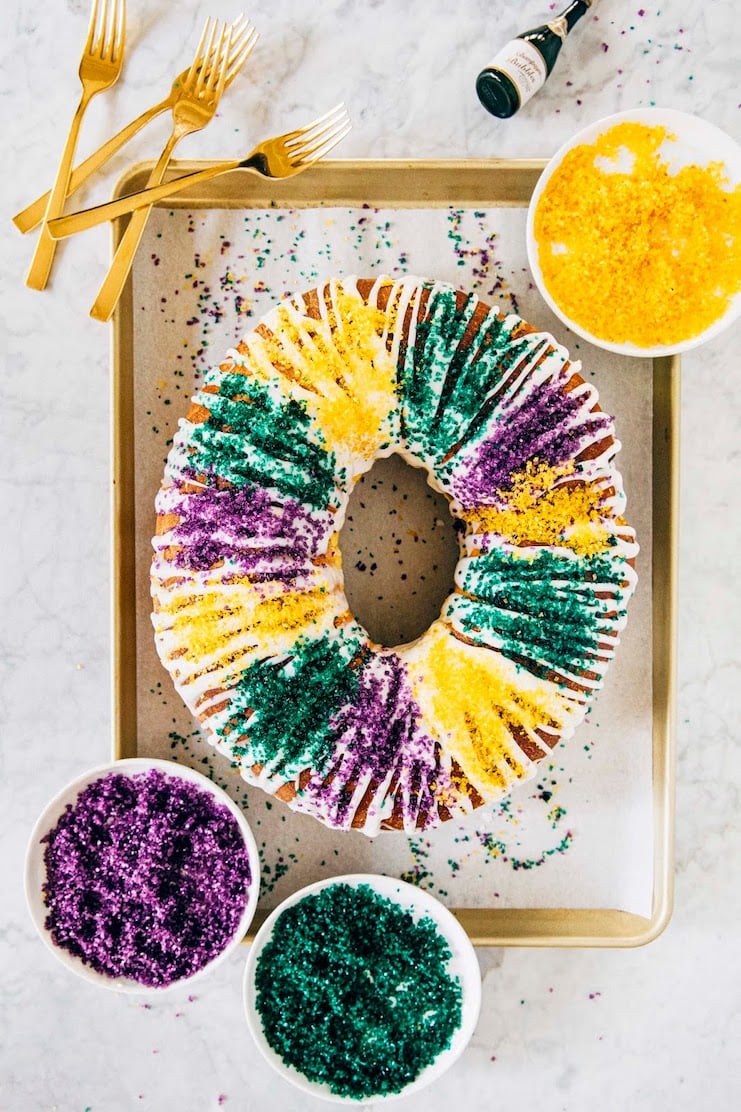
Sanding sugar is NOT necessary to decorate your cake. I decorated with sanding sugar because I have a giant bag of sanding sugar that I’m struggling to get through, and the king cakes of my childhood were often decorated with the stuff. But these days, many bakeries decorate their king cakes with sprinkles, nonpareils, and regular ol’ granulated sugar instead. Whatever topping you decide, get the colors right! You need purple, green, and gold yellow colors.
You can easily buy sprinkles and sanding sugar in those colors online, but you’re likely going to end up with a massive bag of each color that you probably won’t use for anything else. So instead, I like to dye my own.
I buy a bag of clear sanding sugar (or white sprinkles, if you’ve gone the sprinkles route) and put 1/4 cup of the sugar/sprinkles into a Ziploc bag. Then, I add a few drops of food coloring (all found in this food coloring kit). I seal the bag, and shake the sugar/sprinkles until the food coloring disperses to dye the sugar.
Plastic Baby
You need a plastic baby to hide in the cake in the spirit of true king cake tradition.
These days, a king cake ain’t a king cake unless you’ve hidden that damn baby in it. You can get plastic babies online at Amazon. Portlanders—I found mine at Lippman Company, where they were selling them for 20 cents a pop. In a pinch, you can hide another type of trinket, too! Before the babies came along, other hidden trinkets included fava beans, porcelain crowns, plastic rings, pecan nuts, and gold coins.
My Best Tips To Help You Make This King Cake
Making The Recipe Fit Your Schedule
One of my biggest pet peeves is waiting for dough to rise. Most doughs, especially ones molded into rolls or shapes like this one, usually need to rise twice: once after making the dough, and another time after shaping the dough. Each rise usually takes between an hour to two hours. That’s a LOT of time sitting around waiting and doing nothing. As a result, I tend to break these recipes up over 2 days.
On the first day, I’ll make the dough in the evening and let it rise overnight in the fridge. The cooler temperature helps slow down the rise, and after about eight hours (hey, the amount of time I usually sleep for), it’s perfect for molding. In the morning on the second day, I’ll punch down the dough and shape it. I’ve written the recipe below to reflect this schedule (for more of this type of recipe hacking to make them work within your schedule, check out my cookbook, Weeknight Baking).
But if you don’t want to wait overnight for your king cake, you can make it in one day too: follow the instructions to make the dough. Let the dough rise in the covered bowl as instructed, but instead of placing it in the fridge, place it in a warm, draft-free spot for about 1 to 2 hours or until the dough looks puffy and has doubled in volume. Proceed with the recipe as instructed.
Don’t Kill Your Yeast
For this recipe, it’s especially important to use the ingredients at the temperature they are listed in the recipe. Instant yeast needs to be activated at a specific temperature between 120° and 130°F. Anything cooler won’t be hot enough to get the yeast going, and anything warmer will kill the yeast, leaving you with a sad and flat king cake. Use an instant read thermometer to prep your ingredients. if you don’t have one, you can guesstimate it (but I can’t guarantee the results). Dip your finger in the warm butter and water; aim to heat them to a temperature that’s similar to a “just barely too warm” bath.
Don’t Overfill The Cake
After spreading the filling on the rolled out dough, you’ll need to roll it back up again and then pinch the edges together to make a round shape. I’m not going to lie—this part of the recipe gave me a WHALE of a time. You’ll need to make sure that, when rolling the dough, you do it as evenly as possible. If your log ends up thicker in some parts, the king cake will bake up unevenly!
I also found that the sealed edges always left a seam in the cake. While that’s not the biggest deal (especially since you end up covering the cake in frosting anyway), the sealed edges never rose as well as the rest of the cake. My first few king cakes came out looking like a giant croissant, with the seam side never rising as high as the seamless side.
To remedy this, I started leaving out filling towards the edges of the rectangle that make the seam (this’ll make more sense once you start making the king cake—come back and read this tip once you’re at this step, lol). The lack of filling helped the seam rise almost as quickly as the seamless side of the cake.
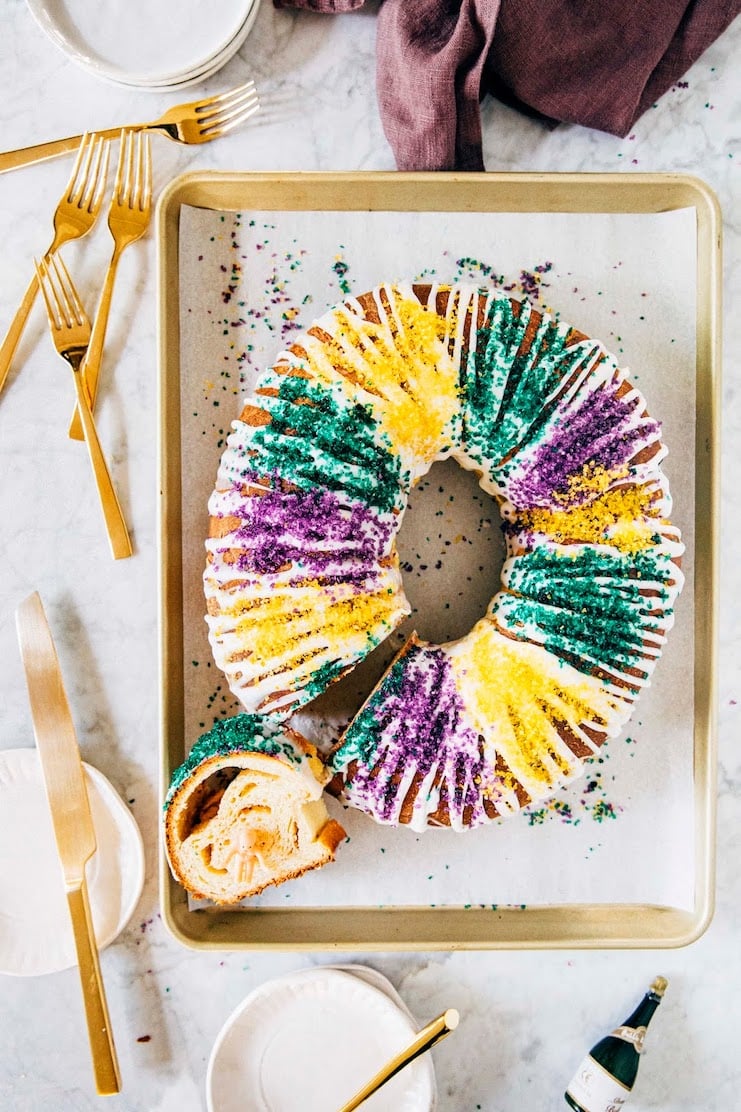
How To Make The Oval Shape
One of the most challenging things about making a king cake at home is getting the dough to bake in its oval shape. I still haven’t quite figured out how professional bakeries do it. I suspect that they use a pan since some of their king cakes definitely look more rectangular than oval. My first attempts at homemade definitely ended up more round and circular than oval.
For this cake, I ended up wrapping the dough log around a small, oval ramekin—I even baked it that way too! In the oven, the dough rose around the ramekin, helping keep its oval shape. That being said, I know most folks don’t own an oval ramekin (I specifically bought one for this recipe myself). But don’t let that stop you!
Follow the recipe as instructed and shape your king cake by pinching the ends together; at this point, you’ll notice that the cake looks more like a circle than an oval. You can either place a small bowl in the center, or just let it bake up without one. Both will result in perfectly round king cakes (though the one with the ramekin will likely have a more defined hole in the middle). Either way, it’ll still be just as tasty.

Get the Recipe: King Cake Recipe
Ingredients
For the Dough:
- 4 ¼ cups (19.15 ounces or 543 grams) all-purpose flour
- ½ cup (3.5 ounces or 99 grams) granulated sugar
- 2 teaspoons instant yeast
- ¼ teaspoon kosher salt
- 3 large eggs, at room temperature
- 1 large egg yolk, at room temperature
- ⅔ cup (5.35 ounces or 152 grams) unsalted butter, melted and cooled to between 120° and 130°F (see baker's notes)
- ½ cup (4 ounces or 113 grams) water, warmed to between 120° and 130°F (see baker’s notes)
For the Cream Cheese Filling
- 1 cup (8 ounces or 227 grams) cream cheese, at room temperature
- ⅓ cup tightly packed (2.5 ounces or 71 grams) light OR dark brown sugar
- 1 large egg yolk
- 1 teaspoon ground cinnamon
- ¼ teaspoon kosher salt
For the Icing
- 2 cups (8 ounces or 227 grams) confectioners' sugar, sifted
- 3 Tablespoons whole milk
- ½ teaspoon lemon extract
Assembly
- ¾ cup (5.25 ounces or 149 grams) sanding sugar
- green food coloring
- purple food coloring
- yellow food coloring
Instructions
Day 1: Make the Dough
- Make the dough. In the bowl of a stand mixer fitted with the dough hook, combine the all-purpose flour, sugar, yeast, and salt. Knead on low to combine, about 30 seconds. With the mixer on low, add the eggs and egg yolk, one at a time, only adding the next egg when the previous one is fully incorporated. Use a tall glass to press down into the center of the mixture to make a well in the center of the ingredients.
- Knead the dough, In a liquid measuring cup, whisk together the melted butter and water. Pour the mixture into the well and knead on medium-low for 10 minutes, or until sticky and elastic, using a rubber spatula to scrape down the bottom and sides of the bowl as necessary.
- Prep the dough for rising overnight. Tip the dough out onto a lightly floured counter. Dust your hands with flour and knead the dough once or twice into a rough ball. Scrape down the bottom and sides of the bowl to remove any excess dough. Spray the bowl with cooking spray and place the dough back in the bowl. Cover with plastic wrap. Refrigerate overnight.
Day 2: Make the King Cake
- First, make the cream cheese filling. In the bowl of a stand mixer fitted with the paddle attachment, beat the cream cheese on medium-low until soft, about 1 minute. Add the brown sugar and beat until light and fluffy, about 1 minute, using a rubber spatula to scrape down the bottom and sides of the bowl as necessary. Reduce the mixer to low and add the egg yolk, cinnamon, and salt, beating until combined. Scrape down the bottom and sides of the bowl once more, and beat on medium-high for an additional 30 seconds.
- Next, shape the cake. Uncover the dough and discard the plastic wrap. Tip it onto a lightly floured counter. Use a rolling pin to roll the dough into a large rectangle about 12 inches wide and 20 inches long. Press a bench scraper against the sides of the dough to create straight edges. Use an offset spatula to spread the cream cheese filling evenly across to the edges, leaving a 1-inch gap between the filling and the short ends. Starting from one of the long ends, roll the dough into a tight, even log. Bring the ends of the log together to form an oval ring, moistening and pinching the edges together to seal.
- Prep the dough for rising again. Place on a parchment-lined sheet pan. Cover with plastic wrap and let sit in a warm spot for 1 to 2 hours, or until puffy and your finger leaves an indent when gently poking the dough.
- Prep the oven. About 30 minutes into this rise, position a rack in the center of the oven and preheat to 375°F.
- Bake the cake. Bake the king cake for 35 to 40 minutes, or until the outside of the cake is golden brown and an instant read thermometer inserted into the center of the cake reads 200°F. Cool on a wire rack completely.
- Dye the sanding sugar. As the cake cools, make the sugar topping. Divide the sanding sugar evenly between three zip-top bags. Add one generous drop of green food coloring in one bag, one generous drop of purple food coloring in the second bag, and one generous drop of yellow food coloring in the third bag. Seal the bags. Shake each bag until the food coloring is distributed evenly into the sugar. Pour each of the dyed sugars onto its own separate plate and use a rubber spatula to spread them evenly across the plate to dry.
- Make the icing. Once the cake is cool, make the icing. In a medium bowl, combine the confectioners' sugar, milk, and lemon extract. Use a rubber spatula to mix until combined; the paste will be thick. Immediately pour the icing into a piping bag fitted with a small tip.
- Decorate the cake. Pipe long, thin lines of icing directly onto the king cake, covering it completely. Immediately sprinkle with the dyed sanding sugars.
- Serve and store. Serve immediately, or wait 1 to 2 hours for the icing to harden before serving. The king cake can be stored at room temperature for up to 3 days.
Notes
- One of my biggest pet peeves is waiting for dough to rise. Most doughs, especially ones molded into rolls or shapes like this one, usually need to rise twice: once after making the dough, and another time after shaping the dough. Each rise usually takes between an hour to two hours. That’s a LOT of time sitting around waiting and doing nothing. As a result, I tend to break these recipes up over 2 days. On the first day, I’ll make the dough in the evening and let it rise overnight in the fridge. The cooler temperature helps slow down the rise, and after about eight hours (hey, the amount of time I usually sleep for), it’s perfect for molding. In the morning on the second day, I’ll punch down the dough and shape it. I’ve written the recipe below to reflect this schedule (for more of this type of recipe hacking to make them work within your schedule, check out my cookbook, Weeknight Baking). But if you don’t want to wait overnight for your king cake, you can make it in one day too: follow the instructions to make the dough. Let the dough rise in the covered bowl as instructed, but instead of placing it in the fridge, place it in a warm, draft-free spot for about 1 to 2 hours or until the dough looks puffy and has doubled in volume. Proceed with the recipe as instructed.
- For this recipe, it’s especially important to use the ingredients at the temperature they are listed in the recipe. Instant yeast needs to be activated at a specific temperature between 120° and 130°F. Anything cooler won’t be hot enough to get the yeast going, and anything warmer will kill the yeast, leaving you with a sad and flat king cake. Use an instant read thermometer to prep your ingredients. if you don’t have one, you can guesstimate it (but I can’t guarantee the results). Dip your finger in the warm butter and water; aim to heat them to a temperature that’s similar to a “just barely too warm” bath.
- After spreading the filling on the rolled out dough, you’ll need to roll it back up again and then pinch the edges together to make a round shape. I’m not going to lie—this part of the recipe gave me a WHALE of a time. You’ll need to make sure that, when rolling the dough, you do it as evenly as possible. If your log ends up thicker in some parts, the king cake will bake up unevenly! I also found that the sealed edges always left a seam in the cake. While that’s not the biggest deal (especially since you end up covering the cake in frosting anyway), the sealed edges never rose as well as the rest of the cake. My first few king cakes came out looking like a giant croissant, with the seam side never rising as high as the seamless side. To remedy this, I started leaving out filling towards the edges of the rectangle that make the seam (this’ll make more sense once you start making the king cake—come back and read this tip once you’re at this step, lol). The lack of filling helped the seam rise almost as quickly as the seamless side of the cake.
- One of the most challenging things about making a king cake at home is getting the dough to bake in its oval shape. I still haven’t quite figured out how professional bakeries do it. I suspect that they use a pan since some of their king cakes definitely look more rectangular than oval. My first attempts at homemade definitely ended up more round and circular than oval. For this cake, I ended up wrapping the dough log around a small, oval ramekin—I even baked it that way too! In the oven, the dough rose around the ramekin, helping keep its oval shape. That being said, I know most folks don’t own an oval ramekin (I specifically bought one for this recipe myself). But don’t let that stop you! Follow the recipe as instructed and shape your king cake by pinching the ends together; at this point, you’ll notice that the cake looks more like a circle than an oval. You can either place a small bowl in the center, or just let it bake up without one. Both will result in perfectly round king cakes (though the one with the ramekin will likely have a more defined hole in the middle). Either way, it’ll still be just as tasty.
get new recipes via email:

buy the book
Weeknight Baking:
Recipes to Fit your Schedule
Over the past several years of running Hummingbird High, I kept a crucial aspect of my life hidden from my readers: I had a full-time, extremely demanding job in the tech world. In my debut cookbook, Weeknight Baking, I finally reveal the secrets to baking delicious desserts on a tight schedule.
Did you make this recipe?
Please leave a comment and rating for the recipe using the form below!
Your ratings make it easier to find the recipe online, and I’m always looking for ways to improve Hummingbird High.
This made such a lovely soft cake! The only thing I’d change next time is rolling it out – I went with the measurements in the recipe and found that my cake ended up very fat and with barely a hole in the middle. I think next time I’ll aim more for ~25in x ~9.5in and see if that helps make a longer, thinner sausage! Thanks for this really detailed guide. It was the first time I had made a king cake 🙂
I only have active yeast! I’m not a baker but really missing my king cakes since I moved from New Orleans! What can I do?
If you want to make your life easy, defs go to the store and buy some instant yeast! If not, you’re going to need to do some adjustments with the active dry yeast.
Instead of adding the active dry yeast to the rest of the ingredients, add 2 teaspoons of it and 1 Tablespoon from the 1/2 cup to 1/2 cup water heated to 110 to 115 F. Let sit for 5 minutes or until foamy and yeasty, then use in the recipe as directed.
This was a great King Cake recipe, and I’ve made quite few! It rose high – the overnight rise was key, and the second rise on a warm radiator helped too. My son loved the nice lemon flavor in the frosting. I’ll use a little more cream cheese in the filling next time.
I made this today, Jan 6 2022, using the 2 day method and volume measurements. The dough was a pleasure to work with, and the filling was nice, not too sweet and plenty flavorful . I added 1/2 tsp cinnamon instead of 1 tsp and added 1/4 tsp each of nutmeg and cardamom.
My issue was similar to another reviewer, a very fat, short circle that couldn’t be coaxed into an oval. Next time I will roll it out to at least 22 inches and probably 10 inches wide. The short fat shape meant the top browned too much before the cake was cooked through. I had to tent it with foil at the 15 minute mark and hope for the best!
Would make again, with modifications. I would give it 3.5 stars if possible