
I’ve spent the last few weeks — no, months — frustrated with my house. When I bought it last summer, I was under the impression that it was in good condition and that I wouldn’t have too much work to do. But how wrong I was!
Because the truth is that there’s been something wrong almost every week since moving in. First, it was minor issues like falling door knobs and leaky faucets… then I started noticing bigger issues like a crowded kitchen (not to mention seriously outdated — no hood, disposal, or dishwasher… can you imagine this situation for a food blogger?!), lack of natural light in the living room, and an incredibly outdated electrical panel. Are home owners supposed to feel pride? Because I feel nothing but shame and stress. This fact was exacerbated a few nights ago when I showed some friends around. I could see the disappointment in their faces. They smiled weakly during my tour, trying to say encouraging things like “Wow, the previous owners really didn’t do a whole lot with this, huh?” and “Well, it has a lot of potential!”
Ouch.
But they’re right — the house does have a lot of potential. It was built in 1912, putting it at just over 100 years old, and it has some beautiful details that are indicative of its age: bay windows, doug fir floors and a claw foot bathtub. If handled with care and love, some updates and a paint job could really turn the place around. Unfortunately, I have neither the time nor the money to provide or purchase any of those things. So instead I’m playing landlord and stuffing way too many people in the house so I can afford a new kitchen by next year. And while the extra rental income definitely has its perks, I’d say it doesn’t outweigh the cons of too many negligent tenants, none of whom particularly understand or care about my stresses.
Later, as I was basically sobbing on the phone to my mom, she told me to be patient. “Most houses take time,” she said. “You have to take it in steps.” I nodded weakly, secretly sighing at her response. It was something I’d heard from too many people, far too often in the last few months. But she’s right. They’re all right. It was something I knew myself. I will eventually have the home that I want — it will just take a lot of money (sigh) and time.
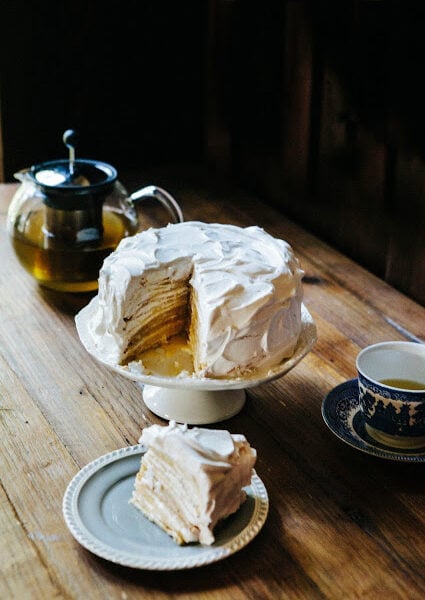
So with that, I present this coconut cream crepe cake:

Similar to my plight, this cake takes time, patience, and many layers. Eventually, after many layers of thin, delicate French crepes, coconut jam and coconut cream, the stack forms a beautiful, snow-white cake. The resulting cake is a slightly spongey, pillowy texture from the stacked crepes, with a lightness from the coconut cream. Every bite is a creamy dream and a reminder that with time and patience, I will eventually have the beautiful home that I want.
Some baker’s notes:
-
- Contrary to popular belief, you don’t need a fancy crepe pan or one of those wooden rakes to make crepes! All you need is a nonstick skillet pan with at least one handle to be able to swirl the batter.
-
- Coconut jam, also known as kaya, is a coconut spread made from coconut milk, eggs, and sugar. It’s incredibly popular in Southeast Asia and can be found online or in specialty Asian supermarkets. I used this coconut jam from Hey Boo, which I received as a Christmas present from Erlend’s mom.
-
- Similarly, coconut cream is available online or in specialty Asian supermarkets. Be sure to use coconut cream and not coconut milk — there’s a difference between the two. Coconut milk is more commonly found in grocer stores and has the consistency of cow’s milk. It is made from shimmering one part coconut in one part water. In contrast, coconut cream is significantly thicker (it has the consistency of flat whipped cream, if that make sense) since it is made from four parts coconut in one part water. Interestingly, you can actually find coconut cream when you buy a can of coconut milk: the cream that often rises to the top of each can is considered coconut cream. If you can’t find any coconut cream, you can always go this route and whip up the excess cream in any can of coconut milk — you’ll just need several cans of coconut milk since this recipe uses a lot of cream.
- Not a fan of coconut? Feel free to sub in with regular whipped cream and any other fruit jam of your choice. I wouldn’t use jam in every layer though — I feel like that would get too intense, fast. I would spread the jam every 5 layers or so.


Get the Recipe: Coconut Cream Cake
Ingredients
For the Crepes
(makes a LOT of crepes, enough for an 8-inch cake)
- 4 large eggs
- 1/4 teaspoon kosher salt
- 2 cups all-purpose flour
- 2 1/4 cups whole milk
- 1/4 cup (1/2 stick) unsalted butter, melted and cooled
For the Coconut Cream Filling and Topping
(makes enough for an 8-inch cake)
- 2 cups coconut cream, chilled overnight
- 1/4 cup confectioner’s sugar
- 2 teaspoons pure vanilla extract
- 1/2 cup coconut jam
- 1/4 cup granulated sugar
Instructions
For the Crepes
- In a medium bowl, whisk together 4 large eggs and 1/4 teaspoon kosher salt until uniformly yellow.
- Add about half of the flour (around 1 cup) to the eggs, whisking gently into the eggs. The batter will be a little lumpy, but that’s okay right now. Add about half of the milk and continue whisking. The milk will thin out the batter. Alternate between the flour and milk until you’ve added it all. Continue whisking until smooth — be careful not to overmix, it should only take a minute or two.
- Once the batter is smooth, add 1/4 cup melted unsalted butter and whisk again until the butter is just incorporated into the mixture. Cover the batter and refrigerate for 1 hour.
- Once the batter has chilled, heat a medium (at least 8 inches) non-stick skillet pan on medium heat. The surface of the pan needs to be pretty hot to make crepes — test its heat by adding a drop of water to the hot pan. If the water sizzles and bubbles and evaporates, the pan is hot enough. Pour about 1/4 cup batter into the pan and use the handle to twirl the pan so that the batter forms a circle. As you twirl the pan in a circular motion, the batter should spread and makes the crepe. Continue cooking until the crepe has set and the edges begin to crinkle up — a set crepe will usually slide around the pan when it is ready. Slip a spatula under the crepe to flip it over and continue cooking for another 20 seconds, or until the crepe's surface has browned. Repeat the process until the batter is finished, allowing the crepes to cool on a wire rack completely before frosting and building the cake.
Putting It All Together
- First, make coconut whipped cream: in the bowl of a freestanding electric mixer fitted with a whisk attachment, combine 2 cups coconut cream, 1/4 cup confectioner's sugar and 2 teaspoons pure vanilla extract. Whisk on medium-high speed until soft peaks form. Use immediately.
- Place 1 crepe in the center of your cake plate or cake stand, and use an offset spatula to spread 3 tablespoons coconut jam evenly over crepe. Spread 3 tablespoons coconut cream, before stacking with a new crepe and repeating the process. On the fifth crepe, sprinkle a tablespoon of granulated sugar on the crepe before spreading with coconut jam and coconut cream. Repeat the process until all crepes are used.
- Spread the remaining coconut cream across the top and the sides of the cake, to cover the layers. The cake is best when eaten immediately.
It's during seasons like this one that I find particular comfort in the immediacy of kitchen work. Even super complicated recipes can get done in a day or two! Not so with so much else in life. SIGH is right. I think it's brave of you to write about the house here, openly and honestly, and be real about how you feel. I'd be stressed out too with a house I wanted to fix! Just about anybody would be.
I am sorry about the house situation..hopefully by the end of the year, you will have a fancy kitchen just the way you wanted. Crepe cakes always stresses me out,..yours looks fantastic!
When we bought our first house I was convinced we were going to go bankrupt immediately. We've been in our second house about, uh, 8 years now, and it is far from finished. I thought we were on the 10-year plan, but I think it's probably more like the 20-year-plan. It's the Portland way. I think I know one person in Portland whose house is actually "done"! You are way ahead of the game, but the journey is not for pussies. Be strong! [Oh, and I made the chocolate crinkle Hug cookies for that cookie party, and they were a big hit. Thanks!]
I love this so hard: "The journey is not for pussies." Next time I'm feeling down about my house, I'll be sure to remind myself of this!!!
Try not to stress too much, my husband and I bought our first house when I was 19. We were dirt poor and got into way too much debt. We couldn't afford to do anything to it for years, and boy did it need a lot done to it! I felt ashamed of it too. I hated having people over because it really wasn't a nice house to be in. After 5 and a half years we managed to fully renovate it, not an inch was left untouched, BUT we did it all ourselves except for the legally required stuff (gas and electricity). It took months of working on it every single day, which was very hard with a baby. By the end of it the house looked a million percent better but we were ready to move in to a better area so we sold it. We had bought the house in a real estate boom. 6 months after we bought, the economic bubble popped. Had we not done up our house we would've lost about 20k and really struggled to sell it. We managed to sell our house 5 days after it had been put on the market, make a 60k profit and only spent 20k for a total house renovation. The very hard work paid off! It can take years of struggling but keep working through it. We walked away with a great DIY skill set, a sense of achievement and some extra cash.
Wow, this is a great story — congrats on all your hard work and making such a profit! I'm so awful at DIY though, I really wish that somewhere along the way I had been taught basic skills. Maybe it's time to stop baking and start learning simple carpentry/plumbing/electricity skills…?
Home ownership can be tough at times. Hang in there!
This cake look absolutely delicious.
You poor thing with your house. I really wish you good nerves, a lot of patience and much force to rebuild your house into your dream house.
Greetings
Evelyn
, love your cakes, have to try your recipe!
cookings set
I feel your home owners pain. I bought a 1918 house in 2004, and while it is a constant source of things to fix, it's beautiful and I love it. Homes are that way. You'll always have something to do and be warned – when fixing one thing, you'll often find another that needs you attention too. It'll be ok, and ignore you're friends.
Ok, I love crepes and putting them in cake, wow. I watched my parents tackle renovating a 100+ year old house on their own, we all helped with the work (only heat that first year was from a wood stove in the kitchen). I was 12yrs old and got to paint and put up sheet rock with my dad. I'm sure they were stressed, but they never showed it and those are some of my fondest memories. We had to actually walk outside to get to the bathroom until my dad closed in part of the back porch. I was so amazed to see them buy an inexpensive chest of drawers, cut a hole in the top for a sink, tile the top and we had a bathroom counter with a hand thrown bowl by a local artist for the sink. This is your house, I hope you are able to step back at times and just enjoy the journey.
I've never heard of crepe cake before, and now I NEED one. As for the house thing, I think houses and babies are similar in that "getting one" is only the beginning, and then you are exposed to a whole other world of things to learn and do. It takes money, patience, and a positive attitude through the ups and downs! I am totally not a DIYer so every year I plan my budget to try to do one project for the house we bought 4 years ago- I usually do it during the first week of January. It can be small things- my first year I contracted to fix the uneven cracked steps I was constantly tripping over, and then a porchlight that blinked like it wanted me to have a seizure. It was a couple years until I could finally do the kitchen. As you're saving, pick something do-able, just so you're making progress. Also, this is a weird tip- I kept entering lots of contests for kitchen makeovers! I didn't win, but I did at one point get some product credit that helped!
Hi
Hope the house is now coming together in a better way for you!
I love this cake and think the jam might be a challenge to find but I'd like to try blueberry jam in its place and use every 5crepes or so, but I need to make this a day in advance, or at least 7hours, but a whole day would be better. Any idea as how it'll look if I don't serve immediately??
Thanks!
I believe there is an error in this recipe. In the ingredient section, it states 1/2 cup coconut jam, but in the instructional section, it states 3 tbsp on top of every crepe.
This made no sense mathematically. I kept re-reading in case I’d read it wrong, but no. There’s clearly an error.
I wasn’t a fan of this cake, at all.
This was delicious but the proportions of the recipe were way off. A half cup of the jam was not enough to do what the recipe called for and the cream didn’t make enough for us to make all of the layers let alone still cover the top and sides. We ended up making the cake about half the height it could have been if we had more filling. If we make it again (we will, it was very tasty) we’ll double the amount of cream and jam in order to be able to use all of the crepes.
The icing was very difficult to get thick enough to stick to the cake well, I had to almost freeze it before beating. At the suggestion of the other comments I started with a large amount of coconut jam. The crepe ratios and recipe was perfect however and the cake turned out very pleasing.