
A few weeks ago, the weather in Portland was absolutely beautiful and stunning. We’re talking about 80-degree, blue and cloudless skies… in April. If you’re a Portland local, you’ll know how utterly rare and crazy it is to have such beautiful weather so early in the spring.
Encouraged by the perfect weather, my friends and I decided to plan a camping trip for this weekend. But not just any kind of camping trip. A glamping trip. Are you familiar with the term? It’s a portmanteau of the words “glamorous” and “camping”, and when combined together is a shortcut for “glamorous camping”.
So what goes on in a glamping trip? Well, everything that goes on in a camping trip… but more glamorous. On the last glamping trip I went on, instead of eating from cans of beans and rice, my friends and I had brought a cooler of pork and red pepper skewers from New Seasons, Portland’s local version of Whole Foods. We’d also brought a pound of asparagus (complete with lemon, black pepper, and butter for garnish) to grill over our fireside. Other glamping items? Pillows, toilet paper, and champagne.
As we were divvying out supplies and assigning who was purchasing what, my friends of course suggested that I take care of dessert. And since we were running out of space in the car, why not just bring some chocolate, marshmallows, and graham crackers for s’mores? Good quality versions of each ingredient, of course.

Looking at what I had been assigned, I couldn’t help but feel a little bit cheated. S’more fixings? Really? Didn’t my friends want me to whip up a batch of cookies or brownies or something? I know that s’mores are a campfire classic, but it seemed a waste to have the food blogger of the group bring nothing but ingredients. Staring doubtfully at the chocolate, marshmallows, and graham crackers in front of me, I had an idea.
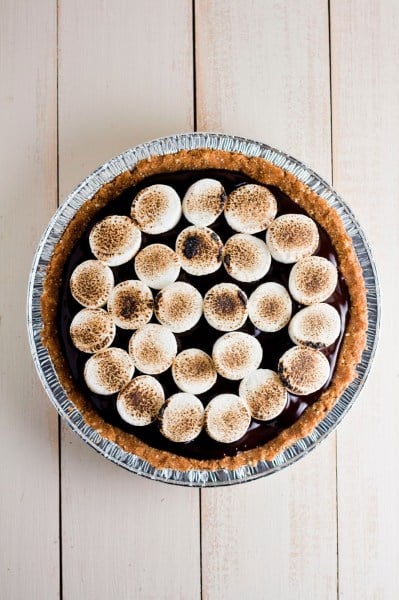
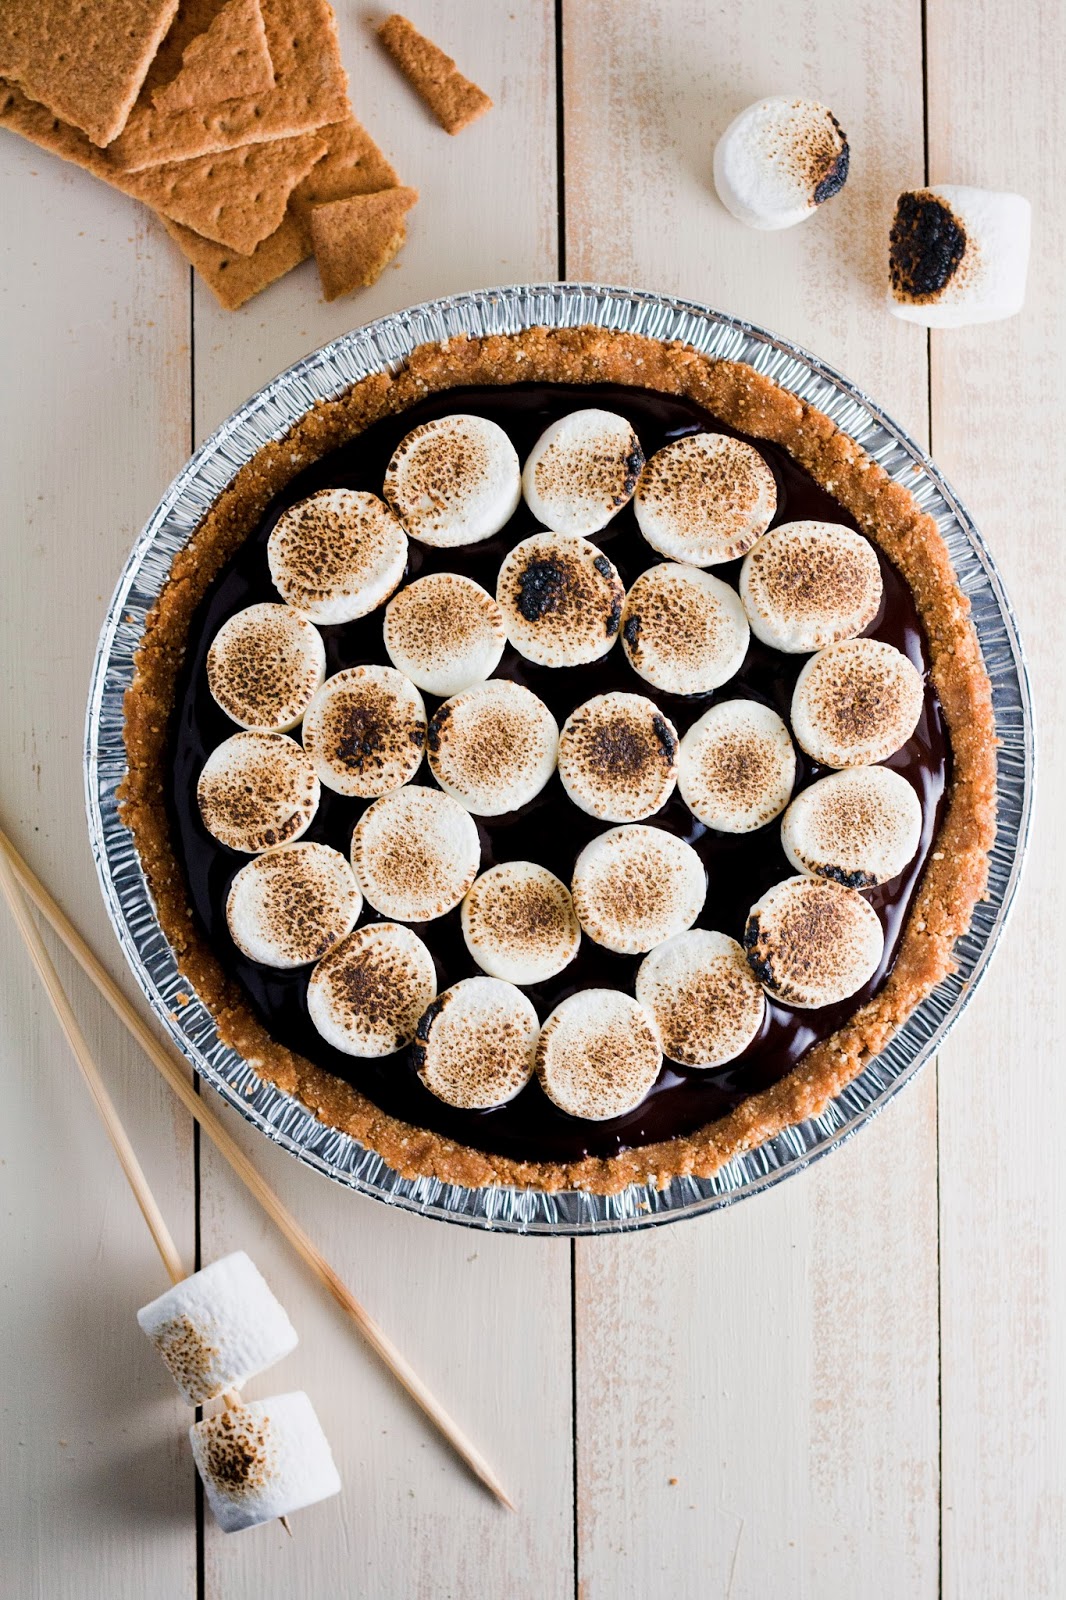
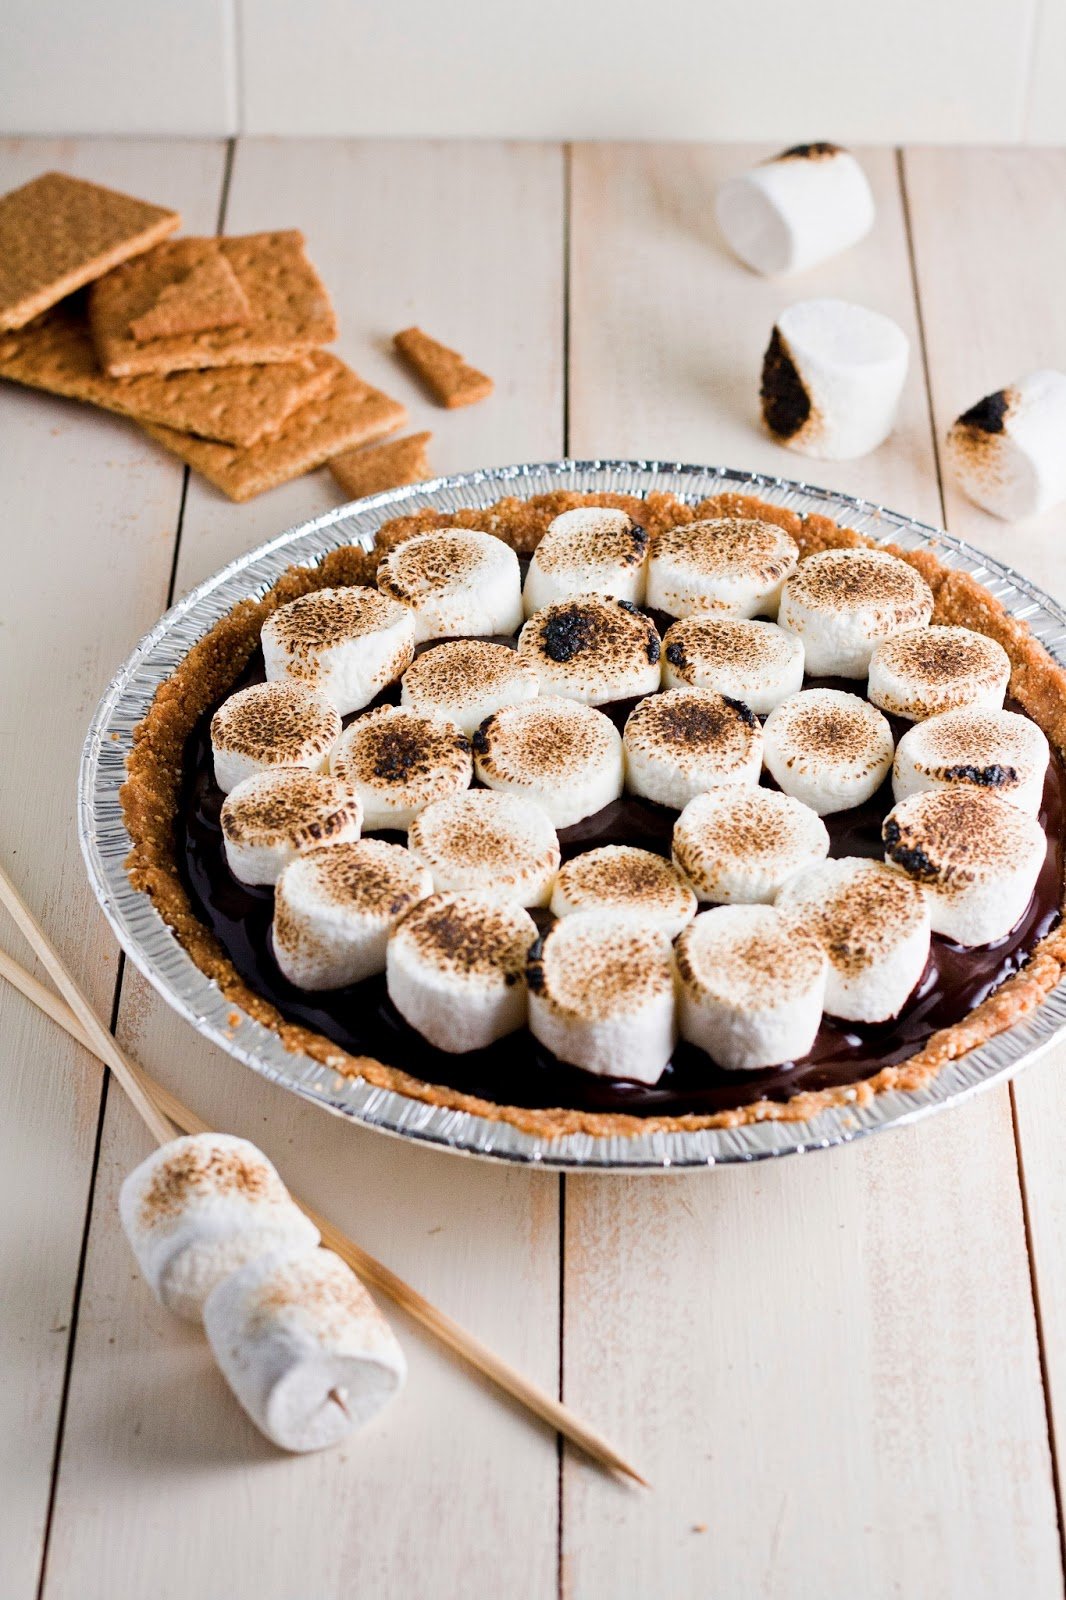
Pie.
Specifically a s’mores pie.
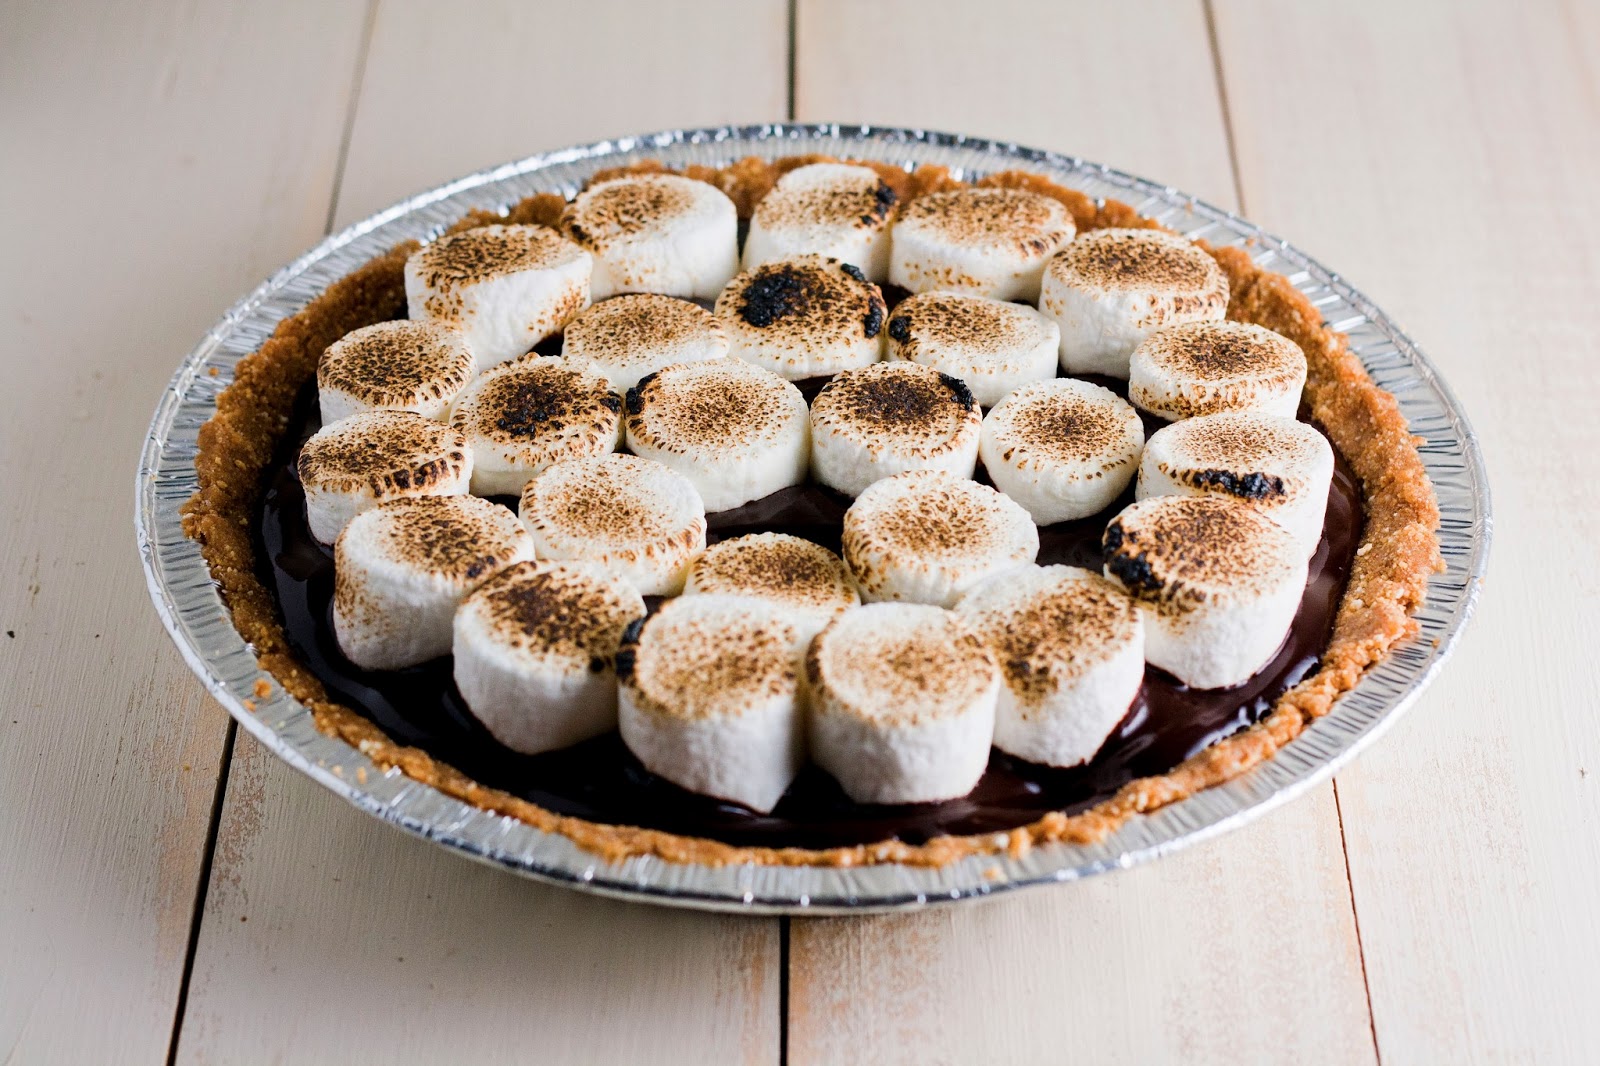
Because there is nothing that defines glamping better than a s’mores pie. I feel like this pie is the very definition of glamping: an ordinary camping staple, classed up and turned on its head. To make the pie even more glamorous, I used a graham cracker crust recipe from New York City’s famed Momofuku Milk Bar and a chocolate truffle recipe from San Francisco’s famed Tartine Bakery. Since I had friends from both cities attending the camping trip, I wanted to represent some of the best and highly lauded bakeries from their hometown.
I took an instagram picture of the pie and sent it to my friends, who all freaked out in excitement. Our enthusiasm for our camping trip was at an all time high… until we checked the weather report. Highs in the 40s, constant, icy rain, and some thunder. And just like that, our plans for our glamping trip was thrown out the window.
Oh well. At least we still had this pie.
A few baker’s notes:
-
- The graham cracker crust is a no-bake recipe from Momofuku Milk Bar’s cookbook. Simply toss the dry ingredients together with the wet ingredients, and the wet ingredients will act like a glue and turn the mixture into small clusters. The crust is easiest to mold just after mixing, and holds it shape best if chilled for an hour in the freezer.
-
- The chocolate truffle recipe is adapted from a no-bake recipe from Tartine Bakery’s cookbook. The chocolate truffle will hold its shape in temperatures below 70 degrees, but starts to get melty at temperatures warmer than that. This recipe is definitely best for cool spring nights.
-
- I used around 27 marshmallows for my pie, but you can use more or less depending on your taste. If you want to make a dense pie (where hardly any chocolate shows), you could probably finish off an entire bag of marshmallows.
- I used a chef’s torch (you know, the kind they use for creme brulee?) to toast my marshmallows, but if you don’t have one, don’t fret! Simply spread out your marshmallows on a baking tin and broil in the oven. Watch out though — because the marshmallows toast easily, you’ll have to monitor them very carefully. I’d suggest even keeping the oven door open. Simply toast until the outsides have started to brown, but the marshmallows still retain their shape.
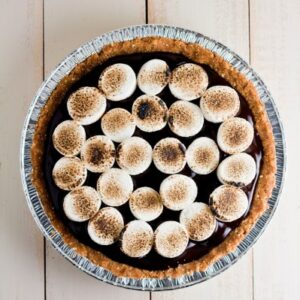
Get the Recipe: S’mores Pie
Ingredients
For the Graham Cracker Crust
(makes 2 cups, enough for a 10-inch pie)
- 1 1/2 cups graham cracker crumbs
- 1/4 cup milk powder
- 2 tablespoons granulated sugar
- 3/4 teaspoon kosher salt
- 4 tablespoons (1/2 stick) unsalted butter, melted
- 1/4 cup heavy cream
For the Chocolate Truffle and Marshmallow Filling
(makes enough for a 10-inch pie)
- 8 ounces bittersweet chocolate, finely chopped
- 1/3 cup heavy cream
- 1/2 tablespoon light corn syrup
- 2 1/2 tablespoons (1.25 ounces) unsalted butter, at room temperature
- 1 bag of marshmallows
Equipment
- A chef’s torch
Instructions
For the Graham Cracker Crust
- In a medium bowl, whisk together 1 1/2 cups graham cracker crumbs, 1/4 cup milk powder, 2 tablespoons granulated sugar, and 3/4 teaspoon kosher salt until well combined and evenly distributed.
- Whisk together 4 tablespoons melted, unsalted butter and 1/4 cup heavy cream. Add to the dry ingredients (from the first step) and use a rubber spatula to toss together until evenly distributed. The butter will act as a glue, adhering to the dry ingredients and turning the mixture into a bunch of small clusters. The mixture should hold its shape if squeezed tightly in the pal of your hand. If it's not moist enough to do so, melt an additional 1 to 1 1/2 tablespoons of butter and mix it in.
- Mold into your pie pan immediately — the crust is easiest to mold just after mixing. Use the back of your hand and your fingers to press the crust evenly across and up the sides of the pan. Cover with plastic wrap and chill in the freezer for 20 minutes. While the crust is chilling, make the chocolate truffle filling.
For the Chocolate Truffle and Marshmallow Filling
- Place 8 ounces finely chopped bittersweet chocolate in a heatproof mixing bowl.
- In a small saucepan, combine 1/3 cup heavy cream with 1/2 tablespoon light corn syrup and heat to just under a boil.
- When the cream and corn syrup mixture is hot enough, pour over the chocolate and let sit for a minute or two. Stir with a rubber spatula in a circular motion until the chocolate has melted. Once the chocolate has melted, add 2 1/2 tablespoons butter and continue stirring until incorporated.
- Once the butter has been fully incorporated, use a rubber spatula to carefully transfer the chocolate mixture onto your prepared graham cracker pie crust (from the first recipe). Carefully spread out the chocolate mixture — at first it won't seem like there's enough for the pie, but believe in the recipe! It'll work out. Don't worry if the chocolate all pools at the base of the pie.
- Gather your marshmallows and gently press the base of each marshmallow into the liquidy chocolate. You’ll notice that the marshmallows help spread out the chocolate. Once you’re satisfied with the amount of marshmallows you have in your pie, transfer the pie to chill in the fridge for an hour.
- Once the pie has chilled and you're ready to serve, toast the marshmallows by using a chef's torch and brown the surface of the marshmallows by moving the flame in a circular motion. Serve immediately.
I think that pie could make even a rainy day better. That looks so delicious!
I think this time of year is harder for me than the winter because we will get these random patches of glorious weather and then be right back to grey skies and rain. I feel like it is such a tease. The pie looks great, btw. A sophisticated take on a camping staple. Perfect for glamping.
This looks fabulous! Great story!
I would definitely pretend to go camping just to have this pie. I might then book it for running water and a bed, but I would do what I need to in order to get a slice of this
S'mores pie, YES. I love your blog, PS. Great photos, great recipes. Top notch!