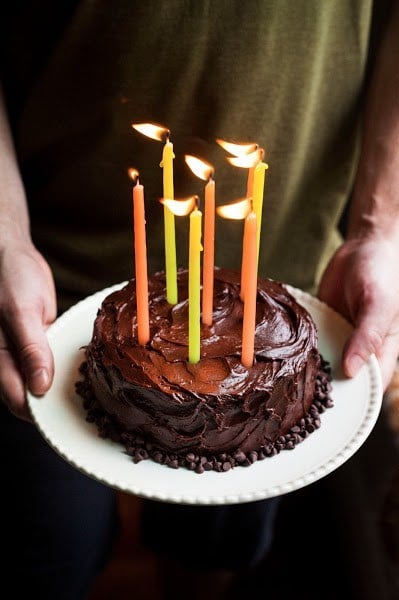

This past weekend, it was my boyfriend Erlend’s birthday. Although we had a ton of friends in town, we managed to find some time to celebrate his birthday quietly. It’s not that we don’t love our friends or anything, but more that Erlend’s not one for big, extravagant birthdays. Like me, he hates being the center of attention and instead prefers smaller affairs involving a meal at a nice restaurant and a drink at a quiet bar.
Despite the fact that Erlend and I have been dating for nearly four years, I still find it difficult to find him a birthday present. Normally I would go the baked goods route, but when it comes to dessert, we are on the opposite sides of the spectrum. While I love refined sugar and flour and all things sweet, he tends to be healthier and instead prefers to indulge on salty, savory snacks.
A few weeks ago, however, I found myself idly flipping through the Miette Cookbook when I realized Erlend was looking over my shoulder. “What’s that?” he asked, pointing at a picture of a beautiful, golden cake covered in what looked like an extremely rich and decadent chocolate frosting.
I read the description out loud: “Bumblebee Cake: a yellow butter cake covered in a bittersweet ganache frosting.”
“You should make that. I’d eat it.”
I smiled a little bit. The Miette Cookbook has that tendency to pull people in; it’s actually one of my favorite cookbooks on my bookshelf. Almost every recipe has a picture of the final product, along with enticing, brightly-lit pictures of Miette’s bakeries in San Francisco. Although I’m not a fan of their macarons (which, for some reason, they insist on calling “macaroons” — people, there is a BIG difference between a macaron and a macaroon!!!), I’ve had a surprising amount of success with the recipes from their cookbook, especially with their cookies and 6-inch cakes.
I scanned through the ingredients for the bumblebee cake, but balked when I saw that the recipe used 5 egg yolks. I tend to avoid recipes that use an excessive number of a specific ingredient. Especially because, well, what was I supposed to do with the leftover 5 egg whites?! I waved Erlend away. “Maybe for a special occasion.”
But really, I meant a special occasion… like his birthday!
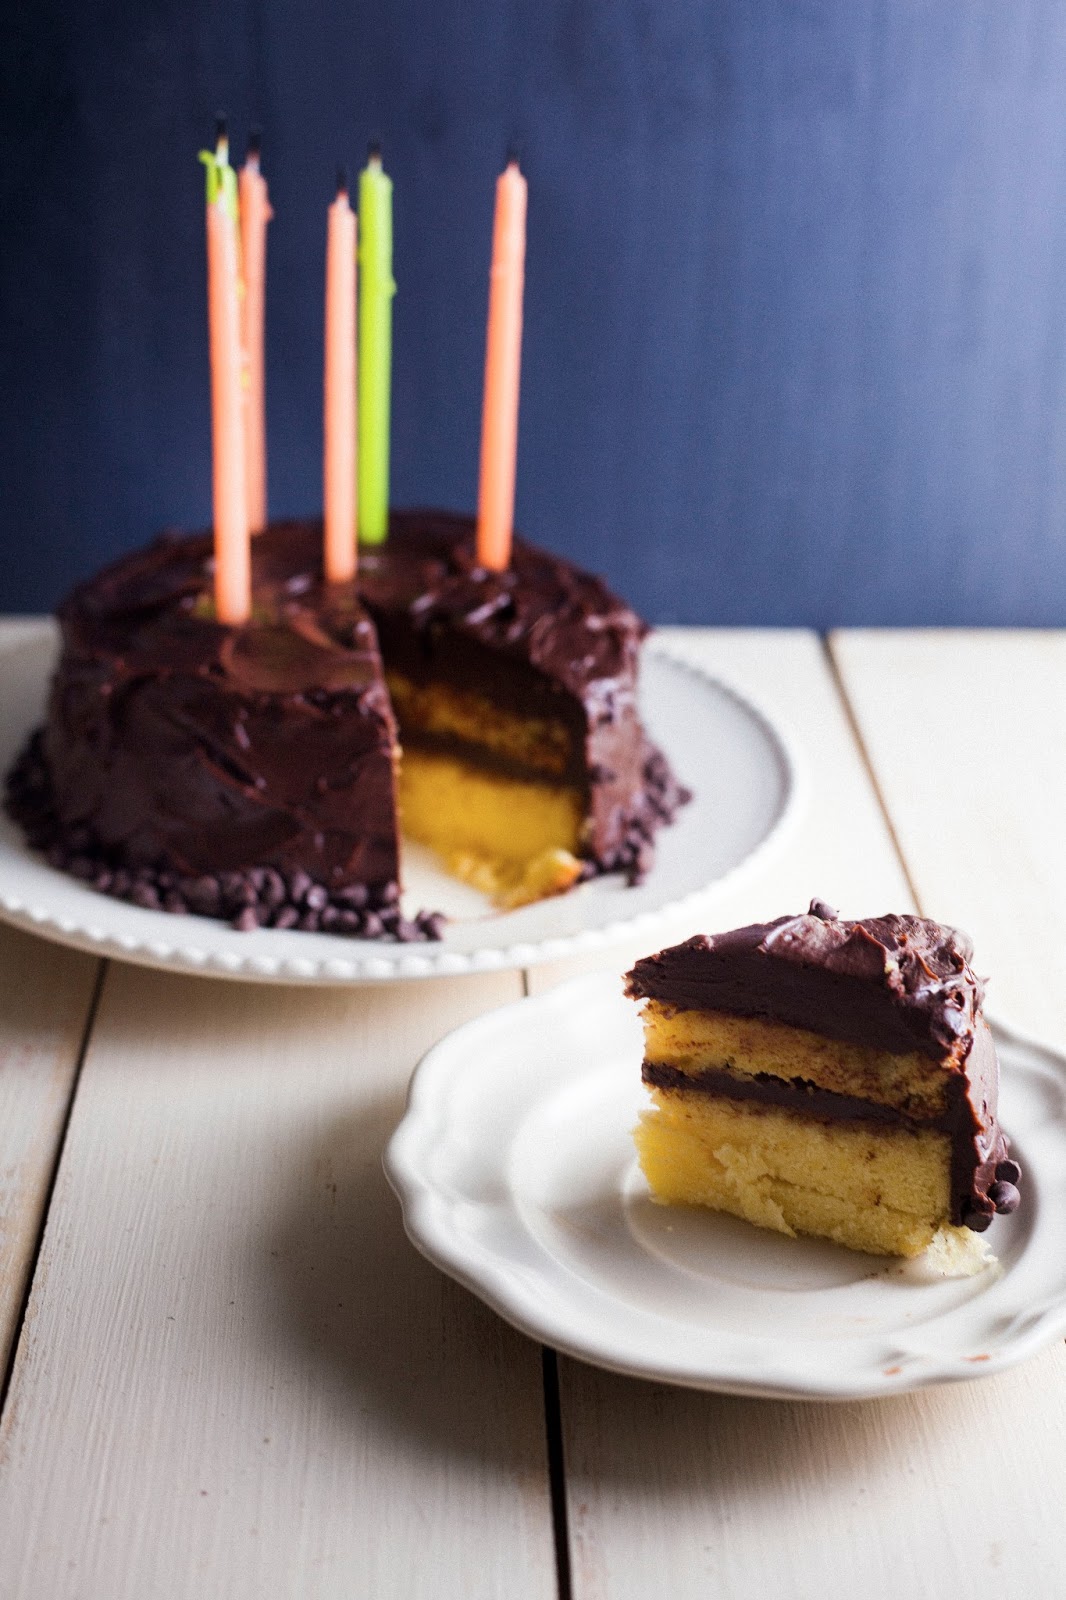
In many ways, this cake is the perfect cake for Erlend. Dense and buttery with an intense chocolate flavor, it’s the perfect combination of some of his favorite flavors and textures.
The cake’s yellow color is completely natural, coming from an almost obscene amount of both butter and egg yolks. Because the cake uses 5 egg yolks, its texture is extremely dense and hearty, similar to that of a pound cake. Buttery to the point of almost tasting a little bit salty, it holds up wonderfully against the incredibly intensely decadent chocolate frosting — which is so good that it deserves a paragraph of its own.
Miette calls this frosting a “ganache”, but originally, I felt like that it was a bit of a misnomer. I tend to think of ganaches as runny, shiny chocolate glazes, but this recipe produced a thick and pliable mixture similar to regular frosting. In any case, I was wrong — according to Wikipedia, a ganache simply refers to any mixture that involves warm cream being poured over chocolate. This recipe does exactly that, with almost 2 parts chocolate to 1 part cream, producing an extremely decadent and rich chocolate frosting. There’s not too much added sugar here — the flavor profile is chocolate all the way, providing an awesome compliment to the cake’s salty, buttery flavor.
This is one of those cakes that, after I took a bite, I just sighed. Sometimes, it’s good to be a food blogger.
A few baker’s notes:
-
- This makes one, small 6-inch cake — perfect for two people. The cookbook actually provides an amount for two cakes, which I then cut in half. Some of the volume measures are kind of odd, which is why I’ve included the specific weight — I suggest using a kitchen scale to measure out the ingredients. The cake really is small, so if you’re feeding a bigger crowd, I suggest doubling the recipe to make an incredibly tall layer cake, or two smaller, separate cakes.
-
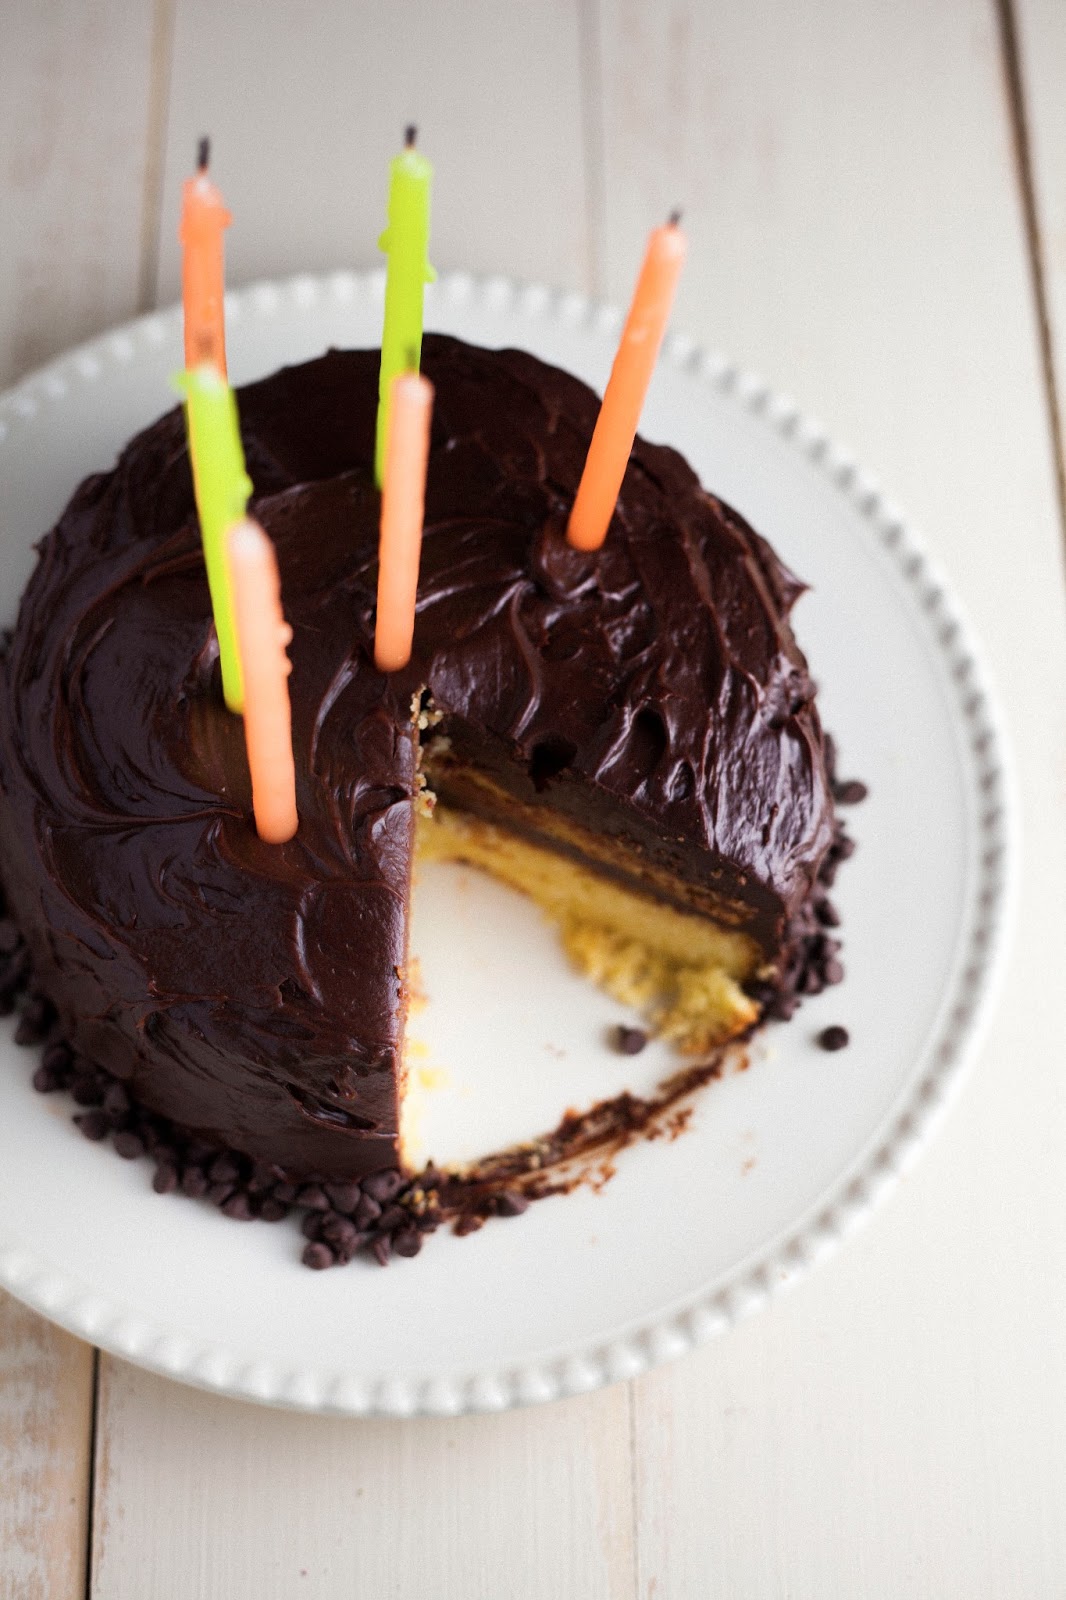
- In the Miette cookbook, the book is officially named “Bumblebee Cake”. The reason why is because the author/head baker of Miette cuts the yellow cake into four even layers, heaping generous amounts of chocolate frosting between each layer. Cutting into the cake reveals the different frosting and cake stripes, which she likened to the stripes of bumblebee. So… yeah, I didn’t cut the cake into the four different layers like I was supposed to. It’s a tiny cake! Each layer would have been thinner than my thumb! I lazed out and instead just cut the cake into two layers and it still tasted awesome. In fact, I think I actually preferred two layers since I got hearty bites of cake with each bite, and the frosting can be a bit intense. But feel free to cut it into four layers if you want to go all out and have the full Miette experience.
-
- Because the cake uses so much butter, you need to cream the butter and sugar together for around 10 minutes+ to get the light and airy texture we all expect from cakes. I know 10 minutes sounds extreme, but please, please, please don’t skip this step or be stingy with the creaming process! Creaming it for 10 minutes allows the sugar to whip plenty of air bubbles in the butter (and therefore the batter). If you don’t cream it for an extended period of time, you’ll end up with a dense, flat cake and I’ll cry for you.
-
- Similarly, be sure to take your time when adding the egg yolks. Add them one at a time, only adding the next egg yolk when the egg yolk prior to that has been completely incorporated into the batter — it should take around 2 minutes per addition.
-
- According to the cookbook, the cake’s flavor improves with time as the vanilla and butter tones intensify — you can make the cake up to 3 days in advance to allow the flavors to grow.
-
- The recipe instructs you to make a simple syrup soak for the yellow cake; DO NOT SKIP THIS STEP. I know it sounds a little gratuitous, but soaking the yellow cake makes it super moist. The cake and frosting is also not too sweet to begin with, so the syrup adds just enough sweetness to cut down on the chocolate and butter flavor.
- The chocolate frosting instructs you to use chocolate with 60% cacao; anything more, and the chocolate will be too bitter and intense. Follow the recipe!


Get the Recipe: Yellow Birthday Cake with Chocolate Frosting
Ingredients
For the Yellow Butter Cake
- 1/2 cup plus 1/3 cup (4 ounces) all-purpose flour
- 1 teaspoon baking powder
- 1/4 heaping teaspoon kosher salt
- 7 tablespoons (3.5 ounces) unsalted butter, at room temperature
- 1/2 cup granulated sugar
- 5 large egg yolks, at room temperature
- 1/3 cup buttermilk
- 1/2 teaspoon vanilla extract
For the Simple Syrup Soak
(makes 1/4 cup, enough for one 6-inch cake)
- 1/4 cup granulated sugar
- 1/4 cup water
For the Chocolate Ganache Frosting
(makes around 3 cups, enough for one 6-inch cake)
- 10 ounces bittersweet chocolate, preferably with 62% cacao
- 2/3 cup confectioner's sugar, sifted
- 3/4 cup plus 1 tablespoon heavy cream
- 2 large egg yolks
- 3 tablespoons unsalted butter, at room temperature
Instructions
For the Yellow Butter Cake
- Prepare a 6-by-3 inch round cake pan by liberally spraying with cooking spray and dust with flour. Tap out the excess flour.
- Preheat the oven to 350 (F).
- In a medium bowl, whisk together 1/2 cup plus 1/3 cup (4 ounces) all-purpose flour, 1 teaspoon baking powder, and 1/4 heaping teaspoon of kosher salt. Set aside.
- In the bowl of a freestanding electric mixer fitted with a paddle attachment, combine 7 tablespoons unsalted butter with 1/2 cup granulated sugar. Beat on medium speed until extremely light and fluffy, about 10 to 12 minutes (see baker's note above).
- Once the butter and sugar is completely light and fluffy, lower the mixer speed to its lowest setting and add 5 egg yolks one by one. Add each egg yolk one at a time, only adding the next egg yolk when the one prior has been completely incorporated into the batter — it should take around 2 minutes per addition. Stop and scrape down the sides of the bowl with a rubber spatula before adding more yolks. Once all the egg yolks have been incorporated into the batter, raise the speed to medium-high and beat for another 30 seconds to fully combine.
- In a liquid measuring cup, whisk together 1/3 cup buttermilk and 1/2 teaspoon vanilla extract. With the mixer on its lowest speed, add the dry ingredients (from the 3rd step) in three additions, alternating with the buttermilk and vanilla mixture in two additions, beginning and ending with the dry ingredients. After each addition, beat until just combined — DO NOT OVERMIX at this stage, or you'll end up with a dense, tough cake that will make me sad. To avoid overmixing, you can turn off the mixer during the last addition of the dry ingredients and use a rubber spatula to scrape down the sides of the bowl, and fold the remnants of any dry ingredients into the batter by hand.
- Use a rubber spatula to transfer the batter into the prepared cake pan, smoothing the top into an even, flat layer. Bake in the preheated oven until the cakes are lightly browned and a wooden skewer inserted into the center comes out clean, about 35 to 40 minutes.
- Transfer to a wire rack and let cool in the pan for about 20 minutes. When the cake has cooled enough to handle the pan but still a tad warm to the touch, carefully run an offset spatula around the edge of the pan to loosen it, then invert the cake onto the rack and remove from its pan. Let cool for about 20 minutes more, before wrapping tightly in plastic wrap and refrigerating to ensure that the interior is completely cooled before decorating, at least 1 hour or for up to 3 days.
For the Simple Syrup
- In a small saucepan, combine 1/4 cup granulated sugar and 1/4 cup water. Bring to a boil over medium-high heat, stirring to dissolve the sugar — the mixture should reduce to around 1/4 cup’s worth of liquid. When the sugar is completely dissolved and the syrup is clear, remove from heat and let cool to room temperature before using. The simple syrup will keep, tightly sealed in the refrigerator, for up to 1 month.
For the Chocolate Ganache Frosting
- Combine 10 ounces bittersweet chocolate and 2/3 cup confectioner's sugar in a medium, heatproof bowl.
- In a small saucepan over medium, bring 3/4 cup plus 1 tablespoon heavy cream to a gentle simmer, whisking occasionally. Pour the hot cream into the medium, heatproof bowl containing the chocolate and confectioner’s sugar mixture (from the 1st step). Stir the mixture with a heatproof, rubber spatula until the sugar is dissolved.
- Once the sugar has dissolved, nestle the medium, heatproof bowl over a medium saucepan of simmer water to make a double boiler — be sure that the water in the saucepan doesn't touch the bottom of your heatproof bowl. Gently cook, stirring with a rubber spatula, until all the chocolate is melted and the mixture is smooth. Remove the bowl from the heat.
- In a separate, smaller heatproof bowl, whisk together 2 large egg yolks. Pour about 1/2 cup of some of the melted chocolate mixture into the yolks while whisking, to temper them. Pour the tempered mixture back into the larger, heatproof bowl containing the rest of the original mixture and whisk to combine. Add 3 tablespoons unsalted butter and stir until smooth.
- Allow the ganache to cool for about 10 – 15 minutes, before using immediately.
Assembly
- When the yellow cake is completely cool and slightly chilled, use a serrated knife to level the cake by removing the dome from the top of the cake.
- Once the cake has been leveled, divide the cake horizontally into two, equal layers. Use your hands and a pastry brush to brush away any excess crumbs.
- Once you’ve brushed away any excess crumbs from the cake layers, brush the top of each cake layer with a generous amount of simple syrup. Each cake should receive about a 1/8 cup of simple syrup.
- Set your bottom cake layer on a work surface (or a serving platter) and scoop about 1 cup chocolate ganache frosting on top, using an offset spatula to spread it evenly across the cake top. Nestle the second cake layer on top, and use the remaining chocolate ganache frosting to cover the cake entirely. I decorated my cake with messy swirls and chocolate chips, but you can opt for the smooth or piped look if you prefer — the recipe gives you plenty of frosting to play with. Enjoy!
I love the Miette cookbook and so far what Ive made based on their recipes have always been hugely successful! Your cake looks beautiful and I hope you both had a wonderful birthday celebration!
Your cake looks so delicious, especially the frosting. I'm about to make a American Birthday Cake this weekend (the typical birthday cakes here in the UK are plain sponge cakes, with not much flavour) and this sounds quite similar to the one I'm going to bake.
I haven't got Miette's book, is it a nice one to have?
I'm a big fan of Miette's cookbook! Every cake I've made from it was a great success. My only qualm about it is that they use a rather small cake pan size (6 inches) for all their recipes, and as a result, most of their recipes make 2 cakes when most of the time I only need one cake! But I imagine it shouldn't be too difficult to use a bigger cake pan to remedy this.
I may add this one to my wish list, I have three 6 inch baking tins already so finding some shouldn't be a problem. Thanks Michelle.
Yum, the cake looks awesome! Have you ever made financiers? They are delicious & my favorite way to use up leftover egg whites :).
I love financiers, but I don't have the proper moulds for it. 🙁 But I'm currently looking at a recipe for pistachio cake that seems great and uses a lot of egg whites…
This cake looks amazing!
Need to make this!
I love cookbooks where they show the picture – I know it costs money to create and set up the shots and publish it, but there is something amazing about seeing the finished product that really motivates me to make it, rather than just looking at the recipe. This cake looks and sounds so rich, and wow, just look at that thick frosting!
I've always been a little bit intimidated by the Miette cookbook but you've totally sold me with your description of this cake.
Love the Miette recipe book. I've made the macarons, chocolate sables, and graham crackers which all turned out beautifully, and only with a few minor tweaks. I've been a bit intimidated to try the cakes – so thanks for the review!
I'm confused. You say that the flour is 4 ounces, but it seems like it's more. Am I missing something?
•1/2 cup plus 1/3 cup (4 ounces) all-purpose flour
Nope, that's correct! According to the cookbook, 1 cup of flour = 5 ounces. When packing a measuring cup, be sure to use the "fluff and scoop" method; that is, instead of dunking your measuring cup into the flour bag, use a spoon to scoop up flour into your measuring cup until it's an even mound, and then use a knife to level it. Let me know if you have any more questions!
Delicious!!! What a great idea!