how to write a cookbook: photography for #weeknightbakingbook
Weeknight Baking, my first cookbook, is coming out on October 29th and I’m spending the next few days celebrating with special giveaways, sneak peeks, and lots of behind-the-scenes stories of how the book came together. In case you missed it, so far I’ve talked about:
- What is “weeknight baking”, anyway?
- How I wrote the proposal and sold Weeknight Baking to publishers
- How I developed recipes for Weeknight Baking
And today we’re going to be talking about something near and dear to my heart: the photography behind the book. There are 80+ recipes in Weeknight Baking, and almost all of them are accompanied with its own full-color image (or more, if it’s showing off a process like how to decorate cakes, lattice a pie, or brown butter), all of which were shot by yours truly.
Shooting Photos for Weeknight Baking
Before food bloggers came to the scene, it was typical for most cookbook authors to hire a photographer (other than themselves) specifically to shoot the book. Back in the day, most authors were even given a special photography budget (separate from the book advance) in order to do so. This budget also sometimes included money for prop and food styling, too!
However, these days, that type of deal is rare. It’s no secret that the publishing industry is in decline, and as a result, photography budgets for books are much less generous. Most of these budgets don’t even exist anymore and folded into the advance itself—that is, the author would now have to dip into his or her advance to pay for the photography (and food styling, and prop styling, lol) required for the book. Side note: this is why publishers *LOVE* bloggers. Not only do we have an easily marketable audience, but we do ALL the work that used to be done by three different people (or four, if you include actually writing and researching the book itself), often times for no extra cash.
When I was pitching Weeknight Baking to different publishers, one of the things I made very clear from the beginning to my agent and in my proposal was that *I* wanted to shoot the book. I really believed that doing so would be the key to making a book that was most representative of me and my work. While I don’t claim to be a photography expert, I worked very hard over the last 8 years to teach myself how to shoot and develop my own distinct style (I mean, check out some of my earliest blog posts—I was using phone photos with bad Instagram filters on my blog back in 2011!).
Many of the publishers I spoke with were on board, especially since it was financially attractive for them—I told my agent that I was willing to forgo an extra photography budget in order to shoot my own book. In retrospect, I should have pushed harder to either get a separate photography budget or negotiated a higher advance on the basis of my photography services. Doing the photography for my book added a LOT of extra work, and I should have been paid fairly for it. This was a big lesson for me. Because yes, although it is rare for publishers to grant photography budgets, it can be done—in fact, I know a handful of friends and acquaintances who successfully negotiated one for themselves! If you’re an aspiring cookbook author who wants to shoot your own book, I highly encourage you to advocate for a photography budget separate from your advance.
My Photography Process
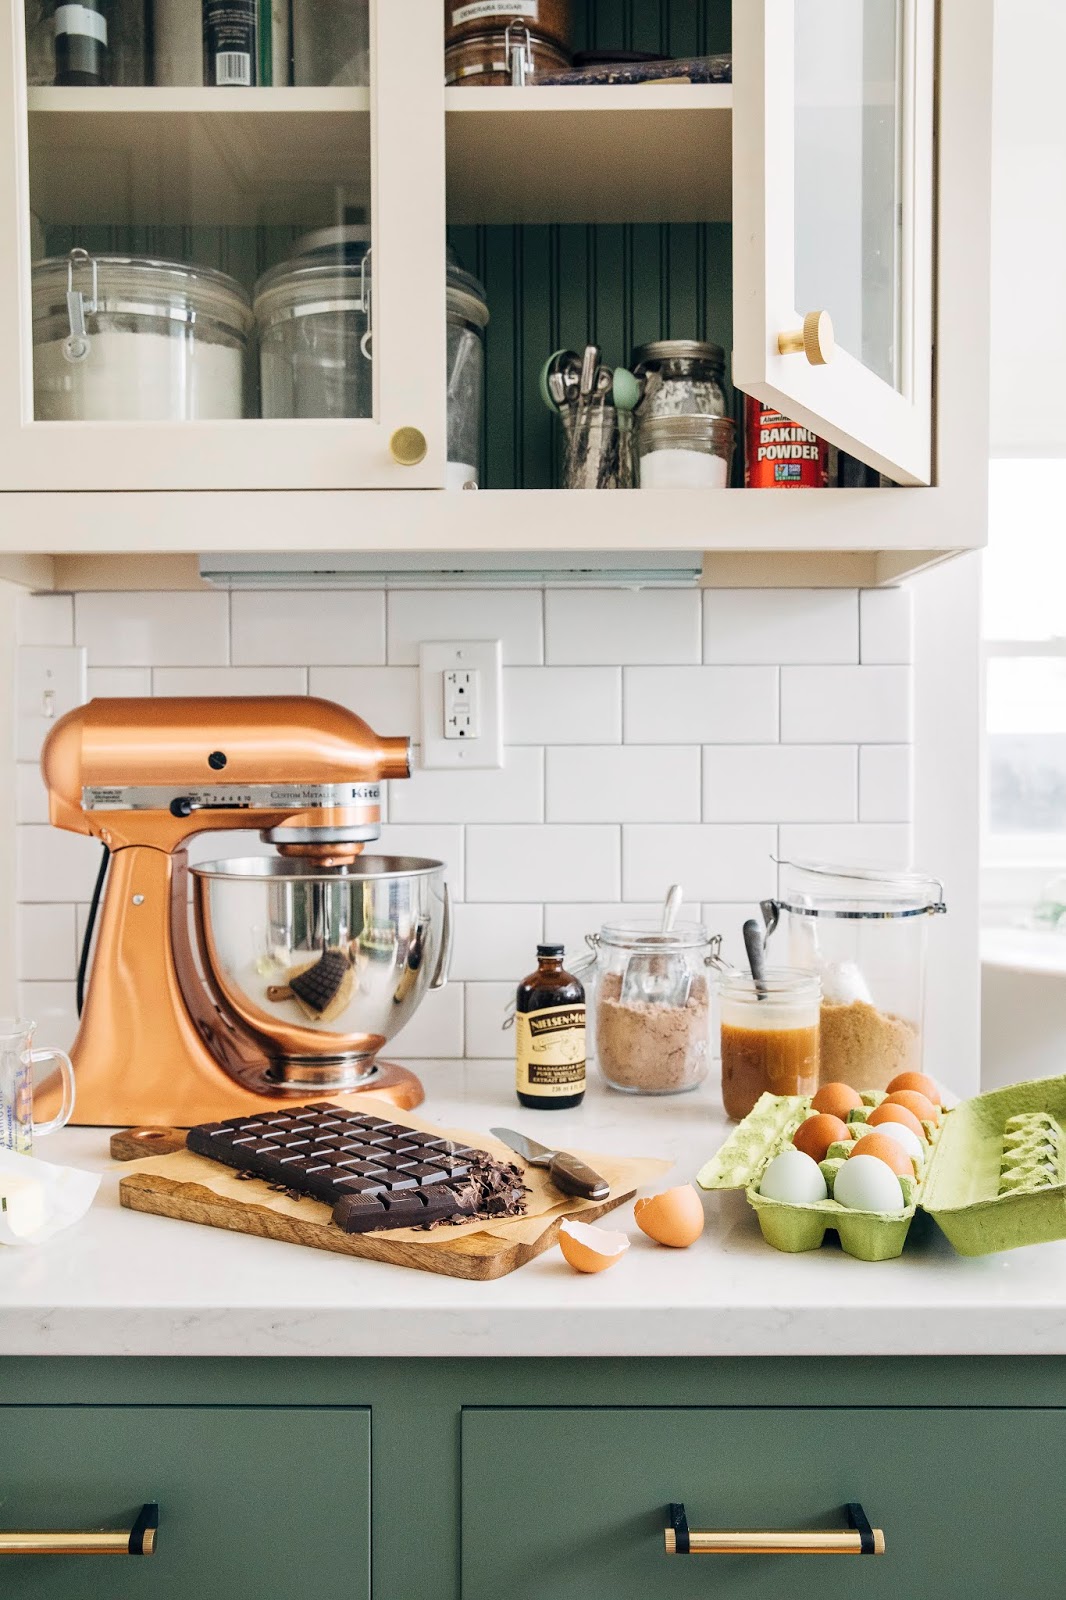
I’m not going to lie—when I first started shooting photos for Weeknight Baking, I didn’t know what I was doing. I did have a few ideas: I knew that I wanted to keep the props “minimal”; that is, I didn’t want to use too many props since I wanted to keep the focus on the baked goods. I also knew that I wanted to keep the style “bright and airy”, use natural light as much as I could, and shoot all the food on the white marble tabletop of my dining table. It was the table that Erlend and I shared most of our meals together, and I thought that doing so would give the reader the feeling of being invited into my home to share dessert.
My editor had given me the advice to treat the book like it was a giant blog post, and to follow the process that I used when shooting for my blog, Hummingbird High. This sounded good in theory. My process for my blog was pretty low-key: I would first develop the recipe; then, once I had perfected it, I’d spend a day making the “hero” that I’d style and shoot for the blog post. After, I’d edit the photos and write up the recipe and blog post itself. I figured that I could emulate that same process for Weeknight Baking too.
What Didn’t Work for Weeknight Baking
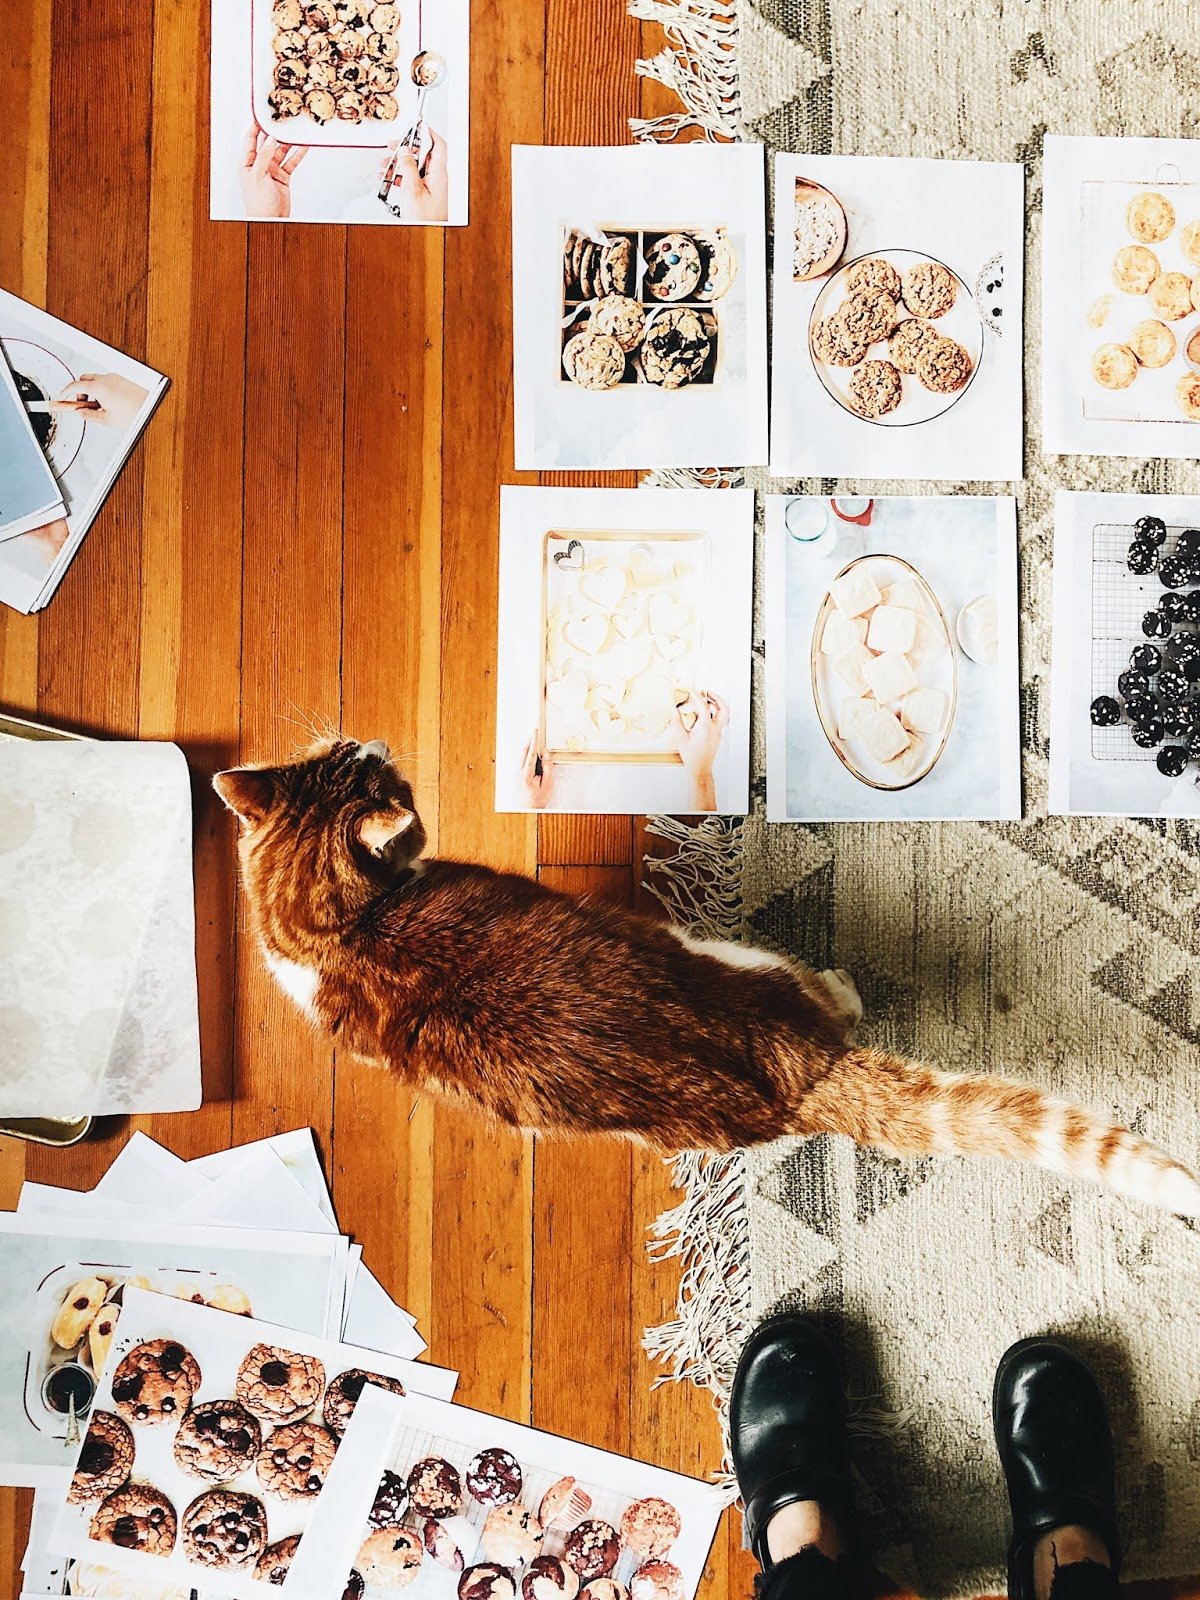
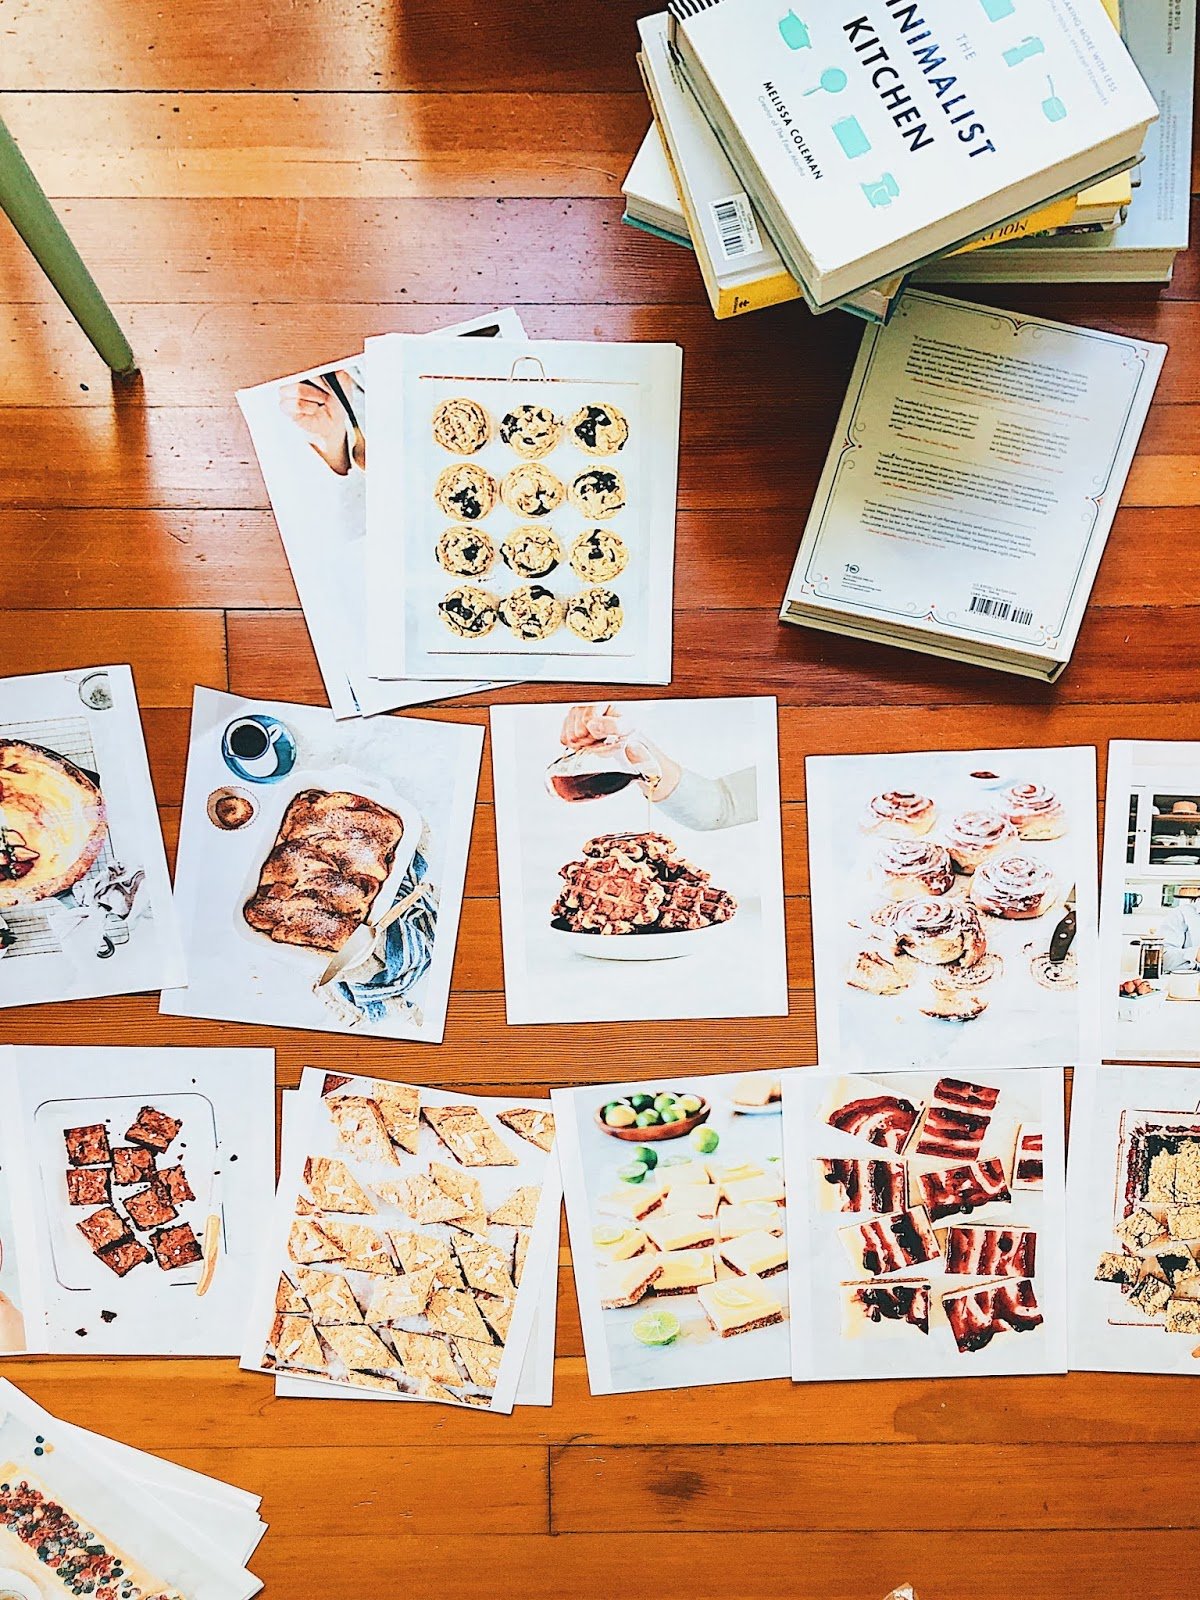
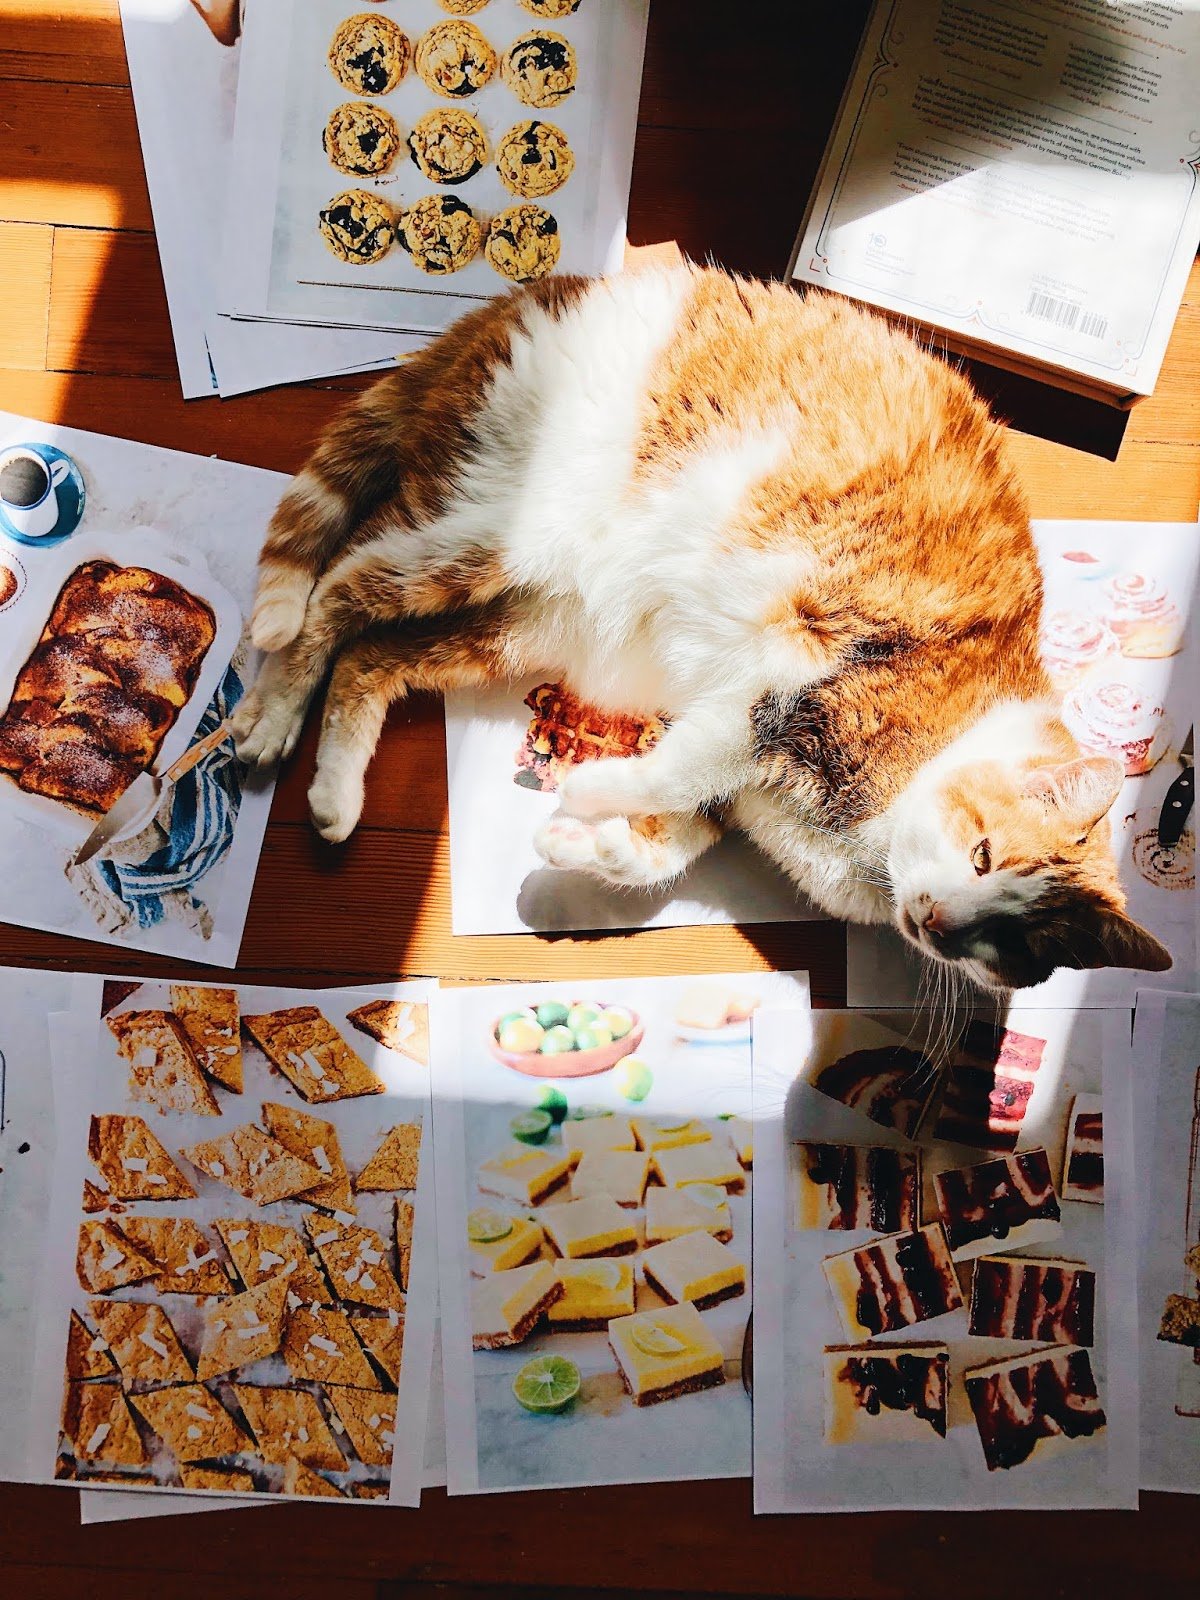
But truthfully, when I followed this advice, it didn’t really work. I shot the first two chapters of my book this way. At the end of the two months or so that it took me to write those chapters, I printed out all the photos and did two things: (1) I laid them out on the floor so I could see them next to one another, and (2) I stapled the photos together in the order they would appear in the book and flipped through the binding (in an attempt to emulate what it would feel like when flipping through the book itself).
Immediately, I could tell that something was off. Many of the photos were too similar and lacked variety—that is, I’d used the same props or angles in photos that were appearing next to each other or grouped in the same chapter. It was also aggravated by the fact that I’d made the decision to shoot all the food on the white marble background. It was visually boring.
Shooting this way worked for my blog because, ultimately, blogs are WAY more forgiving than books. Each recipe can be its own standalone piece; it’s rare that a reader will read a food blog consecutively in the same manner one would flip through a cookbook. Not to mention the fact that, in a blog post, I’m able to provide multiple photos of the same recipe. I usually try and include different angles of the finished result to tell the full story: here’s a photo of the cake before it’s cut, here it is with a slice taken out so you can see the texture inside, and finally, here are the slices themselves. But in a book, you have one photo that’s supposed to show it all. It’s a lot to ask!
What Worked for Weeknight Baking
In the end, what worked was using my Table of Contents to plan the shot for every recipe in the chapter ahead of time. I would develop photography plans for every chapter in the book, deciding the angles and props needed for the photo before the shoot itself.
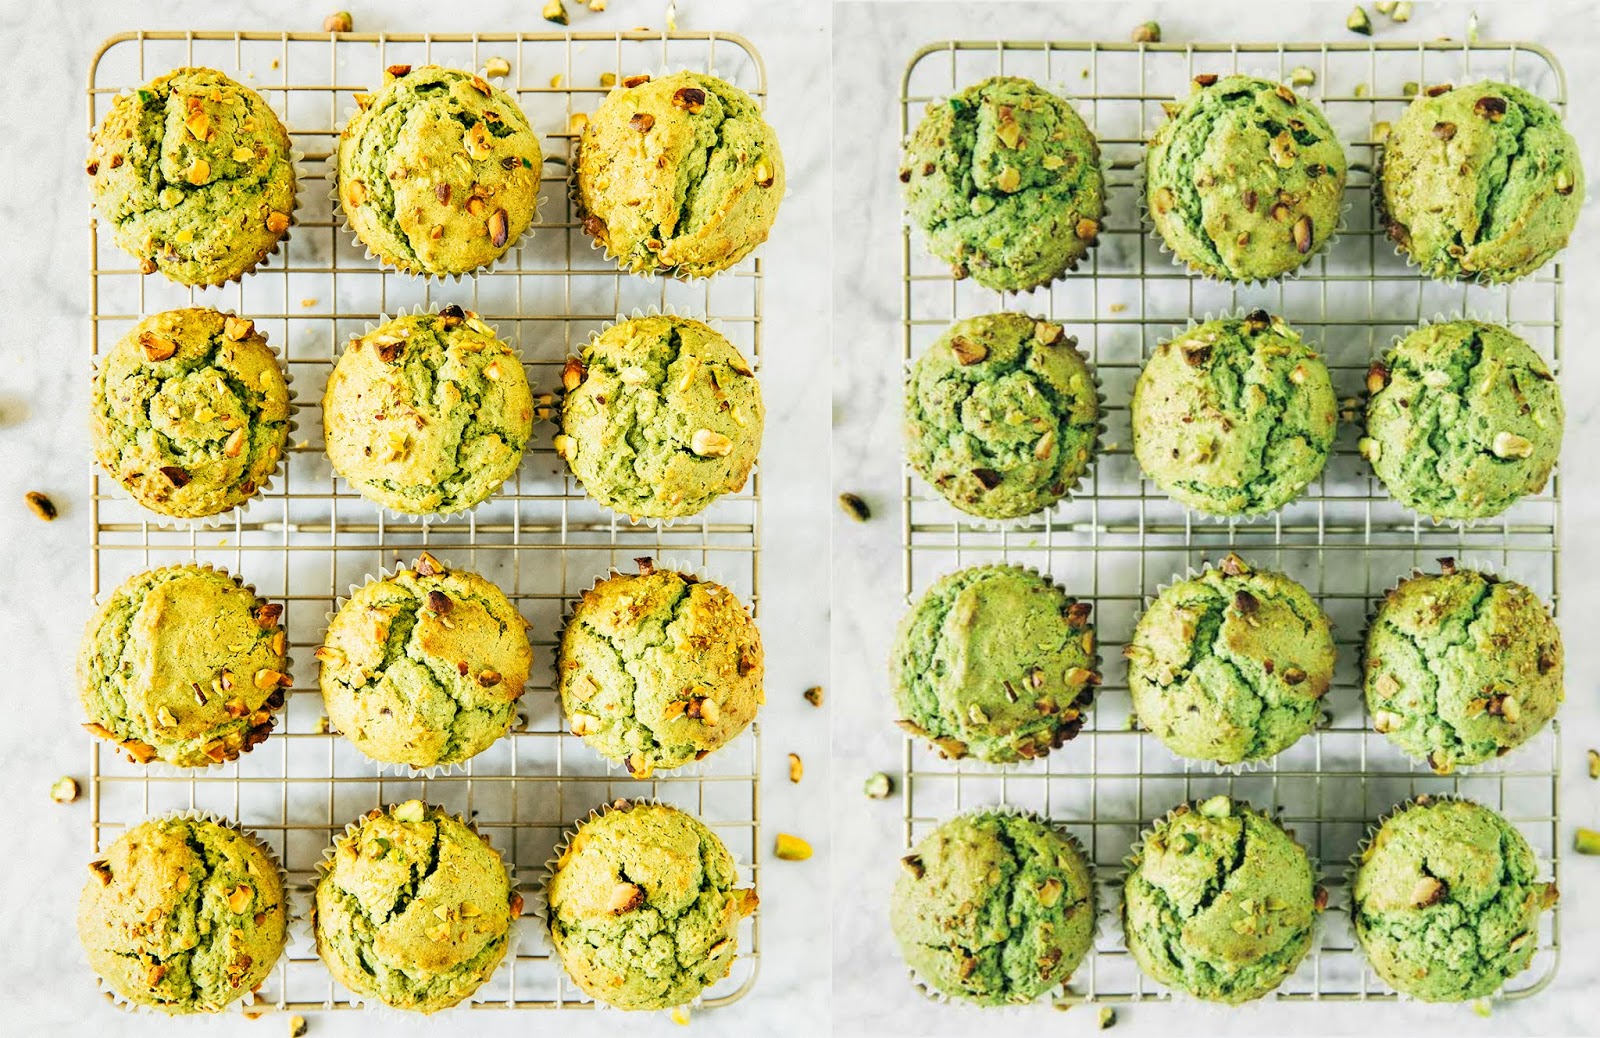
For example, take the “Drop Cookie” chapter of my book. There are four recipes total in the chapter, plus an essay on how to freeze any cookie dough recipe to save and bake for later. That’s a total of five photos that need to be shot for the chapter. But cookies can be a hard thing to photograph—because they’re flat and more two-dimensional, the best way to really show them off is with an overhead angle (“flatlay” in photography terms). And having five flatlay photos in a row is monotonous to the eye. So you really gotta switch it up with different props:

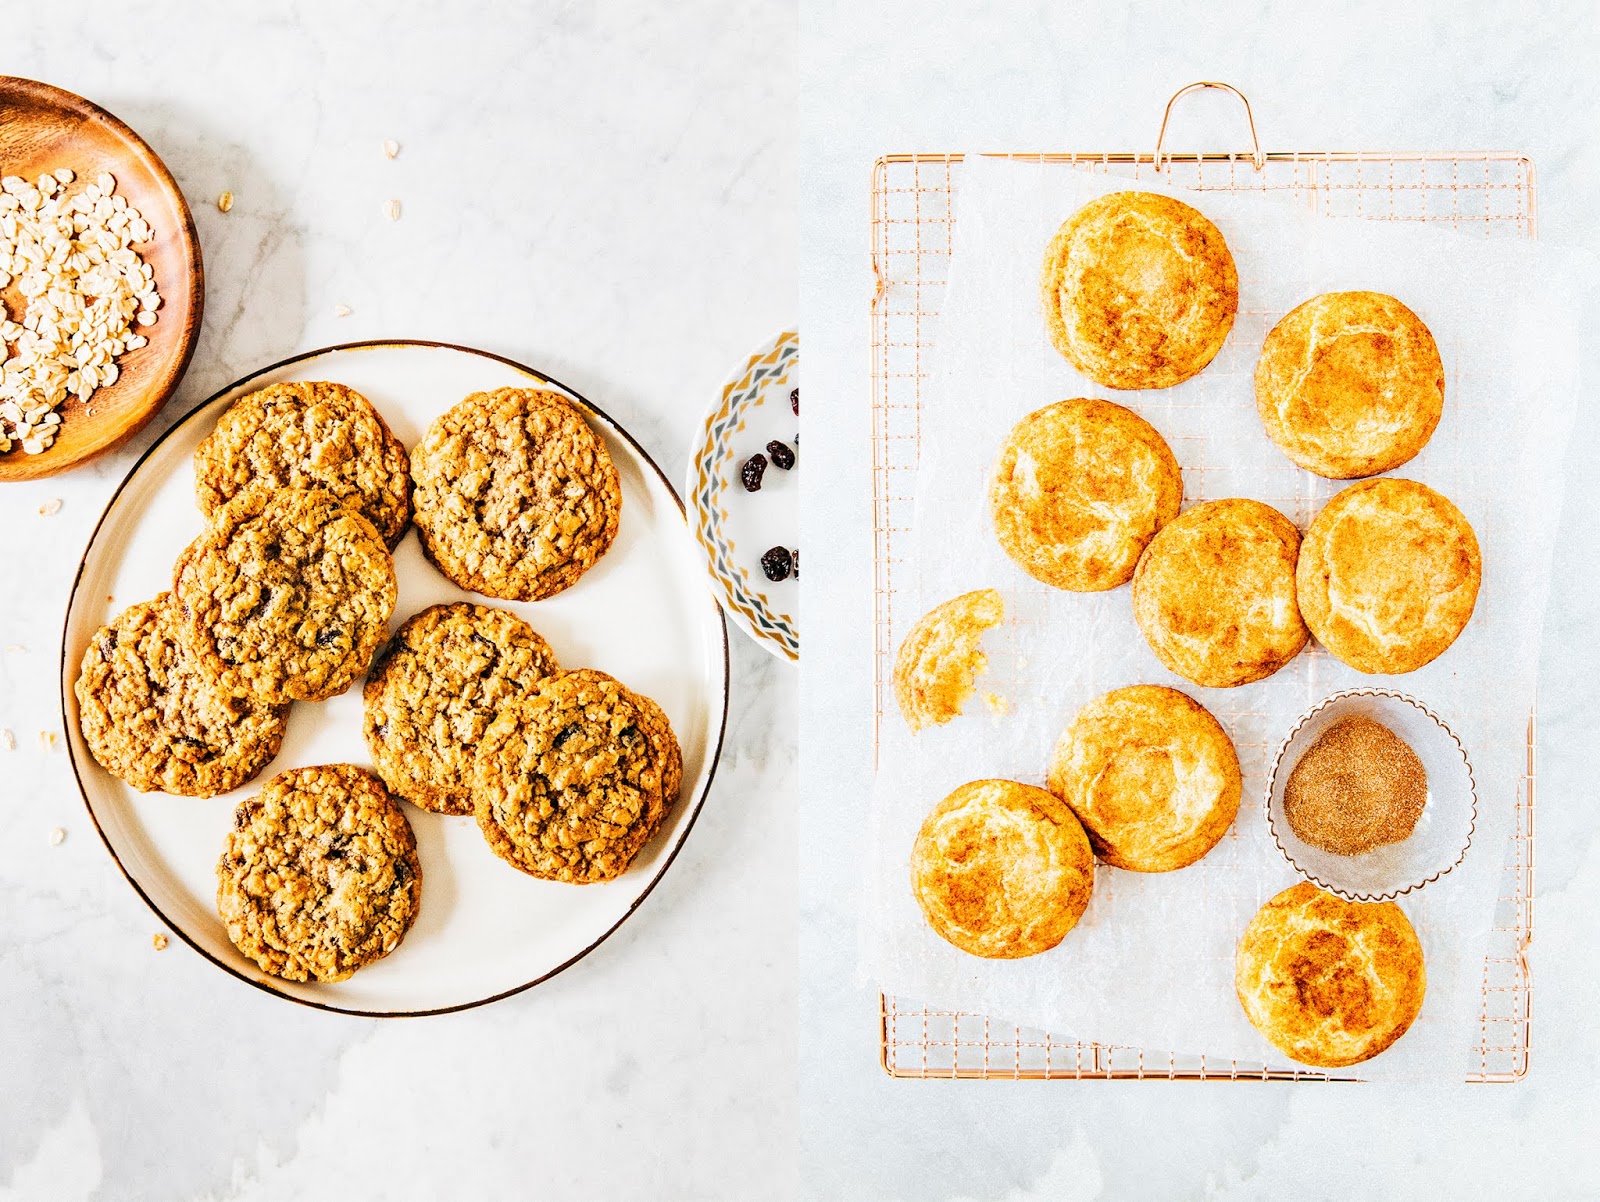
Above are the final photos of the drop cookie chapter. Although all four are flatlay shots, they manage to be distinct from one another because of the way I styled them. The first cookie, for the Single Lady Chocolate Chip Cookie (which, true story, makes one giant chocolate chip cookie for yourself that needs to be consumed IMMEDIATELY) makes use of hands and helps tell the story of the cookie being eaten warm and fresh out of the oven (see how the chocolate is still melted and gooey in the photo?). The second photo is for the chocolate chip cookie recipe in Weeknight Baking, which I encourage you to experiment with by adding different mix-ins like different chocolate varieties and even candies like M&Ms—the cookie box shows these different varieties. The third and fourth photos are for the oatmeal and snickerdoodle cookie recipes in the book; because these cookies are made distinct by their ingredients (oatmeal and cinnamon, respectively), I made sure to include a little plate or bowl of those ingredients in the photo. However, despite the theory behind each photo being the same, they still manage to be pretty different from each other because of the props involved—specifically, the oatmeal cookies are on a plate and the snickerdoodles are on a rack. I decided on those specific props before the shoot itself.
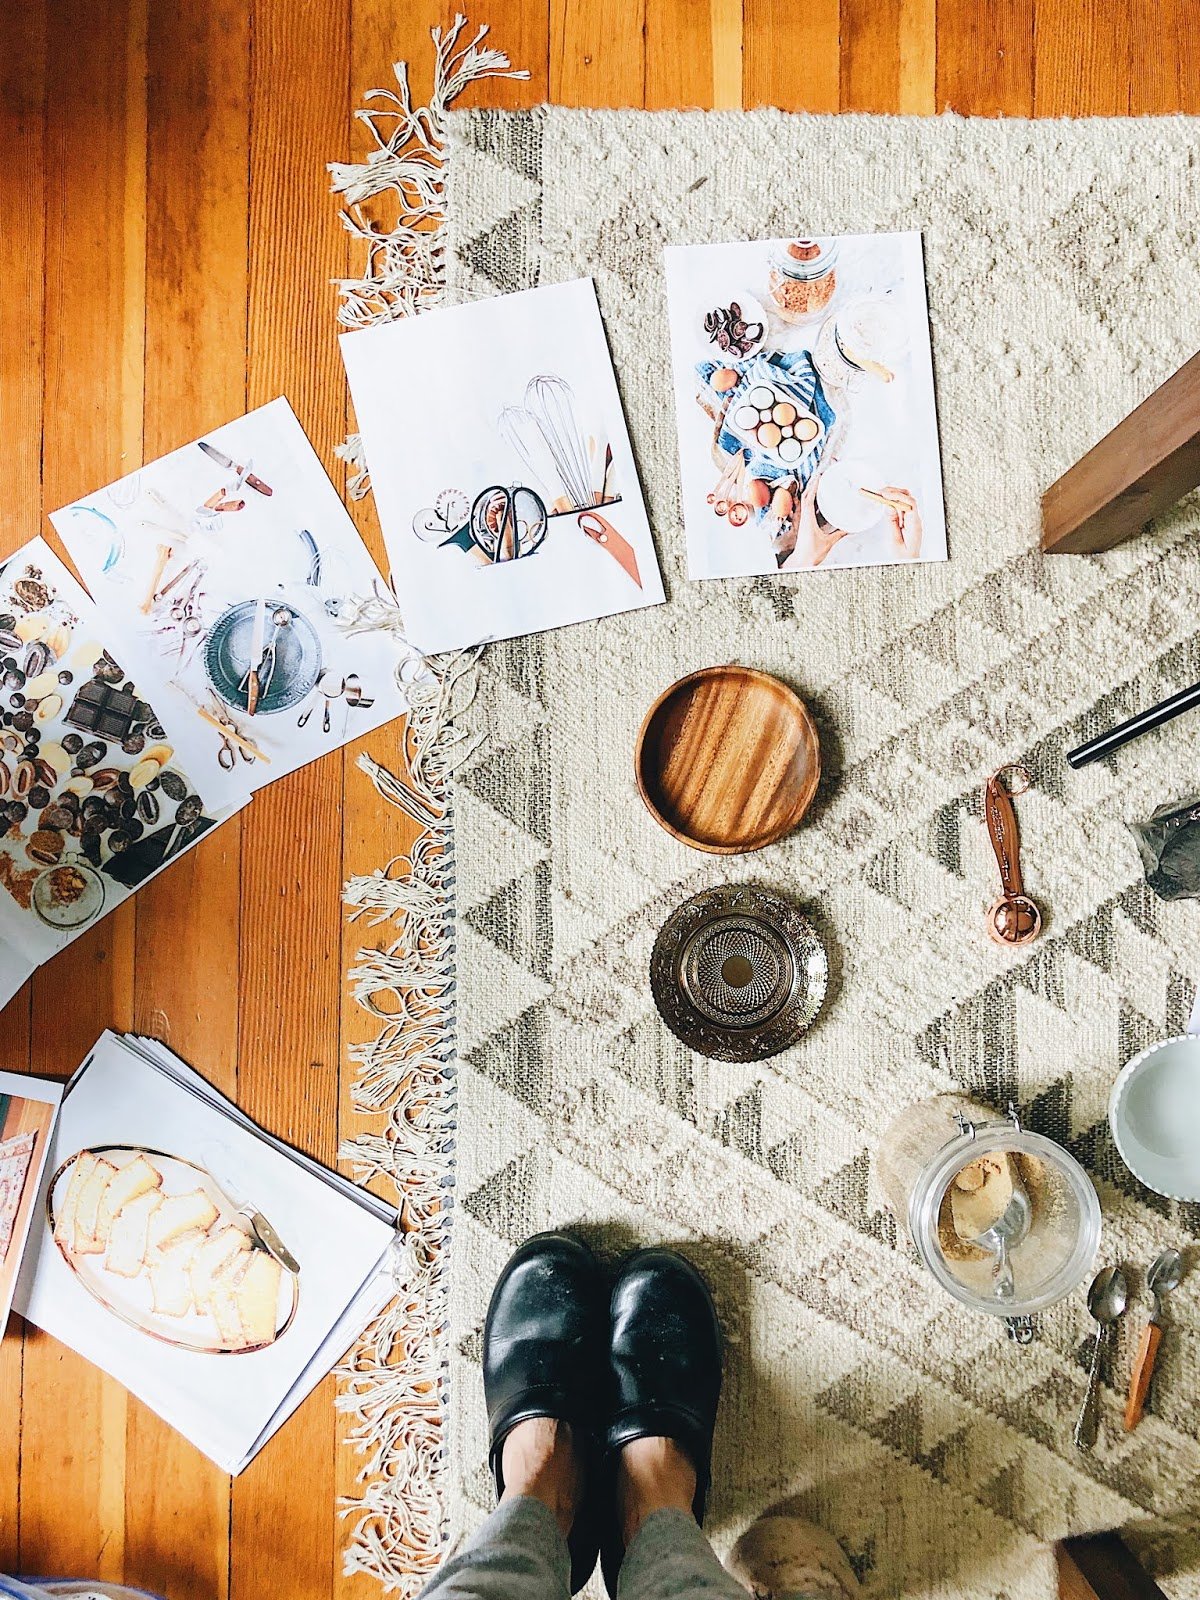
To help brainstorm the different shots ahead of time, I scoured Pinterest for inspiration. I printed out the photos I liked based on different factors like how the food was styled or the angle that the photographer used for the photo. I’d then group the photos together in the way I described above—by laying them out next to each other and by flipping through them consecutively—and arrange and re-arrange things accordingly to prevent any visual monotony or sameness that was occurring. Sometimes, I’d need to find new photos completely—a photo I liked on its own just wouldn’t work with the rest of the group. After I was done with my “inspiration set”, I’d hang them up on a wall close to my shooting space and use them as a reference when doing my own shoots.
Because the photos were so planned out, I didn’t end up with too many shots—in fact, I usually only had one or two photos of the same baked good, each looking pretty similar but differing in technical details like aperture size, shutter speed, and ISO settings. This is really, really different from when I shoot for my blog. With my blog, I’m a lot more experimental and end up with about 10 or so different photos I can use for the post, each playing around with a different angle or style. It was kind of nice not having to edit and choose from a set—it was one less thing to worry about! However, I ended up paying for this later (keep reading, lol).
What All of This Is Really, Actually Like
Because recipe development took so long, I ended up not being able to shoot on the same day (or even the same week!) that I completed the recipe. It would either be way too late in the day for me too shoot (I wanted to shoot the book exclusively in natural light), or, if I did manage to have time, I always felt rushed and unhappy with the result. I made the decision to focus on developing the recipes as best as I could, then do the photography all at once I was done with the recipe development. Timing wise, my plan worked out well. By the time I finished the recipe development, it was summer—the longer days and sunshine meant ideal shooting conditions for the book.
However, this also meant re-baking literally everything I needed to shoot. Depending on how time intensive the recipes were, I aimed to shoot 3 to 5 recipes per day. That meant baking and preparing five different baked goods the day before the shoots themselves. Thankfully, because the recipes themselves were pretty quick (I mean, that’s the point of weeknight baking after all, right?!), this was just like any regular recipe development day. Unfortunately, because these were the “hero” baked goods, I definitely took more time than I typically would have to make sure they looked REALLY good. True story: there were a few times that I shaped each cookie dough ball individually so that they would come out perfectly round.
And thankfully, because my photography plan was so detailed, the shoots themselves were a breeze. With the angles and props so thoroughly planned out beforehand, I was able to get my shots pretty quickly. I’d leave my tripod and the props on hand nearby, swap out the baked good and style accordingly, recalibrate the camera as needed, and take the shot. I’d do some light editing of the photos on the fly, tethering my camera to my computer so I could see what they officially looked like with my presets and reshoot if needed.
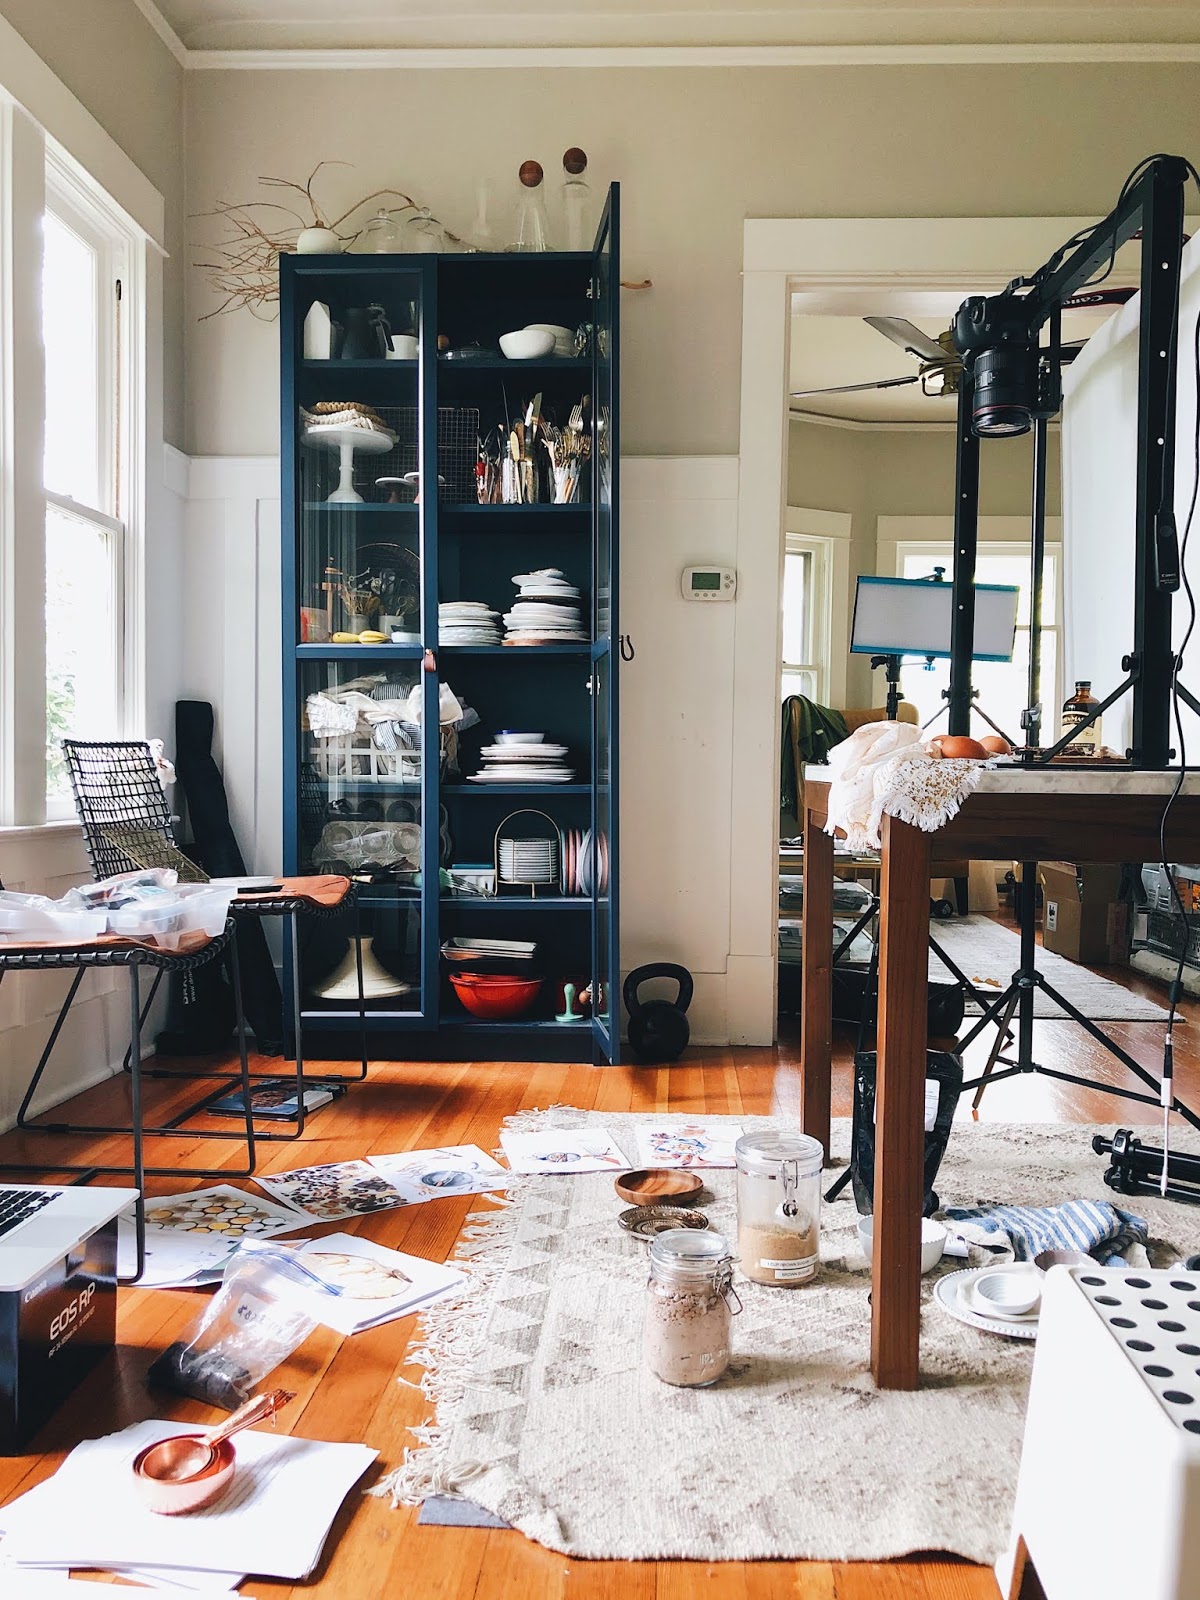
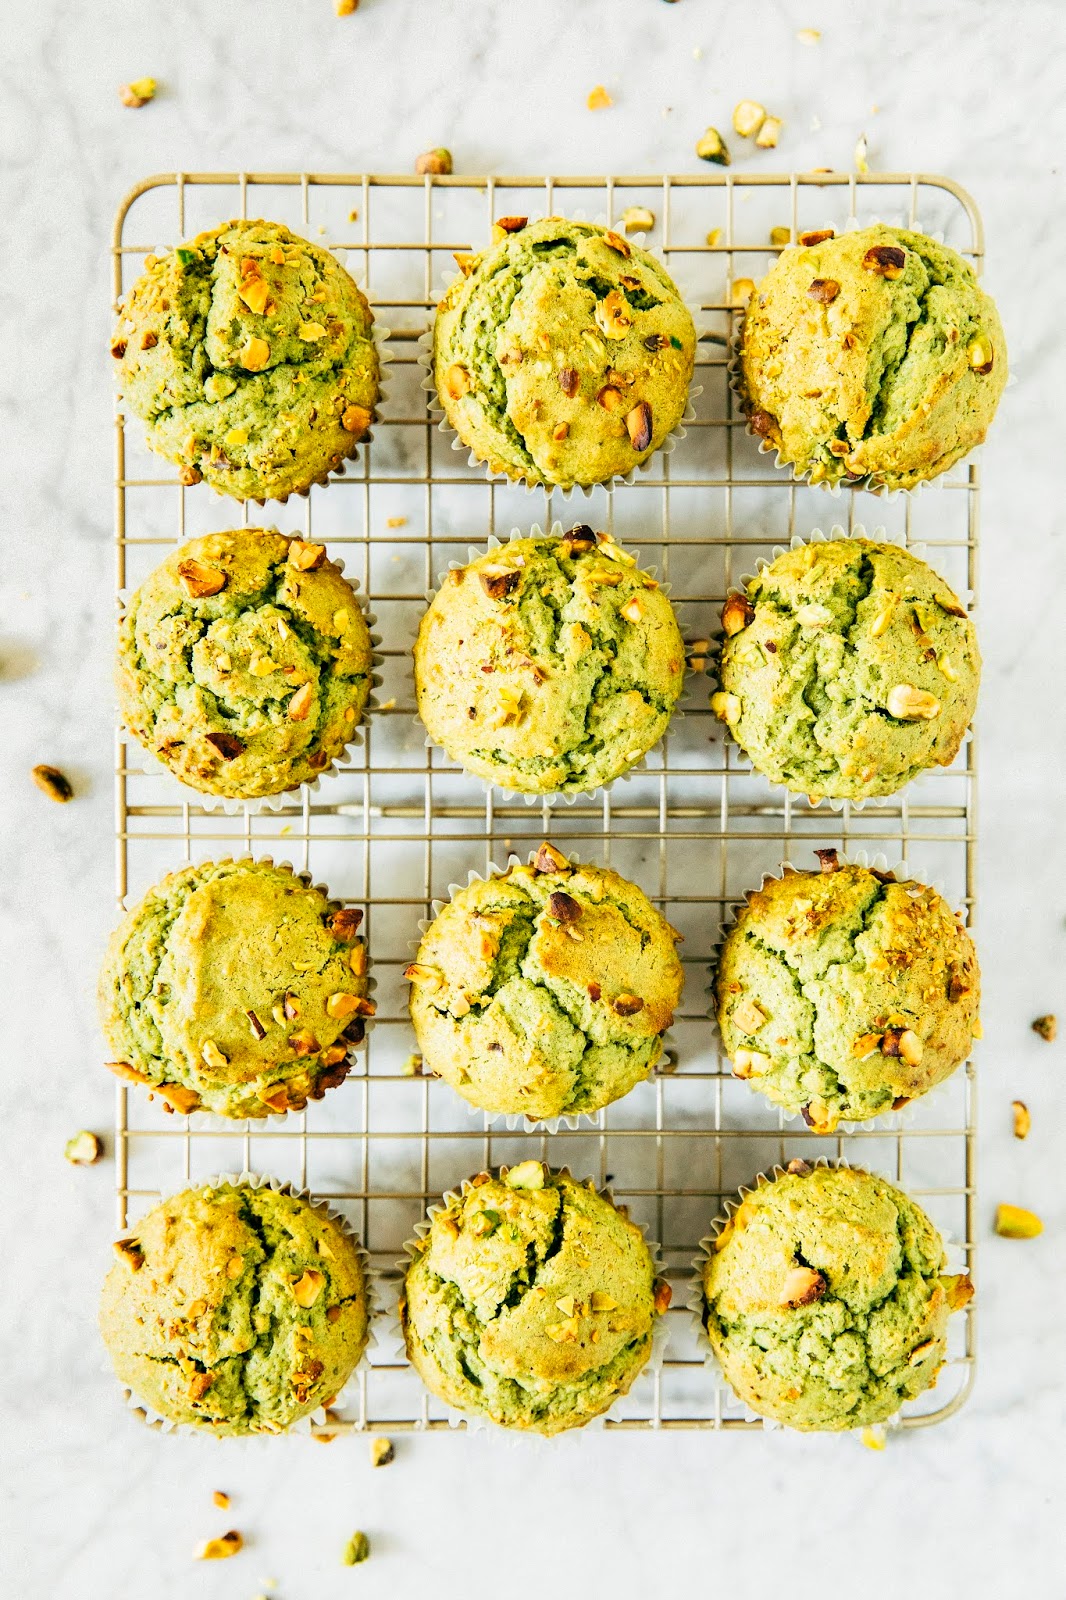
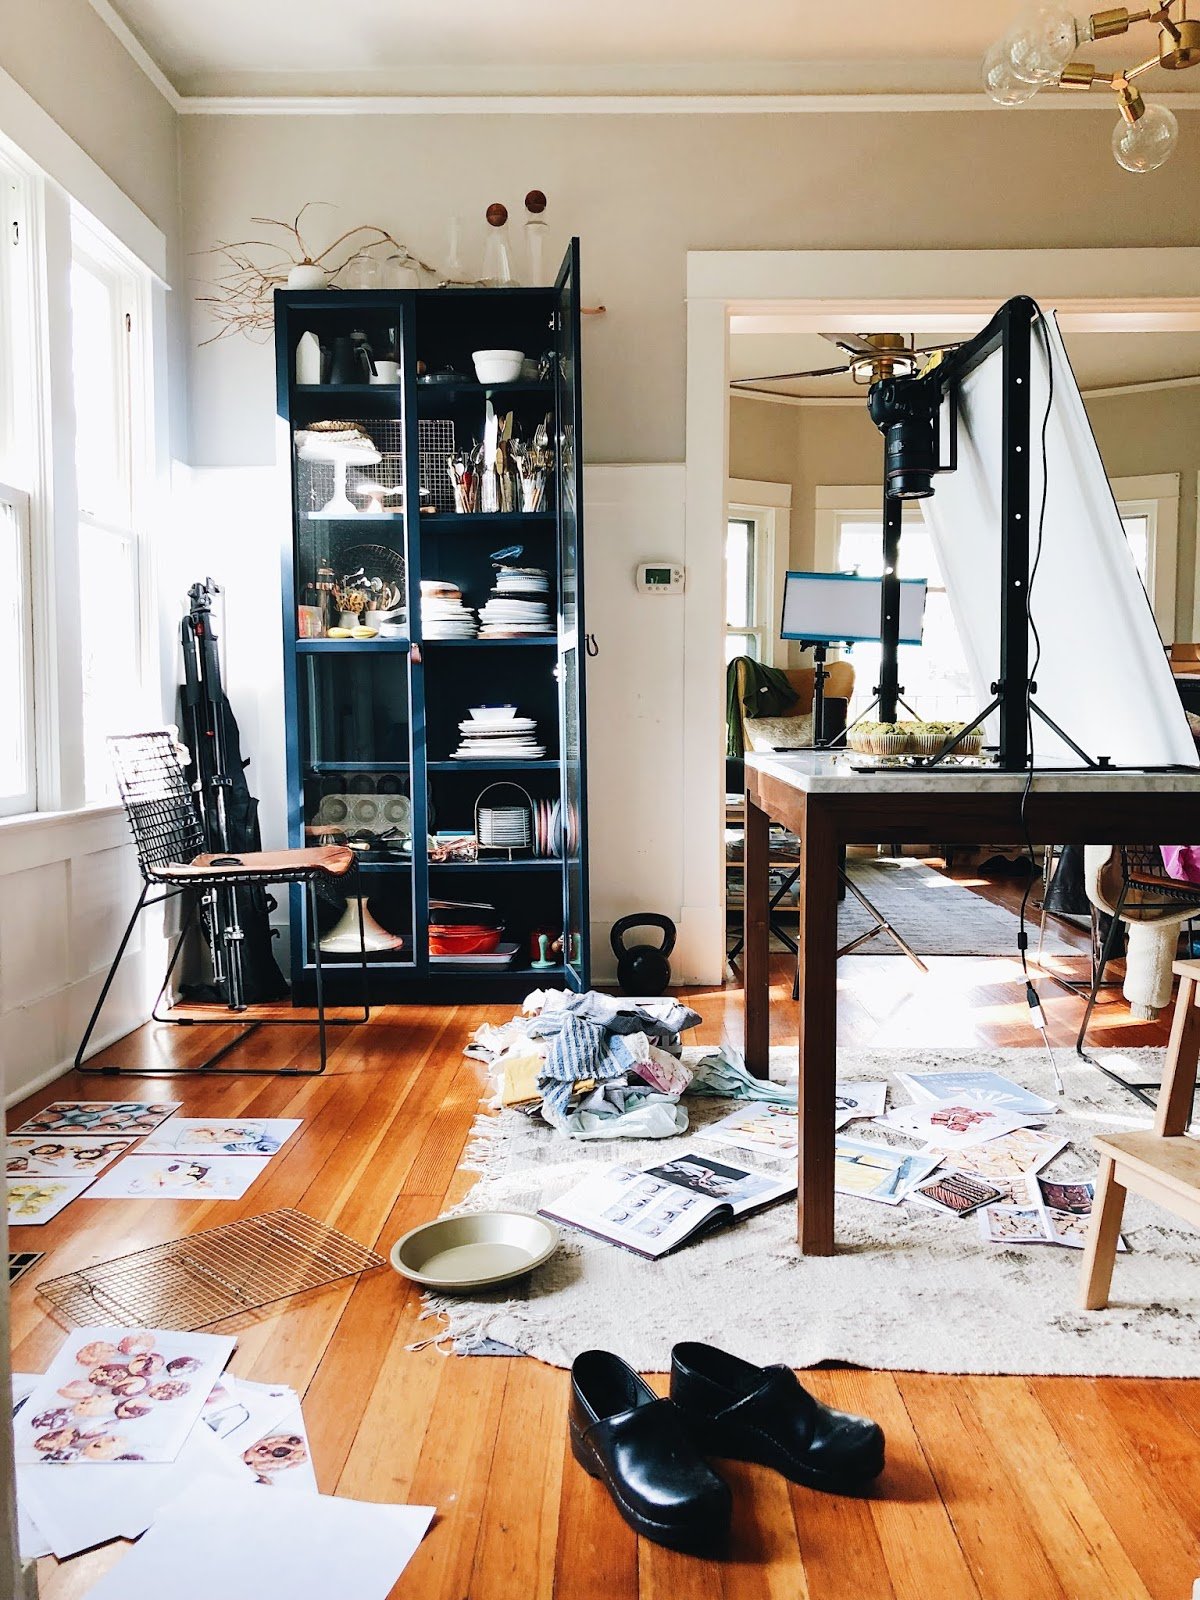
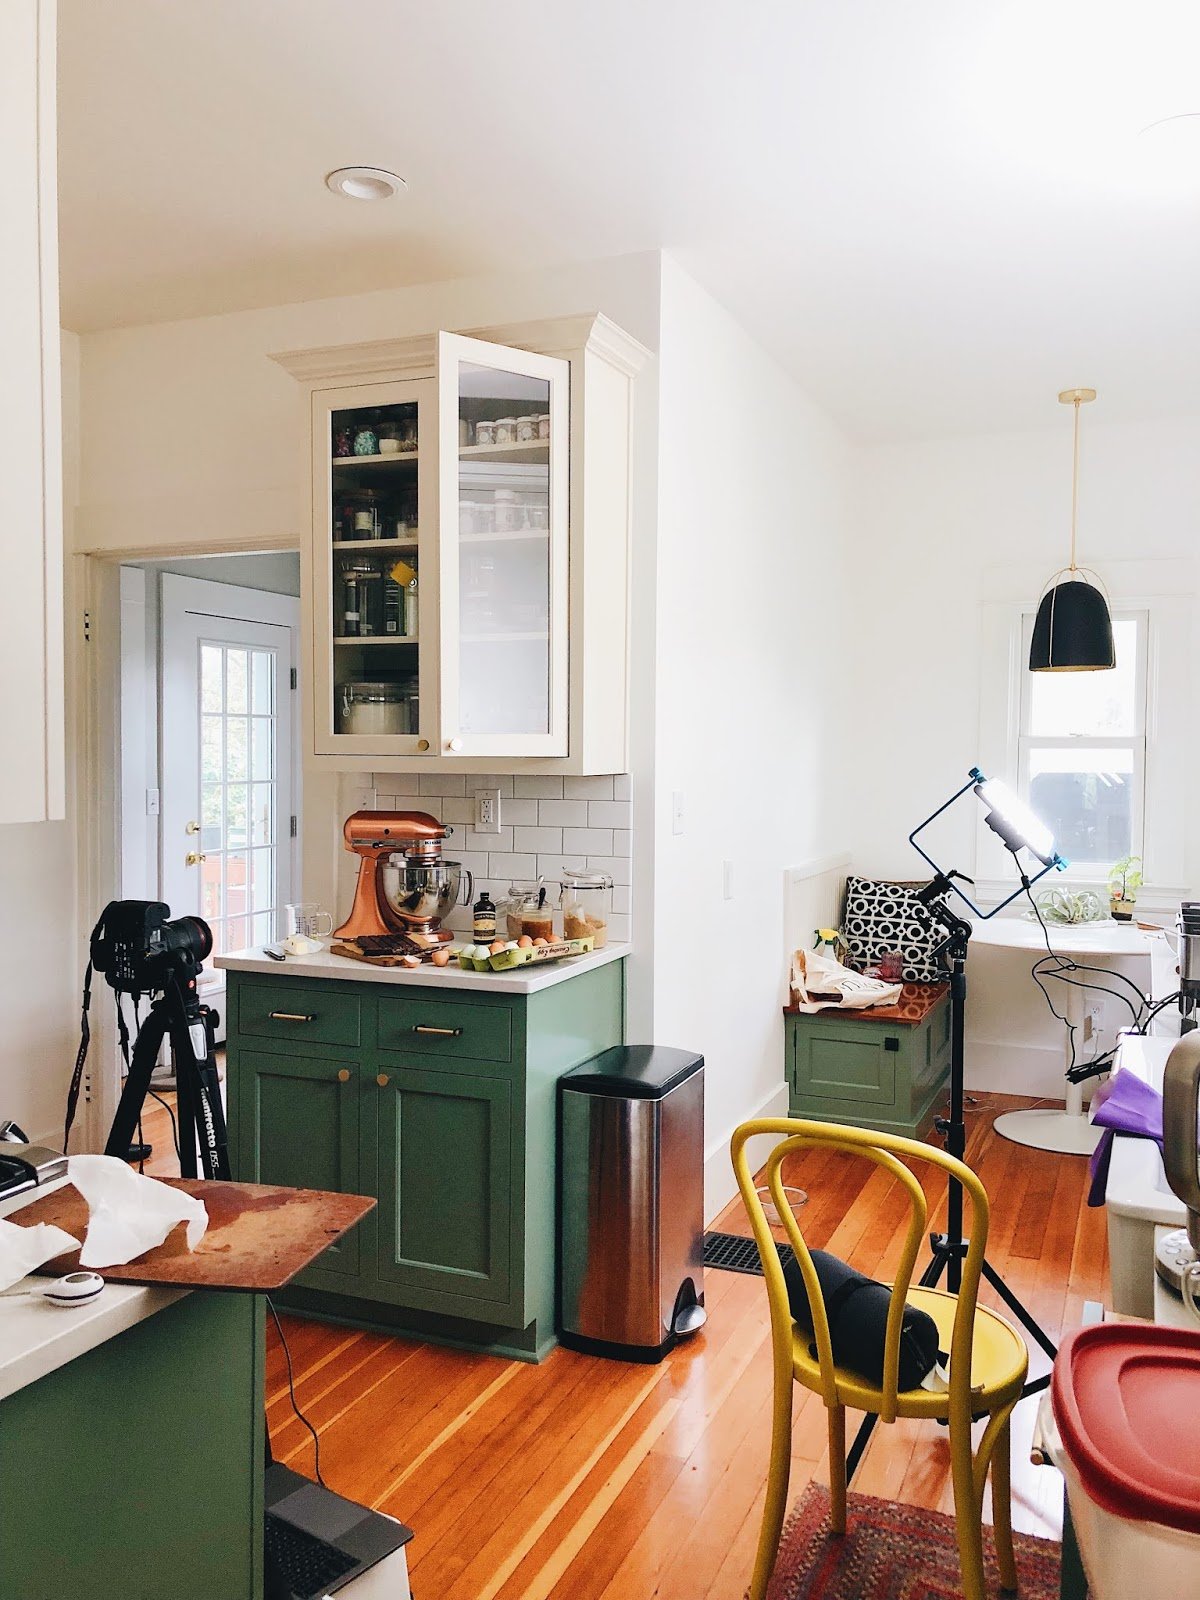
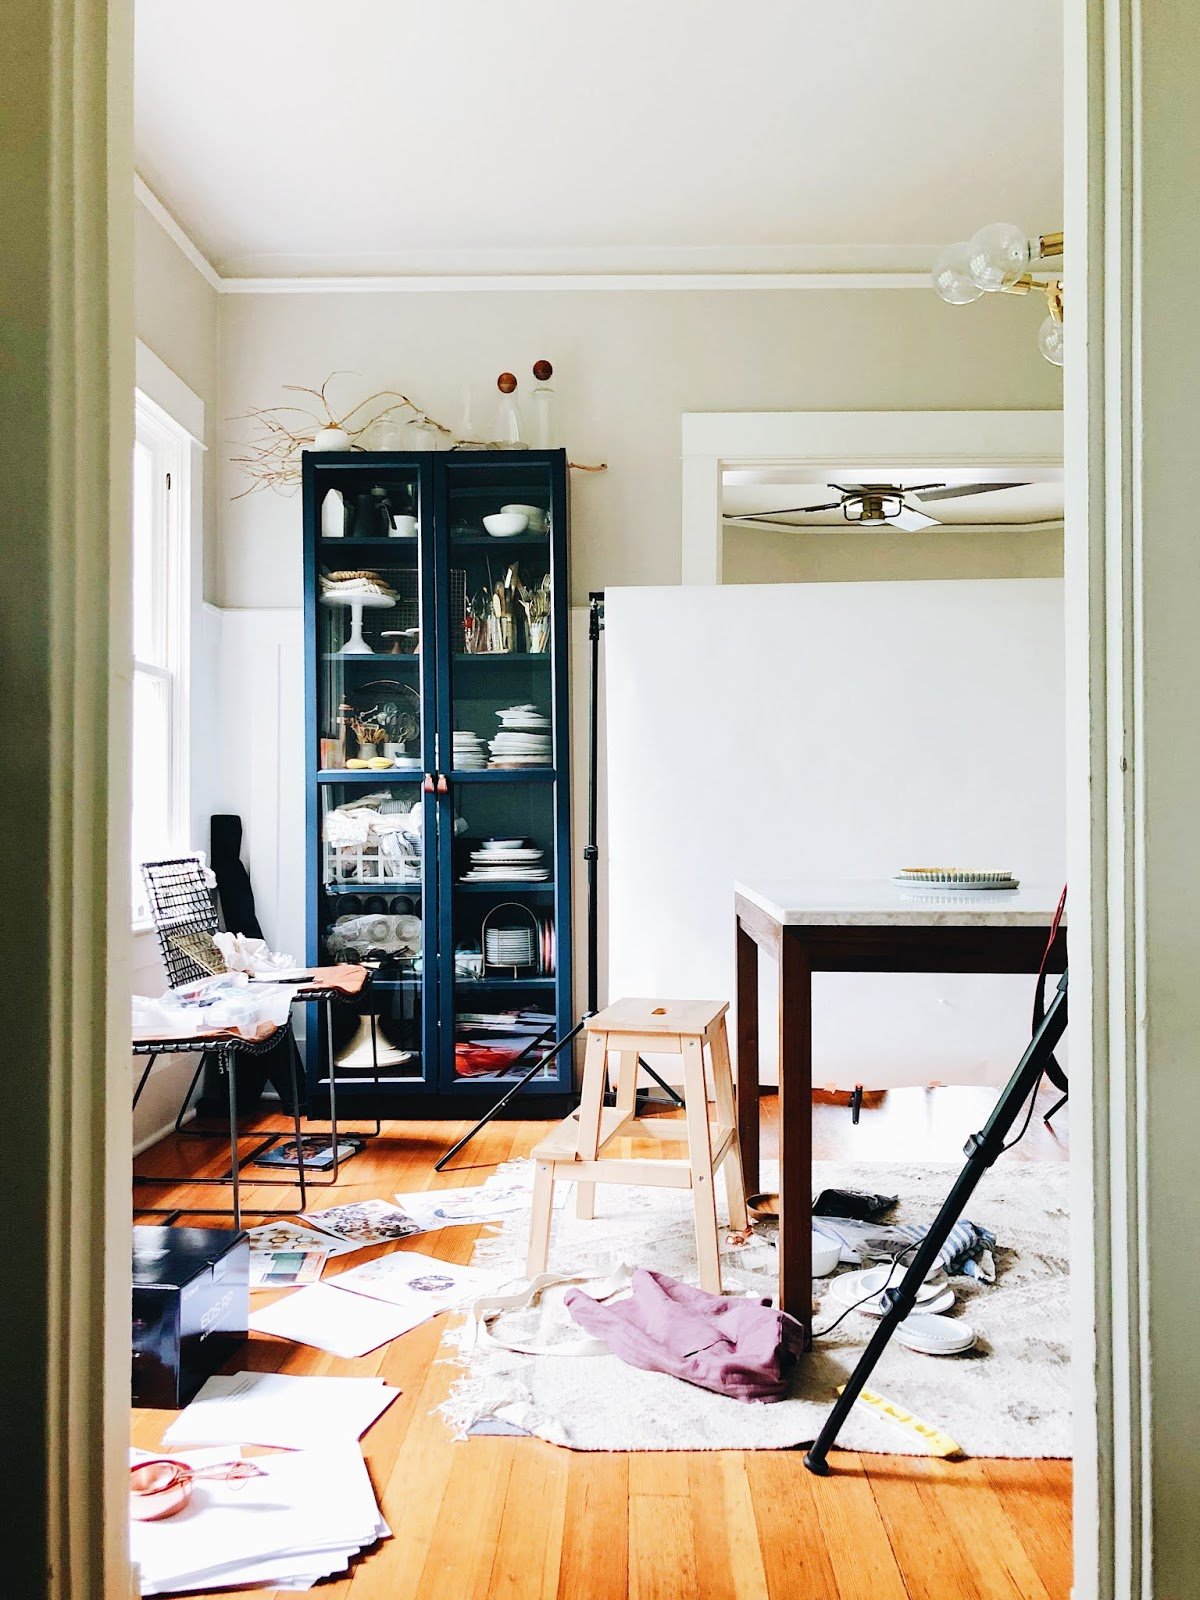
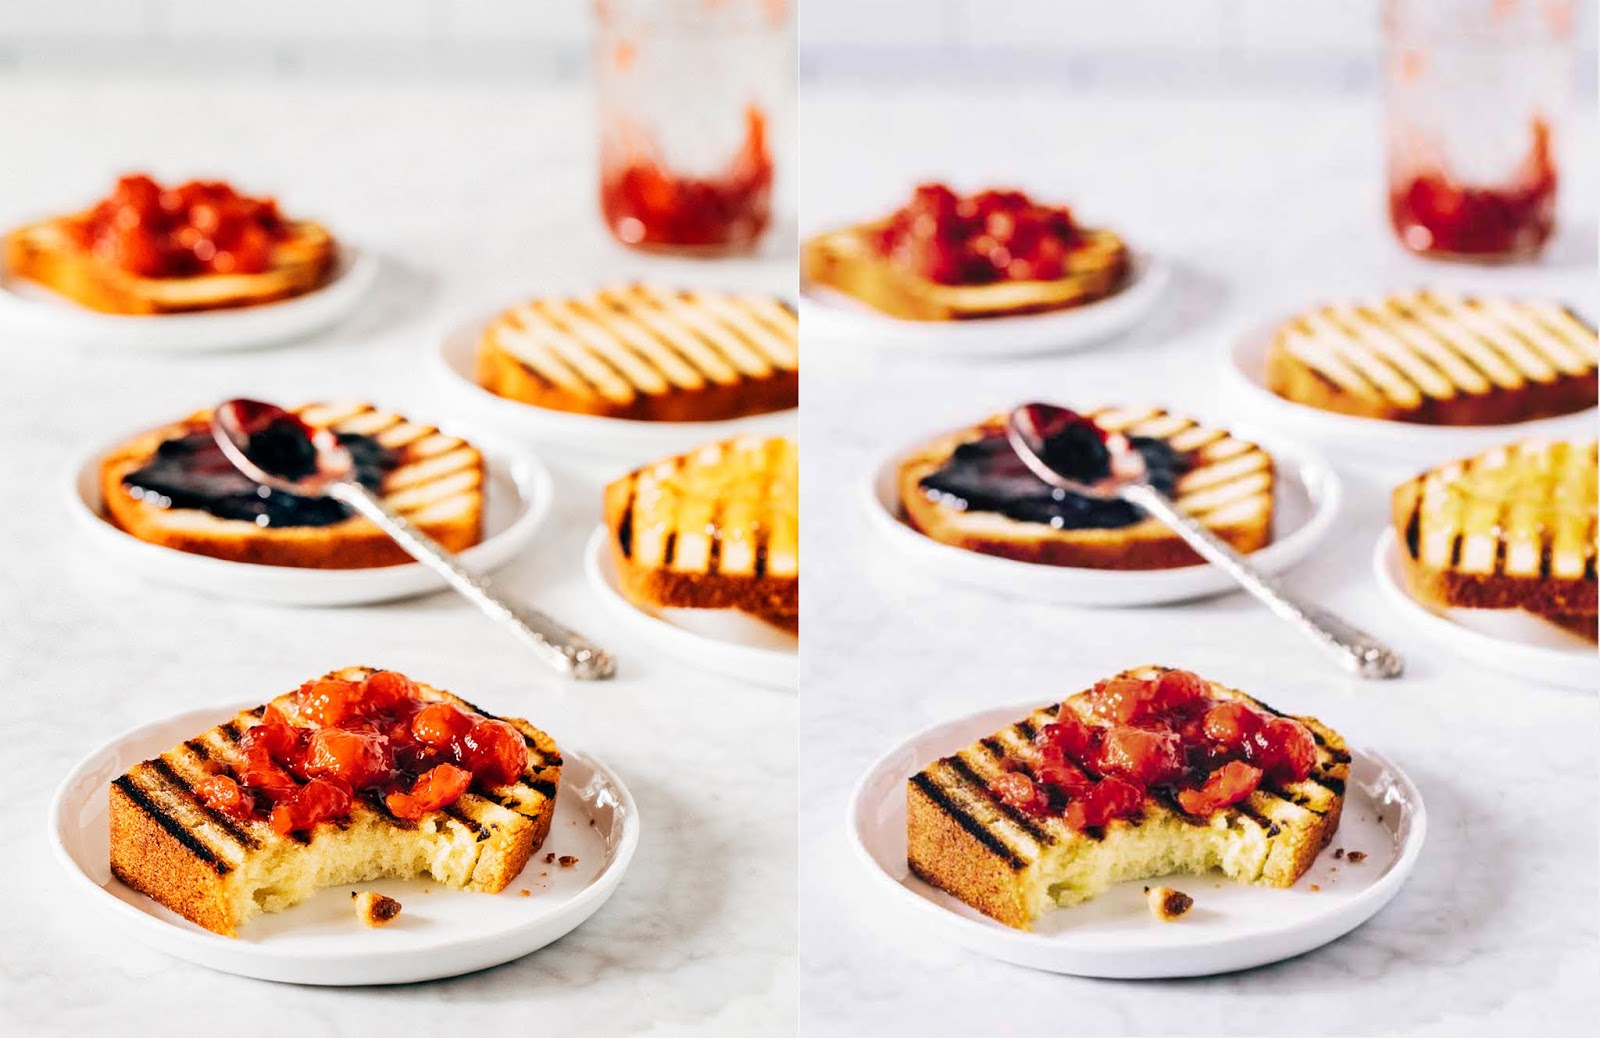
Despite this efficiency, my house was still a HUGE mess. I do most of my shooting in the dining room of my home, which is also the heart of my house (sincerely—the living room, bedroom, study, and kitchen all connect to the dining room). For months, the house was littered with props, photography equipment, and print-outs. Here are some behind-the-scenes—the top photo shows the final photo (which are all in the book), and the bottom photo shows the “outside the frame” setup that I used to get each shot:
Editing and Proofing the Photos for Printing
That being said, I’m always guilty of being my own harshest critic—many of the folks who I sent advanced copies to haven’t noticed, or tell me that it’s beautiful anyway. I also don’t think that the photos detract that much from the heart and soul of the book: the recipes. Have you pre-ordered your copy yet?!