
Guys.
Do you know what the date is, today?
March 14, 2015.
Or, 3.14.15
Which matches up with Pi and the first four numbers that follow its decimal point:
3.1415
MIND BLOWN.
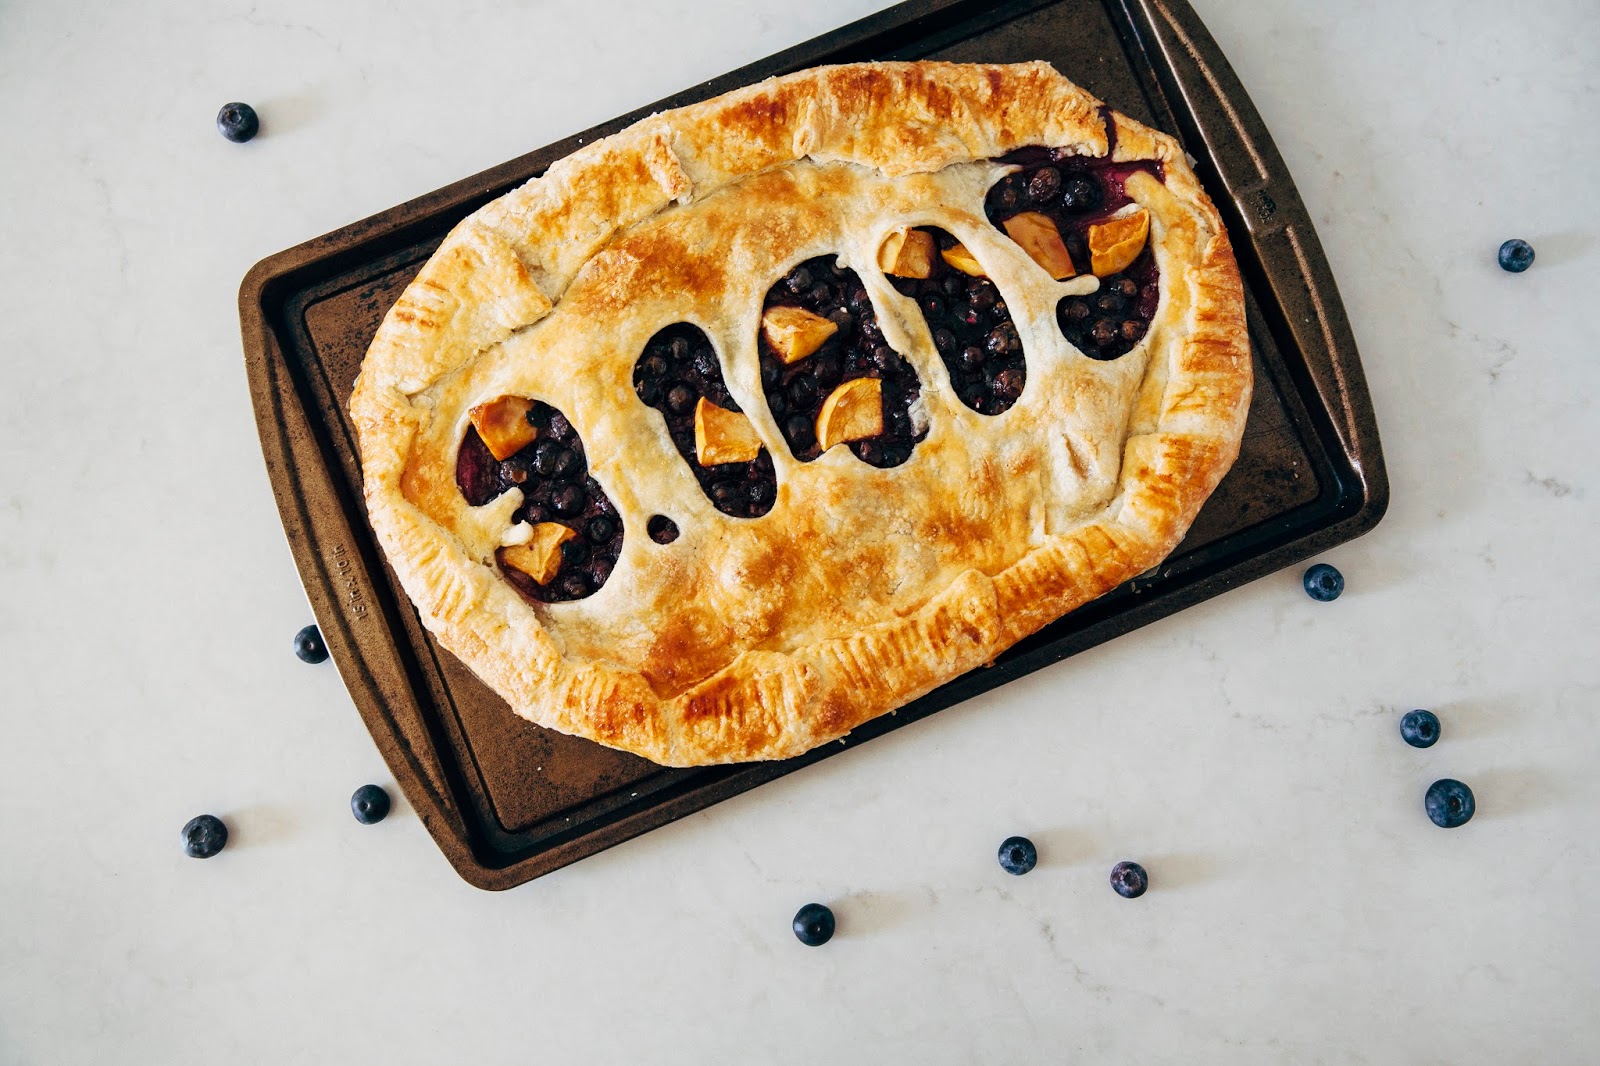
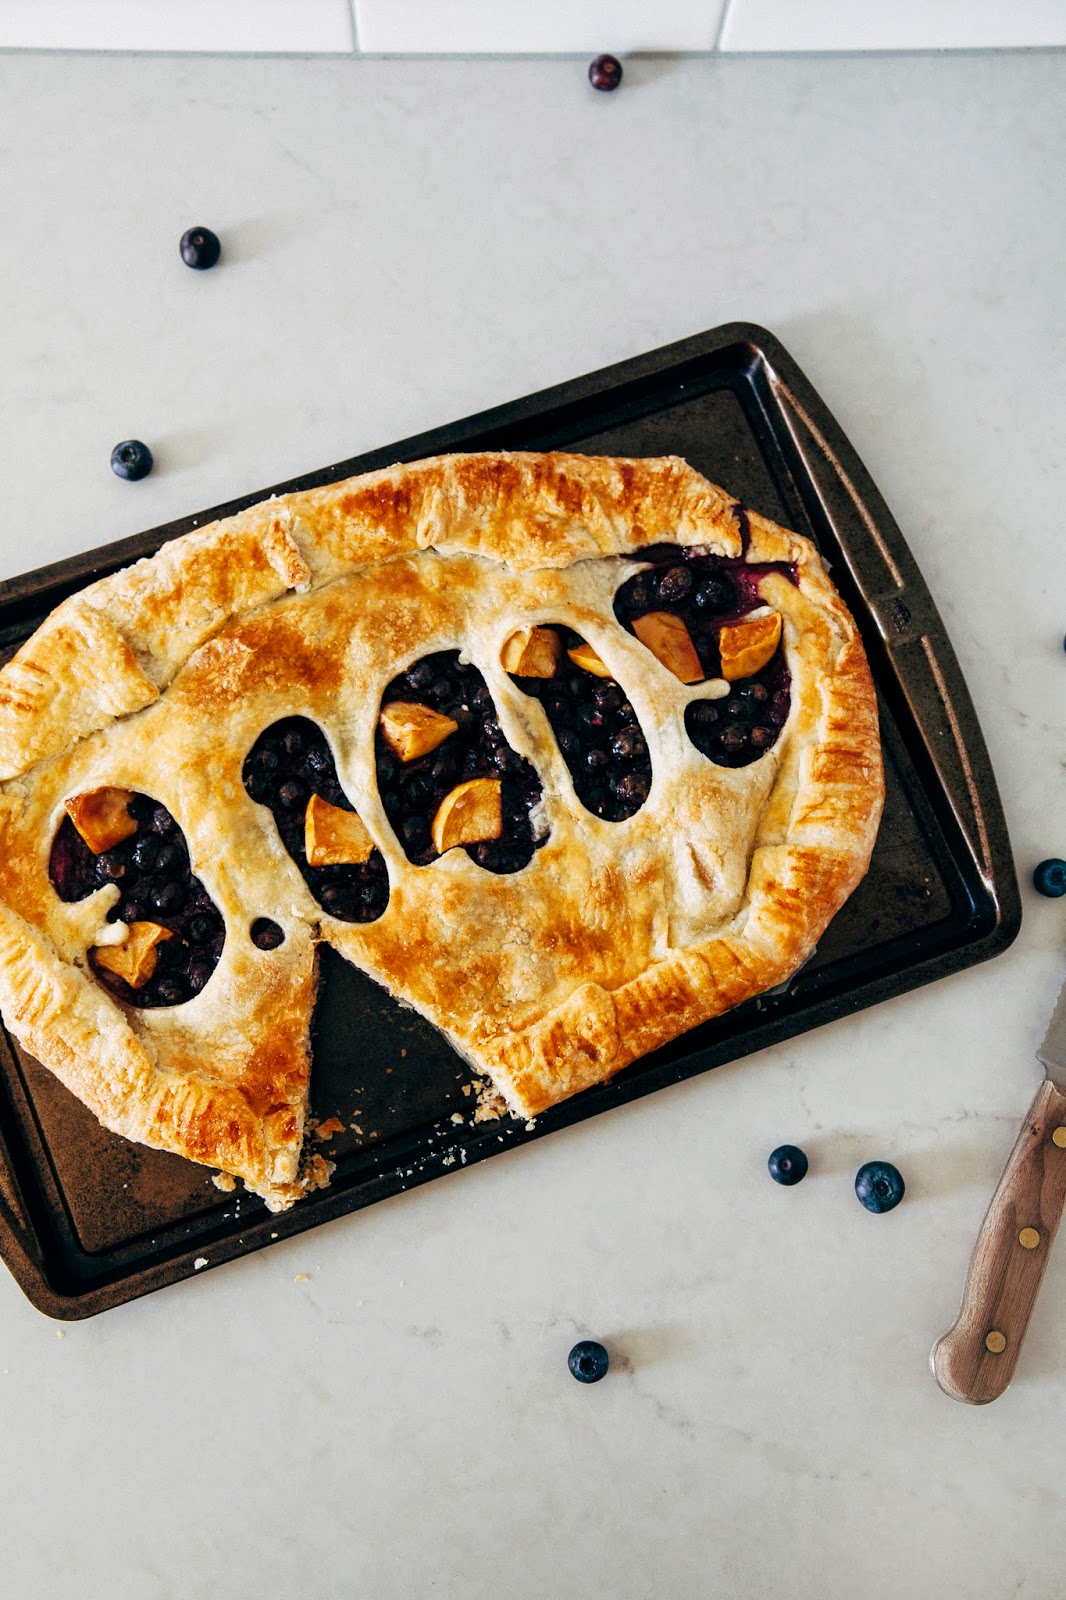
This is a once in a lifetime coincidence; the next calendar occurrence will be in 100 years in 2115! In order to mark the occasion, I spent last weekend battling intense jetlag (I had just gotten back from Asia) to test and bake a number of recipes to find one worthy of the celebration. I believe this baby is it:
A couple of things:
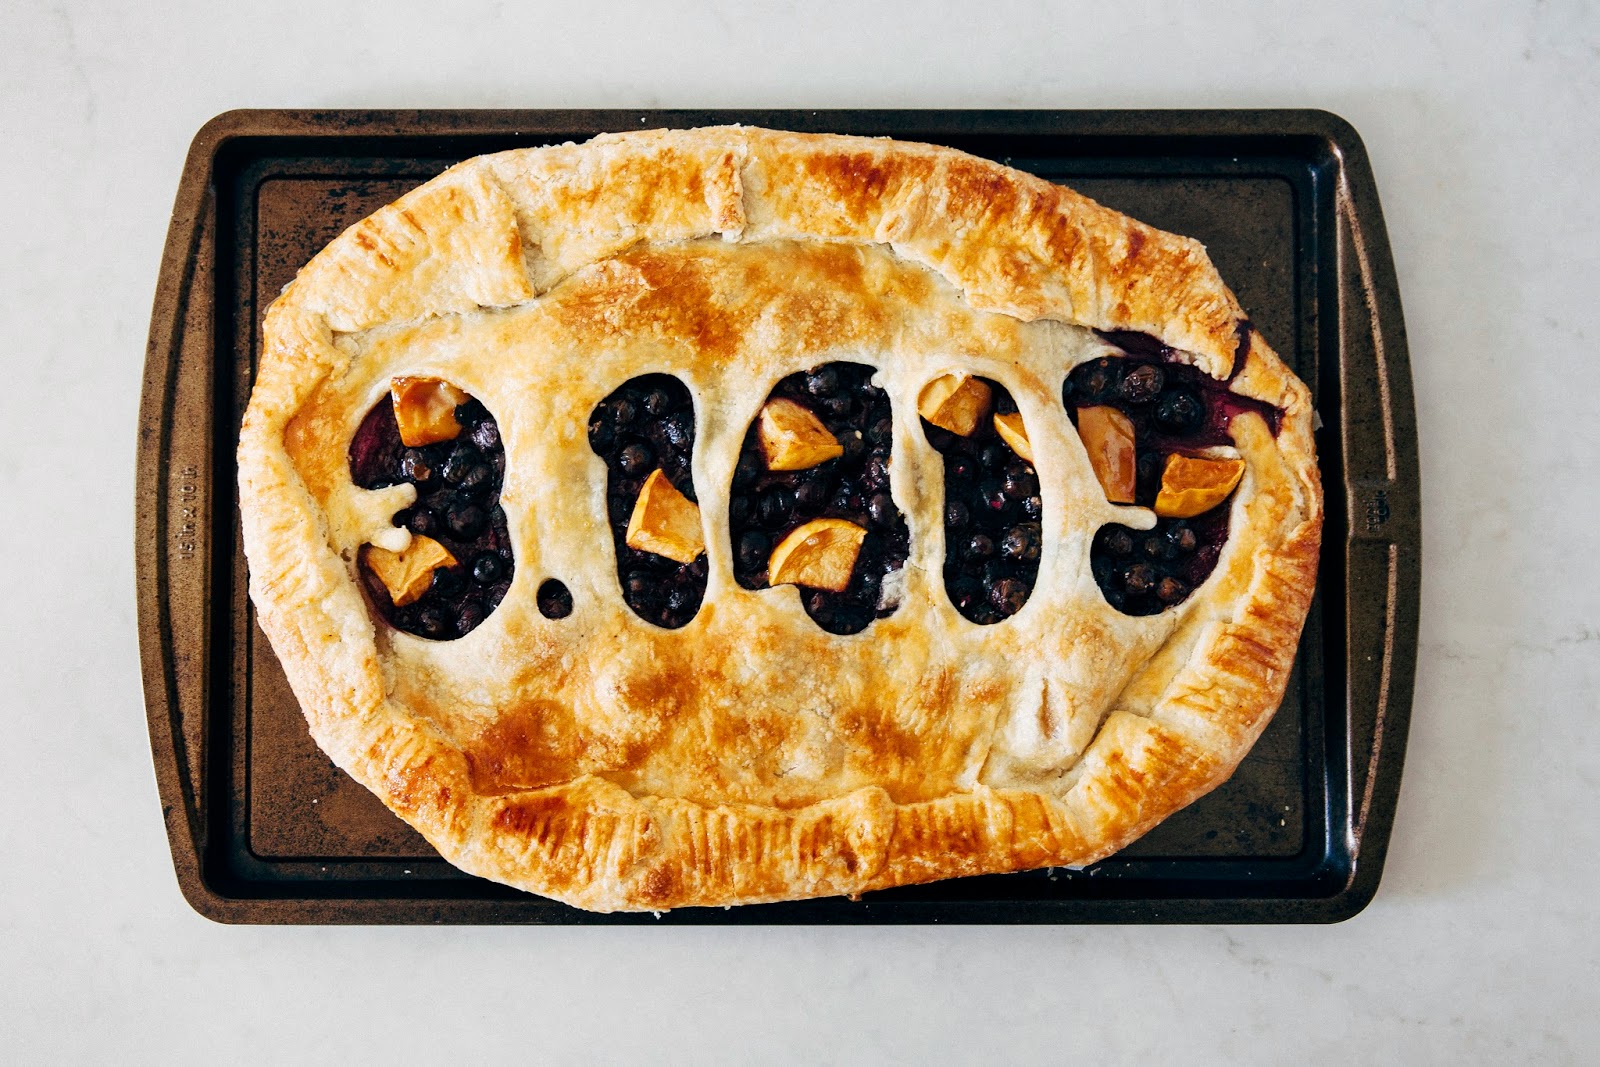
Yes, yes, I know it’s technically not a “pie” but instead a galette. Yes, yes, yes, a truer homage would have been to keep the pie in a circular shape (because Pi, after all, is the ratio of a circle’s circumference to its diameter), as opposed to the oval above. But come on, cut me some slack! At this point, I was 3 test pies deep, running on about 5 hours of sleep, and just wanted to find a crust that was a) unfussy, b) allowed me to stamp out such HUGE numbers for Pi, and c) tasted good. Because I’m insistent on using all butter crusts (no shortening allowed in my household, them’s the rules), the first two recipes that I tried had illegible numbers since the pie crusts kept shrinking. Oh well.
In the end, I used a heavily adapted version of Martha Stewart’s pâte brisée recipe. Pâte brisée is basically French pie crust, but instead of blending the butter in by hand, the French instruct you to use a mixer or food processor to do so. The theory is that a food processor will better distribute the butter throughout the dough, which leads to a flakier, sturdier crust (most French patisserie tends to require a heartier crust to hold all the cream in the pastry). However, with a food processor, it’s easy to overmix the dough, often leading to a crust that’s dense and flat. I ended up finishing the mixing process by hand in order to avoid this problem. My resulting pie crust had a texture that was in between pâte brisée and traditional pie crust: a stronger, heartier crust that allowed me to stamp out and maintain my shapes, but also stayed true to the texture and flavor of good ol’ American pie. Ace.
As for the filling, I was inspired by this blueberry caramel sauce recipe from Bon Appetit that I’ve had bookmarked for many years now. I worried that it might be too intense on its own, so at the last second I added in some Opalescent apple chunks to add some tart bursts of flavor here and there. My worries were in vain — the caramel flavor chilled out in the baking process and blended in wonderfully with the blueberries and apples. It’s definitely a flavor combination I’ll be exploring again soon!
Happy 3.1415 Day!!!
Some baker’s notes:
-
- Not a pie baker? Me either. But I’ve done it enough times to be able to fake it — check out this salty honey pie recipe for some of my ultimate pie baking tips! Tips for this particular recipe include using the coldest ingredients and equipment possible (I froze my butter overnight before using, as well as stuck my food processor bowl and blade in the fridge overnight because I’m anal like that), flouring your work surface and equipment liberally, and yep, letting the dough rest overnight for a tender crust. Plan ahead for this one!
-
- Don’t overdo the liquid in the pie crust recipe. When I was testing recipes, I found it difficult to make pie with a food processor because I would overshoot the liquid and end up with a crust was sticky, soggy, gooey and gross. It’s hard to see how much you’re adding to the crust when you use a food processor — this is why I have you stopping the food processor early and finishing the rest by hand. Use your judgement and add the liquid provided a tablespoon at a time, just until the dough starts to come together. Add only as much as that, and no more — you want to get to the point where it’s still a little bit dry and you’re having a little bit of difficulty keeping the dough together; it’s okay to have a few pea-sized bits of dough fall off here and there as you’re patting it together. Less liquid means a flakier, crispier and ultimately more tender crust.
-
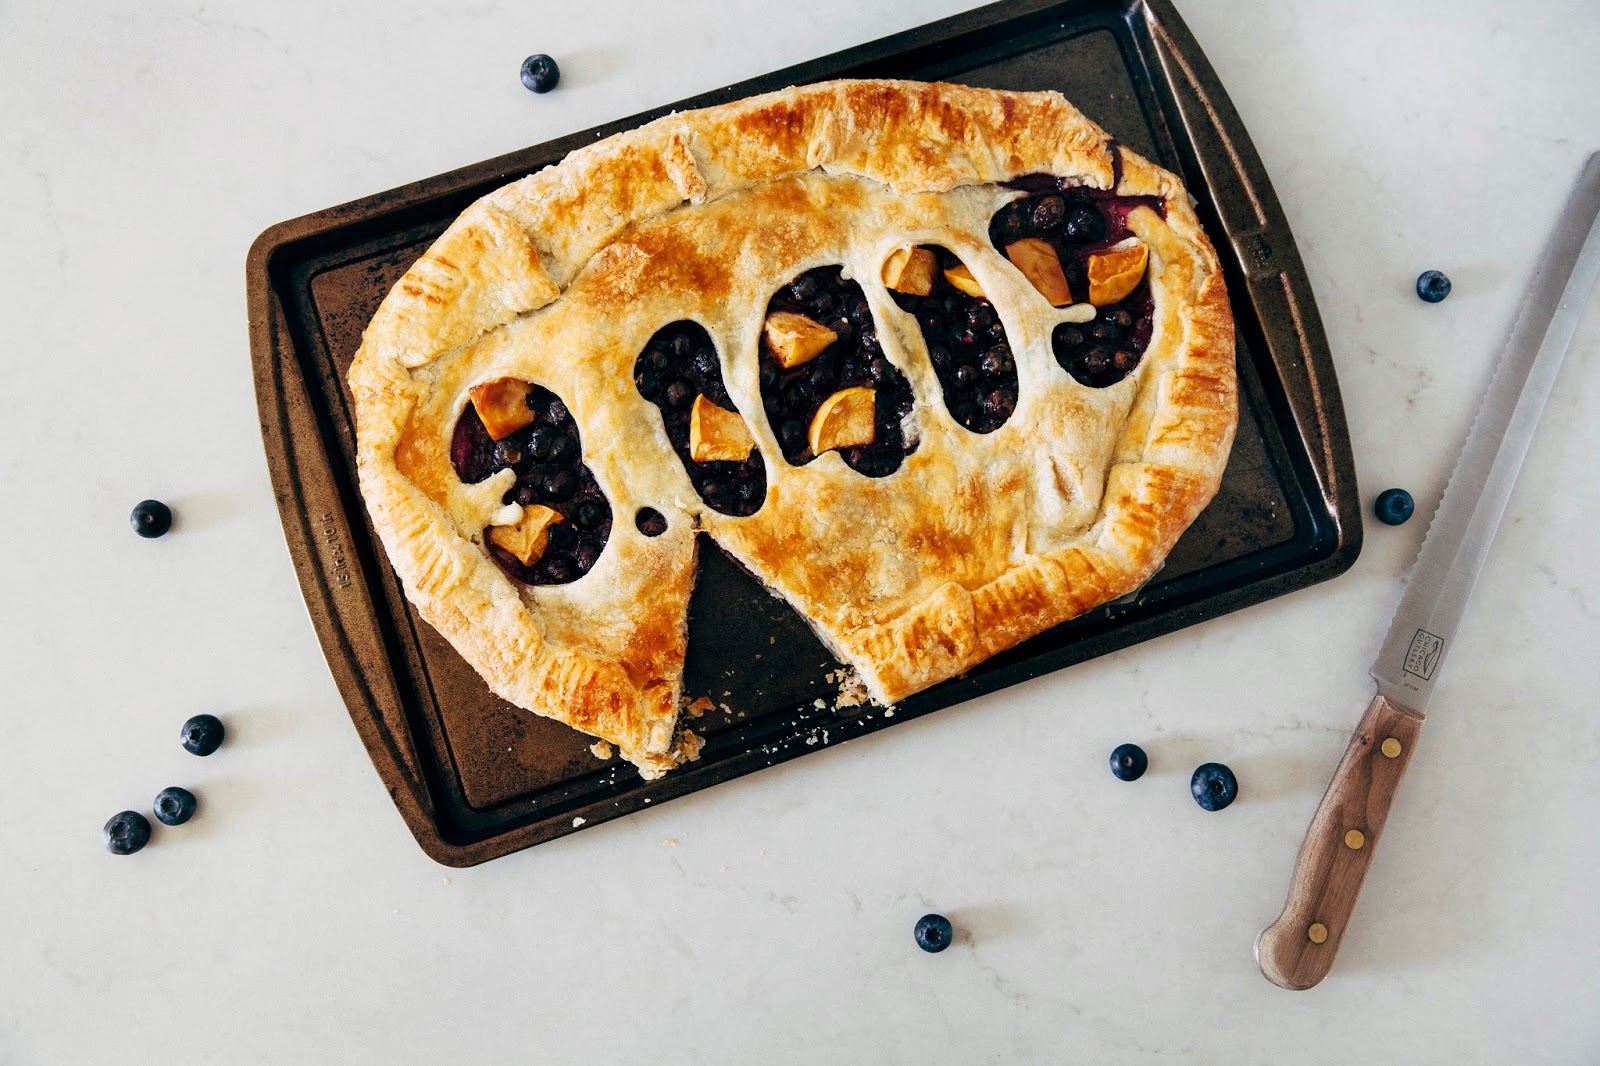
- A note on the filling — it will seem like there’s not enough filling for the pie, especially when you’re spreading out the ingredients on the base before covering and baking. That’s on purpose; I deliberately skimped on the filling because I wanted a larger crust to filling ratio, ensuring that each bite would have an almost equal amount of crust to filling. I like to think of this pie as a giant pop tart, basically. But if you’re a traditionalist and want more filling than pie filling than crust, up the filling quantity by adding half of the amount provided to the filling’s ingredients list.
- To stamp out the numbers, I used these Wilton alphabet and number cookie cutters. For clean, well-defined numbers, dip the sharp edge of each cookie cutter in flour before stamping out the shape.
Get the Recipe: Blueberry, Apple, and Caramel Pi Day Slab Pie
Ingredients
For the Pâte Brisée
(makes 1 double-crust slab pie)
- 2 1/2 cups all-purpose flour
- 1 teaspoon granulated sugar
- 1 teaspoon kosher salt
- 1 cup (2 sticks) unsalted butter, cut into 1-inch cubes and frozen overnight (see baker's notes)
- 6 tablespoons ice cold water
- 2 tablespoons apple cider vinegar
For the Blueberry, Apple and Caramel Filling
(makes enough for 1 double-crust slab pie)
- 3 cups fresh blueberries
- 1 medium apple, cut into 1/2-inch cubes (approximately 1 cup)
- 2 generous (small mound, unleveled) tablespoons cornstarch
- 1/4 cup caramel sauce
- a pinch of kosher salt
For Assembly
(makes enough for 1 double-crust slab pie)
- 2 tablespoons unsalted butter, cut into small specks
- 1 large egg
- 1 generous (small mound, unleveled) tablespoon granulated sugar
Equipment
- A food processor
- numerical cookie cutters (see baker’s notes)
- a pastry brush
Instructions
For the Pâte Brisée
- In the bowl of a food processor, combine 2 1/2 cups all-purpose flour, 1 teaspoon granulated sugar, and 1 teaspoon kosher salt. Pulse for a few seconds until the ingredients are fully incorporated. Scatter 1 cup very cold cubed unsalted butter over the mixture, and pulse for a few seconds until the mixture resembles coarse meal, around 8 to 10 seconds total. DO NOT OVERPULSE.
- In a small liquid measuring cup, whisk together 6 tablespoons ice cold water and 2 tablespoons apple cider vinegar. You should have 1/2 cup of liquid. Grab 2 ice cubes, stick them in the measuring cup and whisk them ferociously for at least 10 seconds to chill the apple cider vinegar before fishing them out.
- With your food processor running, add 1/4 cup of the water and cider mixture in a slow, steady stream through the feed tube. Stop the machine when 1/4 cup is added, and pulse one or 2 times until the dough holds together — at this point, it's okay if the mixture still looks kinda dry and is just holding itself together with a few big chunks here and there. That's actually what you want. Use a rubber spatula to turn out the mixture into a large bowl. At this point, test the dough by squeezing a small amount together. If it is crumbly, sprinkle 1 tablespoon of water/apple cider (from the leftover mixture, you should have a cup left) and use your hands to mix until the dough comes together in a ball with some dry bits remaining. Squeeze and pinch with your fingertips to bring all the dough together, and, if necessary, sprinkle any dry bits with small drops of ice water to combine. Shape the dough into a flat disc, and use a bench scraper to divide it into two portions: one portion should be two-thirds of the dough (16 ounces, for those using a measuring scale), the other should be the remaining third (around 8 ounces). Wrap the portions in plastic and refrigerate for at least 1 hour, preferably overnight to give the crust time to mellow. Wrapped tightly, the dough can be refrigerated for 3 days or frozen for 1 month.
For the Blueberry, Apple, and Caramel Filling
- When you're ready to make out the pie, make the filling. In a medium bowl, combine 3 cups fresh blueberries and 1 cup apple chunks. Sprinkle 2 generous tablespoons cornstarch over the fruit, and use a rubber spatula to gently toss the fruit until completely coated in the cornstarch.
- When the fruit has been dredged, drizzle 1/4 cup caramel sauce and a pinch of kosher salt over the mixture. Use your rubber spatula to toss the fruit until coated completely in caramel. Set aside while you roll out the pie dough.
For Assembly
- Prepare a large rimmed baking sheet (at least 15 x 10-inches) by lining with parchment paper. Set aside.
- Liberally sprinkle a work surface with flour. Unwrap the larger portion of dough (the 2/3rds one) and place it on the work surface, sprinkling its top with flour. This portion will be your base crust. If the dough is hard, let it rest for a few minutes. If the dough seems too sticky at first, add flour liberally. Use a rolling pin to roll with light pressure, from the center out, moving the pie dough around every quarter to roll it evenly. Roll the the dough to a rough oval that is about 15-inches long, 10-inches deep, and about 1/4-inch thick. Transfer this oval onto the prepared baking sheet and refrigerate while you roll out the remaining disk.
- Replenish your work surface with more flour. Repeat step 2, this time rolling the dough out to a smaller oval that is about 13-inches long and 9-inches deep. This portion will be your top crust. Transfer the rolled out dough on to a piece of wax or parchment paper. Use your numerical cookie cutters to stamp out the Pi number sequence, dipping the sharp edge of each cutter in flour before doing so. Once your numbers have been stamped, transfer the crust into the freezer to chill while you fill the bottom crust with pie filling.
- Remove the base crust from the refrigerator and use a spoon or a rubber spatula to transfer the fruit filling to the center of the crust. Spread out the filling evenly over the base, but leave a 2 to 3-inch border all the way around the oval. Evenly dot the fruit filling with 2 tablespoons of unsalted butter specks.
- Remove the top crust from the freezer and gently, carefully lay the crust over the fruit filling. There should still be a 1 1/2 to 2-inch border visible from the base crust. Working quickly, fold this border over the top crust, overlapping when necessary and pressing gently to adhere to the folds. Use a fork to press down on the border to “seal” and “crimp” the bottom crust onto the top crust. Transfer the pie to the refrigerator to chill while you preheat the oven.
- Center a rack in the oven and preheat the oven to 375 (F). While the oven is heating, whisk 1 large egg in a small bowl.
- When the oven is ready, remove the pie from the fridge. Working quickly, use a pastry brush to brush the top and border of the pie. Sprinkle evenly with 1 tablespoon granulated sugar and transfer immediately to the preheated oven. Bake until the crust is golden brown and filling is bubbling, 30 to 35 minutes. Transfer to a wire rack, and let pie cool until it is just warm to the touch, about 45 minutes. Slab pie is best eaten the same day it is baked, but it can be kept at room temperature, loosely covered with plastic wrap, for up to 2 days.
I am stunned! Seriously, the idea is genius and the occasion is so rare that it is worth making a Pi pie for sure ! Happy Pi day ????!
Happy Pi Day! This is awesome. Blueberry, apple AND caramel … whoa. And I approve of your crust to filling ratios.
This slab pie is amazing, Michelle! I had no idea that this particular Pi Day was such a special occasion… I mean the whole 3.1415 thing blows my mind. Woah.
And I love that you cut out the numbers into the pie… so creative!!
Okay, and the addition of caramel. Love.
Thank you, Maryna! You always leave such sweet comments. Happy Pi Day! Does Ukraine celebrate Pi Day as well?
Thanks Sara! I was just over at your blog checking out your illustration. It's gorgeous as usual. And yes, I'm all about more crust per filling 🙂
Hahah, I know, right? Being a math nerd, I actually had it marked out on my calendar. There was no way I could miss it!
And thank you for the kind words (as usual!). You're the sweetest <3
Probably the best pi day non-pie ever. I can't decide what I love more – the flavors or the extremely adorable crust. I am so pleased to have found a fellow math nerd in the food blogging world!!
YAY!! I LOVE that you stamped the date in — 3.1415 blew my mind too!!! So worth memorializing in pie. This looks amazing. Hope you're all settled in again and the jetlag's worn off!
Hahha yes, once a math nerd, always a math nerd. Happy Pi Day! Hope you ate lots of pie!
Thanks Cynthia!!! Hope you had a great Pi Day 🙂
Really looks yummy
This is so amazing Michelle – I love the 3.1419 on the top hehe!
This pie is adorbz I love it. <3
Thank you Millie! Happy Pi Day!
Pie is my favorite food! And I don't even have an exact favorite flavour. I am stunned by this combination of deliciousness, girl!! All over this!
Good lord that is one beautiful pie for Pi day! Your pie baking tips are amazing and I hope you post some photos on the blog from your gorgeous trip to Asia.
Thanks Katrina! I'm still drooling over your Guinness cheesecake myself. Thanks for stopping by!
Thanks Nik! Can you believe that I didn't actually take any photos with my DSLR when I was over there, even despite bringing it with me? In the end, it was too heavy to carry around during the day. I only took cell phone pics, shame on me.
Ahhhh don't you just dread the multiple tests you gotta go through sometimes? good thing we can stomach {most} of our recipe fails, though!!! 😉 And this sounds so delish, girl! The idea of a giant and more wholesome pop tart really tempts me.
On a different note, I am the worst at knowing what day is so-and-so day even when it comes to major holidays. I blame it on me not being at school anymore, hehe.
Lol oh my gosh – when I read your bakers notes – the valuable tips about overmixing, adding too much liquid… I nodded my head along and thought to myself, why couldn't someone have told me this when I first started making pies??? This slab pie is gorgeous. Galette, pie, tart – whatever, they all have crusts and are delicious. The nerd in me loves that you included the numbers. What a shout out to pi day :).
UMMMM HELLO, this is everything!! My mind was totally blown too!! Hope you had a happy pi day 🙂
An equal crust to filling ratio – Michelle, you are a girl after my own heart.
That stamped out 3.1415 is real dedication! I feel like it would totally shrink on me, or I'd tear it, somehow. I'm seriously impressed that your pie came out so perfect! Any tips on ensuring that your pie crusts don't shrink? I've found that using a metal pie plate works, but sometimes I want to use my glass one- it makes for much prettier presentation!
OMG, i know about the holidays thing. I completely missed St. Patrick's Day this year; I was too busy freaking out about Pi Day lol lol.
Thank you Betty! Pies have been my best frenemy for a long time; I'm glad you found my tips helpful, there's literally been months of trial and error behind them 🙂
Thanks Alana!!!
ME TOO. I saw some rhubarb in the grocery store the other day and FREAKED OUT. Can't wait for all the berries to come in season, finally!
Duh. Best kind of pie there is. Don't let anybody tell you otherwise 😉
So — the previous pie crusts I worked with experienced shrinkage and tearing, but not this recipe! Good old Martha knows what's up. This recipe is incredibly, incredibly forgiving. Also if you make a galette as opposed to fitting it into a pan, there's less chance of the crust moving around and sliding down the pan (that's what usually causes ugly pies).
http://coleens-recipes.blogspot.com/
YOU'RE AMAZING. The stamped out numbers are SO CUTE. Ashamedly, the only culinary way I celebrated pi day was by eating pie purchased by my roommate. So craving a from-scratch pie, though! And a belated welcome back from Asia to you–your eating adventures looked BOMB.
Thanks Erika!!! Hope you're doing okay in b-school, I haven't heard from you in a while!
Wonderful site and I wanted to post a note to let you know, ""Good job""! I’m glad I found this blog. Brilliant and wonderful job ! Your blog site has presented me most of the strategies which I like. Thanks for sharing this.sales training Sydney
I was working and suddenly I visits your site frequently and recommended it to me to read also. The writing style is superior and the content is relevant. Thanks for the insight you provide the readers!sales training Sydney