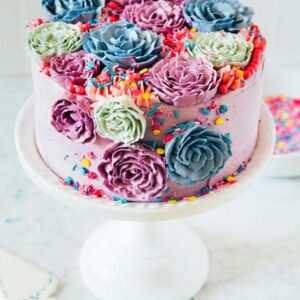
Get the Recipe: Buttercream Flowers 101
Ingredients
- one 8-inch cake of your choice, smoothly frosted
- one recipe Lyndsay’s Swiss Meringue Buttercream (included above)
- pink, purple, green and blue food coloring (I used colors from this awesome Americolor set)
- sprinkles
Instructions
How to Pipe Buttercream Roses
- First, prep your ingredients and tools: divide the buttercream into four even batches, dying each batch with a different color. Fit 4 pastry bags with couplers, and fill each pastry bag with its own batch of buttercream. For one of the pastry bags with the petal tip.
- Squeeze a tiny amount of buttercream onto the center of the flower nail. Pat a parchment paper square on top of the buttercream, pressing down and rubbing it across the surface of the nail to "glue" it onto the nail. Arrange the parchment paper so that it is relatively centered on the nail. Brilliant! You're ready to pipe flowers.
- Start by piping a small blob of buttercream in the center of the parchment paper. It doesn't have to be a specific shape or even pretty — a small blob will do. Next, hold the piping bag at a 45-degree angle with the wide end of the piping tip at the bottom of the nail; squeeze the piping bag, turning the nail at the same time, so that it pipes a half circle around the blob of buttercream frosting. Pipe another half circle, starting from the halfway point of the initial half circle. Repeat until you've got a circle that forms the base of the rose. Repeat this process for the outer petals of the rose — as your flower grows, you'll notice that you'll need to pipe longer and longer half circles. Continue making the layers of petals until you've reached the desired size for your rose — smaller ones will look more like conventional roses, whereas larger ones will look almost like peonies, succulents, or even cabbage flowers.
- Once satisfied with your flower, carefully remove the parchment paper from the flower nail with the flower attached and place it on the half sheet pan. Repeat the process for however many roses you wish to make, moving the petal tip to different piping bags for different colored flowers. Go crazy and make as many flowers as you want, but be sure to reserve some frosting for finishing the cake and gluing the flowers on to the actual cake itself. Once done, transfer the sheet pan to the freezer to freeze for at least 1 hour, or until the flowers are cold and firm to the touch.
How to Assemble a Buttercream Flower Power Cake
- Once the flowers are frozen and firm to the touch, it's time to decorate the cake. Remove the sheet pan from the freezer. Use the flower lifter scissors to carefully lift up each flower from its parchment paper square, discarding the paper and transferring the flower to the top of the cake. To transfer them to the sides of the cake, pipe a blob of reserved frosting onto the sides of the cake to use as glue to hold the flower in place.
- Use a pastry bag with an open star piping tip to pipe quick stars in between the flowers, eliminating any "naked" space on the top of the cake. Garnish with sprinkles.
How to Save Buttercream Flowers for Future Cakes
- If you find yourself with leftover flowers, you can save your hard work for future cakes! Leave any leftover flowers on their individual parchment paper squares on the sheet pan and transfer to the freezer to chill overnight. Once the flowers have frozen solid, carefully transfer the flowers on their parchment squares into a Ziploc bag and seal tightly. The flowers will keep in the freezer for several months. When ready to use, you can use them straight from the freezer: simply unpeel each flower from its square and arrange on your cake as desired.
Did you make this recipe?Please leave a star rating and review in the form below. I appreciate your feedback, and it helps others, too!