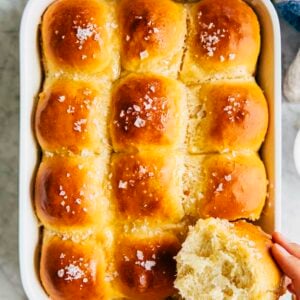
Get the Recipe: Salted Honey Parker House Rolls Recipe
The Parker House rolls are light, fluffy, and drenched in a generous amount of salted honey butter. The honey, sea salt, and salted butter together makes an utterly addicting salty-sweet flavor combo that works well as a side dish to almost every main!
Ingredients
For the Dough
- ¼ cup (2 ounces or 57 grams) water, warmed to between 110° to 115°F
- 1 (0.25-ounce) packet active dry yeast
- 1 cup (8 ounces or 227 grams) whole milk, at room temperature
- 4 Tablespoons (2 ounces or 57 grams) salted butter, melted and cooled slightly
- 1 Tablespoon honey
- 1 ½ teaspoons kosher salt
- 1 large egg, at room temperature
- 3 ½ cups (15.75 ounces or 447 grams) all-purpose flour
For Assembly
- 1 large egg, at room temperature
- 1 teaspoon water
- 4 Tablespoons (2 ounces or 57 grams) salted butter
- ¼ cup (3 ounces or 85 grams) honey
- flaky salt, for garnish
Instructions
For the Salted Honey Parker House Rolls
- First, activate the yeast. In a small liquid measuring cup, whisk together the water and yeast. Set aside for 5 minutes, or until bubbly and foamy, while you prep the other ingredients.
- Make the dough. In the bowl of a stand mixer, whisk together the milk, melted butter, honey, and salt. Add the yeast mixture and the egg all at once and mix with a rubber spatula until just combined. Add the flour and mix until a shaggy dough forms, about 1 minute.
- Knead the dough. Affix the bowl to the stand mixer with a dough hook. Knead on medium-low for 5 minutes, or until the dough is smooth and elastic.
- Proof the dough overnight. Tip the dough out onto a lightly floured counter and use the spatula to scrape down the bottom and sides of the bowl for any stuck dough. Use your hands to knead the dough lightly and bring it together, about 1 minute. Lightly spray the stand mixer bowl with cooking spray and place the dough back in the bowl. Cover with plastic wrap and refrigerate overnight.
- Shape the dough and proof again. Once the dough has doubled overnight, lightly spray an 8-inch square pan with cooking spray. Uncover the dough and discard the plastic wrap. Punch down the dough and tip it onto a floured counter. Use a bench scraper to divide the dough into 12 equal pieces, about 2.5 ounces (71 grams) each. Shape each piece into rough ball and place in the prepared baking pan, arranging the balls in three rows of four. Loosely cover with plastic wrap and let rise for 1 hour.
- Prep the oven. About 30 minutes into the second rise, position a rack in the center of the oven and preheat the oven to 375°F.
- Make the egg wash. In a small bowl, whisk together the remaining egg and water. Use a pastry brush to brush the top and sides of each roll with the egg wash.
- Bake the rolls. Bake for 30 to 35 minutes, or until the tops of each roll are golden brown. An instant thermometer inserted into the center of roll should read 200°F.
- Make the salted honey topping. In a small saucepan over medium heat, melt the butter for the topping. Whisk in the honey for the topping to combine. Use a pastry brush to brush the top of each roll with the salted honey topping immediately after pulling out the rolls from the oven. Garnish with flaky salt.
- Serve and store. Serve immediately. The rolls can be stored in an airtight container or zip-top bag at room temperature for up to 2 days.
Notes
- You can skip the overnight rise and make the rolls all in one day. Follow the recipe instructions to make the dough and place it in a bowl covered with plastic wrap. However, instead of proofing the dough in the refrigerator overnight, let the dough rise for 1 to 2 hours in a warm, draft-free spot. Once puffy and doubled in size, follow the recipe instructions to punch down the dough, shape it into rolls, rise again, and bake accordingly.
- Alternatively, you can make the dough up to 3 days ahead of shaping them into rolls and baking them. Simply keep covered and refrigerated for up to 3 days, then follow the recipe instructions to shape the dough into rolls, proof again, and bake accordingly.
- Just another friendly reminder to make sure to pay attention to the ingredients and the temperatures they’re listed at in the recipe. Yeast is a living thing and you can easily kill it by mixing it in water that’s too hot. You want the temperature to be similar to that of a warm bath and no more.
- The dough recipe also instructs you to use butter that’s melted and cooled slightly. What does that mean? Similar to the water for the recipe, its temperature should feel like a warm bath. When I’m prepping ingredients for this recipe (and others that uses melted and slighted cooled butter), I like to melt the butter first (either over a gentle heat on the stovetop, or short bursts in the microwave to ensure it doesn’t get too hot). Once it’s melted, I prep the rest of the ingredients. That gives it enough time to cool slightly—by the time I’m done prepping the ingredients and ready to start the recipe, it should be at the right temperature!
- Dough rises fastest and best on warm, humid days. Although you can get the same effect on cold, dry days, it can take two to three times as long to proof dough. This is why professional bakeries have dedicated drawers to proof dough. The proofing drawer mimics the environmental conditions of a warm, humid day. And guess what? You can do that at home too, with the oven you already have. First, if your oven has a pilot light, turn it on—doing so increases the temperature inside the oven by about five degrees. Next, bring 2 to 4 cups of water to a boil and pour it into a heatproof glass or ceramic bowl. Place the bowl of water in the oven, then place the dough you’re trying to proof next to it. The warmth from the light and moisture from the steaming, hot water will create a warm, humid environment in the oven to proof the dough faster.
Did you make this recipe?Please leave a star rating and review in the form below. I appreciate your feedback, and it helps others, too!