Get the Recipe: NOT CAKEY Pumpkin Chocolate Chip Cookies Recipe
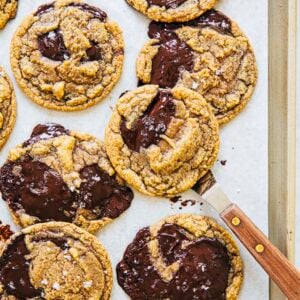
These pumpkin chocolate chip cookies are NOT cakey. Instead, they are crispy on the edges, chewy and fudgy in their centers, and filled with pools of chocolate—just like your favorite chocolate chip cookies!
Ingredients
- 1 ½ cups (6.75 ounces or 191 grams) all-purpose flour
- 1 ½ teaspoon pumpkin spice
- 1 teaspoon ground cinnamon
- ¼ teaspoon baking powder
- ¼ teaspoon baking soda
- 1 teaspoon kosher salt
- ½ cup (1 stick or 4 ounces or 113 grams) unsalted butter, melted and cooled slightly
- 1 cup tightly packed (7.5 ounces or 213 grams) light OR dark brown sugar
- ½ cup (3.5 ounces or 99 grams) granulated sugar
- 1 large egg yolk
- ¼ cup (2 ounces or 57 grams) canned pumpkin puree
- 1 teaspoon pure vanilla extract
- 6 ounces (170 grams) dark chocolate (between 60% to 70% cacao), from whole fèves or a high-quality chocolate bar
- flaky salt, for garnish
Equipment
- a 3-Tablespoon cookie dough scoop
Instructions
For the Pumpkin Chocolate Chip Cookies
- Prep the oven and baking pan. Position a rack in the center of the oven and preheat the oven to 350°F. Line two half sheet pans with parchment paper.
- Mix the dry ingredients. In a medium bowl, whisk together the flour, pumpkin spice, cinnamon, baking powder, baking soda, and salt.
- Mix the butter, sugars, egg yolk, pumpkin, and extract. In a medium bowl, use a wooden spoon or a stiff rubber spatula to mix together the butter and sugars until moistened, about 1 minute. Add the egg yolk, pumpkin, and vanilla extract and mix until combined.
- Add the dry ingredients and chocolate. Gradually mix in the dry ingredients until just combined. Add the chocolate all at once and mix until the chocolate is evenly distributed throughout, about 1 minute.
- Assemble the cookies. Use a 3-Tablespoon cookie dough scoop to portion the cookie dough into dough balls, placing them at least 3 inches apart on the prepared sheet pans as you go.
- Bake the cookies. Bake for 10 minutes, or until the edges have set but the centers are still gooey. The cookies will look puffed when you pull them out of the oven, but will fall and crack into the perfect cookies as they cool. Cool the cookies on the pan on a wire rack for 20 minutes, or until the edges and bottoms of the cookies feel firm to the touch. Repeat with remaining cookie dough balls.
- Serve and store. Serve warm or at room temperature. The cookies can be stored, in an airtight container at room temperature, for up to 3 days.
Notes
- It’s easier to separate an egg’s whites from its yolk while the egg is still cold. At room temperature, yolks break easily. For this recipe, I recommend using an egg yolk that’s still cold from the fridge. Doing so will make your pumpkin chocolate chip cookie dough easier to scoop!
- If you don’t have a digital scale, note that 6 ounces (170 grams) of dark chocolate fèves or chopped chocolate is about 1 cup.
- To save myself some clean up, I melt the butter in the bowl I’m planning to make the cookie dough in. Specifically: I use a small bowl to mix the dry ingredients. Then, I melt the butter in a medium bowl big enough to mix the dough in, add the sugar, egg yolk, and extract, then the dry ingredients and chocolate. As a result, I only need two bowls for this recipe!
- If your dough seems too soft to scoop, don’t panic! It’s likely that the butter was still too hot when you combined it with the rest of the ingredients. Simply pop the bowl of cookie dough in the refrigerator for 10 to 15 minutes to firm the dough up.
- Want your cookies to look *EXACTLY* like mine, with a signature puddle of melted chocolate skimmed across each surface? Easy! Simply reserve a fève or a ½- to 1-inch piece of chopped chocolate for each cookie. Place on top of each cookie dough ball before baking. The chocolate will melt into the puddles you see on top of each cookie!
- I like to bake the cookies one pan at a time. I find that doing so makes the best cookies, ensuring that none of them have overly burnt bottoms or raw centers. However, to save time, you can bake two sheet pans at a time. Position a rack in the upper-third position of the oven, and a second one in the lower-third position of the oven. Bake a pan on each rack, swapping their positions half way through the Bake Time.
Did you make this recipe?Please leave a star rating and review in the form below. I appreciate your feedback, and it helps others, too!
