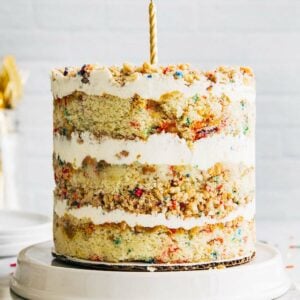
Get the Recipe: Milk Bar Birthday Cake Recipe
This Milk Bar Birthday Cake Recipe is a homemade version of the most popular cake from famed New York City bakery, Milk Bar! The birthday cake is made with layers of white cake studded with rainbow sprinkles, cream cheese frosting, and a crunchy streusel made from birthday cake crumbs.
Ingredients
For the Birthday Cake Crumb
- ½ cup (3.5 ounces or 99 grams) granulated sugar
- 1 ½ Tablespoons (.75 ounces or 21 grams) tightly packed light brown sugar
- ¾ cup (3 ounces or 85 grams) cake flour
- 2 Tablespoons (.75 ounces or 21 grams) rainbow sprinkles
- ½ teaspoon baking powder
- ½ teaspoon kosher salt
- ¼ cup (2 ounces or 57 grams) grapeseed oil
- 1 Tablespoon clear imitation vanilla extract
For the Birthday Cake
- 2 cups (8 ounces or 227 grams) cake flour
- ¼ cup plus 2 Tablespoons (2.25 ounces or 64 grams) rainbow sprinkles, divided into ¼ cup (1.5 ounces or 43 grams) and 2 Tablespoon (0.75 ounces or 21 grams) portions
- 1 ½ teaspoons baking powder
- ¾ teaspoon kosher salt
- ¼ cup (½ stick or 2 ounces or 57 grams) unsalted butter, at room temperature
- ⅓ cup (2.15 ounces or 60 grams) vegetable shortening
- 1 ¼ cups (8.75 ounces or 248 grams) granulated sugar
- 3 Tablespoons tightly packed (1.45 ounces 41 grams) light brown sugar
- 3 large eggs, at room temperature
- ½ cup (4 ounces or 113 grams) buttermilk, at room temperature
- ⅓ cup (2.35 ounces or 67 grams) grapeseed oil
- 2 teaspoons clear imitation vanilla extract
For the Birthday Cake Soak
- ¼ cup (2 ounces or 57 grams) whole milk
- 1 teaspoon clear imitation vanilla extract
For the Birthday Cake Frosting
- 1 ¼ cups (5 ounces or 142 grams) confectioners' sugar, sifted if necessary
- ½ teaspoon kosher salt
- pinch of baking powder
- pinch of citric acid
- ½ cup (1 stick or 4 ounces or 113 grams) unsalted butter, at room temperature
- ¼ cup (1.75 ounces or 50 grams) vegetable shortening
- ¼ cup (2 ounces or 57 grams) cream cheese, at room temperature
- 2 Tablespoons (1.5 ounces or 43 grams) light corn syrup
- 1 Tablespoon clear imitation vanilla extract
Equipment
- parchment paper
- an airtight container
- a stand mixer with a paddle attachment
- a bench scraper
- a 9 x 13-inch quarter sheet pan
- a 6-inch cake ring with 2-inch OR 3-inch tall sides
- acetate paper, cut into one 20-inch long x 6-inch tall rectangular strip OR cut into two 20-inch long x 3-inch tall rectangular strips
- a pastry brush
Instructions
Day 1: Make the Birthday Cake Crumb Recipe
- Prep the oven and baking pan. Position a rack in the center of the oven and preheat the oven to 300°F. Line a quarter sheet pan with parchment paper.
- Mix the dry ingredients. In a medium bowl, whisk together the sugars, flour, sprinkles, baking powder, and salt.
- Whisk the wet ingredients. In a small liquid measuring cup, whisk together the oil and vanilla.
- Mix the wet ingredients into the dry ingredients. Slowly pour the wet ingredients into the dry ingredients. Mix with a rubber spatula until the mixture starts to come together in small clusters and crumbs.
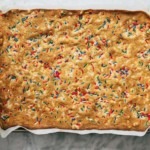
- Bake the crumbs. Use a rubber spatula to spread the clusters on a parchment-lined sheet pan. Bake for 20 minutes, using a bench scraper to break them up every 4 to 5 minutes. After 20 minutes, the crumbs should still be slightly most to the touch at that point. They will harden and dry as they cool.
- Store for assembling the layer cake. Cool the crumbs in the pan on a wire rack completely before storing or using in the recipe. The crumbs will keep, in an airtight container at room temperature, for up to 1 week. The crumbs will also keep, in an airtight container in the refrigerator, for up to 1 month.
Day 2: Make The Birthday Cake Recipe
- Prep the oven and cake pan. Position a rack in the center of the oven and preheat the oven to 350°F. Generously spray a quarter sheet pan with cooking spray and line the bottom with parchment paper, leaving a 2-inch overhang on the pan's two long sides. Spray the parchment, too.
- Mix the dry ingredients. In a medium bowl, whisk together the flour, ¼ cup (1.5 ounces or 43 grams) of sprinkles, baking powder, and salt.
- Beat the butter, shortening, and sugars. In the bowl of a stand mixer fitted with the paddle attachment, combine the butter, shortening, and sugars. Beat on medium until light, fluffy, and doubled in volume, 3 to 4 minutes, using a rubber spatula to scrape down the bottom and sides of the bowl as necessary.
- Add the eggs, oil, buttermilk, vanilla, and dry ingredients. Reduce the mixer to low and add the eggs one at a time, adding the next egg only after the previous one has been fully incorporated, scraping down the bottom and sides of the bowl after each addition. With the mixer on low, slowly pour in the buttermilk, followed by the oil and vanilla, and beat until the mixture is smooth, 4 to 6 minutes.Gradually add the dry ingredients and beat until just combined. Scrape down the bottom and sides of the bowl once more, and beat on low for an additional 30 seconds.
- Assemble the cake for baking. Pour the batter into the prepared pan and use an offset spatula to smooth its top if necessary. Sprinkle the remaining 2 Tablespoons of sprinkles (0.75 ounces or 21 grams) evenly over the batter.
- Bake the cake. Bake for 30 to 35 minutes. When done, the top of the cake should bounce back when gently pressed and a skewer inserted into the center of the cake should come out with a few crumbs attached.
- Store for assembling the layer cake. Cool completely in the pan on a wire rack before storing or using for assembly. Turn the cake out onto a sheet of plastic wrap. Use the plastic wrap to tightly wrap the entire cake (you may need an additional sheet or two of plastic wrap to cover it completely). The cake will keep, at room temperature, for up to 1 day. The cake will also keep in the freezer, wrapped in an additional layer of aluminum foil, for up to 3 months.
Day 3: Make The Birthday Cake Soak Recipe
- Whisk the wet ingredients. In a small liquid measuring cup, whisk together the milk and vanilla.
Day 3: Make The Birthday Cake Frosting Recipe
- Whisk the dry ingredients. In a medium bowl, whisk together the confectioners' sugar, salt, baking powder, and citric acid.
- Beat the butter, shortening, and cream cheese. In the bowl of a stand mixer fitted with the paddle attachment, beat the butter, shortening, and cream cheese on medium-high until smooth and creamy, about 2 to 3 minutes.
- Scrape down the bottom and sides of the bowl, then add the corn syrup and vanilla. Scrape down the bottom and sides of the bowl with a rubber spatula. With the mixer on low, add the corn syrup and vanilla. Beat on medium until combined, about 2 to 3 minutes.
- Add the dry ingredients, and beat on medium-high until creamy and smooth. Scrape down the bottom and sides of the bowl. With the mixer on low, gradually add the dry ingredients. Beat on medium-high until combined, about 2 to 3 minutes. Use immediately.
Day 3: Assemble The Birthday Cake
 First, prep the birthday cake for cutting. Use the overhanging parchment as handles to lift the brownies out of the pan and onto a cutting board.
 Cut the sheet cake into the different layers. Use the cake ring to stamp out 2 full circles and 2 half circles from the cake.
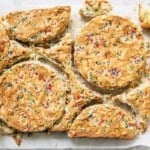 The full circles will be your top two cake layers, while the half circles and remaining cake scraps will come together to make the bottom layer of the cake.
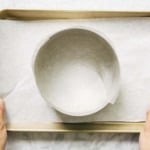 Prep the cake ring and acetate cake collar. Clean the cake ring and place it in the center of a sheet pan lined with clean parchment paper. Line the inside of the cake ring with the acetate paper (if using two strips of acetate paper, just use one strip).
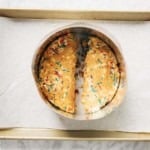 Make the bottom layer. Nestle the two half circles in the cake ring, pressing their round sides against the cake ring. There will be a gap in the middle of the circles—this is totally okay, I promise!
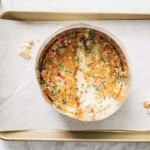 Fill the gap between the two half circles with the remaining cake scraps. Use the back of your hand to press the scraps together to fit into the space. Head's up that you're going to have more scraps than can fit in the gap—that's totally normal, I promise! Simply take the excess scraps and press them down evenly on top of the rest of the cake layer, using the back of your hand to create a flat and even layer.At this point, the acetate collar will start to wrinkle from the pressure of the cake. Don't worry about it too much! It will even back out when you add the middle and top layer.
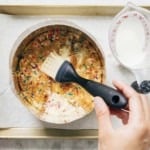 Brush the bottom layer with half of the Birthday Cake Soak. Use a pastry brush to brush half of the Birthday Cake Soak for assembly over the layer. If using a digital scale to weigh out the soak, you'll need approximately 1 ounce (30 grams) of Birthday Cake Soak for this layer.
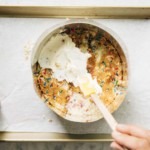 Spread a third of the Birthday Cake Frosting over the soaked cake. Use the back of a spoon or a small rubber spatula to spread ⅓ of the Birthday Cake Frosting as evenly as possible over the soaked cake If using a digital scale to weigh out the frosting, you'll need approximately 5 ounces (142 grams) of frosting for this layer.
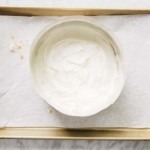 Don't worry too much about making the top of the frosting smooth—you'll cover it with other ingredients in the next step. The more important thing is to try and spread it as evenly as you can across the top of the cake, and ensure that too much of it doesn't get up on the sides of the acetate collar.
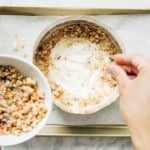 Sprinkle a third of the Birthday Cake Crumbs over the frosted cake. Sprinkle a third of the Birthday Cake Crumbs over the frosted cake. If using a digital scale to weigh out the crumbs, you'll need approximately 3 ounces (85 grams) of crumbs for this layer.
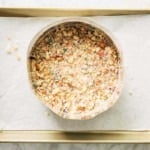 Use the back of your hand to gently press the crumbs in place. If you want to go the extra mile, sprinkle slightly more crumbs along the outer edges of the cake. Christina Tosi recommends doing so in a YouTube tutorial of hers—doing so creates more contrast between layers in the final, assembled cake!
 Make the middle layer. If you're using two acetate cake collars, gently tuck the second strip of acetate between the cake ring and the top ¼ inch of the first strip of acetate. Doing so creates a ring of acetate that is 5 to 6 inches tall, combined—this will be high enough to support the height of the finished cake.Set a cake round on top of the Birthday Cake Crumbs. If one of your cake rounds is jankier than the other, use it in the middle and save the pretty one for the top!
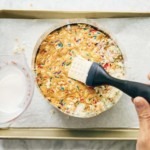 Repeat the process for brushing the middle layer with the remaining half of the Milk Bar soak. Use a pastry brush to brush the remaining half of the Birthday Cake Soak over this cake.
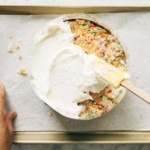 Repeat the process for frosting the soaked cake with a third of the Birthday Cake Frosting. Use the back of a spoon or a small rubber spatula to spread ⅓ of the Birthday Cake Frosting as evenly as possible over the soaked cake.If using a digital scale to weigh out the frosting, you'll need approximately 5 ounces (142 grams) of frosting for this layer.
 Repeat the process for sprinkling a third of the Birthday Cake Crumbs over the frosted cake. Sprinkle a third of the Birthday Cake Crumbs over the frosted cake. If using a digital scale to weigh out the crumbs, you'll need approximately 3 ounces (85 grams) of crumbs for this layer.
- Make the top layer. Set the final cake round on top of the Birthday Cake Crumbs.
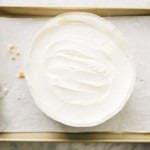 Repeat the process for frosting the cake with the remaining Birthday Cake Frosting. Use the back of a spoon or a small rubber spatula to spread the remaining ⅓ of the Birthday Cake Frosting as evenly as possible over the cake.If using a digital scale to weigh out the frosting, you'll need approximately 5 ounces (142 grams) of frosting for this layer.
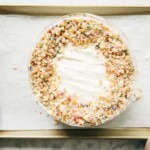 Repeat the process for sprinkling the remaining third of the Birthday Cake Crumbs over the frosted cake. Sprinkle a third of the Birthday Cake Crumbs over the frosted cake. If using a digital scale to weigh out the crumbs, you'll need approximately 3 ounces (85 grams) of crumbs for this layer.I like to leave a little circle of frosting in the center of the cake for "aesthetic"—however, you can cover the frosting completely if you'd like!
- Freeze the cake. Transfer the sheet pan with the cake to the freezer. Freeze, uncovered and fully assembled, for a minimum of 12 hours to set the cake and all its fillings. The cake will keep in the freezer for up to 2 weeks.
Day 4: Serve and Store
- Thaw the cake, then serve. At least 3 hours before you are ready to serve the cake, pull the sheet pan out of the freezer and use your fingers and thumbs to gently pop the cake out of the cake ring.Transfer the cake to a serving plate or cake stand. Gently peel off the acetate. Defrost in the fridge for a minimum of 3 hours (or 1 hour at room temperature) before serving.
- Store the cake. The assembled cake will keep, uncovered in the refrigerator, for up to 1 day. After that, tightly wrap in plastic wrap and refrigerate for an additional 3 days. Leftover slices can be stored in an airtight container in the fridge.
Notes
- In the cookbook, Christina Tosi warns that there is a ton of liquid and fat in the birthday cake base. She encourages you to make sure that the batter is homogenous at each step (meaning no streaks, discolorations, or any other signs of separation and unincorporation). In fact, the book specifically states that you need to mix the batter on medium-high for AT LEAST 4 to 6 minutes, or until the mixture is “practically white, twice the size of the original fluffy butter-and-sugar mixture, and completely homogenous.” Don’t rush the process!
- This funfetti cake recipe is unusual in that it instructs you to use whole eggs as opposed to just egg whites to make the batter. If you use eggs that have an especially orange yolk, your crumb might come out yellow instead of white. Counteract this by adding 1 to 2 drops of blue or purple food coloring to the batter—this will make the crumb more white!
- In the original recipe, Christina Tosi instructs you to assemble the cake with two acetate cake collars, each roughly around 20 inches long and 3 inches tall. These days, you can easily buy acetate cake collar rolls that are taller and measure either 6 or 8 inches in height. Truthfully, these rolls suit the recipe much better since the resulting cake is around 6 inches tall. So if you opt for a taller cake collar roll, you’ll only need to use one cake collar for the whole cake! But there are some disadvantages to doing so—checkout the Troubleshooting and FAQ section of the blog post for more info!
- The original recipe is also pretty vague about dividing up the Birthday Cake Crumbs, Birthday Cake Soak, and frosting between the layers. The book only gives you rough estimates (e.g. “Use half of the Birthday Cake Soak for the bottom layer”) as opposed to giving you exact volume or weight measures for each layers. So the first time I made this cake, it was wildly uneven! I ended up using way more frosting for the first layer, and ran out by the time I needed to frost the rest of the cake. Similarly, I used way too much soak and crumbs in my bottom layer versus the middle layer. So when adapting this recipe for Hummingbird High, I made sure to give you EXACT weight measures of the different components needed for each layer. Doing so ensures an even, perfect cake with just the right textures and quantities for each layer! I mean, truthfully, you can probably just eyeball it too. But why not just strive for perfection?
- After freezing the cake, the recipe instructs you to pop it out of its cake ring before thawing in the refrigerator. Doing so actually more difficult than I anticipated! The acetate cake collar was frozen around the cake ring. I ended up taking an offset spatula and running it between the acetate and the cake ring. I then pressed my fingers around the outside of the cake, rotating it to methodically apply gentle pressure all around.
Did you make this recipe?Please leave a star rating and review in the form below. I appreciate your feedback, and it helps others, too!