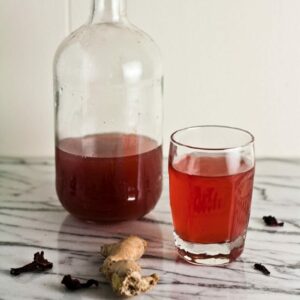
Get the Recipe: Hibiscus Ginger Ale
Ingredients
The Ginger Bug (or, what’s known as a starter)
- de-chlorinated water, A lot of tap water is treated with chlorine, which messes with the microorganisms. You can try to find out if yours is, use bottled water (not distilled though, or you can just boil it for half an hour. The chlorine will evaporate. Leaving it out for a day or two works too.)
- chopped organic ginger root
- sugar
For the Ginger Beer
- 1 quantity ginger bug (from above)
- 2 to 6 inches or more, to taste)) of fresh ginger root
- 1 gallon de-chlorinated water (see note above)
- 2 cups of sweetener (sugar, honey, maple syrup, whatever)
- 5 to 8 hibiscus flowers, dried
Equipment
- shallow jar or ramekin
- paper towels
- rubber bands
- large pot
- bottle(s) (with enough total space to store your soda)
- air lock (optional)
- plastic soda bottle (optional)
Instructions
- Ginger beer starter is called a ginger “bug” (see ingredients above). Think of it as something similar to a sourdough or yogurt starter. The ginger bug is what ferments the ingredients, transforming them into something new. To make the bug, just throw some ginger along with some sugar or honey or any other source of simple carbohydrates in a shallow jar or ramekin. The amounts don’t matter much. Stir, then cover with a paper towel fixed in place with a rubber band. Let the mixture sit for a few days until it starts to bubble (you’ll see bubbles on the surface in a couple days), making sure to stir daily.
- A few things to note here — the ginger is naturally covered in lactic acid bacteria and yeasts just waiting for a suitable food source and an anaerobic environment to start growing (as long as it’s organic… otherwise there’s a good chance it’s been irradiated). There’s no chance at all of this starter “spoiling.” It won’t make you sick. The idea is that by keeping everything submerged under water, an anaerobic environment, lactic acid bacteria and yeasts are the primary microorganisms that can thrive. Once they really get going, they out-compete anything else and take over. These lactic acid bacteria and yeasts are the “live cultures/ probiotics” that have been all the craze these past couple years. Supposedly they’re quite good for you. Anyway, by stirring the starter once a day or so, you can prevent any surface molds from starting, and you shouldn’t have any problems.
- Once the starter is bubbly and ripe (again, this will be a few days from when you first combined the starter’s ingredients), it’s time to make the beer. Boil the rest of the ginger with whatever sweetener you decide on (I like honey) and hibiscus (if you don’t use hibiscus, add a little lemon juice to help feed the microorganisms), then simmer for about twenty minutes. If you don’t have a big enough pot for your batch, make a concentrate with as much water as you can fit, then add the rest of the water later. Let it cool completely, so you don’t kill your starter. Strain the ginger and hibiscus out (I save the ginger for stir-frys and soups), and pour the liquid into whatever container(s) you want to use, then add the starter. The more starter you use per batch, the faster it’ll get going. You can cover your container with a paper towel again, stirring occasionally, or you can use an airlock made for home brewing. They’re super cheap, a couple of dollars at a brew store, but not really that necessary because we’re making soda and not beer (although your soda will be slightly alcoholic). I’d be careful about using any airtight seals because a lot of pressure will build up, potentially causing a dangerous explosion. At least make sure you periodically release the pressure. Anyway, let it sit for a while. You can taste it as it progresses, and carbonate/ refrigerate when you’re satisfied. It will get progressively more sour and alcoholic as the microorganisms feed, concurrently reducing its sweetness. Unless you’re going for a ginger mead, it’ll be ready in a couple of days.
- Carbonation is the process I warned about earlier: as the microorganisms feed, they release carbon dioxide. As it builds up, the ginger beer carbonates, and once it’s sufficiently carbonated, stick the ginger beer in the fridge. The cold temperature slows the microorganisms down, meaning that the process of carbonation will continue, but slowly enough that if you drink the ginger beer in a couple of weeks, it won’t change that significantly. It can be tricky to get the timing of when to stick the bottle(s) in the fridge, but it’s better to err on the side of too soon. Because the ginger beer is alive, you can always leave it out a little longer. If you leave it out for too long, again, it can explode. Sandor Katz suggests filling a plastic bottle up with some of the ginger beer as a useful metric. When the bottle gets pretty hard to squeeze, you know the pressure inside is right and the beverage is carbonated. At the very least, make sure you keep your ginger beer inside a paper bag or cardboard box when it’s carbonating, just in case you forget about it.
- The final product is delicious, but variable. It’s dependent on a lot of factors, and it’s worth tinkering with the recipe a bit to create something to your tastes. For instance, I like my ginger beer REALLY gingery, but Michelle thinks its too much and wants more sugar. The point is that you can make your own sodas from scratch, the way people used to. Beer originated as a way to store calories and make water potable before today’s preservation techniques. A lot of it was pretty low alcohol because it was such a staple and not everybody wanted to be trashed all the time. Soda was just a tasty, refreshing, beer-like beverage particularly well-suited for kids. Maybe the little bit of alcohol helped calm them down. Try it. You don’t even have to use ginger. Most organic roots, fruits, and vegetables have the requisite microorganisms, so branch out and experiment!
Notes
This is based on the very open-ended instructions in The Art of Fermentation by Sandor Ellix Katz (awesome book). Truth be told, I approximated everything in the recipe. Because brewing doesn’t rely on the same crazy strict chemistry as baking, ingredient ratios can be adjusted significantly to taste.
Did you make this recipe?Please leave a star rating and review in the form below. I appreciate your feedback, and it helps others, too!