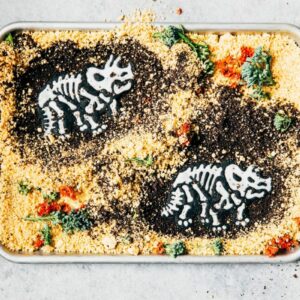
Get the Recipe: Dinosaur Fossil Cookies
Ingredients
For the Chocolate Shortbread Recipe
(makes around 25 to 30 cookies, depending on your cookie cutters)
- 1 3/4 cups plus 1 1/2 tablespoons (9 ounces) all-purpose flour
- 1 cup plus 1 1/2 tablespoons (3 ounces) Dutch-processed cocoa powder
- 3/8 teaspoon baking soda
- 1 cup (2 sticks // 8 ounces) unsalted butter, at room temperature
- 3/4 cup plus 1 tablespoon (5.65 ounces) granulated sugar
- 2 teaspoons kosher salt
For the Royal Icing
(makes around 1 cup)
- 2 cups (8 ounces) confectioner's sugar
- 1 large egg
- 1 teaspoon pure vanilla extract
- 1/4 cup (2 fluid ounces) water
For the Archeological Dig
(makes one 9 x 13-inch site)
- 1 package (14 ounces) Oreos
- 1 package (14 ounces) Golden Oreos
- broccoli, herbs, edible flowers, chocolate rocks for decorating ((see baker's notes!))
Equipment
- wax paper
- dinosaur cookie cutters
- a piping bag with a thin tip
- A food processor
- a pastry brush
Instructions
For the Chocolate Shortbread Recipe
- In a medium bowl, whisk together 1 3/4 cups plus 1 1/2 tablespoons all-purpose flour, 1 cup plus 1 1/2 tablespoons cocoa powder, and 3/8 teaspoon baking soda. Set aside.
- In the bowl of a freestanding electric mixer fitted with a paddle attachment, beat 1 cup unsalted butter on medium-low speed until smooth. Add 1 teaspoon kosher salt and continue to mix for another 15 to 30 seconds. Add 3/4 cup plus 1 tablespoon granulated sugar and mix for about 2 minutes, until fluffy.
- Use a rubber spatula to scrape down the sides and bottom of the bowl before adding the dry ingredients (from the first step) in 2 additions, mixing on low speed for 15 to 30 seconds after each, or until just combined. Be careful not to overmix, and just mix until the dough has come together!
- Mound the dough on a work surface lined with wax paper and push it together until it forms a 6-inch square block. Place the dough between two pieces of wax paper. With a rolling pin, working from left to right, and begin to flatten it. Turn the dough 90 degrees and repeat — this will help prevent the dough from cracking as it is rolled. Roll out to a 1/8-inch to a 1/4-inch thick sheet (see baker's notes). If the dough gets too melty and soft, simply refrigerate it until it gets firm again. This dough tends to harden pretty quickly, so 10 to 15 minutes should do the trick!
- Use dinosaur cookie cutters to cut and stamp cookies from the rolled dough. If necessary, push the trimmings together and re-roll. Arrange the cookies on sheet pans lined with parchment paper, leaving about a 1/2-inch between them (they won't spread out too much when baking). Transfer the cut cookies to the refrigerator and let chill for an hour before baking.
- When the dough is chilled and you're ready to bake, position a rack in the center of the oven and preheat the oven to 325 (F).
- Bake in the preheated oven for around 20 minutes, or until the cookies are fragrant with small cracks on the surface. Because the dough is so dark, it might be kind of hard to tell – look for small cracks on the surface! Set the pans on a wire rack and allow them to cool completely before icing.
For the Royal Icing
- In a medium bowl, whisk together 2 cups confectioner's sugar, 1 large egg, and 1 teaspoon pure vanilla extract. Add 1 tablespoon of water one at a time, whisking until the desired consistency is reached. I like to make a batch of lining icing and flood icing, keeping the two in separate piping bags. For lining icing, which is thinner and good for outlining the bones, you want a soft peak to form when a spoon is lifted from the icing. For flood icing, which is looser and used to actually fill in the bones, add more water a little at a time until you reach a consistency similar to maple syrup. When a spoon is lifted from the bowl, the icing should ribbon down, disappearing in 6 to 8 seconds.
For the Archeological Dig
- When the icing on the cookies are completely dried, it's time to bury them in your archeological dig site! Use a food processor to process 1 package Oreos to a crumby, sandy texture. Transfer to another bowl and set aside.
- Use a food processor to process 1 package Golden Oreos to a crumby, sandy texture. Set aside.
- Take a few cookies and place them in a 9 x 13-inch sheet pan. Use a spoon to gradually cover the cookies with Oreo, using the back of the spoon to create an even layer. It's okay if you have a few bigger crumbs here and there — that adds to the fun and texture!
- Once you've completely covered the cookies with Oreo crumbs, carefully spoon the Golden Oreo crumbs over the dark chocolate ones, making sure not to disturb the dark chocolate layer too much. Use the back of the spoon to spread the Golden crumbs out into an even layer. Top with broccoli, herbs, edible flowers, chocolate rocks. Serve with a spoon and a pastry brush as "archeological tools". Pro-tip: you can spoon the crumbs into a bowl of milk, ice cream, or pudding to avoid waste. Enjoy!
Notes
Cookies adapted from Bouchon Bakery, royal icing adapted from The Baker’s Appendix
Did you make this recipe?Please leave a star rating and review in the form below. I appreciate your feedback, and it helps others, too!