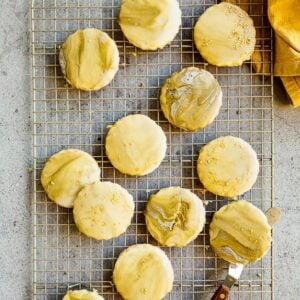
Get the Recipe: Buttered Rum Shortbread Cookie Recipe
Ingredients
- 1 cup 8 ounces Vermont Creamery Unsalted Cultured Butter
- 2 cups 9 ounces all-purpose flour
- ½ cup 3.5 ounces granulated sugar
- 2 teaspoons kosher salt
- For the Buttered Rum Glaze
- 4 tablespoons 2 ounces Vermont Creamery Unsalted Cultured Butter
- 1 cup 4 ounces confectioners' sugar, sifted
- 3 tablespoons rum
- 1 ½ teaspoons light corn syrup
- Dark yellow food coloring, I used this one
- Gold star sprinkles, I used these ones
Instructions
For the Shortbread Cookies
- Cut the Vermont Creamery Unsalted Cultured Butter into 1- to 1½- inch pieces and place them in a small bowl. Freeze while you prep the rest of the ingredients.
- In the bowl of a stand mixer fitted with the paddle attachment, combine the flour, sugar, and salt. Beat on low until just combined, about 15 seconds. Add the butter all at once and beat on low until the dough starts to resemble coarse meal, with pea-sized pieces of butter throughout, about 3 minutes. Increase the mixer to medium and beat until the dough clumps around the paddle and/or the sides of the bowl, 2 to 3 minutes. If necessary, use a mixer cover (or throw a towel over the mixer bowl) while beating to prevent any pieces of dough from shooting out of the bowl.
- Tip the dough out onto a piece of parchment paper around the size of a half sheet pan and use your hands to shape it into a roughly 6-inch square. Place a second sheet of parchment over the dough, creating a parchment sandwich with the dough in the middle. Use a rolling pin to flatten the dough between the parchment sheets, working from left to right. Turn the dough 90 degrees and repeat every so often—doing so will help prevent the dough from cracking as you roll it. If the parchment starts to wrinkle and leave creases in the dough, pull the sheet loose and smooth it before rolling the dough more. Continue rotating and rolling until you have a slab of dough around ¼ inch thick—the shape and the size of the slab doesn’t matter, since you’ll be using a cookie cutter to stamp out shapes.
- Remove the top layer of parchment. Press a bench scraper against the sides of the dough to create straight edges. Transfer the slab of cookie dough, still on the bottom layer of parchment, to a half sheet pan. Cover with the top layer of parchment once more and freeze for 20 minutes.
- Position a rack in the center of the oven and preheat the oven to 350°F.
- Remove the sheet pan of dough from the refrigerator. Use the overhanging parchment as handles to carefully lift the slab of dough off the sheet pan and onto a cutting board. Peel the top layer of parchment from the slab and use it to line the sheet pan once more. Line a second half sheet pan with parchment as well.
- Use a 2 ½-inch round cookie cutter to stamp out cookies, placing the cookies on the lined sheet pans at least 2 inches apart. The dough should still be cool and firm to the touch. If not, chill both sheet pans in the freezer for at least 10 minutes before baking. Gather and reroll the scraps, repeating the process to stamp out cookies as many times as necessary.
- Bake one pan at a time (keeping the other pan in the refrigerator) for 15 to 17 minutes, or until the edges of each cookie are pale golden brown with small hairline cracks visible on their surfaces. Cool the cookies on the pan on a wire rack completely before glazing.
For the Buttered Rum Glaze
- In a light-colored saucepan, melt the Vermont Creamery Unsalted Cultured Butter over medium-low heat, swirling the pan occasionally, until it starts to foam. Use a heatproof rubber spatula to scrape the bottom and sides of the pan occasionally to prevent the milk solids in the butter from burning. Cook for 5 minutes, or until the butter smells nutty and is amber with dark flecks at the bottom of the pan. Remove from the heat and immediately add the confectioners’ sugar, rum, and corn syrup, whisking to combine. Set on a wire rack to cool slightly.
- Prepare a work station by lining two sheet pans with parchment paper for easy clean up. Place two wire racks on top of the parchment paper inside the sheet pans — this will help catch any glaze drippings and make sure you don't end up with any soggy cookies!
- Return to your slightly cooled glaze and gently stir 1 to 2 drops of yellow food coloring into the mixture. When I mean stir, I mean "half-heartedly stir"—the mixture should still be predominantly white at this point, but streaked with yellow food coloring. This works best if the glaze has cooled. If the glaze is too hot, the food coloring will melt and incorporate throughout the mixture. You want it to be streaky!
- Working quickly, dip the top of each cookie into the glaze and quickly flip it up so that the glazed side is upright. There are two ways to go about this—you can use the bottom of the cookie, which is smooth and flat. This creates a smoother finish. Or you can do what I did, which is dip the top of each cookie into the glaze. Any crags, cracks, or bumps in the cookie's surface will exaggerate the marble look. And for a streakier glaze, use a swooshing motion to pull the cookie surface along the glaze surface to achieve even more streaks. Let any excess drip off and transfer to a wire rack to dry for 3 to 4 hours. Repeat for remaining cookies and garnish with gold leaf stars if desired.
Did you make this recipe?Please leave a star rating and review in the form below. I appreciate your feedback, and it helps others, too!