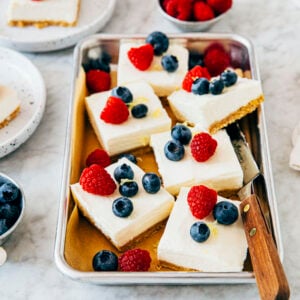
Get the Recipe: Small Batch No Bake Cheesecake Bars Recipe
These small batch no bake cheesecake bars start with a crunchy, addicting graham cracker crust that is topped with a light and creamy cheese cake filling.
Ingredients
For The Graham Cracker Crust
- ¾ cup (2.65 ounces or 75 grams) graham cracker crumbs
- 2 Tablespoons tightly packed light OR dark brown sugar
- 3 Tablespoons (1.5 ounces or 43 grams) unsalted butter, melted and cooled slightly
For The Cheesecake Filling
- ¼ cup plus 2 Tablespoons (2.5 ounces or 71 grams) cold heavy cream
- 1 (8-ounce) box cream cheese, at room temperature
- 2 Tablespoons granulated sugar
- 1 Tablespoon sour cream
- 1 ½ teaspoons confectioners' sugar, sifted if necessary
- ¼ teaspoon pure vanilla extract
- fresh fruit, for garnish
Instructions
- Prep the pan. Spray the bottom of a 9 x 5-inch loaf pan with cooking spray and line it with parchment paper, leaving a 2-inch overhang on the long sides.
- Make the graham cracker crust. In the bowl of a food processor, pulse together the crumbs and sugar. Add the unsalted butter and pulse until the mixture looks like wet sand.Pour the mixture into the prepared pan and use your hands to press it evenly over the bottom of the pan, all the way to the edges. (You can use the bottom of a coffee mug or heavy glass to pound the crumbs in place—you want to apply some pressure here so the crust holds its shape.)Freeze for at least 10 minutes while you make the cheesecake filling.
- Whip the cream for the cheesecake filling. In the bowl of a stand mixer fitted with the whisk attachment, whisk the heavy cream on medium-high until firm peaks form, about 3 minutes. Use a rubber spatula to scoop the whipped cream into a small bowl.
- Make the cheesecake filling. In the same stand mixer bowl (there’s no need to clean it!), combine the cream cheese, granulated sugar, sour cream, confectioners’ sugar, and vanilla. Replace the whisk attachment with the paddle attachment and beat the ingredients on medium until light and creamy, 2 to 3 minutes, scraping the bottom and sides of the bowl as necessary with a rubber spatula.Scrape down the sides of the bowl once more. Scoop the whipped cream back into the mixer bowl with the cream cheese mixture, placing it on top of the cream cheese. Fold together by using the spatula to gently scoop up the cream cheese mixture from the bottom of the bowl and “folding” it on top of the whipped cream, rotating the bowl as you go. Be careful not to deflate the whipped cream.
- Assemble the cheesecake. Scoop the filling into the prepared pan and use an offset spatula to smooth the top. Cover the loaf pan with plastic wrap and refrigerate for at least 4 hours, preferably overnight, to set the bars.
- Serve and store. Run a butter knife or offset spatula along the edges of the pan and use the overhanging parchment as handles to lift the bars out of the pan and onto a cutting board. Use a hot knife to slice into squares. Garnish with fresh fruit and serve immediately. The cheesecake bars can be stored in an airtight container in the refrigerator for up to 5 days.
Notes
- Plan ahead for this one! Because these cheesecake bars are “no bake”, they need to chill in the refrigerator for at least 4 hours, preferably overnight. Otherwise they’ll be too gloopy when you slice into them!
- To make graham cracker crumbs, use a digital scale to weigh out as many crackers as needed to match the weight listed in the recipe. Use a food processor to pulse the crackers into fine crumbs.
- For the smoothest cheesecake filling, make sure that the cream cheese is at room temperature. If the cream cheese is too cold, your filling will end up lumpy!
- I used a tiny pat of butter to grease the bottom of the loaf pan. Although I give you the option to use butter or oil, I recommend using oil in the recipe instead—oil is liquid even when chilled, make it easier to lift out the bars!
- You’ll notice that the recipe instructs you to whip the cream to “firm peaks.” The best way to determine the cream’s texture is to do a test with a whisk. Dip the tip of a whisk (or the whisk attachment) into the whipped cream, remove it, and quickly turn it upside down. If the cream is too soft, it will slide off the whisk, and you’ll need to keep whisking. If the cream has a cloudlike structure, with peaks that lose their shape, you’re at the “soft peaks” stage. Continue whisking, then test again. If, the next time you turn the whisk upside down, the peaks hold, you’re at the “firm peaks” stage. If you find that the whipped cream starts to clump significantly, you’ve accidentally made butter. Add a few Tablespoons of heavy cream and use a rubber spatula to mix until the cream returns to the “firm peaks” stage.
- To get straight edges and smooth sides when slicing cream bars, you’ll need to use a hot serrated knife. Fill a tall heatproof glass with VERY hot water and place a serrated knife in the water, blade side down, for about 20 seconds. Use a kitchen towel to dry the knife. Slice the bars, dipping the knife in the hot water and drying it every so often if the filling starts to stick to the blade.
- After chilling the cheesecake bars, slice them and serve immediately while the bars are still cold. The longer they sit and warm, the gloopier they become. Don’t get me wrong—it’ll still be plenty tasty, but will be more like mousse or pudding than cheesecake bars, ya know?
Did you make this recipe?Please leave a star rating and review in the form below. I appreciate your feedback, and it helps others, too!