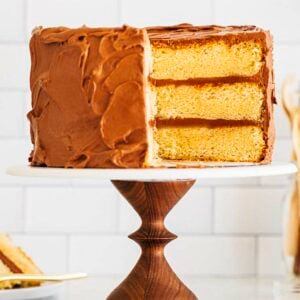
Get the Recipe: My Best Yellow Cake With Chocolate Frosting Recipe
My best yellow cake with chocolate frosting recipe has three layer of moist buttermilk yellow cake, covered in an easy chocolate fudge frosting.
Ingredients
For The Yellow Cake
- 3 cups (12 ounces or 340 grams) cake flour
- 1 ½ teaspoons baking powder
- 1 ½ teaspoons kosher salt
- 1 cup (2 sticks or 8 ounces or 227 grams) unsalted butter, at room temperature
- 2 ½ cups (17.5 ounces or 496 grams) granulated sugar
- ½ cup tightly packed (3.75 ounces or 106 grams) light OR dark brown sugar
- 6 large eggs, at room temperature
- 1 cup (8 ounces or 227 grams) canola oil
- 1 cup (8 ounces or 227 grams) buttermilk, at room temperature
- 1 ½ Tablespoons pure vanilla extract
For The Chocolate Fudge Frosting
- 6 ounces (170 grams) unsweetened chocolate, from a high-quality chocolate bar, hand broken into pieces
- 4 ½ cups (18 ounces or 510 grams) confectioners' sugar, sifted
- 1 ½ cups (3 sticks or 12 ounces or 340 grams) cold unsalted butter
- 6 Tablespoons (3 ounces or 85 grams) cold whole milk
- 1 Tablespoon pure vanilla extract
- ¼ teaspoon kosher salt
Equipment
- A food processor
- a 8-inch or 9-inch round cake board
- a rotating cake stand
- an offset spatula
Instructions
For The Yellow Cake With Chocolate Frosting
- First, make the cake. Position a rack in the center of the oven and preheat the oven to 350°F. Generously spray three 8-inch cake pans with cooking spray and line the bottom of each with a parchment paper circle. Spray the parchment, too.
- Mix the dry ingredients. In a medium bowl, whisk together the flour, baking powder, and salt.
- Cream the butter and sugars. In the bowl of a stand mixer fitted with the paddle attachment, combine the butter and sugars. Beat on medium until light, fluffy, and doubled in volume, 3 to 4 minutes, using a rubber spatula to scrape down the bottom and sides of the bowl as necessary.
- Add the eggs, then the buttermilk and vanilla. Reduce the mixer to low and add the eggs one at a time, adding the next egg only after the previous one has been fully incorporated, scraping down the bottom and sides of the bowl after each addition. With the mixer on low, slowly pour in the oil, followed by the buttermilk and vanilla, and beat until the mixture is smooth, 3 to 4 minutes.
- Add the dry ingredients. Gradually add the dry ingredients and beat until just combined. Scrape down the bottom and sides of the bowl once more, and beat on low for an additional 30 seconds.
- Assemble the cake layers for baking. Divide the batter evenly between the pans; if using a digital scale to measure out layers, note that this recipe makes around 66.5 ounces (1885 grams) of batter—pour 22.15 ounces (628 grams) of batter into each cake pan. Use an offset spatula to spread the cake batter evenly inside the pans and smooth their tops.
- Bake and cool the cake layers. Bake for 40 to 45 minutes. When done, the top of the cake should bounce back when gently pressed and a skewer inserted into the center of the cake should come out with a few crumbs attached. Cool completely in the pans on a wire rack before frosting.
- Prep and melt the chocolate for the frosting. In a food processor, pulse the chocolate for a few seconds at a time until chopped into 1- to 2-inch pieces. Transfer the chocolate to the top of a double boiler or to a heatproof bowl set over a medium, heavy-bottomed saucepan filled with a few inches of simmering water (be sure the bottom of the bowl does not touch the water). Cook over medium heat, using a heatproof rubber spatula to stir the mixture and scrape the sides of the bowl occasionally, until the chocolate has melted, about 10 minutes. Set the top of the double boiler or the bowl on a wire rack and let the chocolate cool while you prep the other ingredients.
- Make the chocolate frosting. In the food processor, combine the confectioners’ sugar, butter, milk, vanilla, and salt. Pour in the melted chocolate and pulse briefly to combine, then process until the frosting is creamy, smooth, and light brown in color, about 5 minutes. Scrape down the bottom and sides of the bowl with a rubber spatula, then process for an additional 30 seconds.
- Assemble the cake. If necessary, level the top of the cakes. Place one of the cake layers on a cake board or serving platter in the center of a rotating cake stand. Use a rubber spatula or cookie dough scoop to drop ½ cup of frosting in the middle of this cake layer. Use an offset spatula to spread it evenly all over the top, just like you would spread butter on toast. Place the second cake on top of this frosting, stacking it evenly on top of the first cake. Use the rubber spatula or cookie dough scoop to drop another ½ cup of frosting in the middle of this cake layer. Spread it evenly all over the top. Finally, place the third cake on top of this frosting, stacking it evenly on top of the first two cakes.
- Next, crumb coat the cake. Use the offset spatula to cover the surface of the entire layer cake with a thin layer of frosting. Use just enough frosting to cover the entire cake completely. Refrigerate, uncovered, for 10 to 15 minutes to stiffen and "set" the frosting.
- After the crumb coat sets, finish frosting the cake. Use the offset spatula to cover the cake with the remaining frosting. Then, use the spatula to make large, random sweeping motions across the frosting on the top and sides of the cake. The sweeping motions will create swirls.
- Serve and store. Serve immediately. The assembled yellow cake with chocolate frosting can be stored at room temperature, under a cake dome or a large bowl turned upside down, for up to 1 day. Press a sheet of plastic wrap against any cut surfaces to prevent the cake from drying out. After that, cover the entire cake loosely with plastic wrap and refrigerate for up to 2 days.
Notes
- When making any kind of layer cake recipe, I always make the cake layers a day ahead of assembling the entire cake. Doing so ensures that I’m not stuck in the kitchen all day waiting for the layers to cool in order to frost and assemble the entire thing! If you want to take this route, I suggest making the cake layers a day ahead of making the frosting and assembling the cake. Let the cakes cool to room temperature, then wrap them in two tight layers of plastic wrap. Freeze overnight. Freezing the cakes will keep them fresh, and make the cakes easier to work with when assembling the cake the next day. And when ready to assemble the next day, thaw the cakes slightly by placing them on the counter at room temperature while you make the frosting. PS—if you like this kind of make-ahead, splitting-the-work-up-so-you’re-not-stuck-in-the-kitchen-all-day, DEFINITELY check out my cookbook. Recipes for intermediate bakes like layer cakes, pies, and more are written this way to help you bake around your schedule!
- The yellow cake recipe instructs you to use 1 ½ Tablespoons of pure vanilla extract. Unfortunately, most teaspoon measuring sets don’t come with a 1 ½-Tablespoon measure (although you can buy one individually online). If your measuring set doesn’t have a 1 ½-Tablespoon measure, use its equivalent in teaspoons! 1 ½ Tablespoons of pure vanilla extract equals 4 ½ teaspoons of pure vanilla extract.
- For this recipe, it’s especially important to pay attention to the temperatures of the ingredients, especially when it comes to the chocolate frosting. The frosting comes together best when both the butter and milk are still cold from the fridge. Why? You’re combining these ingredients with warm, melted chocolate. If they are already at room temperature, the frosting has a tendency to get too runny and melty. If you find yourself with this issue, check out the FAQ and Troubleshooting section on how to fix it!
- For even cake layers, I like to actually weigh out the layers with a digital kitchen scale to make sure they’re even. The easiest way to do this is to set a prepared cake pan on a digital scale and tare it to “0”. Pour batter into the pan until the scale registers the weight listed in the recipe (because yes, I’ve included the approximate weight of the batter needed for each pan!). Repeat with the second and third cake pans.
- For best results, use the chocolate frosting immediately after making it. The frosting will start out with an incredibly silky, creamy, and easy-to-smooth texture. However, as it cools, it will eventually harden into a fudge-like texture. It’s best to work with it when it’s still soft and creamy!
Did you make this recipe?Please leave a star rating and review in the form below. I appreciate your feedback, and it helps others, too!