
Today’s recipe comes from Happiness is Baking, a new cookbook from famed dessert queen and cookbook author, Maida Heatter. It saddens me to say that Maida passed away at the start of the month after releasing Happiness is Baking (at age 102!!!). She had an illustrious career as a restauranteur, cookbook author, and food writer (she published some of the New York Times’ most popular recipes, including the most requested recipe in 1972, a triple layer chocolate torte). Her death was commemorated by many notable publications like Bon Appetit, Epicurious, Food & Wine, The Washington Post, and The New York Times itself.


Her final book is a delight and a breath of fresh air. Because in many ways, Happiness is Baking almost feels like a throwback to an earlier era, before the internet really had any influence in the way we eat and make food now. Like how the book skips the use of photos, instead providing retro watercolor illustrations of cakes, cookies, and bar recipes. And despite the growing trend of extreme precision in recipe writing, Happiness is Baking skips the weight measurements in favor of volume ones like a “sifted cup of flour” (see more in the baker’s notes). In many ways, baking from her book reminded me of the times in which I’ve been in the kitchen with my mom and grandma, where they determine the quantities and processes of their cooking and baking by look, taste, and feel. Despite the lack of precision, it always came out delicious. And some of the best food I’ve had–like my lola’s leche flan, or more recently, the Yemenite kubaneh we were taught to make by an elderly lady in Ein Karem–weren’t made with any recipes at all.


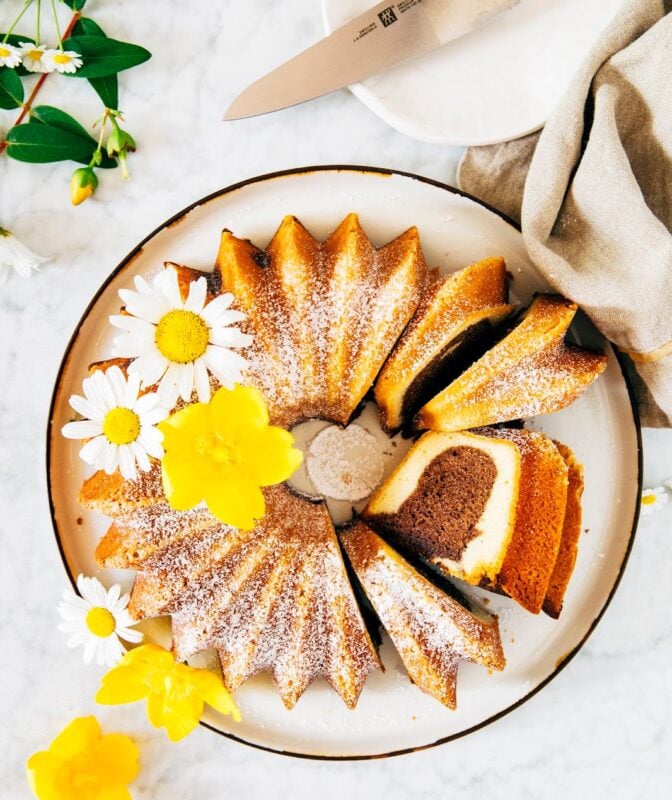
Which brings me to this recipe from her new book. In the headnotes, Maida writes that she loves this cake because it comes out looking different every time. Chocolate cake batter is scooped on top of vanilla batter, creating a dramatic swirl of both in each slice. Although it looks complicated to make, Maida makes it quite easy: she flavors half the vanilla batter with Hershey’s syrup to make that picturesque (and apparently unpredictable) chocolate swirl. As a special treat, I’m giving away a copy of her book and the fancy Nordicware bundt pan on Instagram–be sure to check it out!
Some baker’s notes:
-
- The original recipe instructs you to bake the cake in a 10 x 4-inch tube pan; I cut the original recipe’s quantities in half so I could bake it in my Nordicware Brilliance pan (which holds much less volume than a 10-inch tube pan). When using a bundt pan, especially one with an elaborate design like the one in the photos, be sure to use a generous amount of cooking spray to cover every nook and cranny of the pan (including the middle tube) with oil. After spraying with oil, sift 1 to 2 tablespoons over the oil, then spray again. It seems excessive, but this is how you get the cake out of the pan without breaking it, I promise! Maida’s original recipe gets around this by instructing you to dust the pan with breadcrumbs. But because I only had Japanese breadcrumbs on hand (whattup, panko), I stuck to my method above and it worked perfectly.
-
- For this recipe, you’ll need a 1/8-teaspoon measure. Most measuring spoon sets don’t actually come with a 1/8-teaspoon—you can order one online.
- Alright, let’s talk about the “sifted cup of flour” situation. Most of the recipes in her book call for sifted flour, which means that you sift the bag of flour and THEN measure out the quantity needed for the recipe. Doing so results in a lighter and fluffier product, because you end up using less flour—to wit, my sifted cup of flour ended up weighing around 4 ounces, whereas my unsifted cup of flour weighs around 4.5 ounces. To save you the stress of sifting your flour, I’ve included weight measurements with the recipe below—using them means you won’t need to sift your flour in the first place!
Get the Recipe: Black and White Pound Cake
Ingredients
- 1 cup (8 ounces) unsalted butter, at room temperature
- 1 2/3 cups (11.65 ounces) granulated sugar
- 2 teaspoons pure vanilla extract
- 1 1/2 teaspoons kosher salt
- 5 large eggs, at room temperature
- 2 cups (8 ounces) sifted all-purpose flour (see baker's notes), plus 1 tablespoon
- 1/4 teaspoon almond extract
- 3 ounces Hershey's Chocolate Syrup, well-shaken
- 1/8 teaspoon baking soda
Instructions
- Position a rack in the center of the oven and preheat to 350 (F). Generously spray the bottom, sides, and tube of a 10-cup capacity bundt pan with cooking spray. Use a fine mesh sieve to sift 1 tablespoon of flour over the sprayed pan. Turn the pan over a sink or trash can and tap out any excess flour. Lightly spray the pan once more.
- In the bowl of a stand mixer fitted with the paddle attachment, combine the butter, sugar, vanilla, and salt. Beat on medium-high until light, creamy, and doubled in volume, 2 to 3 minutes, using a rubber spatula to scrape down the bottom and sides of the bowl as needed. Reduce the mixer to low and add the eggs, one at a time, only adding the next egg when the previous one is incorporated, scraping down the bottom and sides of the bowl with each addition. Once all the eggs have been added, gradually add the flour and beat until just combined.
- Use a rubber spatula to scrape half (around 18 ounces) of the batter into a medium bowl. Add the almond extract to the batter and mix until just combined. Pour the batter into the prepared pan, using an offset spatula to smooth the batter evenly across the pan and smooth its top.
- Return to the remaining half of batter in the bowl of the stand mixer. With the mixer on low, slowly pour in the Hershey's Chocolate Syrup and the baking soda beat until just combined, scraping down the bottom and sides of the bowl as necessary. Pour the chocolate batter over the vanilla batter in the pan, using an offset spatula to smooth the chocolate batter evenly across the vanilla batter and smooth its top.
- Cover the top of the pan with a piece of aluminum foil large enough to turn down loosely around the sides of the pan. Bake for 30 minutes. At 30 minutes, open the oven door just enough to reach in and remove the foil. Continue baking, uncovered, for an additional 30 minutes (the total bake time will be around 60 minutes), or until a skewer inserted into the center of the cake comes out with few crumbs attached. The top of the cake should bounce back when gently pressed with a fingertip. Cool on a wire rack for 15 minutes, before covering the bottom of the pan with a serving plate and inverting the cake (it should still be warm!) onto it. Cool for another 30 minutes. Serve warm, or at room temperature.
I baked this cake as directed. Thought that there would have been a taller “rise”. Surprised that the cake was so small.