Happy Seventh Birthday to Hummingbird High!
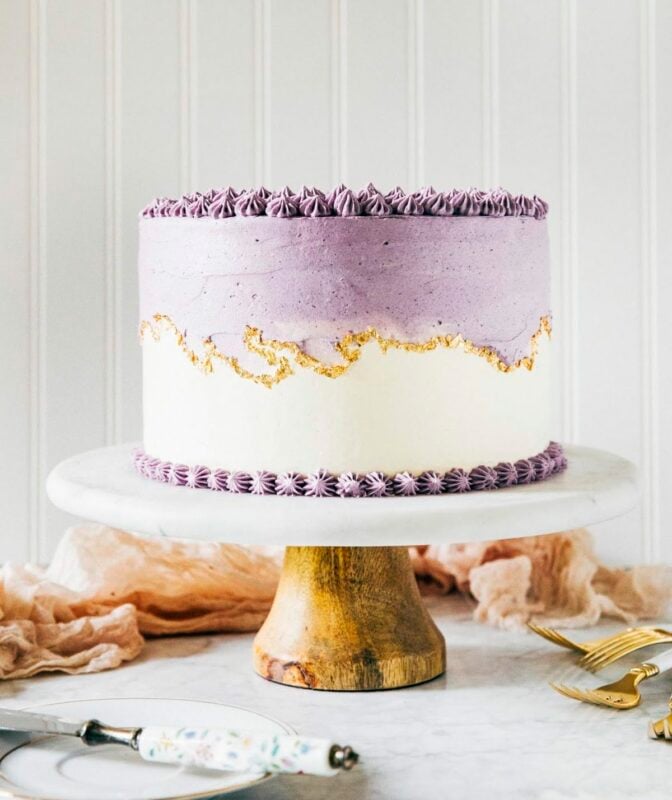
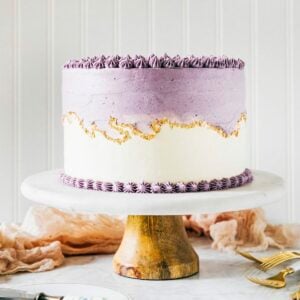
For those who came for the recipe, I’ll keep things short and sweet up here: I’m celebrating the (lucky number) seventh anniversary of starting my blog with an ube layer cake (complete with ube Swiss meringue buttercream frosting!) inspired by my Filipino heritage. Ube is a sweet purple yam that is often used in Filipino desserts; I’ve been experimenting with it more and more in my recipes (see: ube cinnamon rolls and ube babka). The cake’s frosting decoration is inspired by kintsugi, a Japanese technique of repairing broken pottery by brushing the pieces with gold leaf and gluing them back together to create a beautiful and unique webbing pattern. As usual, don’t forget to read the baker’s notes to learn more about ube and get all my best kintsugi frosting tips. Yay!
For everybody else who came to read the actual post, all I can say is this: you make my heart so full. I am still always surprised by how many of you take the precious time out of your day to read and follow along on my adventures. And as you probably already know, a few years ago, I started the tradition of doing a sort of retrospective of my blog on its birthday by discussing the varying and mostly surprising ways that Hummingbird High affected (and continues to affect) my life. Previous posts have reflected on a variety of different topics, including how this blog saved me from the depression and anxieties of my mid-20s by giving me a sense of community and accomplishment, while more recent posts have focused on the ever-changing blog world and my constant struggles with blog burnout due to navigating the increasingly breakneck speed of the internet and ever shifting world of social media. This year, I’m going to take the discussions of the previous years one step further by talking candidly about what many consider taboo: money.
Long-time and careful readers of Hummingbird High will already know that, up until last year, I worked a full-time job in tech. Doing so provided me with a six figure salary and benefits that left me pretty comfortable (if you came for specifics, you can read this anonymous interview I did for The Billfold that caused quite a few side-eyes and snark about my photography on Reddit); as a result, earning money on this blog was always a bit of an afterthought. As opposed to focusing on creating content that would “monetize” my blog well by bringing in new traffic, my tech salary let me do, well, whatever the fuck I wanted to on Hummingbird High. I didn’t worry about making posts and recipe names SEO friendly, I made recipes with obscure ingredients that hardly any folks cared to make, I kept the weird blog name that didn’t really make sense any more. Because guess what? That dirty tech money allowed me not to worry about any of it and, perhaps best of all, let me decline generous sponsored posts from companies whose product I didn’t particularly care for. Non-bloggers always called Hummingbird High my “side-hustle”, but I knew the truth: it was less of a hustle and more of a, er, side-amble, if you know what I mean.
And although that tech salary gave me the creative freedom to run my blog the way I wanted to, it was always a double-edged sword: while I was rich in money, I was extremely poor in time. While the obvious solution would have been to give up one for the other, I couldn’t bring myself to give up what gave me so much security (tech) and what gave me so much joy (this blog). Besides, I felt like I was already doing the bare minimum for my blog, saving my weeknights and weekends for baking and hastily writing blog posts on my subway commutes. But as the years stretched on juggling both, it seemed that every minute spent at my corporate job seemed like a missed opportunity to not only do what I loved, but also a personal failure to pursue a privileged option unavailable to many — that is, to rely on my passion solely for income, and to officially make the transition to owning and running a small business of my own without going into debt or taking out a third party loan.
If my life were a movie, there would have been some big, dramatic catalyst that resulted in me quitting my job in an epic, bridge-burning fashion. The truth is much quieter and boring: my cookbook went to auction in the summer of 2017; I realized that writing a cookbook was a full-time job in itself (more on that in next year’s blog anniversary, probably) and took reduced hours at my tech job, before switching to freelance. My team wished me well and the VP of my department promised to buy all 100+ members of my former engineering department copies of my book.
Spending less time in tech allowed me to focus on Hummingbird High in ways I’d never been able to before. Doing so was both a blessing and a curse: while I could spend days honing on on recipes and photos, I now found myself worrying about my ads, traffic, SEO, numbers, growth, and everything I’d previously ignored. Interestingly enough, I also found myself working more hours on Hummingbird High than I ever did for my tech job (and believe me, I kept long hours then too). The work is different, but in my eyes, no less valuable and infinitely more thrilling than sitting in meetings convincing vendors and engineers to prioritize my JIRA tickets. The best part is that no minute goes un-wasted; unlike in corporate, where you often have to wait around for emails, meetings, and external decisions to be able to do your work, working for yourself eliminates most of those inefficiencies. The ISTJ in me was thriving.
But ah, Michelle. What about the money?

Since doing that Billfold interview about my blog earnings in 2016, those figures have almost quadrupled and Hummingbird High has outstripped my generous tech salary by a decent margin. I wish I could tell you why or how, but realistically, I haven’t done much beyond doing what I’ve always done: developing recipes for baked goods that appeal to me (and sometimes, no one else), and taking the best photos I can within my limited knowledge of photography. Despite what all those guides tell you on how to build your brand and grow your audience and whatever else, the truth is, it’s mostly the market. Influencer marketing is hotter than ever, and more brands are throwing bigger budgets at established bloggers for sponsored work. I don’t actually do any more sponsored posts now than I did back in 2016; my agent just gets me better rates and longer-term contracts. But before you run off to quit your day job, let me warn you that the very same market that is full of opportunity is also more saturated than ever — despite what all those online courses promise, it’s much harder to grow your audience, and that ultimately matters since contracts and partnerships are determined by these figures. While many are optimistic, I’ve always been more pessimistic realistic. I keep waiting for the other shoe to drop and am always preparing myself for the days in which Hummingbird High won’t be able to pay the bills anymore: by building out an Airbnb apartment, taking on more freelance tech work, experimenting with a part-time job more in line with food and photography, and finally trying to tackle the big project I dreamed up several years ago.
So, what does that mean for Hummingbird High? My hope is that it will mean, well, absolutely nothing. I started this blog because I genuinely love to bake; I continue to blog today because of that very same love, still. Everything else — the blogging, the photography, the sponsored posts, the followers — has been a wonderful yet secondary privilege. And when everything else finally fades, my hope is that my love for baking, desserts, and all things sweet will keep Hummingbird High persevering for many years to come.
Happy Seventh Birthday, Hummingbird High!
See previous years’ anniversary posts:
- Hummingbird Cake for Six Years of Hummingbird High
- The Best Red Velvet Cake for Five Years of Hummingbird High
- A Naked Red Velvet Cake for Four Years of Hummingbird High
- Homemade Funfetti Cake for Three Years of Hummingbird High
- Pink Champagne Cupcakes for Two Years of Hummingbird High
- Confetti Cookies for One Year of Hummingbird High
-
- Let me warn you now — this is not the easiest cake to make. Because ube is heavy, the recipe instructs you to leaven the cake in three ways: with conventional leavening ingredients (in this case, baking powder), by beating sugar and butter together to create air bubbles in the batter (the conventional creaming method used for cakes), and by making a meringue from egg whites that the ube is then folded into. That means you’ll need two bowls for mixing. If you have a handheld electric mixer with two sets of beaters (one for mixing batter and one for whisking it), you’re in luck — it’s the best tool for the job since you can just swap out the beaters as you move between two medium-large bowls. Although I provide instructions with a freestanding electric mixer AND a handheld one, I recommend just forging the stand mixer entirely and using the handheld one instead. For those on a budget, I recommend this cheap yet incredibly durable Hamilton Beach mixer (I’ve had it since college and it has yet to break down on me!) and for serious bakers, I recommend Breville’s Hand Mixer — you can read my review about it (along with Deb from Smitten Kitchen!) in the New York Times’ review site, The Wirecutter.
-
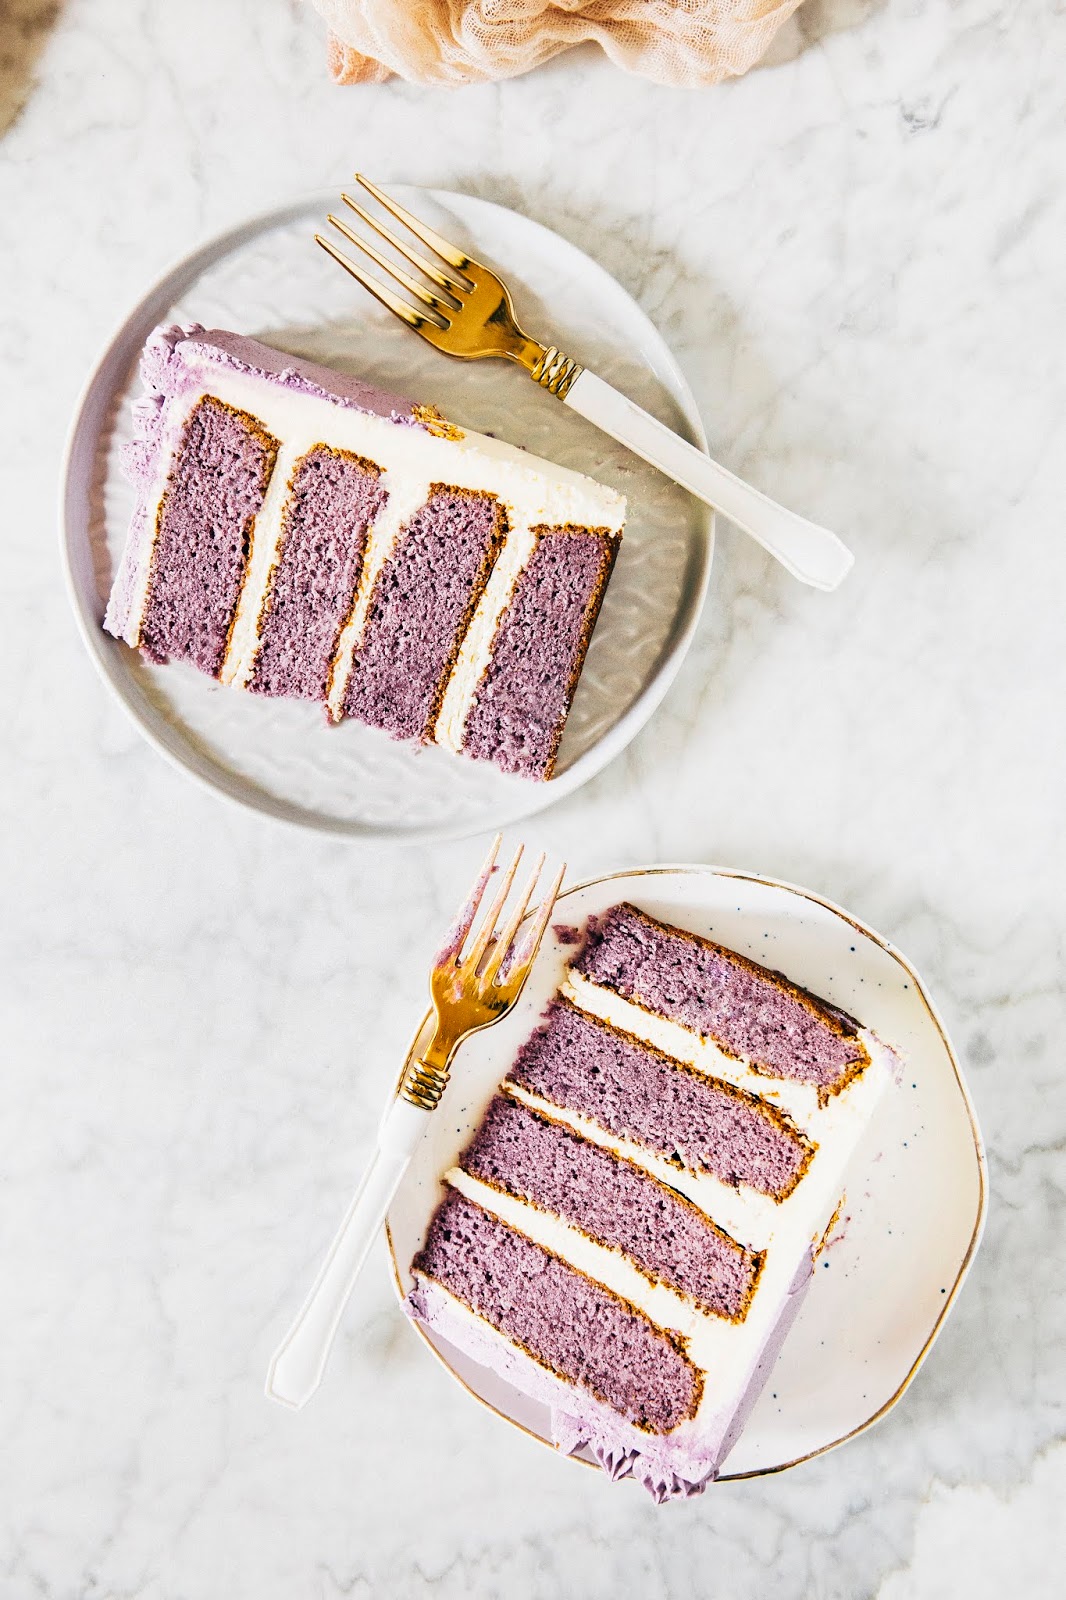
- I’ve already briefly described what ube is up top, but I’d be remiss if I didn’t provide more clarification. Ube is a purple yam different from purple sweet potatoes and taro. In the Philippines, it’s commonly eaten as “ube halaya”, which is made by cooking down the ube yam in evaporated milk, butter, and sugar to create some kind of jam/pumpkin puree similar to what you can get canned in the United States. Folks frequently refer to this ube halaya jam as “ube” itself. For this cake and all the previous recipes in my blog using ube, I actually use ube halaya jam. You can usually find a bottle of that stuff in the Filipino or Hawaiian aisle of a Chinese or Japanese supermarket; the most commonly available brand in the United States is Monika. In a pinch, you can order ube halaya jam on Amazon, but know that you’ll be paying twice as much since a bottle of ube halaya jam at the Asian supermarket usually doesn’t cost more than $5 a pop. And for all ube recipes, ube extract by McCormick (available online via Amazon too) is essential — ube on its own tends to be a subtle flavor, so the extract will really ramp up both the flavor and purple color of your baked good. On that note, don’t be concerned if your cakes come out of the oven looking brown; the insides will be nice and purple, I promise.
-
- I also already mentioned that this cake’s frosting decoration was inspired by kintsugi. I first learned about kintsugi when a shelf in the cabinet holding several of my beloved prop plates for food photos broke, breaking several of my favorite plates and bowls. As I Instagram-Storied the whole mess, several of you recommended I repair the shards with kintsugi, and I’ve been obsessed with the art ever since. I wish I could take credit for turning the design into a cake, but I recently started following this bakery in San Francisco, Butter And, who specializes in decorating cakes in kintsugi (see here, here, and here) — follow them on Instagram, their stuff is amazing! For the design, be sure to use edible goldleaf (available on Amazon) and a clean pair of tweezers and watch this video on my Instagram Stories for the process on how to create the border. I promise that the entire design is easier than it looks, but it is time consuming and you’ll need to know how to smoothly frost a cake (I recommend reading my friend Tessa’s guide if you need guidance on how to do so).
- Finally, because I was pulling out all the big stops for this cake, I made two types of Swiss meringue buttercream frosting — a vanilla flavored one and an ube flavored one for the ombre effect. It is time consuming to make two batches of Swiss meringue buttercream frosting, so I recommend breaking down the process and making the vanilla one the same day you make the cake and frost it, and then finishing with the ube frosting the next day. The cake, when covered in frosting, will keep wonderfully in the refrigerator and be perfect for frosting the next day. Alternatively you can make one giant batch of Swiss meringue buttercream frosting (simply double the vanilla recipe provided) and divide it in half to make a vanilla version and an ube version by folding in 1/2 cup ube halaya jam, 1 tablespoon ube extract, and purple food coloring in the second batch. You got this.
Get the Recipe: Ube Layer Cake
Ingredients
For the Ube Layer Cake
- 3 cups (12 ounces or 340 grams) cake flour
- 1 Tablespoon baking powder
- 1 teaspoon kosher salt
- 5 large eggs, divided into 5 whites and 5 yolks
- 2 ¼ cups (15.75 ounces or 447 grams) granulated sugar, divided into ¼ cup (1.75 ounces or 50) and 2 cup (14 ounces or 397 grams) portions
- 10 Tablespoons (5 ounces or 142 grams) unsalted butter, at room temperature
- 1 cup (8 ounces or 227 grams) ube halaya jam (see baker's notes for sources)
- 1 Tablespoon ube extract (see baker's notes for sources)
- 2 teaspoons purple food coloring
- 1 ¼ cups (10 ounces or 283 grams) whole milk, at room temperature
For the Vanilla Swiss Meringue Buttercream Frosting
- ½ cup plus 2 Tablespoons (5 ounces or 142 grams) large egg whites (from about 5 large eggs)
- 1 ¼ cups (8.75 ounces or 248 grams) granulated sugar
- 2 cups (16 ounces or 454 grams) unsalted butter, at room temperature and cut into 1-inch cubes
- 2 teaspoons pure vanilla extract
For the Ube Swiss Meringue Buttercream Frosting
- cup (4 ounces or 113 grams) large egg whites (from about 4 large eggs)
- 1 cup (7 ounces or 198 grams) granulated sugar
- 1 ½ cups (12 ounces or 340 grams) unsalted butter, at room temperature and cut into 1-inch cubes
- 2 teaspoons ube extract (see baker's notes for sources)
- 2 teaspoons purple food coloring
- ¼ cup (2 ounces or 57 grams) ube halaya jam (see baker's notes for sources)
Assembly
- three or four sheets edible gold leaf (see baker's notes for sources)
Equipment
- a handheld electric mixer with whisk and mixing attachments (see baker's notes)
- a candy thermometer (preferably digital)
- tweezers
Instructions
For the Ube Layer Cake
- Center a rack in the oven and preheat to 350°F. Prepare four 8-inch cake pans by spraying generously with cooking spray. Line the bottom of each cake pan with a parchment paper circle and spray with cooking spray as well. Set pans aside.
- In a medium bowl, combine 3 cups cake flour, 1 Tablespoon baking powder, and 1 teaspoon kosher salt. Whisk to combine and set aside.
- Place 5 large egg whites in a large bowl and use a handheld electric hand mixer to whisk on medium speed until the egg whites are frothy. Raise the mixer speed to high and gradually beat in ¼ cup granulated sugar. Continue whisking until the egg whites form stiff peaks. Set aside.
- In the bowl of a freestanding electric mixer fitted with a paddle attachment, combine the remaining 2 cups granulated sugar and 6 tablespoons unsalted butter. Beat on medium speed until light and fluffy, about 3 to 5 minutes. Lower the mixer speed to its slowest setting and add 5 large egg yolks, one at a time, only adding the next egg yolk when the previous one is fully incorporated. Once all the egg yolks have been added, add 1 cup ube halaya jam, 1 Tablespoon ube extract, and 2 teaspoons purple food coloring. Continue beating until combined and the mixture is a homogenous bright purple, using a rubber spatula to scrape down the paddle and the sides and bottom of the bowl as needed.
- With the mixer on low speed, add the dry ingredients (from the 2nd step) in three parts, alternating with 1 1/4 cups whole milk in two parts, beginning and ending with the dry ingredients. Mix on low speed just until the ingredients are combined.
- Once the ingredients are combined, remove the bowl from the mixer and fold in one-fourth of the beaten egg whites (from the 3rd step) to lighten the batter. Once incorporated, fold in the rest of the egg whites until no steaks remain — be careful not to fold or mix too much, or the batter will deflate and you’ll end up with flat and dense cakes. Fold only until the whites disappear into the batter. The batter should lighten and look almost like a purple mousse.
- Divide the batter into the 4 prepared cake pans and transfer to the preheated oven. Bake for 30 to 35 minutes, or until a skewer inserted into the center of each cake comes out clean and the top of each cake bounces back when gently poked. Transfer to a wire rack to cool completely before decorating.
For the Vanilla Swiss Meringue Buttercream Frosting
- Place ½ cup plus 2 tablespoons large egg whites and 1 ¼ cups granulated sugar in a medium heatproof glass bowl. Use a rubber spatula to mix the ingredients together until combined, scraping down the sides of the bowl. Place the glass bowl on top of a medium sauce pan filled with an inch or two of water, ensuring that the bottom of the glass bowl does not touch the water. Cook over medium-high heat, mixing the egg whites and sugar occasionally and scraping down the sides of the bowl, until it registers 160°F on a candy thermometer. This will take around 10 to 15 minutes, depending on how aggressive you are with your heat.
- Once the mixture is 160°F, carefully pour the mixture into the bowl of a freestanding electric mixer fitted with a whisk attachment. Whisk the mixture on high speed for 8 to 10 minutes, until it holds medium-stiff peaks and the outside of the mixer bowl is at room temperature. Stop the mixer and use a rubber spatula to scrape down the whisk and bottom and sides of the bowl. Replace the whisk attachment with the mixer's paddle attachment.
- With the mixer on low speed, gradually add 2 cups cubed unsalted butter, one or two cubes at a time. Once all the butter is incorporated, add 2 teaspoons pure vanilla extract. Mix on low speed for a few more seconds until incorporated, and then turn the mixer speed up to medium-high and beat until the buttercream is silky smooth, 3 to 5 minutes.
For the Ube Meringue Buttercream Frosting
- Place ½ cup large egg whites and 1 cup granulated sugar in a medium heatproof glass bowl. Use a rubber spatula to mix the ingredients together until combined, scraping down the sides of the bowl. Place the glass bowl on top of a medium sauce pan filled with an inch or two of water, ensuring that the bottom of the glass bowl does not touch the water. Cook over medium-high heat, mixing the egg whites and sugar occasionally and scraping down the sides of the bowl, until it registers 160°F on a candy thermometer. This will take around 10 to 15 minutes, depending on how aggressive you are with your heat.
- Once the mixture is 160°F, carefully pour the mixture into the bowl of a freestanding electric mixer fitted with a whisk attachment. Whisk the mixture on high speed for 8 to 10 minutes, until it holds medium-stiff peaks and the outside of the mixer bowl is at room temperature. Stop the mixer and use a rubber spatula to scrape down the whisk and bottom and sides of the bowl. Replace the whisk attachment with the mixer's paddle attachment.
- With the mixer on low speed, gradually add 1 ½ cups cubed unsalted butter, one or two cubes at a time. Once all the butter is incorporated, add 2 teaspoons ube extract and 2 teaspoons purple food coloring. Mix on low speed for a few more seconds until incorporated, and then turn the mixer speed up to medium-high and beat until the buttercream is silky smooth, 3 to 5 minutes. Lower the mixer speed to its slowest setting and gradually add 1/4 cup ube halaya jam until combined.
Assembly
- Once the layer cakes have cooled completely, use the Vanilla Swiss Meringue Buttercream Frosting to assemble the cake. Use around ⅔ cup of frosting between each cake layer, and use the remainder of the vanilla buttercream to cover the cake completely with a smooth layer of frosting (see baker's notes for resources). Transfer to the refrigerator to chill for at least 1 hour and allow the buttercream to set.
- Once the vanilla buttercream has set, remove from the refrigerator. Cover the top half of the cake with Ube Swiss Meringue Buttercream Frosting. Don't worry about making it an even half — you actually want the ube border to be uneven around the cake for a more interesting kintsugi design. Use an offset spatula to smooth the ube frosting completely.
- Use tweezers to carefully apply a small tear of gold leaf at the border where the ube buttercream and vanilla buttercream meet. As you place the gold leaf on the cake, the gold leaf will wrinkle to give the cake the kintsugi effect. Continue tracing the border of the two buttercreams with gold leaf until complete. For a video of the process, be sure to check out my Instagram Stories!
get new recipes via email:

buy the book
Weeknight Baking:
Recipes to Fit your Schedule
Over the past several years of running Hummingbird High, I kept a crucial aspect of my life hidden from my readers: I had a full-time, extremely demanding job in the tech world. In my debut cookbook, Weeknight Baking, I finally reveal the secrets to baking delicious desserts on a tight schedule.
Did you make this recipe?
Please leave a comment and rating for the recipe using the form below!
Your ratings make it easier to find the recipe online, and I’m always looking for ways to improve Hummingbird High.
Could the cake be made ahead and frozen?
Yes! You can either freeze the cakes individually before frosting and then frost the day before or the day you’re planning on serving, OR assemble the entire thing and freeze it! However, I don’t recommend this as it can lose some of its detail as it thaws.
Is it necessary to use purple food coloring, or can I use red & blue? I’m adapting the recipe a bit to make a 6″ cake as the top tier of my niece’s wedding cake. Thanks!
You can use red and blue food coloring to make your own purple shade!
Hello! This cake looks amazing and I’m wanting to make an Ube cake for my friend as it is her favourite! But I’m really struggling to find extract! I have the Jam and powdered Ube! I’m wondering if there is a way I could use these instead?
Thanks!
Hi, I’m so sorry but ube extract is essential to this cake! It really gives it the ube flavor. Have you checked Amazon? You can buy ube extract from there and have it delivered to your door in two days: https://amzn.to/3gEEJHr
I’m really excited to make this! But I’m wondering if I can use this recipe to make a bundt cake version? What kind of adjustments do I have to do? Thanks!!
I’m so sorry, I’ve only ever made it as a layer cake!
Hi! Can I make half of this recipe for 3, 6″ layer cake?
Hm, I haven’t ever done that, but I don’t see why not? It makes a lot of batter though, so I wouldn’t be surprised if halving it made a 4 x 6-inch cake.
The cake recipe calls for 6 tablespoons of butter, but also says 5 oz or 142 grams.
6 tablespoons of butter is 3/4 of a 113g stick, so only about 85g…
Which one should it be? Thanks!
The weight measures are correct (5 ounces/142 grams). I just updated it to the right volume amount too (10 Tablespoons). Thanks for pointing that out!
Eek! I just did it with 8 tbsp since it was a happy middle ground :). Hopefully it turns out, will report back! Thanks for the recipe!!!
This cake is phenomenal. I’m so glad I made it. The ube flavour comes through loud and clear and the cake itself is moist and tender. Other than using my favourite Swiss meringue buttercream recipe and tweaking the baking time to suit my oven, I followed your recipe exactly.
I’ve wanted to make this cake since you first published the recipe. But I was only able to get my hands on ube halaya now. Better late than never!
Hello! Can I make this to a 9 inch pan?
Do you mean using four 9-inch pans?
Yes 9 inch pan please.
Do you think this recipe could be tweaked to make a pandan cake? Just not sure what would replace the ube jam.
Probably not. Ube has specific starchy qualities similar to eggs that make it hard to replace in baked goods. The only appropriate substitution I can think of is sweet potatoes, but you’d end up with a sweet potato flavored cake.