About This Vietnamese Iced Coffee Cake
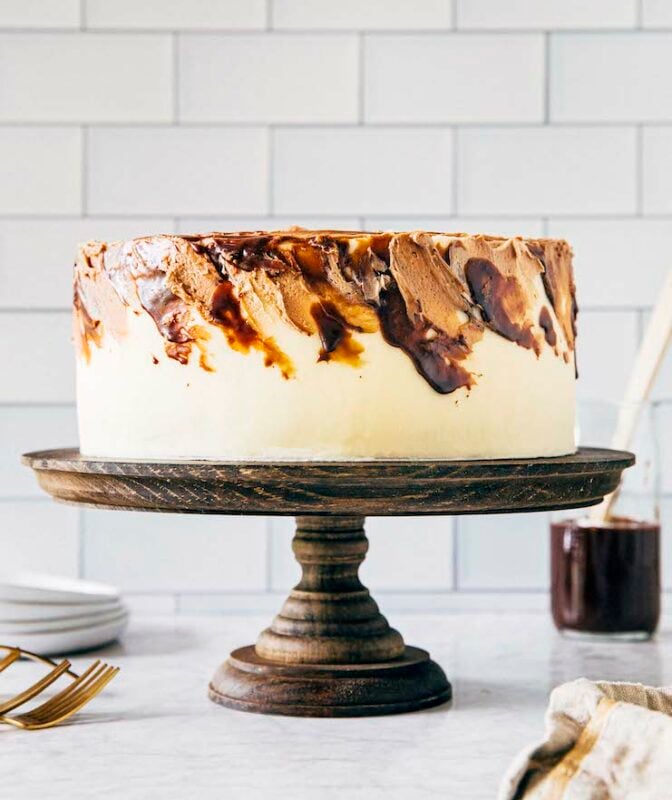
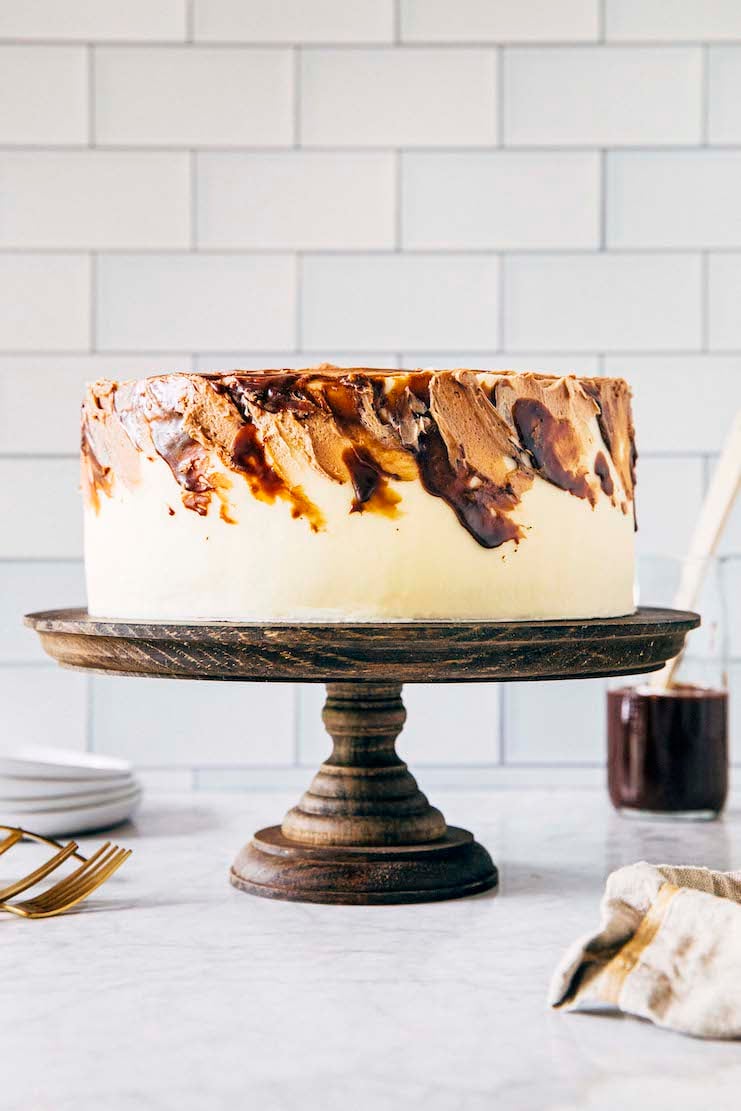
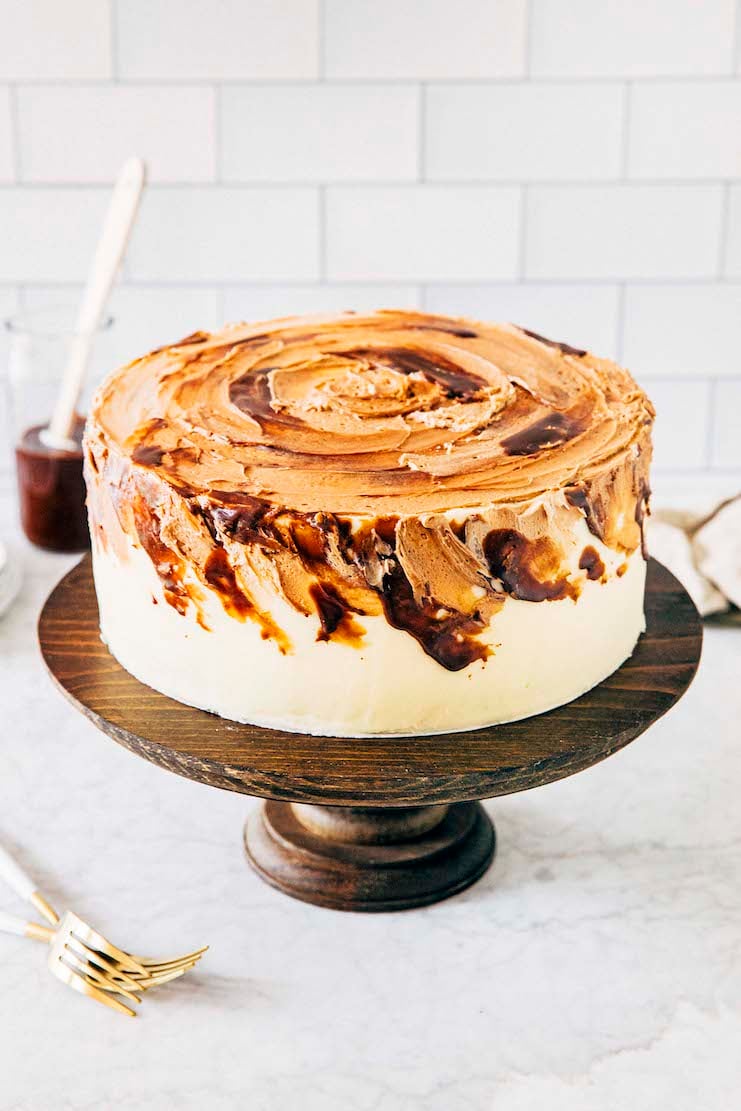
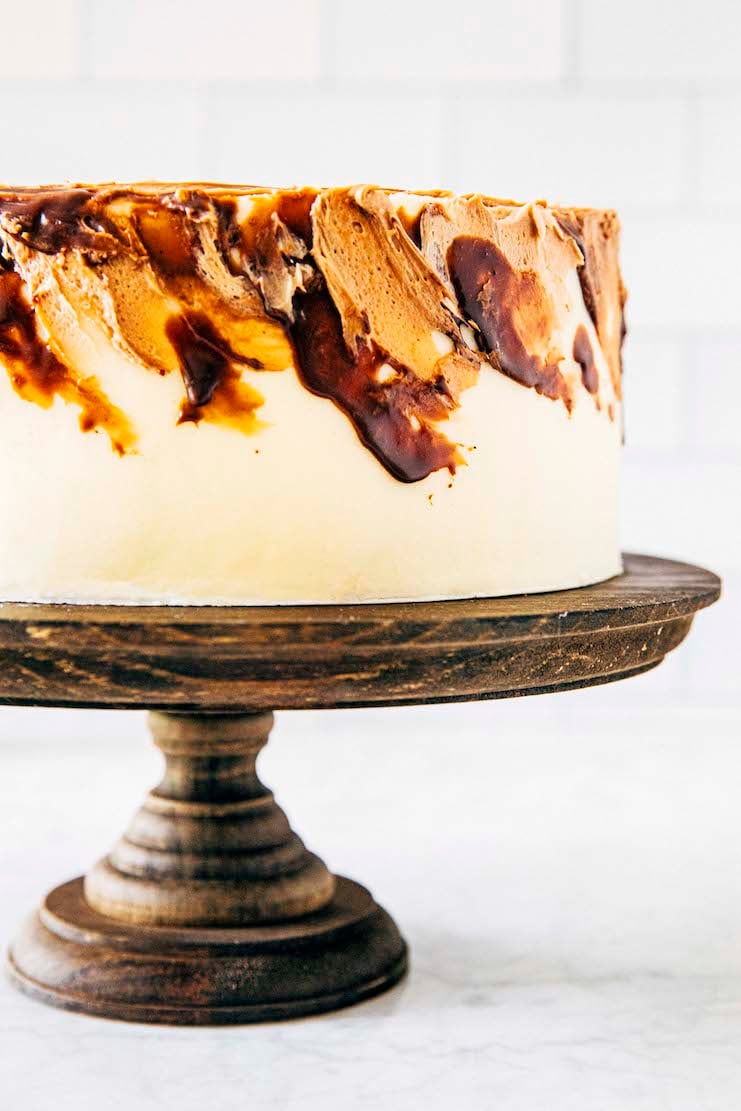
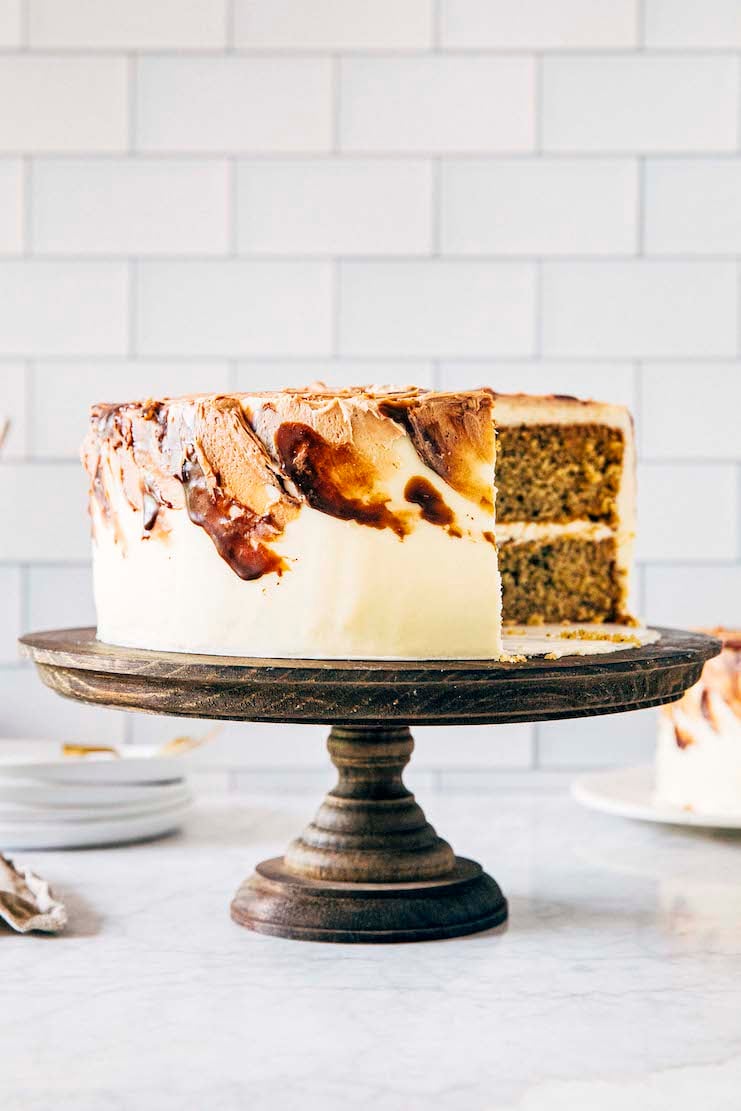
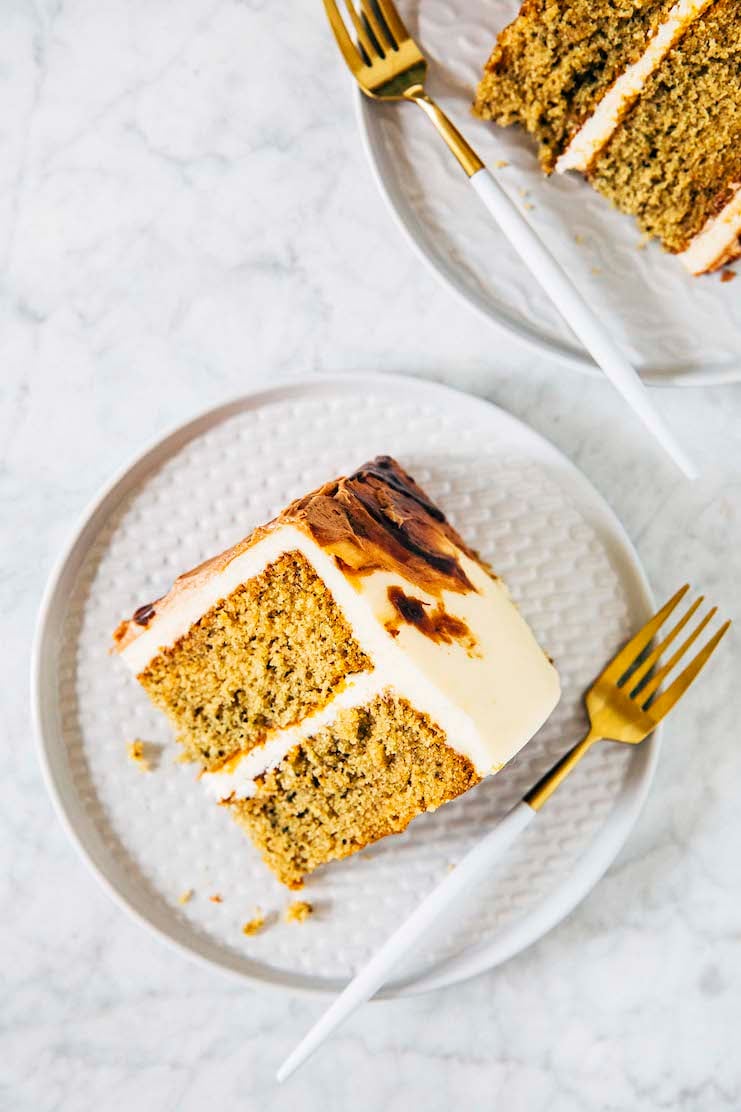
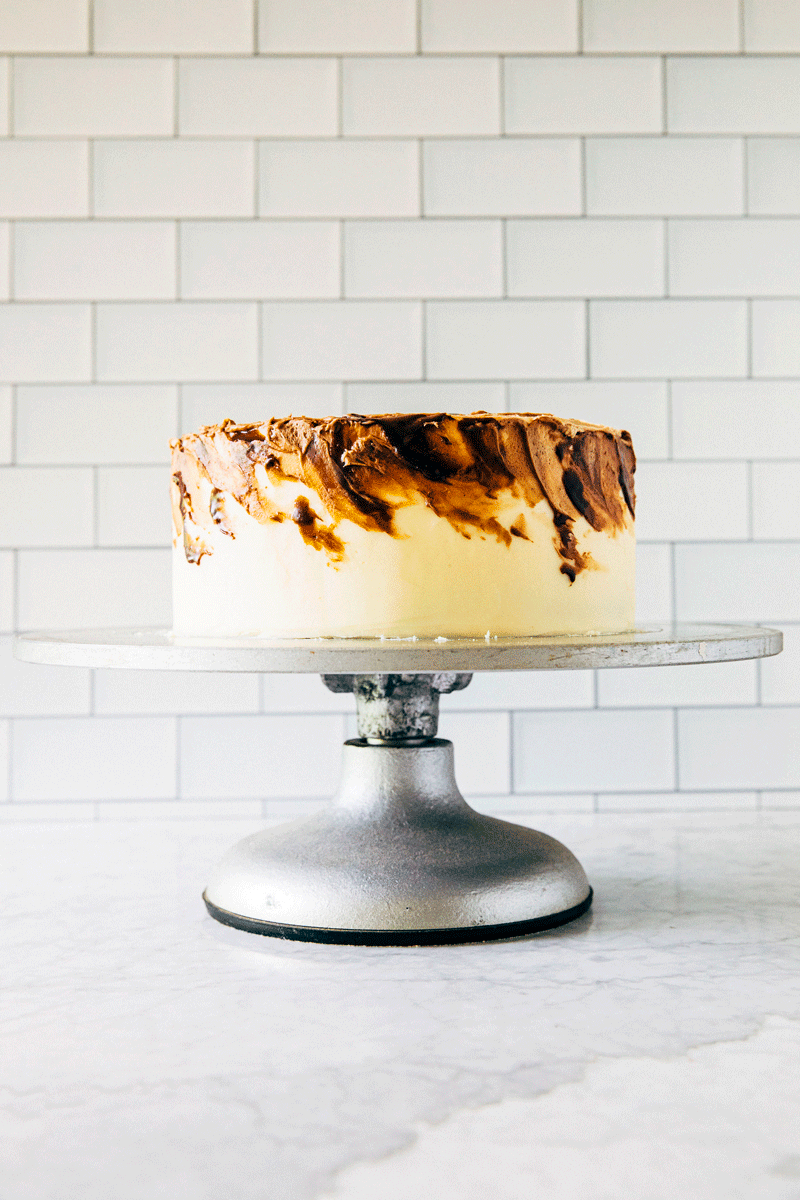
Looking for a beautiful and unique layer cake recipe? Vietnamese iced coffee, one of my all time favorite coffee drinks, inspired this beautiful Vietnamese iced coffee cake. The recipe starts with two layers of a VERY strong coffee-flavored cake. These layers are then combined together and covered with a toasted, sweetened condensed milk frosting. To make it an “iced” Vietnamese coffee cake, I also finished the cake with mocha fudge swirls. These swirls mimic a freshly swirled iced coffee drink!
For more fun layer cake recipes, check out this Pistachio Pudding Layer Cake, this Vanilla Mille Crepe Cake, and of course, My Best Chocolate Birthday Cake Recipe!
What is Vietnamese Coffee?
Okay, hold the phone—what is Vietnamese coffee, anyway? And how does it differ from regular coffee?
Vietnamese coffee starts with strong, coarsely ground, medium to dark roasted Vietnamese-grown coffee beans. Vietnamese coffee beans come pre-ground, or whole—check out the Ingredients section below for what brands I recommend! Place these grounds in a small metal drip filter (called “phin cà phê“) over a small cup, and then pour hot water over the grounds. The filter then slowly releases the water into the beans, filtering strong coffee into the cup. Because Vietnamese coffee is so strong, folks usually serve the coffee with a few tablespoons of sweetened condensed milk. The sweetened condensed milk sits at the bottom of the glass as the hot coffee slowly drips on top of it.
How to Make Vietnamese Iced Coffee
However, many people also serve the Vietnamese coffee over ice to make Vietnamese iced coffee. To make Vietnamese iced coffee, pour the filtered coffee into a glass filled with ice. Similar to the hot version, you can use sweetened condensed milk to sweeten and flavor the iced coffee. Personally, I like this iced, sweetened preparation of Vietnamese coffee the best—that’s why I made this cake! 😜 But we’ll get to that shortly, I promise.
How to Drink Vietnamese Coffee
Okay, I know it feels silly to have a section titled “How to Drink Vietnamese Coffee”. But I learned my lesson from my dalgona coffee blog post, when many of you asked me how to drink dalgona coffee. It’s actually a fair question!
Most sweetened Vietnamese hot coffee, when served, comes in layers. At the bottom of the cup lies the sweetened condensed milk. The coffee then drips on top of this milk. The filter rests on top of everything, holding itself up with the sides of the cup. To drink Vietnamese coffee, wait until the water has completely passed through the filter. The water passes through the coffee grounds to create coffee. This coffee then drips slowly on top of the sweetened condensed milk. Now, remove the filter by placing it on a small saucer and set aside. Use a small spoon to stir the sweetened condensed milk into the coffee. Once it’s completely combined, you’ll end up with a pretty homogenous, creamy, mocha-colored beverage. There should no longer be any sweetened condensed milk at the bottom of the cup. Now enjoy!
On the other hand, you likely won’t need to go through this process for Vietnamese iced coffee. Most places serve Vietnamese iced coffee without the filter. At this point, the coffee has already been poured into the glass of ice and sweetened condensed milk. All you need to do is stir everything together.
What Does Vietnamese Coffee Taste Like?
Vietnam produces the second largest amount of coffee beans in the entire world. However, historically, most Vietnamese coffee bean typically end up in mass-market ground coffee blends. It’s only recently that start-ups like Nguyen Coffee Supply have popped up to bring freshly roasted and more nuanced Vietnamese whole beans to the craft coffee scene.
As a result, with the exception of these exciting new companies, I sadly think of Vietnamese coffee beans as boring and basic. In the past, I described Vietnamese coffee—specifically, Vietnamese iced coffee—as this: think of the most boring, basic cheap coffee you can find. Now, brew it very strongly to the point of bitterness. On its own, the coffee tastes forgettable and perfunctory, like the sad final dregs of the office coffee pot. But then you top it off with sweetened condensed milk and ice, give it a good stir, and bam! You have a wonderful, well-balanced creamy iced coffee drink. Well… okay, it’s a little on the sweet side, but in the way that a tall iced caramel macchiato and a pumpkin spice latte from Starbucks is too.
What Does THIS Vietnamese Iced Coffee Cake Taste Like?
Now that you’ve learned all about Vietnamese coffee, let’s talk about this Vietnamese iced coffee cake! I wanted this cake to taste like all the best parts of Vietnamese coffee. For me, that means lots of strong coffee and toasty sweetened condensed milk flavors. As a result, this recipe starts with a VERY strongly flavored coffee cake. The cake has two types of coffee in it: coffee granules (from instant coffee OR ground coffee beans—I’ll explain more in a hot second), and strong-brewed coffee. The cake is then layered and covered with an unapologetically sweet and creamy sweetened condensed milk frosting, and completed with mocha swirls to mimic a freshly swirled iced coffee!
Why You Should Make This Recipe
In addition to being extremely delicious, here are all the reasons why you should make this Vietnamese iced coffee cake recipe:
This Vietnamese iced coffee cake recipe is one of the most popular recipes on Hummingbird High… of all time!
I first made this Vietnamese iced coffee cake back in 2017! It was the first recipe of mine that nearly incited a riot. Since then, many of you have made this cake to celebrate special occasions like birthdays, anniversaries, and more. One Instagram follower even told me that she makes the cake every year for her birthday! I’m beyond touched.
This Vietnamese iced coffee cake recipe has ingredients that can be easily substituted with other ingredients.
I mentioned recently that I’ve been working hard to make my recipes more accessible. Part of that means creating more recipes with ingredients that you likely already have in your pantry, and providing substitutions when appropriate. Be sure to check out the ingredients section below on ways you can customize this cake and/or avoid an unnecessary shopping trip!
Different parts of this Vietnamese iced coffee cake recipe can be made ahead to fit your schedule.
I’m not going to lie—most layer cake recipes take all day to make. First, you make the cakes and wait for them to cool completely before assembling and decorating. Next, you make the frosting and assemble the cake. If you’re using a complicated frosting like Swiss meringue buttercream, it can take up to a full half hour to make the frosting! Decorating the cake can be time-consuming, too. Fancy cake designs (like this Christmas wreath cake, this fault line cake, and this geode cake) can take hours to put together.
Luckily, this recipe is pretty forgiving and flexible. The cake can be made ahead far ahead of serving. Simply freeze the layers until you’re ready to assemble the cake. Be sure to check out more of my notes on how to make this cake fit into your schedule (and, spoiler alert: if you’re into this kind of time management, definitely check out my cookbook). The sweetened condensed milk frosting comes together in just 5 minutes. Cool, right?
Truthfully, creating and making the mocha swirls for the iced coffee cake takes up the most time. But once you get the hang of the design, it’s weirdly easy to pull off. Really! Don’t forget to watch my Instagram tutorial to help guide you through the process. To access the tutorial, click on the circle titled “Vietnamese Iced Coffee Cake” underneath my Instagram bio. You may need to scroll left or right to find the tutorial.
Ingredients and Substitutions
Now that I’ve convinced you to make this Vietnamese iced coffee cake recipe, here’s your shopping list for the recipe:
Shopping List for Vietnamese Iced Coffee Cake Recipe
Be sure to scroll down to the recipe card for the exact ingredient quantities—hit the “Jump to The Recipe” button on the page for a quick shortcut!
- all-purpose flour
- ground coffee OR instant coffee granules
- baking powder
- baking soda
- kosher salt
- granulated sugar
- large eggs
- pure vanilla extract
- sour cream
- canola oil
- unsalted butter
- confectioners’ sugar
- sweetened condensed milk
- chocolate sauce
And let’s talk about some of its key ingredients:
Ground Coffee or Instant Coffee Granules
This Vietnamese iced coffee cake recipe uses 1 tablespoon of ground coffee or instant coffee granules for the cake base.
Ground Coffee versus Instant Coffee
Contrary to popular belief, instant coffee and ground coffee are different things! Ground coffee is made by grinding coffee beans into a coarse or fine powder. You can easily make ground coffee at home with a coffee grinder.
Instant coffee, on the other hand, is made from whole coffee beans that are roasted, ground, and brewed. The water is then removed from the brewed coffee either by flash-heat drying or freeze-drying, leaving behind dehydrated crystals. You then add water back to these crystals to make a cup of coffee.
So while ground coffee literally looks like ground up coffee, instant coffee looks more like Demerara or raw sugar crystals. Most folks are unable to make instant coffee crystals at home (since you’d need a freeze-dried machine to do so).
I have both. Should I use ground coffee or instant coffee in this Vietnamese iced coffee cake recipe?
You can use whichever type of coffee you have on hand for this recipe. I promise. My original recipe instructed you to use instant coffee—it’s 100% delicious. However, over the years, I’ve also made this cake with ground coffee. The ground coffee gives the cake a stronger coffee flavor than the instant coffee otherwise would. This strong coffee flavor is more akin to the Vietnamese coffee I know and love.
Just note that both instant and ground coffee come in medium or dark roast flavors. While you can get away with using medium roast coffee, a dark roast coffee gives you the ideal coffee flavor for this cake.
Sour Cream
This Vietnamese iced coffee cake recipe uses 1 cup sour cream for the cake base.
Why use sour cream?
I love using sour cream in baked goods to give them a subtle, tangy flavor. For this particular recipe, the sour cream in the Vietnamese iced coffee cake base helps balance out the sweetness from the sweetened condensed milk frosting. It also gives the cake a super soft and moist crumb that keeps it fresh for days.
What can I substitute for the sour cream in this Vietnamese iced coffee cake recipe?
Buttermilk: In a pinch, you can use 1 cup of buttermilk instead of sour cream in this recipe. Just note that your cake batter will look different from my cake batter in my Instagram Story tutorial. Buttermilk makes the cake batter more liquidy and loose.
Crème Fraîche: Sour cream can be substituted with crème fraîche. However, note that crème fraîche is LESS acidic than sour cream. That means that your coffee cake will taste less tangy than if you’d used sour cream.
Yogurt: Sour cream can be substitute with plain, unsweetened full-fat regular OR Greek yogurt. AVOID using flavored yogurt since these have added sugars and artificial flavors that affect your cake. Finally, plain unsweetened yogurt is MORE acidic than sour cream. Substituting sour cream with yogurt in this recipe results in a tangier coffee cake.
Coffee
This Vietnamese iced coffee cake recipe uses ¾ cup strongly brewed dark roast coffee for the cake base.
What is strongly brewed coffee?
Strongly brewed coffee is coffee that has been brewed with more coffee beans than normal to give it a stronger taste and more caffeine. Coffee is often brewed at a 1:18 ratio. To make a “strong” cup, increase the amount of coffee so that its ratio to water will now be 1:16. What does that mean exactly? Around one to two tablespoons of ground coffee for every six ounces of water. If you want more specific measurements, check out this article on how to brew coffee. It has the most comprehensive chart I’ve seen yet, with notes on how to adjust the ratio to account for different brewing methods with a pour over, French press, and Aeropress tools.
Why you should use cold brew coffee
If you don’t want to mess around and make your own coffee, do what I do: use cold brew coffee for this Vietnamese iced coffee cake! Cold brew coffee is higher in caffeine than regular coffee; you can why in this Kitchn article. That being said, some cold brew coffee brands are notorious for having stronger flavors and more caffeine than others. Those qualities make them perfect for this cake! My personal brand of choice is Stumptown’s Original Cold Brew Coffee. The New York Times even highlights this particular brand of cold brew coffee as one of the strongest on the market.
Do you have any recommendations for Vietnamese coffee?
Okay, so you want to be legit and source Vietnamese coffee for this Vietnamese iced coffee cake recipe. I see you and respect you!
I mentioned earlier that most Vietnamese coffee comes pre-ground. If you want to go this route, I recommend going with either of the two most popular Vietnamese ground coffee brands: Trung Nguyen and Café Du Monde.
(Side note: Did you recognize Café Du Monde as the famous cafe in New Orleans that serves the beignets? Yep, they’re the same! According to this article, Vietnamese immigrants in America’s Gulf Coast region embraced Café Du Monde coffee due to its accessibility and similarity to dark-roasted Vietnamese beans. Just note that Café Du Monde ground coffee has chicory in it for flavor—learn why in my recipe for New Orleans-style iced coffee.)
If you want whole beans, I’ve heard great things about Nguyen Coffee Supply. Sarah Nguyen, the founder and CEO of the company, imports organic coffee beans from a fourth-generation family farm in Da Lat, Vietnam, and roasts them in Brooklyn, New York. Pretty cool, right?
Does decaf coffee work in this Vietnamese iced coffee cake recipe?
Technically, yes. Just be sure to follow the instructions above for brewing a strong cup of coffee to ensure that you get the strong coffee flavor you need for this cake!
Does espresso work in this Vietnamese iced coffee cake recipe?
Yes. Instant espresso, espresso grounds, and brewed espresso will work in place of instant coffee, espresso grounds, and brewed coffee in this recipe. However, note that you need ¾ cup (6 ounces) of coffee for the cake. Most espresso machines only make around 2 ounces of espresso at a time. You can extend the espresso by turning it into an Americano and using that in place of coffee in this recipe as well.
Sweetened Condensed Milk
This Vietnamese iced coffee cake recipe uses 6 tablespoons of sweetened condensed milk for the frosting.
What is sweetened condensed milk?
Sweetened condensed milk is milk that’s been cooked down to remove water from it. Doing so gives the milk a thick, sticky, and densely creamy texture. Almost all condensed milks are sweetened (non-sweetened condensed milk is instead referred to as “evaporated milk”, which we’ll discuss more in a hot second). The sugar keeps the sweetened condensed milk shelf-stable for years, and gives the sweetened condensed milk a unique flavor. Sweetened condensed milk is often used in baking recipes where the final product is very creamy, but also firm. Think: key lime pie fillings, caramels, and more.
Do I have to use sweetened condensed milk in this Vietnamese iced coffee cake recipe?
Yes! Historically, the use of sweetened condensed milk with Vietnamese coffee goes all the way back to French Indochina, France’s occupation of Vietnam. Back then, Vietnam’s dairy farming industry was little to non-existent. French soldiers missed their milky coffees from back home, and began using sweetened condensed milk in place of fresh milk in their coffees. Additionally, sweetened condensed milk has a unique flavor that’s hard to replicate with other ingredients. Without it, your cake won’t taste like Vietnamese iced coffee.
Sweetened condensed milk is hard to find where I live. Can I make it at home?
In theory, yes. But I haven’t done it myself, so I can’t personally vouch for it.
However, there are many recipes online that teach you how to make sweetened condensed milk at home. This recipe by Bigger Bolder Baking and this one by Stella Parks at Serious Eats look the most legit to me. That being said, it’s a bit of a time-consuming process: both recipes instruct you to simmer the milk for a minimum of at least 35 minutes. So plan ahead if you’re planning on making your own sweetened condensed milk at home!
Chocolate Sauce
This Vietnamese iced coffee cake recipe uses ¼ cup of chocolate sauce to make the coffee fudge swirls.
Chocolate Sauce versus Chocolate Syrup
To make the fudge swirls on this cake, I dabbed a small dot of chocolate sauce on the cake, and used an offset spatula to smear it to resemble a coffee swirl. Note that chocolate sauce is different from chocolate syrup. Although there are similarities between the two, chocolate sauce is thicker and more similar to ganache and chocolate fudge. It thickens and solidifies slightly when poured over a cold ingredient like ice cream. On the other hand, chocolate syrup tends to have more corn syrup and keeps its liquidy and runny form when poured over ice cream.
For this Vietnamese iced coffee cake recipe, I used Stonewall Kitchen’s Bittersweet Chocolate Sauce. It has the perfect consistency to work with (not to mention that it’s plenty tasty, too). However, I’ve also made this recipe with Smucker’s Chocolate Fudge Topping. The key is to find a thick, chocolate sauce—this recipe does not work as well with chocolate syrups like Hershey’s Chocolate Syrup.
If you are unable to find a chocolate sauce that works for this recipe, don’t worry! See the next section below with instructions on how to make your own coffee fudge sauce from scratch.
Wait—I’ve made this cake before. The original recipe instructed you to make coffee fudge from scratch. What happened?
Ah, yes! When I first published this recipe back in 2017, I instructed you to make a coffee fudge sauce from scratch and use that instead of chocolate sauce. It’s delicious and although I highly recommend it, it adds more time to an already time-consuming recipe and baking project. So I decided to update the recipe with the shortcut of using store-bought chocolate sauce.
That being said, if you miss the original coffee fudge recipe, go ahead and make it! I included the recipe below.
Ingredients for Coffee Fudge Sauce
This recipe makes around ⅓ cup of coffee fudge. The fudge can be made up in advance of making the cake and frosting. You’ll likely have leftover fudge. Leftover fudge can be stored in the refrigerator for up to 2 weeks. Use any leftovers by drizzling it on top of other desserts like ice cream, brownies, and more!
- 4 ½ teaspoons strongly brewed (preferably cold brew) coffee
- 1 Tablespoon natural unsweetened cocoa powder
- 0.5 ounces (14 grams) dark chocolate (at least 70% cacao), from whole fèves or a high-quality chocolate bar, chopped into ½- to 1-inch pieces
- a pinch of kosher salt
- 2 Tablespoons heavy cream
- 1 Tablespoon granulated sugar
- 1 Tablespoon light corn syrup
Recipe for Coffee Fudge Sauce From Scratch
- In a medium bowl, whisk together the coffee, cocoa powder, chocolate, and salt.
- Place the cream, sugar, and corn syrup in a small, heavy-bottomed sauce pan. Bring to a boil over medium-high heat, whisking occasionally. Immediately pour over the coffee and chocolate, then place a dinner plate over the bowl to make a makeshift lid. Let sit, undisturbed, for 1 minute.
- Remove the plate. Whisk slowly but steadily until the fudge is thick, smooth, and shiny, about 2 to 4 minutes. Pour the fudge into a glass jar with an airtight lid, cover, and refrigerate for up to 2 weeks.
How to Make Vietnamese Iced Coffee Cake
Below are the basic steps to make this Vietnamese iced coffee cake from scratch. Note that if you’re making the coffee fudge from scratch, I encourage you to do so as the first step in the recipe. Doing so will give the coffee fudge time to firm and set in the refrigerator.
First, make the coffee-flavored cake:
- Prep your ingredients for the coffee cake. (Prep Time: 5 to 10 minutes)
To make the cake, you need ¾ cup strongly brewed coffee that’s been cooled to room temperature. It’s important to cool the coffee! If it’s still too hot when you pour it into the batter, it may curdle the batter by accidentally cooking the eggs. Using cold brew coffee will spare you 5 minutes of Prep Time since you won’t need to make coffee from scratch. That being said, cold brew coffee is typically refrigerated; it’s important to bring the cold brew coffee to room temperature, too! I speed up this process by pouring it into a glass and blitzing it in the microwave for 20-second intervals until it’s at room temperature. - Make the cake batter. (Work Time: 10 minutes)
Making the cake batter is an easy process. Simply beat together the sugar, eggs, and vanilla before mixing in the sour cream, oil, and coffee. After that, gradually add the dry ingredients. That’s it! - Bake the coffee cake. (Bake Time: 30 minutes)
Divide the cake between two 8-inch round cake pans and bake for 30 to 35 minutes. Note that you’ll need to wait for the cake to cool completely before frosting—check out my baker’s tips below on how to make this recipe fit into your schedule!
Next, make the sweetened condensed milk frosting:
- Prep your ingredients for the sweetened condensed milk frosting. (Prep Time: 5 minutes)
When making frosting, it’s especially important to make sure that your butter is at room temperature and that your confectioners’ sugar was sifted. Cold butter and unsifted confectioners’ sugar makes lumpy frosting that is difficult to frost and riddled with bumps! - Make the sweetened condensed milk frosting. (Work Time: 5 minutes)
After you’ve prepped your ingredients, making the sweetened condensed milk frosting is an easy process. Simply beat the butter until creamy, then gradually add the confectioners’ sugar and condensed milk. Easy, right?
Then, start assembling the Vietnamese iced coffee cake:
- Assemble the cake layers. (Work Time: 5 to 10 minutes)
Place one of the cake layers on a cake board (or a serving plate) in the middle of the rotating cake stand. Take an offset spatula and drop about ½ cup of the frosting right in the middle of the top of the cake. Spread it evenly all over the top, just like you would spread butter on toast. Place your second cake layer on top of this frosting, stacking it evenly on top of the cake. - Crumb coat the cake. (Work Time: 15 to 30 minutes)
A crumb coat is a thin layer of frosting that’s spread over the naked cake to trap crumbs. If you’ve ever tried to frost a cake without a crumb coat, you’ll know that crumbs can shake loose from the cake and get caught in the frosting, leaving your cake with unsightly bumps. The crumb coat seals in any crumbs, allowing you to apply thicker and smoother layers of frosting later.
To apply a crumb coat, follow the instructions to stack the cakes, layering frosting between each cake to “glue” them together. Then cover the surface of the entire layer cake with a thin layer of frosting—this is the crumb coat. Use just enough frosting to cover the entire cake completely. Refrigerate for 30 minutes, just enough for the frosting to harden.
Finally, frost and finish the cake:
- Cover and smooth the cake completely with the sweetened condensed milk frosting. (Work Time: 30 to 60 minutes)
Use the offset spatula to spread the frosting all over the top and sides of the cake evenly. Once the cake is completely covered, hold the length of the offset spatula’s blade against the frosting as you rotate the cake stand. Doing so will smoothen out the frosting. Check out the FAQ section below for links to video tutorials that show you how to do this! - Make the chocolate fudge frosting. (Work Time: 5 minutes)
You need to reserve about ⅓ cup of the sweetened condensed milk frosting for the fudge frosting swirls. After you’ve scooped out the ⅓ cup, divide it evenly between two small bowls. Add 1 teaspoon to 2 teaspoons of chocolate sauce to one bowl, and add 1 to 2 tablespoons of chocolate sauce to the other. Mix until combined. These are your chocolate fudge swirls! - Frost the coffee swirls. (Work Time: 10 minutes)
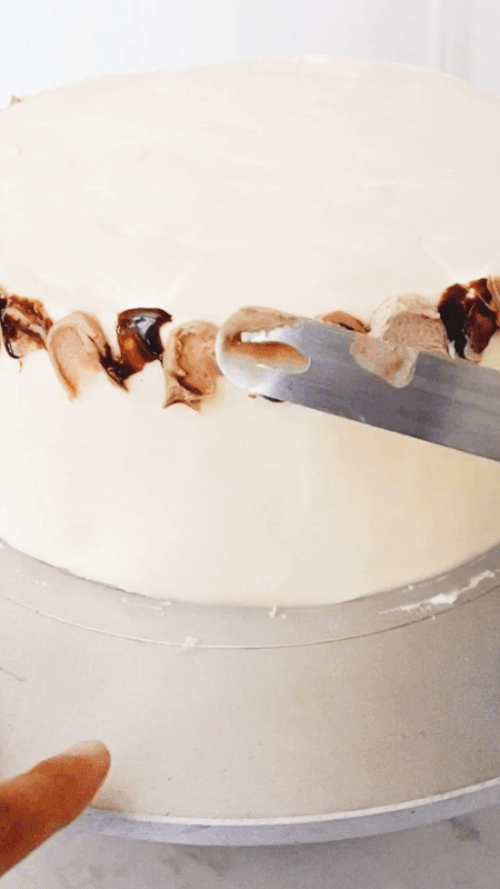
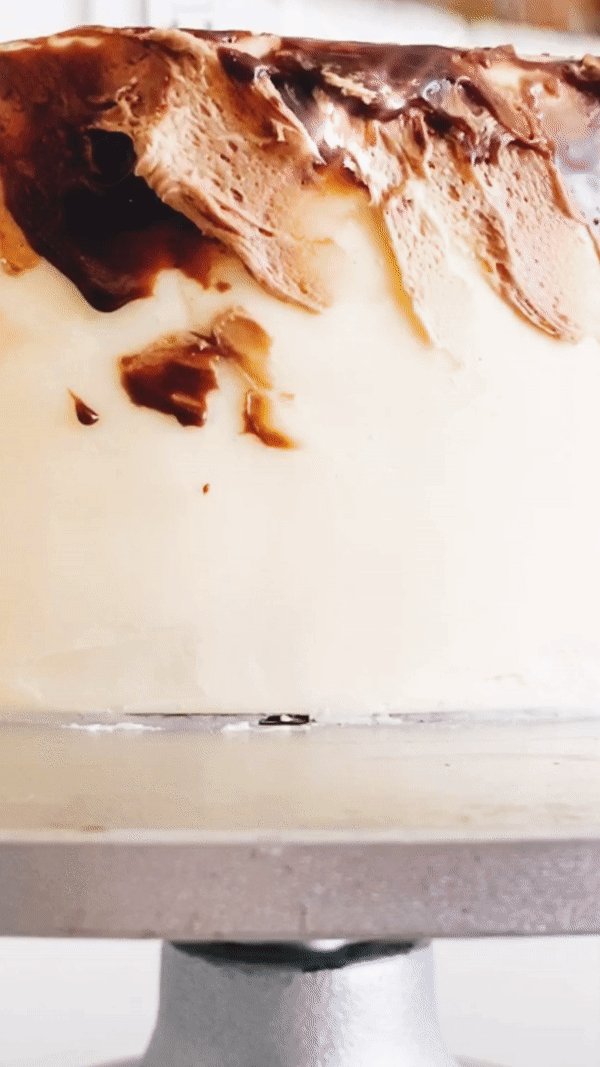
Dab small dollops of chocolate sauce and chocolate fudge flavored frostings along the top of the edge of the cake. Use an offset spatula to carefully smear each dollop down the cake in a diagonal motion. Be sure to check out the GIFs below (please be patient—they take a while to load!) and my Instagram Story tutorial for a visual representation.
Recipe Troubleshooting and FAQ
FAQ: Tools to Make Vietnamese Iced Coffee Cake
Do I need special tools to make this Vietnamese iced coffee cake?
Sort of. If you bake cakes regularly, it’s likely that you already have the main tools you need for this Vietnamese iced coffee cake: a round cake board, a rotating cake stand and an offset spatula.
What’s a cake board?
A cake board is a stiff piece of cardboard that’s placed underneath the cake. The cake board makes it easy to transfer the cake from the rotating cake stand (which we’ll get to in a hot second) and onto a different serving plate or cake stand.
Cake boards come in different sizes to match the most commonly used cake pans. Professionals like to match the size of their cake board to their cake pan—that is, professional bakers will place an 8-inch round cake on top of an 8-inch round cake board. That being said, it’s easier for beginners and novice bakers to use a slightly larger cake board (e.g. pairing an 8-inch round cake with a 9-inch round cake board). Doing so makes it easier to pick the cake up for transfer. You can cover the rest of the cake board with a piped frosting border, or leave it as is—nobody will mind, I promise!
Do I really need a cake board for this Vietnamese iced coffee cake recipe?
No, you don’t really need a cake board. This recipe instructs you to place the cake on a cake board, and then place the whole thing in the center of a rotating cake stand. However, you can place the cake on its serving plate instead (and then place the serving plate on the rotating cake stand). If you’re opting for this method, it’s best to use a plate that’s completely flat—like any of these plates from Crate and Barrel’s Mercer collection (which I love and have, BTW). A flat plate gives you a level surface that makes it easier to frost the cake evenly and smoothly.
What’s a rotating cake stand?
A rotating cake stand, or a cake turntable, is a cake stand with a plate that rotates 360 degrees. This function allows bakers to smooth the sides of cakes evenly and efficiently. The best cake stands are sturdy, with a heavy base that doesn’t easily move when accidentally nudged. I found my rotating cake stand at a local restaurant professional supply store; however, this Ateco model is very similar. If you’re on a budget, opt for this cheaper, lightweight plastic version by Wilton. I also like this rotating cake stand from Food52. It looks like a regular cake stand, so there’s no need to put yourself through the scary task of moving your beautiful, finished cake onto a serving platter!
Can I make this Vietnamese iced coffee cake without a rotating cake stand?
Yes, but I don’t recommend it. In a pinch, you can use a lazy Susan by setting the cake on a serving platter, then placing it on an upside-down bowl on the lazy Susan’s center. You’ll be able to rotate the cake this way. That being said, it’s likely that you’re going to have a much harder time frosting smooth sides on your cake.
Okay, now what’s an offset spatula?
While spatulas for cooking have a wide rectangular or square head, offset spatulas have a thin, blunt blade. This blade enables you to easily spread and scrape sauces, fillings, frostings and more when baking. If you don’t already own one, I recommend investing in both a short and long offset spatula with sturdy metal blades. These ones from Ateco are my favorites.
Can I make this Vietnamese iced coffee cake without an offset spatula?
Yes, but your life will be infinitely easier if you invest in an offset spatula. But without one, you can use a baking spatula, a butter knife, or the back of a spoon to cover the cake completely in frosting. Then, use a bench scraper or a (clean) ruler to smooth the sides of the cake. Use the back of a spoon again to dollop a small amount of chocolate sauce onto the cake and spread it to make the swirls. However, let me warn you—your swirls probably won’t look like mine!
FAQ: Vietnamese Iced Coffee Cake Frosting Technique
Do I really need a crumb coat for this cake?
You don’t necessarily need a crumb coat for this recipe, but it’s definitely helpful to have. The cake’s crumbs are pretty loose and come off easily, especially at room temperature. That being said, I always stick my cakes in the freezer during the last 20 minutes of their cooling period. Doing so not only brings them to room temperature faster, but also preps them for frosting. The freezing helps keeps the cake’s crumbs intact!
How do I frost a cake smoothly?
Gahhh, to be perfectly honest, I hate frosting cakes smoothly. It honestly takes a lot of time and practice to get it done right.
To frost a cake smoothly, you definitely need a rotating cake stand and an offset spatula. Once the cake is completely covered with the sweetened condensed milk frosting, hold the length of the offset spatula’s blade against the frosting as you rotate the cake stand. Doing so will smoothen out the frosting. Continue doing this until the cake is perfectly smooth. It also helps to dip the blade of the offset spatula in a tall glass of hot water, wiping down the blade before using it on the cake each time. The warm blade will help create smoother sides.
If you want a visual tutorial, check out this video by Martha Stewart and this one by Stella Parks. I also recommend the tutorial on my friend Tessa’s blog. I also share some additional tips on how to frost cakes smoothly and evenly in this Cake Decorating 101 post.
FAQ: Vietnamese Iced Coffee Cake Recipe Results
Can I make this cake recipe in two 9-inch round cake pans instead?
Yes! Just note that using 9-inch pans will result in thinner layers. Just start checking for doneness 5 to 10 minutes earlier than the Bake Time listed in the recipe.
I want to make this Vietnamese iced coffee cake into a three layer cake instead. Is that possible?
Yes! However, you need to adjust the original recipe’s ingredients by multiplying the quantities by 1.5. See the new quantities below:
- 5¼ cups (23.65 ounces or 670 grams) all-purpose flour
- 1½ Tablespoons (4 ½ teaspoons) ground coffee or instant coffee granules
- 2¼ teaspoons baking powder
- 1½ teaspoons baking soda
- 1½ teaspoons kosher salt
- 2⅔ cups (18.65 ounces or 529 grams) granulated sugar
- 3 large eggs
- 1½ Tablespoons (4 ½ teaspoons) pure vanilla extract
- 1½ cups (12 ounces or 340 grams) sour cream
- ¾ cup (6 ounces or 170 grams) canola oil
- 1 cup plus 2 Tablespoons (7 ounces or 198 grams) strongly brewed (preferably cold brew) coffee
Follow the instructions in the recipe. Bake Time will not change. I also recommend that you double the frosting recipe to give you a generous amount to work with. The new quantities are below:
- 3 cups (24 ounces or 680 grams) unsalted butter, at room temperature
- 1 Tablespoon pure vanilla extract
- ½ teaspoon kosher salt
- 9 cups (36 ounces or 1021 grams) confectioners’ sugar
- ¾ cup (12 ounces or 340 grams) sweetened condensed milk
You can save any leftover frosting by using a rubber spatula to scrape it into a zip-top bag. Press as much air out of the bag as possible before sealing. Freeze for up to 1 year.
Help! I made the coffee fudge from scratch and it’s extremely runny. What did I do wrong?
Don’t panic! After first making the chocolate fudge, it will be thin and liquidy with a consistency similar to chocolate syrup. This is normal! You want to refrigerate it for at least 4 hours before using in this recipe—doing so will thicken it up ever so slightly, making it perfect to work with in this recipe. This is why I recommend making the chocolate fudge from scratch ahead of time!
Help! I can’t get my coffee swirls to look like yours. What did I do wrong?
To get the “swirl” effect, I was inspired by this technique for galaxy cakes that I found on Instagram. I try my best to walk you through it in the recipe instructions, but that video and my GIFs of the method above is probably going to be more helpful than whatever I say. Also, did you check out my Instagram Story tutorial for this cake? Head to my Instagram profile. Underneath the bio, you’ll see a bunch of circles with pictures of food in them with labels underneath each one. Click on the circle titled “Vietnamese Iced Coffee Cake”. You may need to swipe left or right in order to find it!
How do you transfer the cake from the rotating cake stand onto a different cake stand for serving?
First, let me stress this: use a cake board!!! Doing so makes it much easier to transfer the cake from place to place. If you’re a beginner, I recommend getting a cake board that’s slightly larger than the size of cake you’re making (ie, using a 9-inch or 10-inch cake board for this 8-inch Vietnamese iced coffee cake). A larger cake board makes it easier to pick the cake up by the board and move it place to place without messing up the frosting you worked so hard on.
However, I mentioned earlier that professionals tend to use the same size cake board as their cake. Like me! Though I’m not really a professional (I think I’m more akin to a contestant on The Great British Bake Off), I used an 8-inch cake board for this Vietnamese iced coffee cake. To transfer it to its serving platter, I used this handy Wilton tool for lifting cakes. I wedge it carefully underneath the cake to pick it up and transfer it to its new cake stand. In a pinch, you can use a long and wide offset spatula.
FAQ: How to Make this Vietnamese Iced Coffee Cake Fit Into Your Schedule
Whenever I bake an elaborately decorated cake like this Vietnamese iced coffee cake, I break down the recipe to make its different components over multiple days. Why? It can be really time-consuming to make the cake all in one day! First, you need to bake the cakes and wait for them to cool completely. Then you need to make the frosting, assemble the layers and frost a crumb coat, and wait for that to set. After that, you need to finish decorating the whole thing! You can see how this recipe is turning into a full day’s worth of work (as well as sitting around and waiting for things to cool and set) in the kitchen.
To make sure I’m not stuck in the kitchen all day, I stretched the work for this Vietnamese iced coffee cake recipe over a few days. Here’s what I did:
Day 1: Make the Coffee Flavored Cakes (Total Time: around 40 minutes, including Bake Time)
Follow the recipe instructions for making and baking the coffee flavored cake layers. Once cool, tightly wrap each cake layer in its own sheet of plastic wrap. Freeze overnight.
Day 2: Assemble the Layers and Crumb Coat the Cake (Total Time: around 40 minutes)
Follow the recipe instructions for assembling the layers and making a crumb coat for the cake. Refrigerate the cake overnight to set the crumb coat. Place the rest of the sweetened condensed milk frosting in an airtight container and refrigerate, too.
Day 3: Finish Frosting the Cake and Serve (Total Time: around 1 hour)
Bring the frosting back down to room temperature—you can speed up this process by warming it in a double boiler over low heat, or microwaving in 20 second intervals until soft. Beat in a stand mixer fitted with the paddle attachment until light and creamy once more, about 2 to 3 minutes. Follow the recipe instructions for frosting the cake completely and applying the chocolate fudge swirls.
Note: if three days to make one cake sounds like too long to wait, you can also combine the work for Day 2 and Day 3 into one. And if you liked the way I broke it out above, be sure to check out my cookbook, Weeknight Baking—literally all the cake recipes in the book are designed this way!
FAQ: Storing Vietnamese Iced Coffee Cake
Can I make the coffee cake batter and save it for baking later?
Sadly, no. The cake batter uses baking soda to leaven the cake. Baking soda reacts immediately with other ingredients in the batter to create bubbles that get trapped in the cake batter. These bubbles then rise up in the oven to give the cake rise and create its texture. If you let the batter sit for too long, these bubbles will pop and dissolve, leaving you with a flat cake.
Can I make the sweetened condensed milk frosting and save it for baking later?
Yes! You can make the sweetened condensed milk frosting up to 3 days in advance of making the rest of the cake. Follow the recipe’s instructions to make the frosting. Then, transfer it to an airtight container with a lid. Press a sheet of plastic wrap directly against the surface of the frosting to prevent a skin from forming, then cover with the lid. You can also freeze the frosting. Instead of an airtight container, scrape the frosting into a zip-top bag. Press as much air out of the bag as possible before sealing. Freeze for up to 1 year.
To use in the Vietnamese iced coffee recipe, bring the frosting back down to room temperature. Beat on medium-high speed in a stand mixer fitted with the paddle attachment, until soft and creamy, about 2 to 3 minutes.
How to Store Vietnamese Iced Coffee Cake
The assembled Vietnamese iced coffee cake can be stored at room temperature, under a cake dome or a large bowl turned upside down, for up to 1 day. Press a sheet of plastic wrap against any cut surfaces to prevent the cake from drying out. After that, cover the entire cake loosely with plastic wrap and refrigerate for up to 2 days.
Can you freeze Vietnamese iced coffee cake?
Yes! You can freeze Vietnamese iced coffee cake in the following ways:
Freeze the baked, unfrosted coffee-flavored cake layers.
Follow the recipe instructions for making and baking the coffee-flavored cake layers. Once the layers have cooled, tightly wrap each cake layer in its own individual sheet of plastic wrap. Freeze for up to 3 months. To use in the recipe, there’s no need to thaw the cakes! Simply set the cake layers out on the counter as you make the sweetened condensed milk frosting to let them thaw slightly. Use in the recipe as directed.
Freeze the entire assembled Vietnamese iced coffee cake.
You can freeze the entire assembled Vietnamese iced coffee cake, too! However, doing so works best if you use a cake board. Follow the recipe instructions for making all the different components of Vietnamese iced coffee cake and assembling them together on a cake board. Refrigerate the entire assembled Vietnamese iced coffee cake, uncovered, for a minimum of 4 hours. Doing so sets the frosting and preps it for freezing. After 4 hours, test the cake by gently poking the frosting with your finger. Poke it gently! You don’t want to leave an indent, you just want to swipe it gently to see if any frosting comes off. If no frosting comes off onto your finger, the cake is ready.
Carefully cover the whole thing—cake board and all—in two layers of plastic wrap. Freeze for up to 3 months. To serve, transfer to the refrigerator overnight to thaw, then let stand at room temperature for 1 to 2 hours before serving.
Freeze any leftover slices of Vietnamese iced coffee cake.
Tightly wrap any leftover slices of Vietnamese iced coffee cake in plastic wrap and freeze for up to 3 months. Follow the instructions above to thaw and enjoy!
Best Vietnamese Iced Coffee Cake Recipe Tips
Best Vietnamese Iced Coffee Cake Technique Tip
- For even cake layers, I like to actually weigh out the layers with a digital scale to make sure they’re even. The easiest way to do this is to set a prepared cake pan on a digital scale and tare it to “0”. Pour batter into the pan until the scale registers the weight listed in the recipe (because yes, I’ve included the approximate weight of the batter needed for each pan!). Repeat with the second cake pan.
Video Tutorial for Vietnamese Iced Coffee Cake Recipe
Use the video player below to watch my Instagram Story tutorial on how to make this Vietnamese iced coffee cake recipe! The arrows to the left and right of the frame allow you to skip through the different recipe steps. You can also hit the “pause” or “enlarge” buttons on the upper right hand side of the frame to pause or enlarge the frames accordingly.
Alternatively, head to my Instagram profile to watch these Stories on mobile! The circles underneath my bio indicate saved Instagram Story highlights depicting various recipes. Clicking on one of the circles will play the videos you see above. You may need to scroll right to find this Vietnamese iced coffee cake recipe.
More Coffee Dessert Recipes
- Coffee Tres Leches Cake
- Flourless Mocha Brownies
- No Churn Coffee Ice Cream with Circus Animal Cookie Crumbs
- One Bowl Chocolate Cake with Mocha Buttercream Frosting
More Fancy Layer Cake Recipes
- Chocolate Peanut Butter Cake
- Fault Line Cake Tutorial
- Geode Cake Tutorial
- Mint Chocolate Kintsugi Cake
Coffee Drink Recipes
Get the Recipe: Vietnamese Iced Coffee Cake Recipe
Ingredients
For the Coffee Cake
- 2 ½ cups (11.25 ounces or 319 grams) all-purpose flour
- 1 tablespoon ground coffee or instant coffee granules
- 1 ½ teaspoons baking powder
- 1 teaspoon baking soda
- 1 teaspoon kosher salt
- 1 ¾ cup (12.25 ounces or 347 grams) granulated sugar
- 2 large eggs, at room temperature
- 1 tablespoon pure vanilla extract
- 1 cup (8 ounces or 227 grams) sour cream
- ½ cup (4 ounces or 113 grams) canola oil
- ¾ cup (6 ounces or 170 grams) strongly brewed (preferably cold brew) coffee, at room temperature
For the Sweetened Condensed Milk Frosting
- 1 ½ cups (12 ounces or 340 grams) unsalted butter, at room temperature
- 1 teaspoon pure vanilla extract
- a pinch of kosher salt
- 4 ½ cups (18 ounces or 510 grams) confectioners' sugar
- 6 tablespoons (6 ounces or 170 grams) sweetened condensed milk
For the Coffee Fudge Sauce
- ¼ cup (2.5 ounces or 70 grams) chocolate sauce
- 1 Tablespoon strongly brewed (preferably cold brew) coffee, at room temperature
Instructions
For the Coffee Cake
- Prep your oven and pans. Position a rack in the center of the oven and preheat the oven to 350°F. Generously spray two 8-inch round cake pans with cooking spray and line the bottom of each with a parchment paper circle. Spray the parchment, too.
- Make the cake batter. In a medium bowl, whisk together the flour, ground or instant coffee, baking powder, baking soda, and salt.
- In the bowl of a stand mixer fitted with the paddle attachment, combine the sugar, eggs, and vanilla. Beat on medium until light, fluffy, and doubled in volume, 3 to 4 minutes, using a rubber spatula to scrape down the bottom and sides of the bowl as necessary. With the mixer on low, slowly pour in the sour cream, followed by the oil and coffee, and beat until the mixture is smooth, 3 to 4 minutes. Gradually add the dry ingredients and beat until just combined. Scrape down the bottom and sides of the bowl once more, and beat on low for an additional 30 seconds.
- Divide the batter evenly between the pans; if using a digital scale to measure out the layers, note that this recipe makes around 45 ounces (1276 grams) of batter. Pour 22.5 ounces (638 grams) of batter into each pan.
- Bake the cakes. Bake for 30 to 35 minutes. When done, the top of the cake should bounce back when gently pressed and a skewer inserted into the center of the cake should come out with a few crumbs attached. Cool completely in the pans on a wire rack before frosting.
For the Sweetened Condensed Milk Frosting
- Make the frosting. In the bowl of a stand mixer fitted with the paddle attachment, beat the butter, vanilla, and salt on medium-low until smooth and creamy, about 1 minute. Reduce the mixer to low and add the confectioners' sugar 1 cup at a time, beating until combined. Scrape down the bottom and sides of the bowl with a rubber spatula. With the mixer on low, slowly pour in the condensed milk and beat until just combined. Scrape down the bottom and sides of the bowl once more, then beat on medium-high until the frosting is creamy and smooth, 2 to 3 minutes. Use immediately.
Assembly
- First, assemble the cake. If necessary, level the top of both cakes. Place one of the cake layers on a cake board or serving platter in the center of a rotating cake stand. Use a rubber spatula or cookie dough scoop to drop ½ cup of frosting in the middle of this cake layer. Spread it evenly all over the top, just like you would spread butter on toast. Place the second cake on top of this frosting, stacking it evenly on top of the first cake.
- Next, crumb coat the cake. Cover the surface of the entire layer cake with a thin layer of frosting. Use just enough frosting to cover the entire cake completely. Refrigerate, uncovered, for 30 minutes to stiffen and "set" the frosting.
- After the crumb coat sets, finish frosting the cake. Scoop out ⅓ cup of the sweetened condensed milk frosting and place it in a separate bowl; reserve this for the chocolate fudge swirls. Place the cake back in the center of the rotating cake stand. Cover the cake completely with the remaining frosting, using an offset spatula to spread the frosting all over the top and sides of the cake evenly. Once the cake is completely covered, hold the length of the offset spatula's blade against the frosting as you rotate the cake stand to smoothen the frosting. Once the frosting is perfectly smooth, refrigerate the cake while you prepare the chocolate fudge swirls.
- Make the chocolate fudge swirls. In a small bowl, whisk together the chocolate sauce and coffee until combined. Divide the reserved sweetened condensed milk frosting and between two small bowls. In one bowl, use a small rubber spatula to mix in 1 to 2 teaspoons of the chocolate coffee sauce until pale brown and creamy. In the second bowl, use the rubber spatula to mix in 1 to 2 Tablespoons of chocolate coffee sauce until dark brown and creamy.
- Decorate the cake. Remove the cake from the refrigerator and place it back in the center of the rotating cake stand. Use the offset spatula to dab about 1 teaspoon of frosting at the top edge of the cake, rotating from each different bowl of frosting so that you have different colored dollops of frosting next to each other. Continue dabbing until you have a border of these dollops around the top of the cake.
- After you've bordered the cake, use the offset spatula to carefully swipe each of the dollops down the cake in a diagonal motion, rotating the cake stand slowly to help. Repeat until all the dollops are even, but try not to overwork it or you might lose some of the "barely stirred" pattern you're going for. Smoothen any leftover mocha dollops at the top of the cake, rotating the cake stand in a circle to create a spiral motion at the top of the cake. Use the remaining chocolate sauce and chocolate fudge frostings to cover the top of the cake completely.
- Serve and store. Serve immediately. The assembled Vietnamese iced coffee cake can be stored at room temperature, under a cake dome or a large bowl turned upside down, for up to 1 day. Press a sheet of plastic wrap against any cut surfaces to prevent the cake from drying out. After that, cover the entire cake loosely with plastic wrap and refrigerate for up to 2 days.
Notes
- For even cake layers, I like to actually weigh out the layers with a digital scale to make sure they’re even. The easiest way to do this is to set a prepared cake pan on a digital scale and tare it to “0”. Pour batter into the pan until the scale registers the weight listed in the recipe (because yes, I’ve included the approximate weight of the batter needed for each pan!). Repeat with the second cake pan.
Did you make this recipe?
Please leave a comment and rating for the recipe using the form below!
Your ratings make it easier to find the recipe online, and I’m always looking for ways to improve Hummingbird High.
get new recipes via email:

buy the book
Weeknight Baking:
Recipes to Fit your Schedule
Over the past several years of running Hummingbird High, I kept a crucial aspect of my life hidden from my readers: I had a full-time, extremely demanding job in the tech world. In my debut cookbook, Weeknight Baking, I finally reveal the secrets to baking delicious desserts on a tight schedule.
Hi, I was wondering what the consistency of the fudge is supposed to be? Mine turned out incredibly thin , yet tasty lol thank you!
Thin is normal! It’s similar to a chocolate sauce. Keeping it thin will make it easier to mix into the frosting when you decorate the cake. Also, it should thicken up in the fridge!
Oh ok cool thank you for the response ( I can’t find my comment..) it did thicken a tad in the fridge. It does taste good, I’m going to try whipping it a bit and see if it gets a tad fluffy. Making the cake later today=)
Hello – If you don’t serve immediately, does it need to be stored in the refrigerator?
No, I would keep it out at room temperature unless it’s really hot where you live!
AMAZING CAKE!
I used to live in Vietnam and miss the coffee so I was excited when I came across your cake!
The flavor was wonderful and the frosting not too sweet.
Will definitely be making this again!
Unbelievably rich and delicious – and I’m so happy to see the decorating tutorial! I’m making it again so it looks as good as it tastes this time 😂
I really enjoyed how the recipe was similar to “choose your own adventure,” allowing the “cook” to decide the variations that suited them best 🙂 I took both reins and made cold brew for the first time and went down the coffee fudge route. Both most excellent decisions ✨ It does take time and patience (the icing set faster than I anticipated), but it was well worth the tender care!
Do you have a recipe for the chocolate fudge sauce used in the frosting portion of the cake? If not, what did you use?
I do! Do a search within the blog post for “Recipe for Coffee Fudge Sauce From Scratch”. That’s the from scratch recipe. If you scroll up, you can see that I also provide options/specific brands to use for the chocolate sauce.
Tastes amazing!!!!! It was absolutely worth the effort…although it felt effortless because of the instructions we well written. I wish I could eat more! 🙂
Delicious cake. Loved the condensed milk icing ! Will make this again for sure.
I’m in love with this cake! This is the first cake recipe I have made from scratch that turned out light and fluffy instead of dense. I will 100% be making this again!
Some changes I made: I used 2 cups of powdered sugar instead of 4.5 for the frosting since the condensed milk added a lot of sweetness. I also had some leftover chocolate magic shell syrup that I mixed with a bit of instant coffee in replacement of making the fudge. It wasn’t as pretty but it still tasted good lol
This cake is remarkable & truly a test of patience. I can understand why you recommend a rotating cake stand now Michelle. LOL free-styling this was hard, and it took a lot of trial and error to get the exact look that I wanted. Thank you Michelle for this outstanding recipe! As a side note, I grew up drinking Vietnamese iced coffees with my dad – it could explain why I’m so addicted to caffeine! The flavors & nuances of this cake brings me back to fond childhood memories with him. Can’t wait to share a slice with him when this pandemic is over! Until then, can’t wait to try your other recipes! xoxo
I halved the recipe because.. we’re in lockdown and my husband and I cannot finish a 2 layer 8 inch cake between the two of us. It made an adorable 6 inch cake, which I baked in one tin because I found out at the last minute that I don’t have two 6 inch cake pans (I have a terrible memory and probably too many baking implements). ANYWAY, onto the cake itself!
The cake baked up beautifully despite baking it all in one tin. I subbed full fat greek yogurt instead of sour cream (I never have sour cream at home any more :S) and used instant coffee to make all the coffee I used in this recipe. I also reduced the sugar in the cake and frosting because I’m a freak who doesn’t love super sweet desserts and everything still turned out great! The frosting has a delicious condensed milk flavour and the coffee in the cake really comes through. They complement each other perfectly and are definitely reminiscent of Thai iced coffee. I made the coffee fudge from scratch but it turned out a little water-y, probably user error, but I just poured a little on top of the cake and some on the plate.
TL;DR if you like Vietnamese iced coffee, make this cake already!
Thanks for letting us know about using 1/2 recipe to make a 6″ cake. Can you please let us know how best to adjust the temperature and the baking time? Small batch recipes are very helpful during the pandemic 😊 . Thank you.
Hello, so I’ve baked and frozen the cakes and will be serving them in 3 days time! I just wanted to double check-so i can take the cakes straight out of the freezer once while I make the frosting and then frost them straight away? I’m just worried about condensation forming. Sorry if it’s silly to ask!
That’s what I usually do! Right at the start, I take out the cakes then measure out my ingredients for frosting, make the frosting, then crumb coat the cake. If you want to be extra safe, unwrap them and let them sit for 10-15 minutes longer and THEN make the frosting/crumb coat the cake. Crumb coating the cake also tends to prevent condensation from forming on the final layer anyway. Hope that makes sense!
This recipe is amazingly I was a bit worried as to how it’d turn out Because I froze the cakes and defrosted them on a really humid day but it received rave reviews. There were two deserts on the table and this was the star of the show! Thank you for another great recipe as always. ❤️
Hi, i’ve been wondering can i use the cake recipe to make in a cupcake size?
cheers
I think so; one of my followers did and tagged me on Instagram. Unfortunately, I don’t know how many it cupcakes it would yield or what the Bake Time adjustments would be since I haven’t tried it myself. You’ll have to experiment some!
Hi, just wondering beating eggs and sugar till light and fluffy and double in volume does it mean beat till soft peak form?
Nope; just beat until light and fluffy, around 2 to 3 minutes on medium speed in a stand mixer.
Hi! Am I able to use instant espresso coffee for the coffee granules? Something like Medaglia D’oro. I already have it from a previous recipe so hoping I can use that!!
Hi, yes! Do a search for “Does espresso work in this Vietnamese iced coffee cake recipe?” on the blog post for more info! It will take you to a paragraph with specifics on how to swap the coffee in this recipe with espresso instead.
Do you have a recipe for the chocolate fudge sauce used in the frosting portion of the cake? If not, what did you use?
I am so excited to have this as my wedding celebration cake! 🙂 How much would you say it costs to buy all the ingredients?
Hm, this is hard for me to gauge since, as a professional baker, I buy all my ingredients in bulk. But I’d say probably $15 to 20? And you’re going to have leftovers of stuff like flour, sugar, butter, eggs for future meals.
This looks amazing and I’m pretty sure I’ll be making it the next time I want a cake for a special occasion! Unless I can’t wait until then… maybe I’ll make it sooner!
Also – just a note about instant coffee. Instant coffee is made by either flash-heat drying or freeze drying liquid coffee, not coffee beans. https://www.thekitchn.com/food-science-how-is-instant-co-69158
Thanks for the clarification! I’ll update the post with the right info!
Hi Michelle, can I halve this recipe to make a single 8 inch cake? Thanks so much!
Yes!
This cake was truly delicious!! Decadent and tender…mmm!
I made some adjustments because I don’t like overly sweet things (SO I CAN EAT MORE). I reduced the sugar in the cakes by 20%, and the powdered sugar in the frosting by 21%. The frosting still whipped up beautifully and was sturdy enough for a 3 layer cake!
I didn’t have dark roasted beans so I used my light medium roast to make the cold brew…it really wasn’t bold enough, so I had to resrot to adding some instant coffee to it 🙁 Also mixed some condensed milk into the cold brew and brushed on each layer to keep the cake more moist and to add more flavor.
Even if you don’t like coffee or chocolate…you’re gonna love this cake because the frosting is SO. DAMN. DELICIOUS!!!
Thank you, Michelle!!
Best cake everrrr. A must have for all get togethers, now a family favorite. I’ve done a few different add ins like mini chips in a layer, coffee liqueur, this cake is the best, anyone who loves coffee and choc this is a must bake. Thankyou Thankyou ! Love and appreciate you sharing your recipes. Again this is my all time favorite. 😍😋🍫☕🍰. Seriously a 🎤drop on this one 💟
Do you have a recipe for the chocolate fudge sauce used in the frosting portion of the cake? If not, what did you use?
The coffee fudge sauce recipe is in the blog post! Hit Ctrl+F in a PC or Command+F on a Mac. That will pop up the search function on the browser. Type in “Ingredients for Coffee Fudge Sauce”—it should take you to the exact spot!
Please add a “jump to recipe” button. After 25 minutes of trying to get through all the ads loading, I lost interest and gave up. Shame bc it looks like a great site
Miriam! There are two “Jump to Recipe” buttons at the top of the page. One is the arrow next to the photo of the food. The second is within the “Table of Contents”, also at the top of the page. The Table of Contents has links to different sections of the site (like “Ingredients and Substitutions” and “FAQ and Troubleshooting”) as well as the recipe itself.
Made this for a friend, 3 x 6″ layers were a bit tall but I did not want to play around with the ratios to reduce the recipe. I’m super happy with it and turned out beautifully. The condensed milk icing is EVERYTHING. I also did a chocolate drip for that extra extra wow…
Is there a substitute for corn syrup in the chocolate sauce? And would semi sweet chocolate work as well?
You can use honey instead of the corn syrup. Semi sweet chocolate works too.
Based on all the positive reviews, I made this for my mom’s 91st birthday based. Made everything based on weight measurements. The positive is that the cake was easy to make, came out moist with nice crumb and the frosting had a good consistency. The negative is that the frosting was way too sweet and the coffee flavor was barely noticeable. For reference, I used a combination of Starbucks Instant and Medaglia D’oro instant espresso powder, Torani chocolate sauce, and Nestle condense milk. Sadly, I had to throw the rest of the cake away as none of the guests wanted to take any home. What a shame 😞 . If I ever crave another Vietnamese Coffee Cake again, I may try the Bake From Scratch version (which was inspired by this recipe), or follow some of the comments to reduce the sugar.
This is officially my favorite cake! Absolutely delicious. Frosting is divine & easy to work with. Could you tell how to make chocolate condensed milk frosting?
Hey Michelle!
So excited to make this cake but definitely following your advice to spread the work out over a few days!
I’m just wondering whether it would be OK to make the cake the day before (on day 2 rather than day 1) and wrap and leave them out on the counter overnight (it’s not too hot where I live at the moment)? I’d be making the chocolate fudge and frosting on day 1 and leaving them covered in the fridge until day 3 when I would assemble the cake.
I’m just leery about unnecessarily freezing the cakes – I feel like leaving them at room temp might keep the cakes fresher than freezing them and having them thaw after they’re already iced…
What’s your take on this – do you recommend to freeze them because you think that keeps them more fresh than not freezing the layers? You know the recipe waaay better than I do 🙂
Thank you for your advice!
Taylor
That’s fine! You can leave the cakes out at room temp—just make sure to double wrap the layers in plastic wrap so that they don’t get stale! And just a head’s up—it will be harder to frost the cake since this is a fairly soft cake with loose crumbs. Freezing helps keep them in place while you frost the cake. But if you make a crumb coat/have experience frosting cakes at room temp, you’ll be fine!
Okay, so I made this a few days ago following your advice and it was a pretty damn good cake!
I ended up making the cake in the afternoon and freezing it until after dinner to do the crumb coat – and boy, am I glad. I never understood how much easier crumb coating a cake is when it’s cold, even if the very outside of the cake is the only part that’s frozen.
The cake itself is really moist and fluffy with a texture very very akin to a carrot cake (one of my favourite cake textures, really), especially with the ground coffee flecks throughout (which I loved). 100% win with that.
However, the flavours didn’t really come together. Don’t get me wrong, the flavour of the cake is delightful, but it didn’t taste very strongly of coffee (more of a hint if anything). This may have been due to the ingredients I used – you can’t really buy cold brew where I live (Australia) and I didn’t have fridge space/think in advance enough to make my own, so I just diluted 2 shots (~60mL) freshly brewed espresso up to 200mL. I thought this would be pretty damn strong, but maybe not? I did use 1T freshly ground coffee beans (medium grind, in the style of Vietnamese coffee – we have a grinder at home) rather than instant coffee in the cake, which I thought would make it stronger too. In the end, the strongest coffee flavour ended up coming from the mocha fudge on the top of the cake, rather than the cake itself.
Also, the frosting didn’t really taste like condensed milk. I think that part pretty much got lost in all of the butter, sugar and vanilla. To my family, it was pretty indistinguishable from a regular vanilla buttercream. I think if you wanted a frosting that actually reminded you of condensed milk you’d have to base the frosting off of condensed milk (rather than the butter component) and go from there – although it’d probably be hard to get the consistency to anything you could make a layer cake from, it’d probably be more like a drizzle than a frosting.
Even though it didn’t specifically remind me of the Vietnamese coffee I adored whilst I was there, all in all this cake was delicious, and certainly worth making, looked amazing, and made my brother very happy on his birthday! Thank you for sharing this recipe and your very wonderful advice <3
Taylor
I had some tamarind cold brew that I didn’t like but didn’t want to dump. Did some googling and found this recipe. The cake part turned out fantastic! Used some watered down greek yogurt as I had no sour cream, and I don’t have 8” pans so I used 6” instead and the batter fit nicely. The flavor of the frosting was good, but waaaaay too sweet. Like, I almost couldn’t finish my thin slice. I would probably cut the frosting recipe in half.
Trying to follow this recipe killed all baking fun. In order to optimize her income, the blogger has spread out the recipe farther than most bloggers do with so many ads, that the page can’t even stay loaded. By the time I finished the cake, I realized that navigating this page ruined the process. Additionally, the author spends PARGRAPHS describing things that don’t need descriptions, yet doesn’t even bother to post a video fo her spreading the fudge frosting (arguably the hardest part). It doesn’t matter what the cake tastes like, I will never use this blog again and recommend against it to anyone who bakes. Stop being greedy for clicks and time and fix the page Michelle.
Hi Tim MacDonald,
There’s a video of the process within the page, which is also accessible via the shortcut link at the Table Of Contents at the top of the page (which is there to help users navigate to different parts of the post quickly and easily): https://www.hummingbirdhigh.com/2017/10/vietnamese-iced-coffee-cake.html#video-tutorial-for-vietnamese-iced-coffee-cake-recipe
There’s also two links that provide shortcuts to the recipe card, which has the instructions in full. You can also find both at the top of the page, either using the big blue “JUMP TO RECIPE” button OR the link in the Table of Contents titled “Vietnamese Iced Coffee Cake”. Here it is though, since it appears you didn’t see either: https://www.hummingbirdhigh.com/2017/10/vietnamese-iced-coffee-cake.html#vietnamese-iced-coffee-cake-recipe
Unfortunately, your comment is a great example of the flood of negative/entitled and illiterate behavior that I face on a daily basis. It takes a lot of time, energy, and money to develop these recipes, which are accessible for FREE (aside from the minor cost of having to scroll extra for a few seconds) to folks like you. But of course, I am greedy for trying to recover a few cents of the costs of ingredients, time, and writing/shooting/filming via display ads.
In either case, you win! You’ve inspired me. After almost a decade of putting up with folks like you, I am ready to stop being “greedy”. I am no longer going to be updating this site and responding to comments like this one—or heck, even the nicer ones—on a regular basis. Hooray for all!
Finally got to try this recipe ! Followed the recipe down to a T. Read every tip and tricks before starting the recipe. (I honestly don’t know why people hate it so much you gain so much knowledge about baking from them) anywho onto the recipe.
Although it was delicious. It was very sweet. I would cut the sugar in the cake and DEFINITELY cut the sugar by atleast half for the icing. It barely had any coffee flavor. The most coffee I tasted was from the chocolate fudge sauce I’d prob add more coffee somehow or make a coffee icing with the condense milk icing . Everyone ended up scraping the icing off and only eating the cake. It was served to Asians so you can imagine how sweet they thought it was for them to do that. This is the first cake I made that no one raved about and had to absolutely take home leftovers. Which is a little sad. I’d prob make this again to give it another shot but would make lots of modifications to the recipe. Long story short
LESS SUGAR, MORE COFFEE FLAVOR.
I’m following your recipe to make 3 layers and saw your note that the amounts should be multiplied by 1.5. For the flour, I see you recommend 5.25 cups, but in the original recipe, it’s 2.5 cups. My math would show that multiplying that by 1.5 is actually 3.75 cups of flour. Where am I going wrong? I am looking to even double the recipe, but want to make sure I’m understanding correctly. Thank you so much for this yummy recipe – can’t wait to make it!
A quick follow-up on my previous message – I went to Print and saw that there is a calculator that adjusts the recipe for you. I typed in 1.5 and again the flour was still off from your suggested instruction, and playing around with the calculator more, I noticed the grams/ounces stay fixed while the cup sizes change. Maybe a quirk with the calculator? Thank you again!
Uh oh, looks like my calculator is broken. Thanks for letting me know! Looking into it now.
Your post is very clear and helpful when preparing the recipe!
It is an amazing cake!!!!! Thank you for Sharing it with us, defínitely our new favorite!
Love all about this cake it was amazing