The summer after I graduated college, I had zero savings and was thrust suddenly into the scary post-undergrad world of unemployment and lots of idle time. I spent much of those initial first few months scouring Craigslist hopelessly for a job and finding ways to make my meager checking account last as long as it could.
One way I decided to pinch pennies was in meals. It happened to be strawberry season, and entire mounds of strawberries were going for less than $10 dollars a flat. My friend had recently showed me what I considered at the time to be the best way of consuming strawberries: that is, to first dip the strawberry in a dollop of sour cream before sprinkling with a generous amount of brown sugar. I found myself going through pints of strawberries this way, eventually replacing meals with these strawberry sour cream treats. It sounds ridiculous now, but at the time, I was pleased with how much money these strawberry meals were saving me.
After around two weeks of this behavior, I woke up with a stinging sensation on my lips. Maybe it’s sunburn, I thought to myself, ignoring the fact that it might have something to do with the fact that, a few weeks ago, I’d finally kissed that British exchange student that I’d spent my entire last semester crushing on. I continued my strawberry meals and hopeless Craigslist searches without a second thought, finishing a record three pints of strawberries in one day and the same score of absolutely zero job prospects. The next day, I woke up with blisters on my lips that I couldn’t ignore.
After freaking out in front of the mirror for about an hour, I finally biked to the free clinic. There, I self-consciously explained to the nurse that I thought I had the big H; that is,
“HERPES!” I yelled, pointing at my pink and swollen lips.
My nurse peered at me through her glasses. “That’s not herpes,” she said, her furrowed brow relaxing. “I think you’re having an allergic reaction to something. Did you try new lipstick, maybe? Or something you haven’t eaten before? For instance, I’m allergic to strawberries. Whenever I eat one, they blow up my lips and look exactly like that.”
“But I can’t be allergic to strawberries,” I exclaimed, my voice turning almost hysterical. “That’s all I’ve been eating for the last 2 weeks!” I quickly explained to her that I’d saved around $100 a week since I’d started eating nothing but strawberries for all my meals.
She gave me a look of disbelief, one that quickly turned into mild disapproval. “Strawberries contain a type of protein that is also a common allergen; if you’re constantly exposing yourself to this pathogen, your immune system will start to become allergic and develop antibodies to fight it.”
“So you’re saying… I gave myself this allergy? Because… I was eating too many strawberries?”
“Yep,” she said, showing me the door. “On the plus side, at least it’s not herpes.”
Immediately after that visit to the clinic, I stopped my insane strawberry diet and avoided the damn things for a good four years or so. It was only last year that I started reintroducing them into my diet, and, despite my constant use of them in my recipes, I’ve been much more cautious about the amount I consume. I’m pleased to report that the allergy seemed to have been short lived — the blisters haven’t reappeared yet, though I certainly haven’t been eating as much as I was back in the day.
Even so, I still haven’t the heart to try my old favorite treat of dipping them in sour cream and brown sugar. I know that the combination probably won’t have any negative consequences, but I guess I’m worried that doing so will bring me back the feelings of loss and nervousness that I had that summer, pining about boys who moved away and jobs I was completely unqualified for. Basically, the feelings that ultimately drove me to, you know, start screaming hysterically about herpes and strawberries at the free clinic.
Still, strawberries and cream remains one of my favorite flavor combinations. And in the years since that summer, I like to think I’ve become more sophisticated and have upgraded from dipping strawberries in plastic buckets of sour cream and sugar. So with that, I present this strawberry crème brûlée recipe:
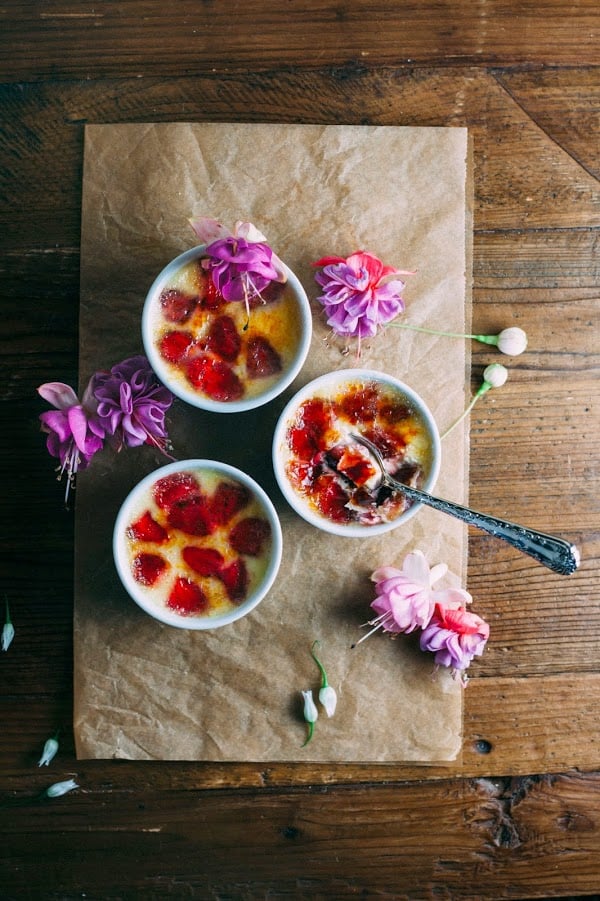
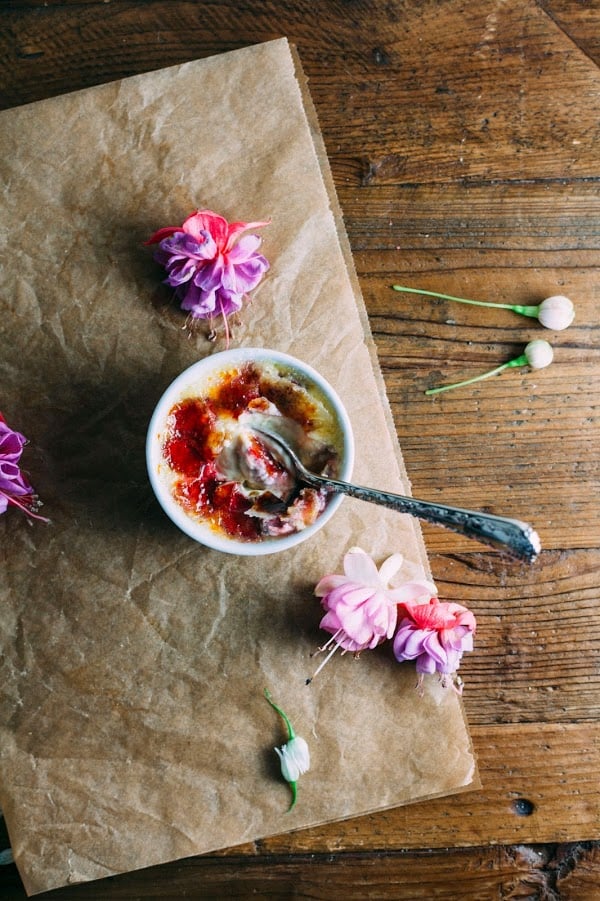
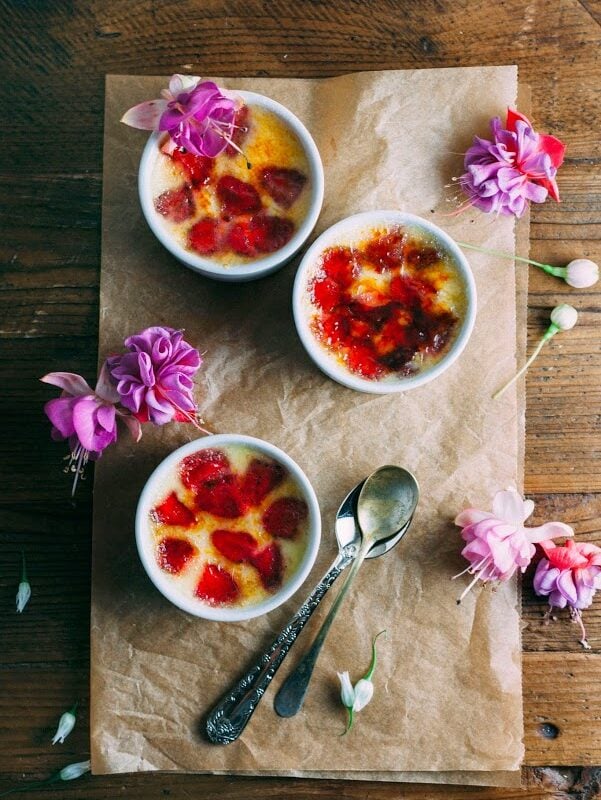
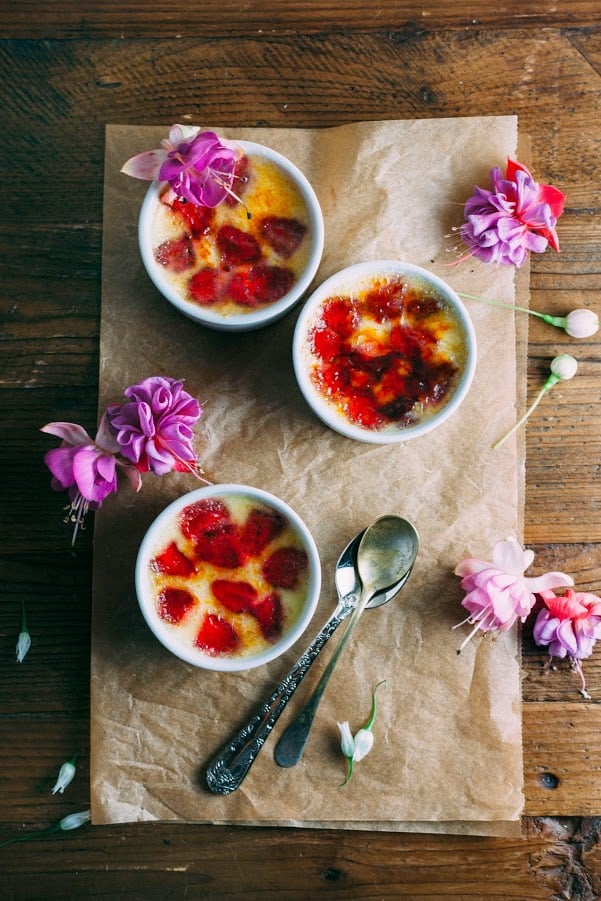
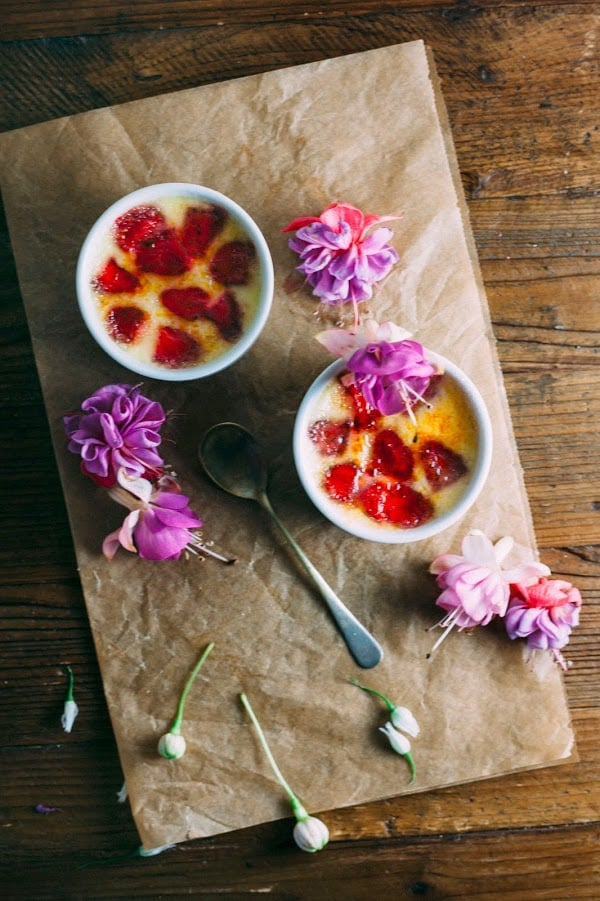
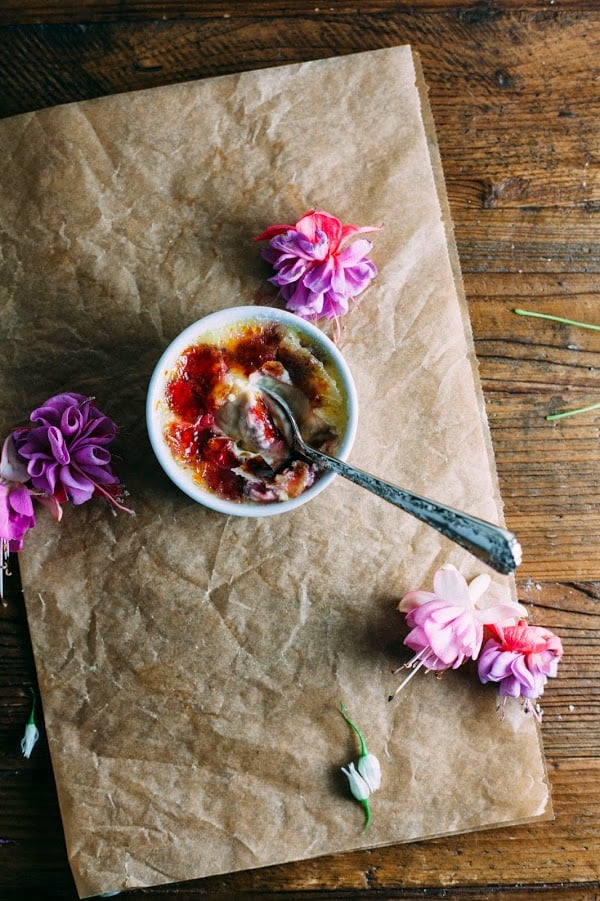
Strawberries and crème brûlée are the perfect combination. The crème brûlée is the classic French vanilla baked dessert, but with strawberries sprinkled last minute to sit on top of the custard. As the custard bakes and sets, the strawberries release their juices into the cream, gently infusing the entire dessert. The best part, however, is from the brûlée. I’ve sprinkled each ramekin with only the slightest amount of sugar, and used a chef’s torch to create that burnt sugar brûlée. Since the strawberries sit on top of the custard, however, they also get brûléed and allow the fruit to crystalize and emit a kind of burnt strawberry sugar as well. It’s honestly such a heavenly experience, and one of my favorite recipes I’ve posted on the blog to date.
Some baker’s notes:
-
- Vanilla bean pods can be expensive, so feel free to substitute the vanilla bean used in the recipe with 1 1/2 teaspoons pure vanilla extract or vanilla bean paste. To properly split open a vanilla bean pod, use the tip of a sharp knife to slice the pod lengthwise and scrape the seeds into the cream. Don’t discard the pods though! They’re still very flavorful, and you can cook the pods with the cream for an even strong vanilla flavor infusion.
-
- It’s important that you cook the custard ramekins in the water bath (as instructed in the recipe). This will allow the custards to cook evenly throughout.
-
- Do NOT overcook the custard. Overcooking will result in a weirdly crumbly and grainy custard texture. If you know your oven runs hot, constantly check your ramekins to see how done they are. Custards, unlike cake, are unaffected by the number of times you open your oven door. You can find the perfect custard texture by taking a heatproof utensil and giving each ramekin a gentle tap on its side. If the sides are firm but the center jiggles, you’re good to go. If the center is firm, you’ve overcooked your custard and I’m crying for you.
- If you don’t have a chef’s torch, you can still make crème brûlée! Cover the tops of each baked custard with the appropriate amount of sugar and set them under high heat in your broiler. The only warning I have with this method is to watch them carefully, as the sugar has a tendency to brûlée way faster than you expect and could over burn the top and reheat the already cooled custard.


Get the Recipe: Strawberry Crème Brûlée
Ingredients
For the Strawberry Vanilla Custard
- 2 cups heavy cream
- 1 vanilla bean pod, split lengthwise (see baker's notes for substitutes)
- 5 large egg yolks
- a slightly mounded 1/3 cup granulated sugar
- 1 cup small fresh strawberries, hulled and halved
For the Sugar Brûlée Topping
- 2 tablespoons granulated sugar
Equipment
- a culinary chef’s torch
Instructions
- Preheat the oven to 325 (F).
- Pour 2 cups heavy cream into a medium, heavy bottomed sauce pan. Use the tip of a sharp knife to scrape the vanilla beans from the inside of the pod into the cream; throw the vanilla bean pods into the cream as well. Simmer over medium-low heat until just below boiling, watching carefully to ensure the cream doesn’t boil over.
- In a medium bowl, whisk together 5 large egg yolks and a slightly mounded 1/3 cup granulated sugar until pale yellow and thick. Set aside.
- Once the cream is warm, strain out the pods using a fine mesh strainer and discard. Ladle 1 cup of the warm cream into the egg and sugar mixture, whisking gently. Be careful not to ladle too much cream into the eggs or you’ll accidentally scramble them! Once the first cup is added, whisk in the rest of the cream slowly until well combined.
- Divide the mixture evenly between six ramekins. Divide 1 cup hulled and halved strawberries between the ramekins — the strawberries should float to the top of the custard, covering most of the custards’ surface area. Transfer the ramekins to a rimmed baking sheet. Pour boiling water into the baking sheet until the water comes halfway up the ramekins. Bake for 30 minutes, or until just set. Check on the custards every so often — the custards start to brown, create an aluminum foil tent as a cover.
- Once the custards are ready, the edges should be set but the center should still be jiggly. Allow the ramekins to cool completely to room temperature on a wire rack. Once the custards are cool, cover in plastic wrap and chill for at least 3 – 4 hours.
- When the custards have chilled, they are ready to serve. Sprinkle 1 generous teaspoon of granulated sugar evenly over the surface of each custard. Use a culinary chef's torch to quickly but carefully brown the sugar to create a thin, crisp surface over the top of each custard. Enjoy immediately.
OMGOSH!!!!!! I've actually heard of that happening before. But it was with pineapple. THAT IS CRAZY. #strawberries4life
That looks amazing! Beautiful pictures, as always. 🙂 Love the addition of strawberries, I can just imagine how lovely it would taste!
Michelle, this looks incredible…
I too am glad that you didn't have the big ol' H. But an allergy to strawberries!! That's no fun at all. I am glad to hear that that hasn't stopped you from eating them entirely. Especially when you create a dessert as lovely as this one!! I'm making this asap…
OMG hahaha I died over your story!!! I totally understand the feeling of pinching pennies and eating nothing but yogurt for days to save $$ (ahem, not like I've ever done that), but I am VERY glad to know that I should not be housing strawberries for fear of developing an allergy! So glad you can now eat them without major consequence because these creme brulees look SO GOOD. Those little jammy pockets of strawberries? UGH. Gorgeous gorgeous photos as usual!! <3
Wow! These are incredibly gorgeous – never seen anything like it!
I'm not gonna lie – despite your story, I can think of nothing more I want to do right now than dipping strawberries in sour cream + brown sugar. Mind = blown.
heehee!! i am very glad it turned out to be just a strawberry allergy !!! i heart the flavour of strawberries and cream,too! so good! love these creme bruleé and i totally want to crack into a top of one right now and gobble it up! xoxo
omg – you are TOO funny! and what a great idea of actually baking the strawberries *inside* the creme brulee! i've always placed sliced straberries ontop of my creme brulee, but putting them inside is genius!
I have never heard of that happening. Your recollection is wonderfully written – too funny! I'm so glad that it ended up going on away and that you can return to eating strawberries more sparingly. This creme brûlée also happens to look delicious!
haha, that is so funny! I am glad you can have strawberries again! Pinned, cannot wait to try!
Oh my gosh, your story make me laugh so hard, I snorted. (and I'm at work, so clients are giving my strange looks). I am glad you can eat strawberries again and this creme brûlée looks stunning! I've pinned it !
OMG you are SO hilarious. that is seriously the best strawberry story i've heard 🙂
this creme brulee looks all kinds of awesome, like you!
Loved that this recipe has the suggestion for using the broiler if you don’t have a torch! I tried it and it worked! I also used imitation vanilla flavoring because $$.
Mine took much longer to cook than the recipe suggested. Perhaps because I used frozen strawberries and probably used more than the recipe called for. No matter, I just kept checking it and it baked perfectly.
I could have eaten 10 of them! So good!