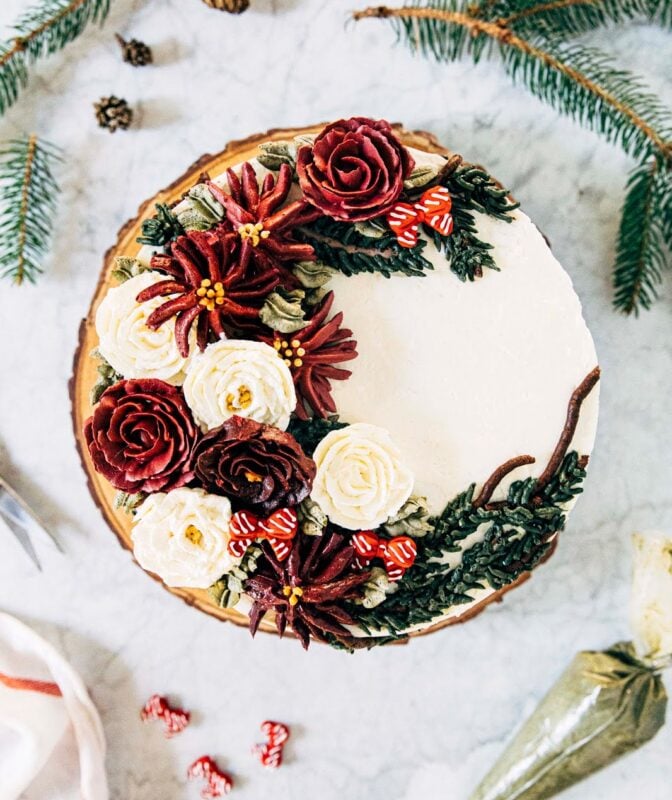
This mint chocolate Christmas wreath cake is beautiful and impressive showstopper perfect for any holiday table. The cake is made with chocolate cake that is layered and adorned with life-like florals made with mint Swiss meringue buttercream frosting—jump to the recipe! While the florals look impressive, they are actually incredibly easy to make thanks to the piping tips and tools provided by my partner, Wilton. For more holiday baking ideas, be sure to check out Wilton.com! As always, thank you for supporting Hummingbird High and the sponsors that help keep the lights on at my blog!

DIY Christmas Wreath Cake
A few years ago, I fell in love with the asymmetrical half wreaths that had taken over Pinterest. I appreciated how chic and modern they looked, and thought that they fit into my minimalist-yet-cozy home decor style perfectly. Unfortunately, I was a little ahead of my time—although half wreaths are pretty common now, back then, the trend hadn’t yet left my small corner of the internet. I went to multiple craft and holiday stores in my city, but found that they only offered traditional full wreaths. While these were plenty cute and festive, I was determined not to settle for anything other than my vision. But during my search, I ran into a lot of folks who were confused as to why I would want a wreath that was “half naked” (seriously—that is a direct quote from one of the sales ladies I spoke with!). I gave up pretty quickly after that.
But a particularly crafty friend of mine had taken note of my obsession and invited me over to try making them ourselves. After studying some tutorials online, we gathered some greenery from my yard and gave it a shot. In theory, it didn’t seem too hard—it was all about tying greens artfully around a metal hoop. My friend’s turned out beautifully, of course. She was a big DIYer, and had a lot of experience with that sort of finnicky craft work.
I wish I could say mine turned out well too, but the truth is, I’m much better at making baked goods like cakes and cookies! Which is why today, I’m sharing with you this recipe for a Christmas wreath cake—it’s the asymmetrical Christmas wreath I’ve been dreaming about for years and years…but in cake form.

How to Make a Christmas Wreath Cake
To make a Christmas wreath cake, you’ll need to start with your favorite cake recipe and a good, pipeable frosting (more on that, shortly). Since it’s the holiday season, I knew I wanted to incorporate more festive flavors into my cake. I personally was still dreaming about this mint chocolate cake I’d made over the summer, and figured that it would be the perfect cake base for my holiday Christmas wreath, too.
You’ll first need to bake and assemble the cake into layers, covering it all with a perfectly smooth base layer of frosting. If you’re working with a dark crumbed cake and combining it with a white buttercream frosting like this recipe, I recommend covering the entire cake with a crumb coat first. A crumb coat is a thin layer of frosting that will help “seal” any loose cake crumbs in and prevent any unsightly bumps and cake crumbs in the final frosting layer of your cake—this is especially helpful when working with a soft crumbed cake, like this chocolate frosting. After chilling the crumb coated cake, you’ll need to cover the cake with the remaining frosting and smooth the sides and top perfectly. You’ll need a good cake turntable (like this one from Wilton, which also has some other awesome features—more on those in a hot second!) and an icing spatula or an icing smoother to do so. I’m not going to lie—frosting a cake to be perfectly smooth takes some practice; I like watching this tutorial on the Wilton YouTube channel as a refresher:
If I’m working with a cake that needs a crumb coat AND has an elaborate piping design like this wreath, I usually end up making two medium batches of buttercream: the first batch is specifically dedicated to crumb coating the cake and making the smooth base layer of frosting, while the second batch is dedicated to piping the cake’s elaborate design. Making two batches of buttercream seems like a lot, but it actually saves me stress during the process: I don’t have to worry about rationing my buttercream and can be as generous as I need to be for the base layers and design of the cake. Furthermore, any extra buttercream freezes really well and can be used in future cake decorating projects.
When making a cake with an elaborate piping design like this Christmas wreath cake, I like to use Swiss meringue buttercream frosting. Swiss meringue buttercream pipes really smoothly and easily, holding intricate shapes well. The only problem is that it can be time-consuming to make: you’ll first need to make a meringue out of egg whites and sugar, and then beat a generous amount of butter into the meringue to make the buttercream itself.
After making the buttercream, you’ll need to divide the frosting into batches that you’ll then dye with food coloring to use for different components of your wreath. For my wreath, I decided to keep it relatively simple and stick with six colors: white, a burgundy red, and a golden yellow for the base layer of the cake and its florals, a brown and two different shades of green for the wreath’s greenery. The colors I used all came from this Wilton Gel Icing color pack—I actually ended up mixing both the greens with a few drops of yellow and black to give it more of a natural green color (since its base color is actually more of a kelly green).

Tools You Need to Make a Christmas Wreath Cake
Once you have the layer cake assembled and your frosting dyed accordingly, it’s time to actually make the cake’s wreath design. First, you’ll need to organize your work station and start by piping the florals for your Christmas wreath cake with the following tools:
Six piping bags with couplers
You’ll need to fill each piping bag with a different color (white, burgundy, yellow, dark and light green, and brown). I like using smaller disposable piping bags for decorating, but you can also buy reusable ones or larger ones—whatever works best for you! But to keep things organized, I recommend investing in this Wilton Cake Decorating Icing Bag Stand.
Parchment paper squares
Unlike simpler cake designs where you can pipe buttercream dollops and dots onto the cake itself, more elaborate buttercream flowers are typically piped OFF the cake and onto individual parchment paper squares. These squares containing the piped design are then frozen; this allows the buttercream to harden and hold your design, making it easier to assemble onto the cake later.
For this Christmas wreath design, you’ll need to pipe the flowers for the wreath onto the parchment paper squares and then transfer them to the cake with with a pair of flower lifters (see the last tool on this list!) towards the end of the assembly process. Your parchment paper squares don’t need to be a specific shape—I eyeballed cutting mine and they all roughly turned out to be around 3 by 3-inches or 4 by 4-inches.
A flower nail
A flower nail looks like a thumbtack with a giant pinhead. Glue a piece of parchment paper onto the pinhead with a small dollop of frosting, then pipe your buttercream flower onto the parchment paper, using the long stake of the nailhead to rotate and help you as you draw the design. Think of the flower nail as a pint-sized version of a cake turntable, specifically dedicated for piping buttercream flowers. If you’re having a hard time envisioning what I mean, check out this video on the Wilton YouTube channel on how to use a flower nail to pipe buttercream flowers:
Wilton Tip #103
This is one of my favorite Wilton tips; it’s a tip specifically dedicated to piping petals and looks like a teardrop with a wider, round bottom that narrows into a tight tip up top. I used this tip to pipe the burgundy and white roses on my Christmas wreath cake.
To pipe a rose, I followed this tutorial on the Wilton YouTube channel:
Wilton Tip #1
To give some of the roses a unique look, I ended up piping tiny yellow dots to mimic flower stamens in some of their centers. I did this with Wilton Tip #1, which is a standard round decorating tip from Wilton. I like to think of it as similar to the shape of a standard pen tip; it’s great for piping letters, straight lines, and micro-embellishments. The only thing is that because the opening of the tip is so small, it can be hard to physically squeeze out the buttercream (especially if you’re working with a completely full bag!). I recommend only filling the piping bag a quarter of the way through.
Wilton Tip #81
Before this project, I’d never worked with this tip before but wanted to experiment with it after being inspired by this awesome video. I ended up making a brand new flower that kinda looks like those maroon succulents you see in specialty nurseries. I used a combination of this piping technique of making a leafy succulent and this one for making more spiky succulents to make the flowers.
After piping the flowers above, you’ll need to freeze them as you work on the rest of the cake’s Christmas wreath design. You’ll need to draw branches and greenery on the cake itself with the following tools:
Wilton Tip #5
This is another one of the standard round decorating tips from Wilton. I started out by coupling this tip with the piping bag filled with brown frosting and drawing half a circle on top of the cake to make the branch outline for my asymmetrical wreath. I then randomly drew other lines offshooting from the main circle to give the wreath a more rustic, natural look. I even drew them down the cake’s sides, with the help of this cake stand—the cake stand tilts upwards to make it easier, it’s amazing!
I also used this piping bag/tip combo to go ahead and pipe round blobs of frosting in the spots I planned to place the buttercream flowers on. Not only would the blobs help “glue” the flowers in place, but they would also give the Christmas wreath a more realistic, three-dimensional look.
Wilton Tip #4
This is a smaller version of Wilton Tip #5. I used this tip to pipe the dark green pine leaves of the Christmas wreath’s greenery—although it looks time-consuming, it was actually SUPER easy and less complicated than the flowers. All you need to do is pipe short, straight-ish lines that are perpendicular to the brown branches and around ⅛ inches long.
A flower lifter
Once you’ve finished your cake’s Christmas wreath greenery, you’ll need to transfer your frozen florals onto the wreath. To ensure success, use a flower lifter to do so. Flower lifters look like scissors with blunt blades—simply wedge the blunt blades underneath the frozen flowers and use the handles (like you would scissors) to position them on the cake. You can see it in action in this buttercream flower tutorial post.
Wilton Tip #352
This is one of many of the leaf piping tips by Wilton. I used this tip with the light green frosting and simply “finished” any weird gaps in the Christmas wreath design by filling them in with short green leaves. For a tutorial on how to pipe leaves, check out this guide by Wilton. Try not to overthink it—whatever you end up doing will look great!
For a long time, I invested in individual piping tips. I kept them loose in my baking drawer and I’m not going to lie—it was a low-key disaster! I ended up losing half of them most of the time. If I still managed to hang on to them, I never remembered what shape they actually piped too, lol. Enter this amazing Master Cake Decorating Tips Set—not only does it keep my tips organized, but it has almost every shape you’ll ever need for decorating. All the tips I mentioned above are included with this set already, along with a couple of flower nails and couplers, too! It’s worth it, I promise.

Best Christmas Wreath Cake Recipe Tips
-
- Here’s the truth: nobody ever talks about how time-consuming these more elaborate cake designs can be. If I were to make this cake all one day, I’d probably be in my kitchen for around six hours—it’d be like a challenge from The Great British Bake Off! But I rarely have that kind of time on my hands. So instead, I usually end up tackling a project like this over the series of a few days, breaking down the recipe so I’m only working on a single component per day (incidentally, this is the premise of my latest cookbook, Weeknight Baking). Luckily, a lot of components of this cake store well, allowing you to do so without compromising any flavor. I suggest breaking down the recipe over the span of 3 days: on the first day, make and bake the cakes. On the second day, make the Swiss meringue buttercream, assemble, and frost the layer cake base. You’ll likely end up with some leftover buttercream, which you can store in an airtight container in the fridge and re-use for decorations. On the third day, make some more Swiss meringue buttercream again for the floral components, pipe them accordingly, and finish the layer cake. Voila! That way you’ll be in you kitchen only for an hour to two hours or so over three days as opposed to spending that chunk of time all at once.
-
- While the chocolate cake recipe is adapted from my cookbook, Weeknight Baking, the Swiss meringue buttercream recipe is adapted from my girl Stella over at Serious Eats. Now, I don’t recommend this often, but when making the frosting, I highly encourage you to add mint flavoring a half teaspoon at a time and taste as you go—mint extract can be a VERY overpowering flavor, and it’s one that is pretty relative to the person’s palette. That is, what tastes subtle to some will taste very, very toothpaste-y and gross to others. I use a whopping 2 teaspoons of mint extract in this frosting—which is a LOT. The frosting on its own tasted super intense and too much, but was really, really lovely and subtle when paired with the chocolate cake. But again, it’s really important to use your judgement and taste as you go with this recipe!
- Like I said—Swiss meringue buttercream can be finicky. Make sure your butter is completely at room temperature (that is, between 65°F to 70°F) before adding it to the meringue. If it’s too melty, your Swiss buttercream will turn out like soup—but no worries, we can fix this! Simply stick it in the fridge for 15 minutes, before beating again. Alternatively, if your butter is too cold, the buttercream can curdle. If you find this happening, scoop out ¼ cup of the frosting (there’s no need to be precise—you can just eyeball it), microwave it for 15 seconds, then add it back to the frosting while beating it on medium-high speed. That should help bring the rest of the buttercream down in temperature and prevent any further curdling!
Get the Recipe: Christmas Wreath Cake Recipe
Ingredients
For the Chocolate Cake
- 3 cups 12 ounces cake flour
- 3 cups 21 ounces granulated sugar
- 1 cup plus 2 tablespoons, 3.35 ounces natural unsweetened cocoa powder, sifted if lumpy
- 3 teaspoons baking soda
- 1 ½ teaspoons baking powder
- 1 ½ teaspoons kosher salt
- 1 ½ cups 12 ounces buttermilk
- ¾ cup 6 ounces canola oil
- 3 large eggs
- 2 teaspoons pure vanilla extract
- 1 ½ cups 12 ounces boiling hot coffee
For the Mint Swiss Meringue Buttercream Frosting
- ⅔ cup 6 ounces egg whites (from about 5 to 6 large eggs)
- 1 ½ cups 10.5 ounces granulated sugar
- ¼ teaspoon cream of tartar
- ¼ teaspoon kosher salt
- 2 cups 16 ounces unsalted butter, at room temperature
- 2 teaspoons peppermint extract, see baker’s notes
Instructions
For the Chocolate Cake
- Position a rack in the center of the oven and preheat the oven to 350°F. Generously spray three 8-inch cake pans with cooking spray and line the bottom of each with a parchment paper circle. Spray the parchment, too.
- In a medium bowl, whisk together the flour, sugar, cocoa powder, baking soda, baking powder, and salt.
- In a large bowl, whisk together the buttermilk, oil, eggs, and vanilla. Gradually whisk in the dry ingredients until just combined. Slowly pour in the coffee. The batter will be fairly runny; use a rubber spatula to scrape down the bottom and sides of the bowl. Use the rubber spatula to finish mixing until smooth and well combined, 2 to 3 minutes more.
- Divide the batter evenly between the pans; if using a digital scale to measure out layers, note that this recipe makes around 66 ounces of batter—pour 22 ounces of batter into each cake pan. Bake for 25 to 30 minutes. When done, the top of the cake should bounce back when gently pressed and a skewer inserted into the center of the cake should come out with a few crumbs attached. Cool completely in the pans on a wire rack before frosting.
For the Mint Swiss Meringue Buttercream Frosting
- Whisk together the egg whites, sugar, cream of tartar, and salt in the top pan of a double boiler (or, make a homemade version by placing a heatproof bowl over a sauce pan filled with 2 to 3 inches of simmering water, ensuring that the bottom of the bowl does not touch the water). Cook over medium-high heat, whisking intermittently, until the mixture registers 160°F on a digital candy thermometer.
- Once the mixture reaches 160°F, immediately pour into the bowl of a stand mixer fitted with a whisk attachment. Whisk on high speed for 8 to 10 minutes, or until the mixture has turned into a meringue that holds medium-stiff peaks. When done, the outside of the mixer bowl should be at room temperature and no residual heat should be escaping the meringue out of the top of the bowl. Stop the mixer and use a rubber spatula to scrape down the whisk and the bottom and sides of the bowl. Replace the whisk attachment with the paddle attachment.
- With the mixer on low speed, add the butter, a few tablespoons at a time. Once incorporated, increase the mixer speed to medium-high and beat until the buttercream is silky smooth, 3 to 5 minutes. Use a rubber spatula to scrape down the paddle and bottom and sides of the bowl. With the mixer on medium-low, add the peppermint extract, ½ teaspoon at a time, tasting the buttercream after every addition until satisfied with the flavor.
- Use immediately per the decoration instructions in the blog post. Buttercream can be stored in the refrigerator in an airtight container for up to 5 days; if storing for longer, transfer to a ziptop bag and freeze for up to 3 months. To reuse, scrape the chilled buttercream in the top pan of a double boiler (or, make a homemade version by placing a heatproof bowl over a sauce pan filled with 2 to 3 inches of simmering water, ensuring that the bottom of the bowl does not touch the water) and cook over medium-low heat until the frosting has melted all around the edges, with most of it still in a cold and solid mass in the center. Transfer to a stand mixer fitted with the whisk attachment, and whisk on low speed to prevent splashing for 1 minute. Gradually increase to high and whip until homogeneous, about 4 minutes.
What a masterpiece! It looks so elegant and yummy at the same time! Congrats
Wow, what a show-stopping Christmas Cake! It looks very festive and beautifully garnished. Thank you for the recipe.